Page 252 of 347
8-27
Maintenance and Care
Owner Maintenance
Form No. 8R65-EA-03C
Light Bulbs
Headlights (High-beam)Front side-marker lights
Front turn signal lights
Headlights (Low-beam)
Fog lights*
Parking lights Overhead light/Map lights (Front)
Vanity mirror lights
Courtesy lights
Overhead light (Rear)
Trunk light
High-mount brake light
License plate light
Brake lights/Taillights
Reverse lights
Rear side-marker lights
Rear turn signal lights
*Some models.
J60E_8R65-EA-03C_Edition2.book Page 27 Saturday, April 26, 2003 1:48 PM
Page 253 of 347
 8-28
Maintenance and Care
Owner Maintenance
Form No. 8R65-EA-03C
Your Mazda’s headlights and fog lights
have replaceable halogen bulbs.�Replacing a Headlight Bulb
1. Make sure the ignition switch i")
8-28
Maintenance and Care
Owner Maintenance
Form No. 8R65-EA-03C
Your Mazda’s headlights and fog lights
have replaceable halogen bulbs.�Replacing a Headlight Bulb
1. Make sure the ignition switch is turned
off and the headlight switch is off.
2. Lift the hood and find the high and low
beam bulbs in the rear of the headlight
unit.
The outboard bulb is the LOW beam,
and the inboard one is the HIGH
beam.(page 8-27)
3. If you are changing the right headlight
bulb, start the engine, turn the steering
wheel all the way to the right, and turn
off engine. If you are changing the left
headlight bulb, turn the steering wheel
to the left.
4. Turn the center section of the plastic
retainer counterclockwise and remove
the retainers and partially peel back the
mudguard.
Xenon Fusion Bulb Replacement:
Replacing the xenon fusion bulbs by
yourself is dangerous. Because the
xenon fusion bulbs require high
voltage, you could receive an electric
shock if the bulbs are handled
incorrectly. Do not replace the xenon
fusion bulbs by yourself. Consult an
Authorized Mazda Dealer when the
replacement is necessary.
Handling Halogen Bulbs:
When a halogen bulb breaks, it is
dangerous. These bulbs contain
pressurized gas. If one is broken, it
will explode and serious injuries
could be caused by the flying glass.
If the glass portion is touched with
bare hands, body oil could cause the
bulb to overheat and explode when lit.
Never touch the glass portion of the
bulb with your bare hands and always
wear eye protection when handling or
working around halogen bulbs.
Children and Halogen Bulbs:
Playing with a halogen bulb is
dangerous. Serious injuries could be
caused by dropping a halogen bulb or
breaking it some other way.
Always keep halogen bulbs out of the
reach of children.
WARNING
Removal
Installation
J60E_8R65-EA-03C_Edition2.book Page 28 Saturday, April 26, 2003 1:48 PM
Page 255 of 347
 8-30
Maintenance and Care
Owner Maintenance
Form No. 8R65-EA-03C
5. Carefully remove the headlight bulb
from the socket by pulling it straight
back.
6. Replace the bulb.
7. Install the new bulb in t")
8-30
Maintenance and Care
Owner Maintenance
Form No. 8R65-EA-03C
5. Carefully remove the headlight bulb
from the socket by pulling it straight
back.
6. Replace the bulb.
7. Install the new bulb in the reverse order
of removal.
�Replacing a Fog Light Bulb*
Due to the complexity and difficulty of
the procedure, the bulbs should be
replaced by an Authorized Mazda Dealer.
�Replacing a Bulb (Front)
1. If you are changing the right bulb, start
the engine, turn the steering wheel all
the way to the right, and turn off
engine. If you are changing the left
bulb, turn the steering wheel to the left.
2. Turn the center section of the plastic
retainer counterclockwise and remove
the retainers and partially peel back the
mudguard.Front turn signal lights, Parking lights,
Front side-marker lights
1. Turn the socket and bulb assembly
counterclockwise and remove it.
2. Disconnect the bulb from the socket.
3. Install the new bulb in the reverse order
of removal.
NOTE
Use the protective cover and carton of
the replacement bulb to dispose of the
old bulb promptly out of the reach of
children.
Removal
Installation
Front turn signal
lights
Parking lights
Socket
Socket
Front side-marker lightsSocket
*Some models.
J60E_8R65-EA-03C_Edition2.book Page 30 Saturday, April 26, 2003 1:48 PM
Page 256 of 347
8-31
Maintenance and Care
Owner Maintenance
Form No. 8R65-EA-03C
�Replacing a Bulb (Interior)
Overhead light/Map lights (Front)
1. Remove the screws with a Phillips
screwdriver.
2. Wrap a flathead screwdriver with a soft
cloth to prevent damage to the trim and
gently insert it in the overhead light as
shown in the figure, and then remove
the overhead light unit.
3. Turn the socket and bulb assembly
counterclockwise and remove it.
4. Disconnect the bulb from the socket.
5. Install the new bulb in the reverse order
of removal.Overhead light (Rear), Courtesy lights,
Vanity mirror lights
1. Wrap a small flathead screwdriver with
a soft cloth to prevent damage to the
lens and remove the lens by carefully
prying on the edge of the lens with the
screwdriver.
2. Disconnect the bulb by pulling it out.
Socket
Edge
Overhead light (Rear)
Courtesy lights
Edge
Vanity mirror lights
Edge
J60E_8R65-EA-03C_Edition2.book Page 31 Saturday, April 26, 2003 1:48 PM
Page 257 of 347
 8-32
Maintenance and Care
Owner Maintenance
Form No. 8R65-EA-03C
3. Install the new bulb in the reverse order
of removal.
Trunk light
1. Press both sides of the lens cap to
remove it.
2. Disconnect")
8-32
Maintenance and Care
Owner Maintenance
Form No. 8R65-EA-03C
3. Install the new bulb in the reverse order
of removal.
Trunk light
1. Press both sides of the lens cap to
remove it.
2. Disconnect the bulb by pulling it out.
3. Install the new bulb in the reverse order
of removal.
�Replacing a Bulb (Rear)
Rear turn signal lights, Brake lights/
Taillights, Reverse lights
1. Pull the center section of the plastic
retainer and remove the retainers and
partially open the trunk side trim.2. Turn the socket and bulb assembly
counterclockwise and remove it.
3. Disconnect the bulb from the socket.
4. Install the new bulb in the reverse order
of removal.
Rear side-marker lights
Due to the complexity and difficulty of
the procedure, the bulbs should be
replaced by an Authorized Mazda Dealer.
High-mount brake light
1. Turn the center section of the plastic
retainer counterclockwise and remove
the retainers and trunk rear trim.
2. Turn the socket and bulb assembly
counterclockwise and remove it.
Removal
InstallationTrunk side trim
Rear turn signal lights
Brake lights/Taillights
Reverse lights
Socket
Removal
Installation
Trunk rear trim
J60E_8R65-EA-03C_Edition2.book Page 32 Saturday, April 26, 2003 1:48 PM
Page 258 of 347
 8-33
Maintenance and Care
Owner Maintenance
Form No. 8R65-EA-03C
3. Disconnect the bulb from the socket.
4. Install the new bulb in the reverse order
of removal.
License plate light
1. Press the fron")
8-33
Maintenance and Care
Owner Maintenance
Form No. 8R65-EA-03C
3. Disconnect the bulb from the socket.
4. Install the new bulb in the reverse order
of removal.
License plate light
1. Press the front of the lens to detach the
front tabs.
2. Wrap a flathead screwdriver with a soft
cloth to prevent damage to the lens and
remove the lens by carefully prying on
the edge of the lens with a flathead
screwdriver.
3. Disconnect the bulb by pulling it out.
4. Install the new bulb in the reverse order
of removal.Yo u r v e h i c l e’s electrical system is
protected by fuses.
If any lights, accessories, or controls don’t
work, inspect the appropriate circuit
protector. If a fuse has blown, the inside
element will be melted.
If the same fuse blows again, avoid using
that system and consult an Authorized
Mazda Dealer as soon as possible.
�Fuse Replacement
If the electrical system doesn’t work, first
inspect fuses on the driver’s side.
1. Turn off the ignition switch and other
switches.
2. Open the fuse panel cover.
Socket
Edge
Fuses
Fuse panel cover
J60E_8R65-EA-03C_Edition2.book Page 33 Saturday, April 26, 2003 1:48 PM
Page 259 of 347
 8-34
Maintenance and Care
Owner Maintenance
Form No. 8R65-EA-03C
3. Pull the fuse straight out with the fuse
puller provided on the inside of the
engine compartment fuse block cover.
4. Inspect it a")
8-34
Maintenance and Care
Owner Maintenance
Form No. 8R65-EA-03C
3. Pull the fuse straight out with the fuse
puller provided on the inside of the
engine compartment fuse block cover.
4. Inspect it and replace if it’s blown.
5. Push in a new fuse of the same rating,
and make sure it fits tightly. If it
doesn’t, have an Authorized Mazda
Dealer install it.
If you have no spare fuses, borrow one
of the same rating from a circuit not
essential to vehicle operation, such as
the SPARE circuit.If the headlights or other electrical
components don’t work and the fuses in
the cabin are OK, inspect the fuse block
under the hood. If a fuse is blown, it must
be replaced. Follow these steps:
1. Turn off the ignition switch and all
other switches.
2. Remove the fuse block cover.
Always replace a fuse with one of the
same rating. Otherwise you may
damage the electric system.
Fuse puller
Fuse block cover
(next to air filter)
Normal Blown
CAUTION
NOTE
Remove the engine and battery covers
before removing the fuse block cover
near the battery.
Fuse block cover
Ta bNext to air filter
Engine cover
Near battery
Battery cover
J60E_8R65-EA-03C_Edition2.book Page 34 Saturday, April 26, 2003 1:48 PM
Page 261 of 347
8-36
Maintenance and Care
Owner Maintenance
Form No. 8R65-EA-03C
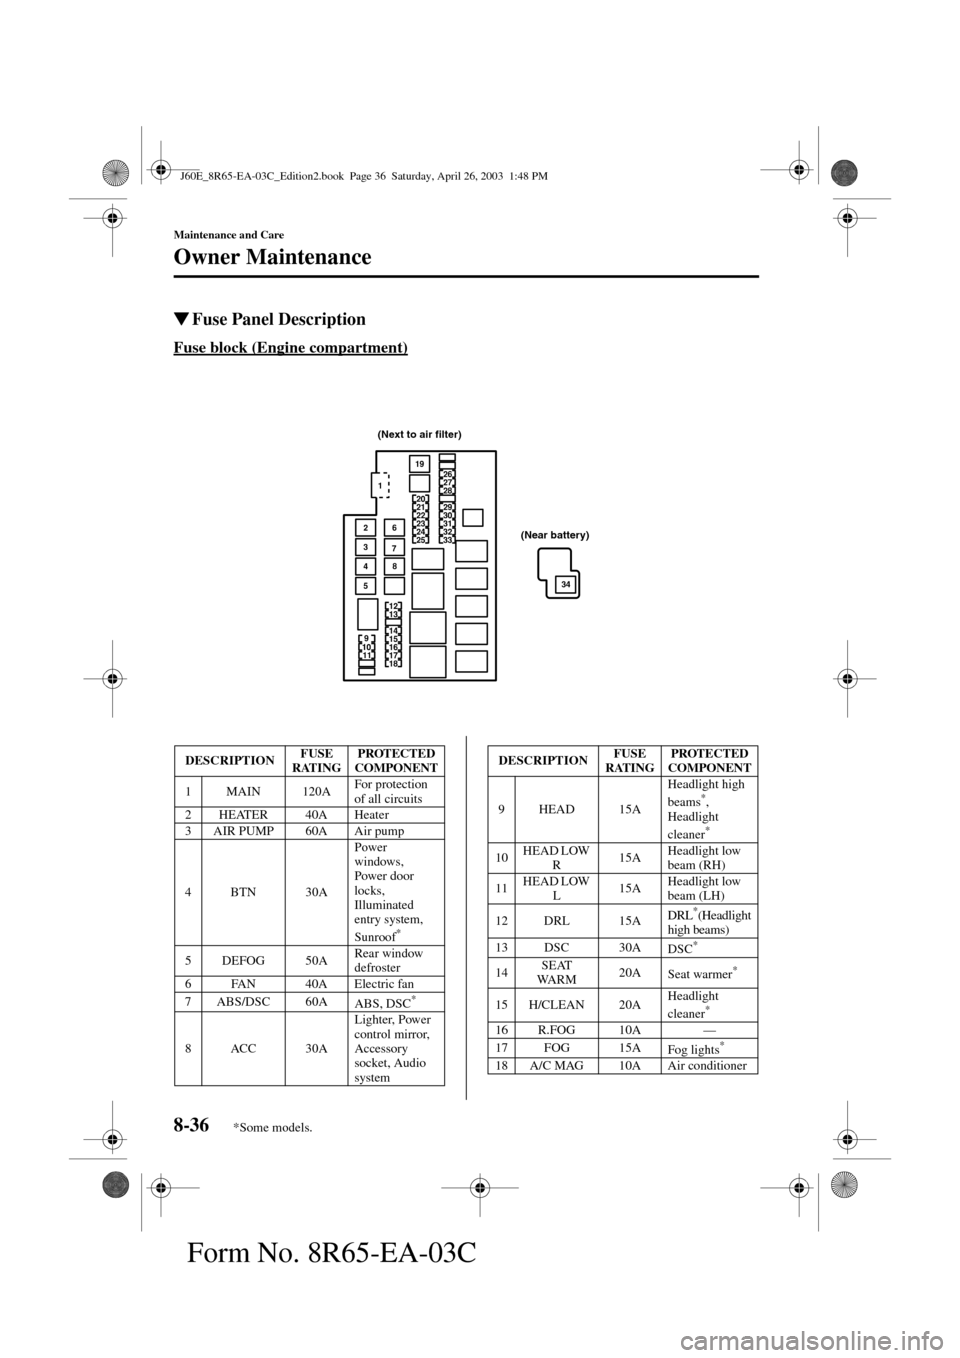
�Fuse Panel Description
Fuse block (Engine compartment)
(Next to air filter)
(Near battery)
DESCRIPTIONFUSE
RATINGPROTECTED
COMPONENT
1 MAIN 120AFor protection
of all circuits
2 HEATER 40A Heater
3 AIR PUMP 60A Air pump
4BTN 30APower
windows,
Power door
locks,
Illuminated
entry system,
Sunroof
*
5DEFOG 50ARear window
defroster
6 FAN 40A Electric fan
7ABS/DSC 60A
ABS, DSC
*
8ACC 30ALighter, Power
control mirror,
Accessory
socket, Audio
system
DESCRIPTIONFUSE
RATINGPROTECTED
COMPONENT
9HEAD 15AHeadlight high
beams
*,
Headlight
cleaner
*
10HEAD LOW
R15AHeadlight low
beam (RH)
11HEAD LOW
L15AHeadlight low
beam (LH)
12 DRL 15A
DRL*(Headlight
high beams)
13 DSC 30A
DSC*
14SEAT
WA R M20A
Seat warmer*
15 H/CLEAN 20AHeadlight
cleaner*
16 R.FOG 10A—
17 FOG 15A
Fog lights*
18 A/C MAG 10A Air conditioner
*Some models.
J60E_8R65-EA-03C_Edition2.book Page 36 Saturday, April 26, 2003 1:48 PM
 8-27
Maintenance and Care
Owner Maintenance
Form No. 8R65-EA-03C
Light Bulbs
Headlights (High-beam)Front side-marker lights
Front turn signal lights
Headlights (Low-beam)
Fog lights*
Parking lights Ov")