Page 32 of 280

2-24
Essential Safety Equipment
SRS Air Bags
Form No. 8S15-EA-03G
When the ignition switch is turned to the
ON position, the passenger air bag
deactivation indicator light comes on for
about 6 seconds.
If the passenger air bag deactivation
switch is in the OFF position, the
indicator light remains on to warn that the
passenger air bag has been deactivated.�To Deactivate The Passenger Air
Bag
1. Insert the key into the switch.
2. Turn the key clockwise until the key
points to OFF.
3. Remove the key.
4. Make sure the air bag deactivation indicator light remains on when the
ignition is in the ON position.
The passenger air bag will remain
deactivated until the passenger air bag
deactivation switch is turned to the ON
position.
NOTE
Have the passenger air bag
deactivation switch inspected by an
Authorized Mazda Dealer if any of
these conditions occur:
• The indicator doesn
’t come on
when the ignition switch is turned to
the ON position.
• The indicator doesn
’t remain on
when the ignition switch is in the
ON position and the passenger air
bag deactivation switch is in the
OFF position.
• The indicator remains on when the
ignition switch is in the ON position
and the passenger air bag
deactivation switch is in the ON
position.
Leaving the Key in the Passenger Air
Bag Deactivation Switch:
Unintentional deactivation of the
passenger air bag is dangerous. In an
accident, the passenger will not be
properly protected. Serious injuries or
even death could occur. To avoid
unintentional deactivation, always
use the same key to operate the
passenger air bag deactivation switch
and the ignition switch, that way you
won
’t leave the key in the passenger
air bag deactivation switch.
WARNING
J07S_8S15-EA-03G_Edition2.book Page 24 Thursday, August 21, 2003 10:04 AM
Page 33 of 280
2-25
Essential Safety Equipment
SRS Air Bags
Form No. 8S15-EA-03G
�To Ready The Passenger Air Bag
1. Insert the key into the switch.
2. Turn the key counterclockwise until the
key points to ON.
3. Remove the key.
4. Make sure the air bag deactivation indicator light goes off after 6 seconds
when the ignition switch is turned to
the ON position.
J07S_8S15-EA-03G_Edition2.book Page 25 Thursday, August 21, 2003 10:04 AM
Page 48 of 280

3-10
Knowing Your Mazda
Doors and Locks
Form No. 8S15-EA-03G
�Opening and Closing the TrunkOpening the trunk lid with the key
Insert the key into the slot and turn it
clockwise.
Opening the trunk lid with the
transmitter
The trunk lid can be opened by operating
the keyless entry system transmitter, refer
to Keyless Entry System (page 3-3).
Trunk Lid
Open Trunk and Exhaust Gas:
Exhaust gas in the cabin of a vehicle
is dangerous. This gas contains CO
(carbon monoxide), which is
colorless, odorless, and highly
poisonous. If inhaled, it can cause
loss of consciousness and death.
Because exhaust gas can get into the
cabin through an open trunk, keep
the trunk closed when driving.
Open Trunk Lid and Children:
Leaving the trunk lid open or leaving
children in the vehicle with the keys is
dangerous. Children could open the
trunk lid and climb inside resulting in
possible injury or death from heat
exposure. Close the trunk lid and do
not allow children to play inside the
vehicle.
WARNING
WARNING
Unattended Children and Pets:
Leaving children or animals
unattended in a parked vehicle is
dangerous. Babies left sleeping and
kids who lock themselves in cars or
trunks can die very quickly from heat
prostration. Don
’t leave your children
or pets alone in a car at any time.
Don ’t leave the car or the trunk
unlocked. Always keep the car from
being a tempting place to play by
locking doors and the trunk, and
keeping the keys where children won ’t
play with them.
WARNING
Open
J07S_8S15-EA-03G_Edition2.book Page 10 Thursday, August 21, 2003 10:04 AM
Page 49 of 280

3-11
Knowing Your Mazda
Doors and Locks
Form No. 8S15-EA-03G
Opening the trunk lid with the remote
release lever
The remote trunk lid release is mounted in
the center console.
To open the console, unlock it and pull the
release catch.
To release the trunk lid, pull up on the
trunk lid release lever.
Closing the trunk lid
Use both hands to push the trunk lid down
until the lock snaps shut. Do not slam it.
Pull up on the trunk lid to make sure it is
secure.
�Remote Trunk Lid Release Lock-
Out
The remote release may be canceled to
prevent anyone in the vehicle from
opening the trunk.
Close the trunk, insert the key, and turn it
counterclockwise, then return the key to
the center position and remove it.
To activate the remote release, insert the
key, turn it clockwise and open the trunk
lid at the same time.
Trunk lid
release
lever
NOTE
If the remote trunk lid release does not
work, insert the key and turn it
clockwise.
J07S_8S15-EA-03G_Edition2.book Page 11 Thursday, August 21, 2003 10:04 AM
Page 54 of 280
3-16
Knowing Your Mazda
Doors and Locks
Form No. 8S15-EA-03G
�Fuel-Filler Lid
The remote fuel-filler lid release is
mounted in the center console.
To open the console, unlock it and pull the
release catch.
To open the fuel-filler lid, pull up on the
remote fuel-filler lid release.
�Fuel-Filler Cap
To remove the filler cap, turn it
counterclockwise.
To close the filler cap, turn it clockwise
until it clicks.
Remote
fuel-fillerlid release
Make sure the fuel-filler cap is
tightened securely. The check engine
light may illuminate on when the cap
isn ’t tightened securely. If the light
remains on (even after you have
tightened the cap securely, driven, and
restarted the engine several times), it
may indicate a different problem.
Contact an Authorized Mazda Dealer
as soon as possible.
Open
Close
CAUTION
J07S_8S15-EA-03G_Edition2.book Page 16 Thursday, August 21, 2003 10:04 AM
Page 125 of 280
6-5
Interior Comfort
Climate Control System
Form No. 8S15-EA-03G
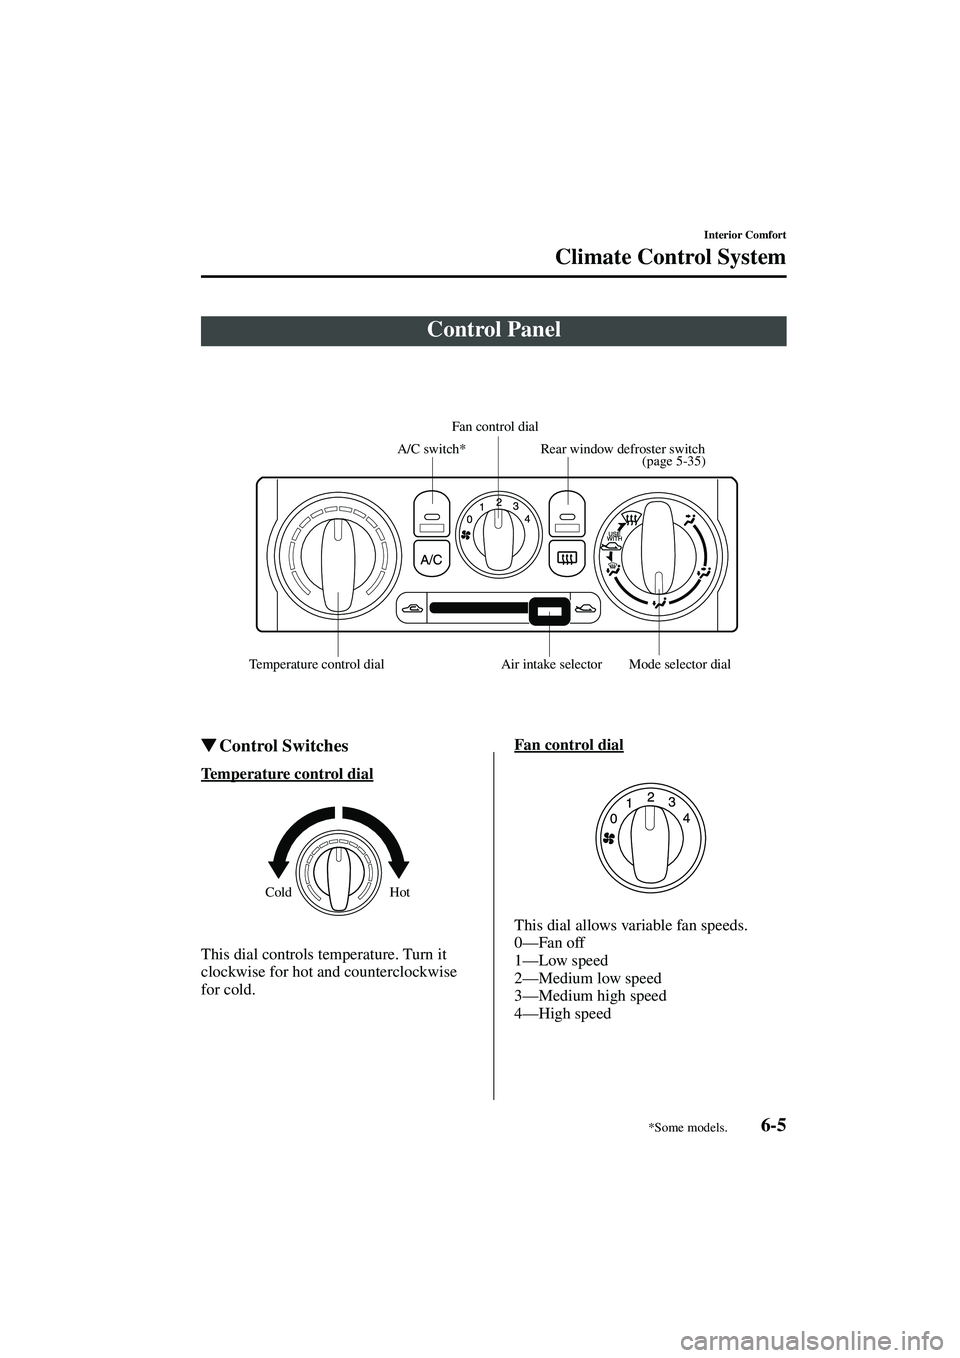
�Control Switches
Temperature control dial
This dial controls temperature. Turn it
clockwise for hot and counterclockwise
for cold. Fan control dial
This dial allows variable fan speeds.
0
—Fan off
1 —Low speed
2 —Medium low speed
3 —Medium high speed
4 —High speed
Control Panel
A/C switch* Fan control dial
Rear window defroster switch
Temperature control dial Air intake selector Mode selector dial(page 5-35)
Hot
Cold
*Some models.
J07S_8S15-EA-03G_Edition2.book Page 5 Thursday, August 21, 2003 10:04 AM
Page 137 of 280

6-17
Interior Comfort
Au di o S ys t em
Form No. 8S15-EA-03G
Power/Volume/Sound Controls ............................................................................................. 6-18
Clock ..................................................................................................................................... 6-22
Operating the Radio ........................................................................................................... .... 6-24
Operating the Cassette Tape Player* ...................................................................................... 6-26
Operating the Mini Disc (MD) Player* ................................................................................. 6-28
Operating the Compact Disc (CD) Player* ........................................................................... 6-30
Operating the In-Dash CD Changer* .................................................................................... 6-32
Error Indications ............................................................................................................. ....... 6-36
Audio Set (Type A)*
CD Player* In-dash CD Changer*
Cassette Tape Player* Mini Disc (MD) Player* Illustration is of a representative audio unit.
*Some models.
J07S_8S15-EA-03G_Edition2.book Page 17 Thursday, August 21, 2003 10:04 AM
Page 142 of 280
6-22
Interior Comfort
Au di o S ys t em
Form No. 8S15-EA-03G
�Clock
Setting the time
The clock can be set at any time when the
ignition switch is in the ACC or ON
position.
1. To adjust the time, press the clock
button ( ) for about 2 seconds
until a beep is heard.
The clock ’s current time will flash. 2. To advance the hours, press the hour
set button ( ). To advance the
minutes, press the minute set button
( ) while the time is flashing.
3. Press the clock button ( ) again to start the clock.
Display Clock button
Hour set
button
Minute set
button
NOTE
To select 12-hour or 24-hour clock
time, turn the audio control dial while
the clock display is flashing. After
selecting the desired display, press the
audio control dial to return to the
flashing clock display.
J07S_8S15-EA-03G_Edition2.book Page 22 Thursday, August 21, 2003 10:04 AM