Page 222 of 332
 7-6
In Case of an Emergency
Flat Tire
Form No. 8S18-EA-03I
(5 Door)
1. Remove the trunk mat, trunk board and
cargo sub-compartment.
2. Turn the tire hold-down bolt
counterclockwise with the lug wren")
7-6
In Case of an Emergency
Flat Tire
Form No. 8S18-EA-03I
(5 Door)
1. Remove the trunk mat, trunk board and
cargo sub-compartment.
2. Turn the tire hold-down bolt
counterclockwise with the lug wrench.If you have a flat tire, drive slowly to a
level spot that is well off the road and out
of the way of traffic to change the tire.
Stopping in traffic or on the shoulder of a
busy road is dangerous.
Trunk board
Cargo sub-
compartment
Lug wrench
Tire clamp
Changing a Flat Tire
NOTE
If the following occurs while driving, it
could indicate a flat tire.
•Steering becomes difficult.
•The vehicle begins to vibrate
excessively.
•The vehicle pulls in one direction.
Jacking a Vehicle:
Changing a tire is dangerous if not
done properly. The vehicle can slip off
the jack and seriously injure
someone.
Be sure to follow the directions for
changing a tire, and never get under a
vehicle that is supported only by a
jack.
Passenger in Vehicle Supported by a
Jack:
Allowing someone to remain in a
vehicle supported by a jack is
dangerous. The occupant could cause
the vehicle to fall resulting in serious
injury. Never allow anyone inside a
vehicle supported by a jack.
WARNING
J48C_8S18-EA-03I_Edition1.book Page 6 Wednesday, August 6, 2003 8:51 AM
Page 237 of 332
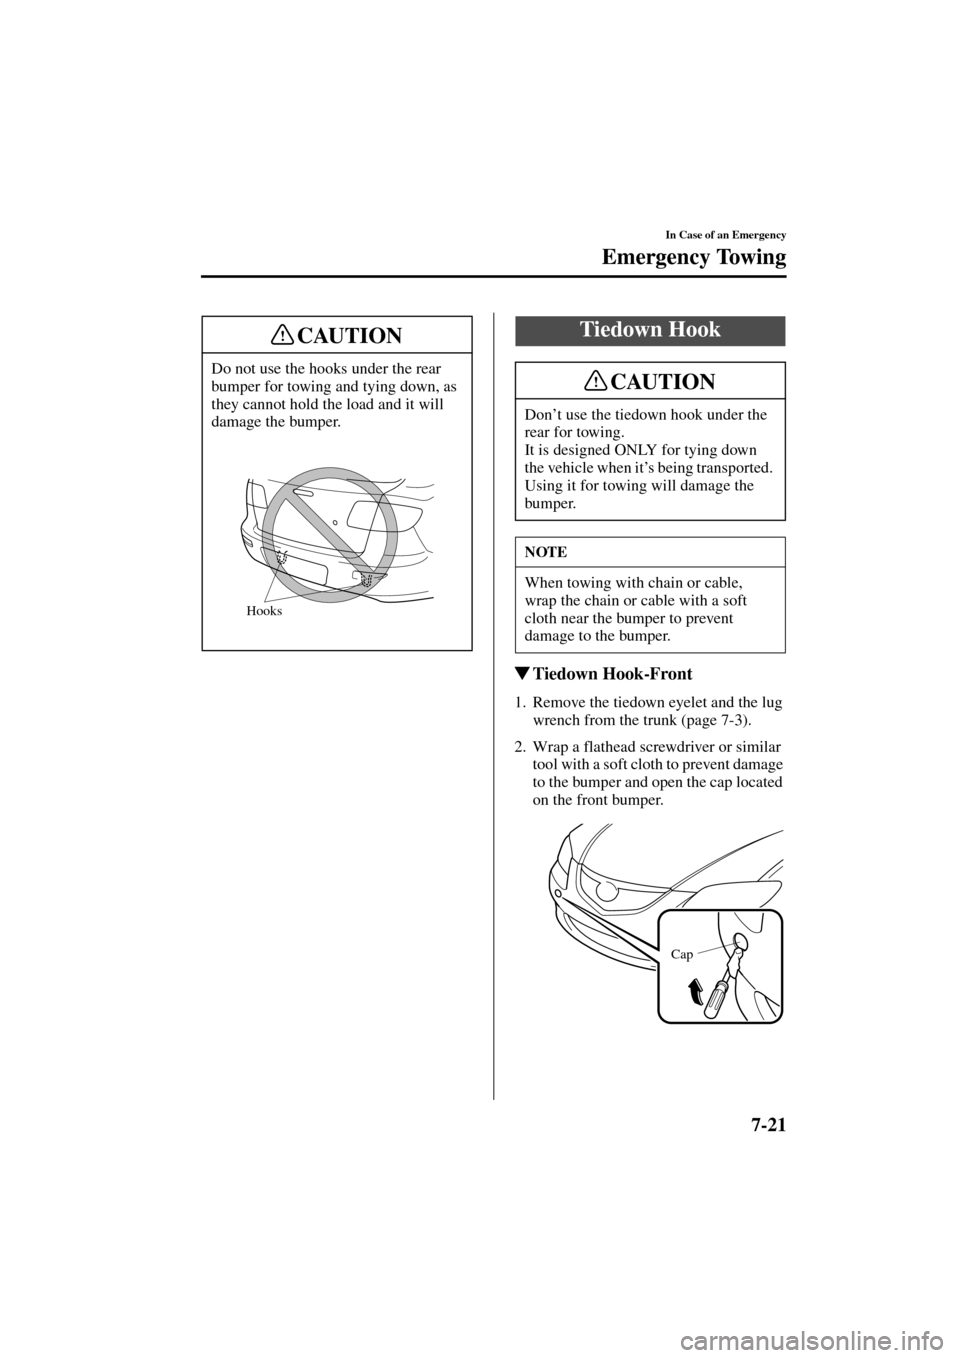
7-21
In Case of an Emergency
Emergency Towing
Form No. 8S18-EA-03I
�Tiedown Hook-Front
1. Remove the tiedown eyelet and the lug
wrench from the trunk (page 7-3).
2. Wrap a flathead screwdriver or similar
tool with a soft cloth to prevent damage
to the bumper and open the cap located
on the front bumper. Do not use the hooks under the rear
bumper for towing and tying down, as
they cannot hold the load and it will
damage the bumper.
CAUTION
Hooks
Tiedown Hook
Don’t use the tiedown hook under the
rear for towing.
It is designed ONLY for tying down
the vehicle when it’s being transported.
Using it for towing will damage the
bumper.
NOTE
When towing with chain or cable,
wrap the chain or cable with a soft
cloth near the bumper to prevent
damage to the bumper.
CAUTION
Cap
J48C_8S18-EA-03I_Edition1.book Page 21 Wednesday, August 6, 2003 8:51 AM
Page 276 of 332
8-36
Maintenance and Care
Owner Maintenance
Form No. 8S18-EA-03I
Light Bulbs
Side turn signal lightsFront turn signal lights/
Side-marker lightsRear turn signal lightsLicense plate light
Overhead light/Map lights (Front)*
Headlights (Low beam)
Headlights
(High beam)
Fog lights*Brake lights/Taillights
Reverse light High-mount brake light
Trunk light 4 Door
5 DoorOverhead light (Rear)
Overhead light/Map lights (Front)*
Headlights (Low beam)
Headlights
(High beam)
Side turn signal lightsFog lights*
License plate light
High-mount brake light
Luggage compartment
lightOverhead light (Rear)
Rear turn signal lights Brake lights/Taillights
Reverse light
Front turn signal lights/
Side-marker lights
*Some models.
J48C_8S18-EA-03I_Edition1.book Page 36 Wednesday, August 6, 2003 8:51 AM
Page 280 of 332
8-40
Maintenance and Care
Owner Maintenance
Form No. 8S18-EA-03I
Side turn signal lights
1. Slide the unit as shown in the figure to
remove it.
2. Detach the electrical connector from
the unit by pulling it to the rear.
3. Install the new side turn signal unit in
the reverse order of removal.Brake lights/Taillights, Rear turn signal lights (4 Door)
1. Pull the center of each plastic retainer
and remove the retainers and the trunk
end trim.
2. Pull the center of each plastic retainer
and remove the retainers and partially
open the trunk side trim.
3. Turn the socket and bulb assembly
counterclockwise and remove it.
NOTE
Bulb replacement is not possible
because it is built into the unit. Replace
the unit.
Removal
InstallationTrunk end trim
Trunk side trim
Removal
Installation
J48C_8S18-EA-03I_Edition1.book Page 40 Wednesday, August 6, 2003 8:51 AM
Page 282 of 332
8-42
Maintenance and Care
Owner Maintenance
Form No. 8S18-EA-03I
4. Install the new bulb in the reverse order
of removal.
Reverse light
4 Door
1. Pull the center section of the plastic
retainer and remove the retainers, then
remove the trunk rear trim.
2. Turn the socket and bulb assembly
counterclockwise and remove it.
3. Disconnect the bulb from the socket.4. Install the new bulb in the reverse order
of removal.
5 Door
1. Remove the cover.
2. Turn the socket and bulb assembly
counterclockwise and remove it.
3. Disconnect the bulb from the socket.
4. Install the new bulb in the reverse order
of removal.
NOTE
To replace the bulb, contact an
Authorized Mazda Dealer.
Removal
Installation
Trunk rear trim
Socket
NOTE
To replace the bulb, contact an
Authorized Mazda Dealer.
NOTE
To replace the bulb, contact an
Authorized Mazda Dealer.
Socket
Cover
J48C_8S18-EA-03I_Edition1.book Page 42 Wednesday, August 6, 2003 8:51 AM
Page 283 of 332
8-43
Maintenance and Care
Owner Maintenance
Form No. 8S18-EA-03I
High-mount brake light
4 Door
1. Pull the center of each plastic retainer
and remove the retainers and the trunk
rear trim.
2. Disconnect the electrical connector
from the socket.
3. Turn the socket and bulb assembly
counterclockwise and remove it.
4. Disconnect the bulb from the socket.
5. Install the new bulb in the reverse order
of removal.5 Door
1. Remove the liftgate upper trim.
2. Disconnect the electrical connector
from the socket.
3. Turn the socket and bulb assembly
counterclockwise and remove it.
4. Disconnect the bulb from the socket.
5. Install the new bulb in the reverse order
of removal.
NOTE
To replace the bulb, contact an
Authorized Mazda Dealer.
Removal
Installation
Trunk rear trim
Socket
NOTE
To replace the bulb, contact an
Authorized Mazda Dealer.
Liftgate upper trim
Socket
J48C_8S18-EA-03I_Edition1.book Page 43 Wednesday, August 6, 2003 8:51 AM
Page 285 of 332
 8-45
Maintenance and Care
Owner Maintenance
Form No. 8S18-EA-03I
Overhead light (Rear)
1. Wrap a small flathead screwdriver with
a soft cloth to prevent damage to the
lens and remove the lens by car")
8-45
Maintenance and Care
Owner Maintenance
Form No. 8S18-EA-03I
Overhead light (Rear)
1. Wrap a small flathead screwdriver with
a soft cloth to prevent damage to the
lens and remove the lens by carefully
prying on the edge of the lens with the
flathead screwdriver.
2. Disconnect the bulb by pulling it out.
3. Install the new bulb in the reverse order
of removal.
Trunk light (4 Door)
1. Press both sides of the lens cap to
remove it.
2. Disconnect the bulb by pulling it out.
3. Install the new bulb in the reverse order
of removal.Luggage compartment light (5 Door)
1. Insert your finger as shown in the
figure and remove the unit.
2. Wrap a small flathead screwdriver with
a soft cloth to prevent damage to the
lens and remove the lens by carefully
prying on the edge of the lens with the
flathead screwdriver.
3. Disconnect the bulb by pulling it out.
4. Install the new bulb in the reverse order
of removal.
Edge
J48C_8S18-EA-03I_Edition1.book Page 45 Wednesday, August 6, 2003 8:51 AM
Page 325 of 332
10-7
Specifications
Form No. 8S18-EA-03I
�Light Bulbs
Exterior light
*1 Bulb replacement is not possible because it is built into the unit. Replace the unit.
Interior light
Light bulb WattageCategory
ECE R SAE
HeadlightsHigh beam 60 HB3—
Low beamHalogen 55 H7—
Xenon fusion 35 D2S—
Front turn signal lights/Side-marker lights 27/8—#1157NA
Fog lights
*55 H11—
Side turn signal lights*15WY5W—
High-mount brake light 18 W16W #921
Rear turn signal lights 21 W21W #7440
Brake lights/Taillights 21/5 W21/5W #7443
Reverse light 21 W21W #7440
License plate light 5 W5W—
Light bulb WattageCategory
ECE R
Trunk light (Sedan)
5W5W
Luggage compartment light (Hatchback)—
Overhead light/Map lights (Front)
*W5W
Overhead light (Rear) 10—
*Some models.
J48C_8S18-EA-03I_Edition1.book Page 7 Wednesday, August 6, 2003 8:51 AM
 8-36
Maintenance and Care
Owner Maintenance
Form No. 8S18-EA-03I
Light Bulbs
Side turn signal lightsFront turn signal lights/
Side-marker lightsRear turn signal lightsLicense plate light
Overhead ligh")
 8-40
Maintenance and Care
Owner Maintenance
Form No. 8S18-EA-03I
Side turn signal lights
1. Slide the unit as shown in the figure to
remove it.
2. Detach the electrical connector from
the unit by pu")
 8-42
Maintenance and Care
Owner Maintenance
Form No. 8S18-EA-03I
4. Install the new bulb in the reverse order
of removal.
Reverse light
4 Door
1. Pull the center section of the plastic
retainer and")
 8-43
Maintenance and Care
Owner Maintenance
Form No. 8S18-EA-03I
High-mount brake light
4 Door
1. Pull the center of each plastic retainer
and remove the retainers and the trunk
rear trim.
2. Discon")
