Page 1 of 304
Introduction 4
Instrument Cluster 10
Warning and control lights 10
Gauges 15
Entertainment Systems 17
AM/FM stereo cassette with CD 17
CD changer 21
Navigation system 25
Climate Controls 88
Dual automatic temperature control 88
Rear window defroster 91
Lights 92
Headlamps 92
Turn signal control 95
Bulb replacement 96
Driver Controls 101
Windshield wiper/washer control 101
Steering wheel adjustment 102
Power windows 114
Mirrors 115
Speed control 117
Message center 122
Locks and Security 130
Locks 130
Anti-theft system 141
Table of Contents
1
REVIEW COPY
2004 Town Car(tow), Owners Guide (post-2002-fmt)(own2002),
Market:USA_English(fus)
Table of Contents
Page 31 of 304

Press VOICE briefly (on your steering wheel controls) and the voice
icon
appears on the Navigation display. Press the REPEAT button or
arrow on your steering wheel controls to hear the previous command
repeated from the navigation system.
The voice activated command feature will not operate if a map DVD is
not inserted into the navigation DVD unit.
At any time, you may say these commands to change modes:
•Radio•Audio on
•AM•Audio off
•FM1•Power off
•FM2•CD Changer (if equipped)
•CD•DVD (if equipped)
•Power on
During normal radio operation, you may say:
•Seek up•Seek down
Disc operation commands you may say when using a rear seat DVD (if
equipped):
•Track up•Track down
•Previous track•Disc up
•Disc down•Next disc
•Previous disc
During CDDJ or in-dash CD play, you may say:
•Track up•Track down
•Previous track•Disc up
•Next disc•Disc down
•Previous disc
To change the screen display, you may say the following commands:
•Screen off•Screen day mode
•Day mode on•Screen night mode
•Night mode on•Screen auto mode
•Auto mode on
Note:If you say“Screen off”, you must touch the screen in order to
activate the screen again. The screen will not turn on again with a voice
command.
REVIEW COPY
2004 Town Car(tow), Owners Guide (post-2002-fmt)(own2002),
Market:USA_English(fus)
Entertainment Systems
31
Page 102 of 304
Changing the wiper blades
1. Pull the wiper arm away from the
vehicle. Turn the blade at an angle
from the wiper arm. Push the lock
pin manually to release the blade
and pull the wiper blade down
toward the windshield to remove it
from the arm.
2. Attach the new wiper to the
wiper arm and press it into place
until a click is heard.
3. Replace wiper blades every 6
months for optimum performance.
TILT STEERING WHEEL
To adjust the steering wheel:
1. Pull and hold the steering wheel
release control toward you.
2. Move the steering wheel up or
down until you find the desired
location.
3. Release the steering wheel
release control. This will lock the
steering wheel in position.
Never adjust the steering wheel when the vehicle is moving.
REVIEW COPY
2004 Town Car(tow), Owners Guide (post-2002-fmt)(own2002),
Market:USA_English(fus)
Driver Controls
102
Page 117 of 304

SPEED CONTROL
With speed control set, you can maintain a speed of 30 mph (48 km/h)
or more without keeping your foot on the accelerator pedal. Speed
control does not work at speeds below 30 mph (48 km/h).
Do not use the speed control in heavy traffic or on roads that
are winding, slippery or unpaved.
Setting speed control
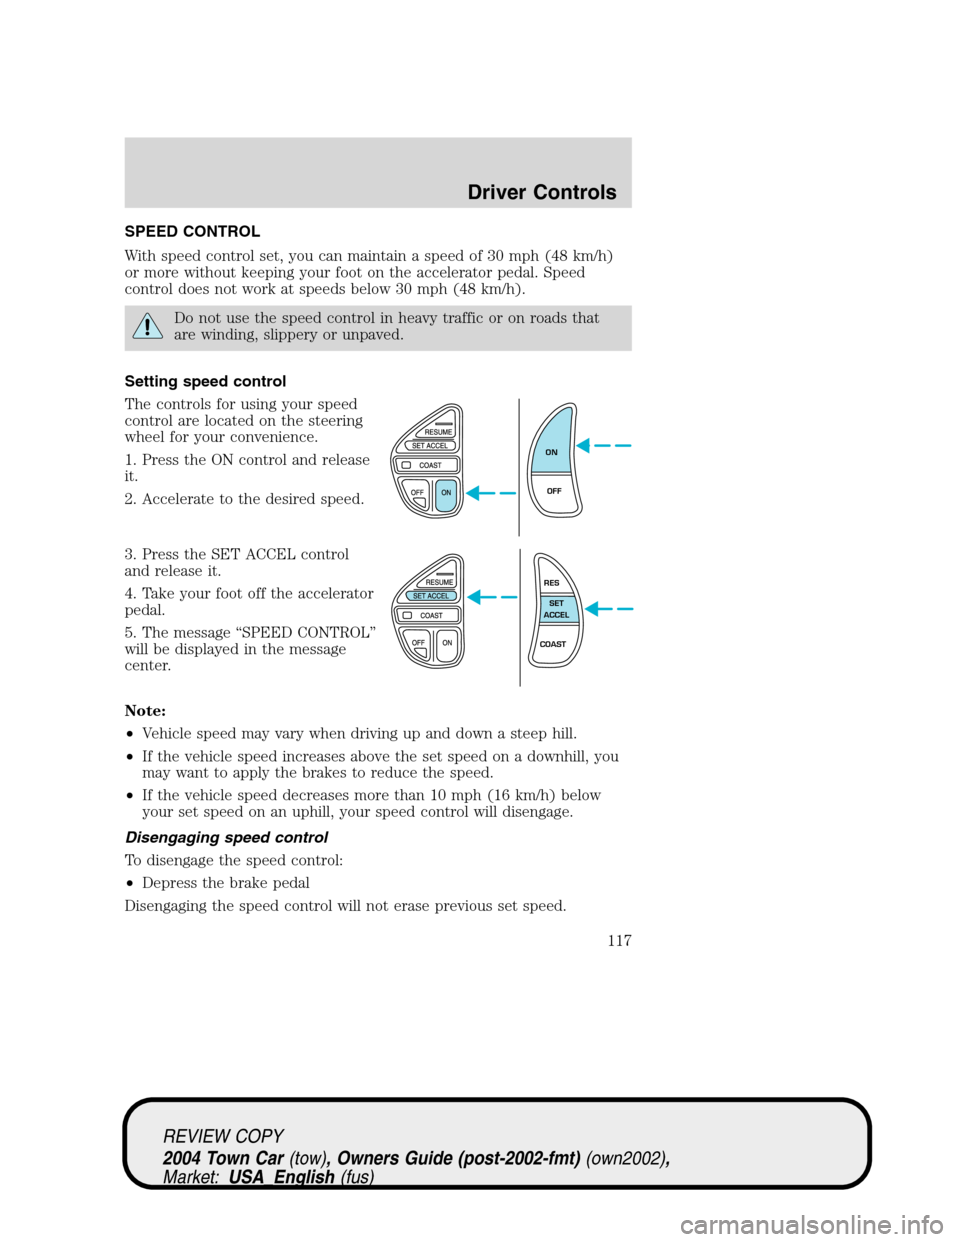
The controls for using your speed
control are located on the steering
wheel for your convenience.
1. Press the ON control and release
it.
2. Accelerate to the desired speed.
3. Press the SET ACCEL control
and release it.
4. Take your foot off the accelerator
pedal.
5. The message“SPEED CONTROL”
will be displayed in the message
center.
Note:
•Vehicle speed may vary when driving up and down a steep hill.
•If the vehicle speed increases above the set speed on a downhill, you
may want to apply the brakes to reduce the speed.
•If the vehicle speed decreases more than 10 mph (16 km/h) below
your set speed on an uphill, your speed control will disengage.
Disengaging speed control
To disengage the speed control:
•Depress the brake pedal
Disengaging the speed control will not erase previous set speed.
ON
OFF
RES
SET
ACCEL
COAST
REVIEW COPY
2004 Town Car(tow), Owners Guide (post-2002-fmt)(own2002),
Market:USA_English(fus)
Driver Controls
117
Page 120 of 304
STEERING WHEEL CONTROLS (IF EQUIPPED)
These controls allow you to operate some radio and climate control
features.
Radio control features
•Press MODE to select AM, FM1,
FM2, TAPE or CD (if equipped).
In Radio mode:
•Press NEXT to select a preset
station from memory.
In Tape mode:
•Press NEXT to listen to the next
selection on the tape.
In CD mode:
•Press NEXT to listen to the next
track on the disc.
In any mode:
•Press VOL up or down to adjust
the volume.
Climate control features
•Press TEMP up or down to adjust temperature.
•Press FAN up or down to adjust fan speed.
NEXT
MODE
REVIEW COPY
2004 Town Car(tow), Owners Guide (post-2002-fmt)(own2002),
Market:USA_English(fus)
Driver Controls
120
Page 121 of 304
Rear radio/climate controls
Refer toSteering Wheel Controlsin this chapter for operation
instructions.
Without navigation system
With navigation system
Rear radio/climate controls lockout
The rear radio/climate control feature can be locked out by pressing the
3 and the 5 buttons on the radio simultaneously while the radio is on. To
enable the rear radio/climate controls, press the 3 and the 5 buttons
again.
For navigation radio, press audio button, press sound soft button, press
disable rear controls soft button.
REVIEW COPY
2004 Town Car(tow), Owners Guide (post-2002-fmt)(own2002),
Market:USA_English(fus)
Driver Controls
121
Page 184 of 304

STARTING
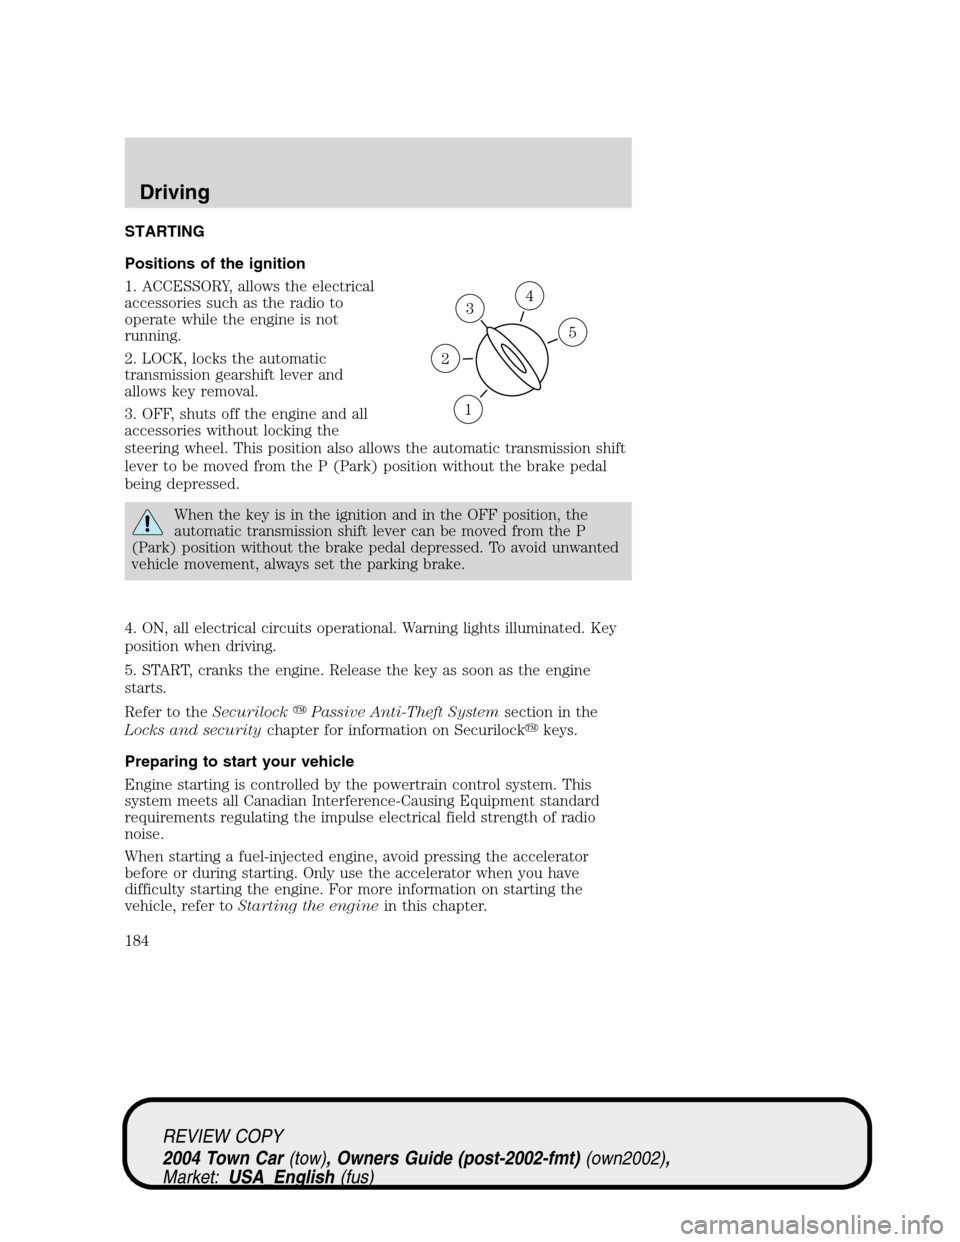
Positions of the ignition
1. ACCESSORY, allows the electrical
accessories such as the radio to
operate while the engine is not
running.
2. LOCK, locks the automatic
transmission gearshift lever and
allows key removal.
3. OFF, shuts off the engine and all
accessories without locking the
steering wheel. This position also allows the automatic transmission shift
lever to be moved from the P (Park) position without the brake pedal
being depressed.
When the key is in the ignition and in the OFF position, the
automatic transmission shift lever can be moved from the P
(Park) position without the brake pedal depressed. To avoid unwanted
vehicle movement, always set the parking brake.
4. ON, all electrical circuits operational. Warning lights illuminated. Key
position when driving.
5. START, cranks the engine. Release the key as soon as the engine
starts.
Refer to theSecurilock�Passive Anti-Theft Systemsection in the
Locks and securitychapter for information on Securilock�keys.
Preparing to start your vehicle
Engine starting is controlled by the powertrain control system. This
system meets all Canadian Interference-Causing Equipment standard
requirements regulating the impulse electrical field strength of radio
noise.
When starting a fuel-injected engine, avoid pressing the accelerator
before or during starting. Only use the accelerator when you have
difficulty starting the engine. For more information on starting the
vehicle, refer toStarting the enginein this chapter.
3
1
2
5
4
REVIEW COPY
2004 Town Car(tow), Owners Guide (post-2002-fmt)(own2002),
Market:USA_English(fus)
Driving
Driving
184
Page 188 of 304

BRAKES
Occasional brake noise is normal. If a metal-to-metal, continuous grinding
or continuous squeal sound is present, the brake linings may be worn-out
and should be inspected by a qualified service technician. If the vehicle
has continuous vibration or shudder in the steering wheel while braking,
the vehicle should be inspected by a qualified service technician.
Refer toBrake system warning
lightin theInstrument Cluster
chapter for information on the brake
system warning light.
Four-wheel anti-lock brake system (ABS)
Your vehicle is equipped with an Anti-lock Braking System (ABS). This
system helps you maintain steering control during emergency stops by
keeping the brakes from locking. Noise from the ABS pump motor and
brake pedal pulsation may be observed during ABS braking and the
brake pedal may suddenly travel a little further as soon as ABS braking
is done and normal brake operation resumes. These are normal
characteristics of the ABS and should be no reason for concern.
Using ABS
When hard braking is required, apply continuous force on the brake
pedal; do not pump the brake pedal since this will reduce the
effectiveness of the ABS and will increase your vehicle’s stopping
distance. The ABS will be activated immediately, allowing you to retain
full steering control during hard braking and on slippery surfaces.
However, the ABS does not decrease stopping distance.
ABS warning lamp
The ABS lamp in the instrument
cluster momentarily illuminates
when the ignition is turned on. If
the light does not illuminate during
start up, remains on or flashes, the
ABS may be disabled and may need to be serviced.
Even when the ABS is disabled,
normal braking is still effective. (If
your BRAKE warning lamp
illuminates with the parking brake
released, have your brake system serviced immediately.)
ABS
REVIEW COPY
2004 Town Car(tow), Owners Guide (post-2002-fmt)(own2002),
Market:USA_English(fus)
Driving
188