Page 207 of 482
 STEERING WHEEL AND MIRRORS
182When you set your driving position:
1. Set the parking brake firmly.
2. Move the accelerator and brake pedals to the front most
position.
3. Adjust the seat position and")
STEERING WHEEL AND MIRRORS
182When you set your driving position:
1. Set the parking brake firmly.
2. Move the accelerator and brake pedals to the front most
position.
3. Adjust the seat position and steering wheel angle properly.
(See pages 108 and 181.)
4. Move the pedals toward you until you can fully depress the
brake pedal.
5. After adjusting, depress the pedals a few times to get used
to the feel.
CAUTION
�Never put your foot on the accelerator pedal while the
pedals are moving. It may cause racing of the engine
or sudden acceleration.
�Make sure that you can fully depress the brake pedal
before driving. Otherwise, you may not be able to
hold down the brake pedal firmly in an emergency
stop.
OUTSIDE REAR VIEW MIRRORS
Adjust the mirror so that you can just see the side of your
vehicle in the mirror.
Be careful when judging the size or distance of any object seen
in the outside rear view mirror on the passenger's side
because it is a convex mirror. Any object seen in a convex
mirror will look smaller and farther away than if seen in a normal
flat mirror.
When the inside rear view mirror darkens in AUTO mode, the
outside rear view mirrors also darken to reduce the reflection
of the headlights of the following vehicle. For details, see
Inside rear view mirrorº on page 184.
Page 208 of 482
 STEERING WHEEL AND MIRRORS
183 When you push the rear window and outside rear view mirror
defogger switch, the heater panels in the outside rear view
mirrors will quickly clear the mirror surface. (S")
STEERING WHEEL AND MIRRORS
183 When you push the rear window and outside rear view mirror
defogger switch, the heater panels in the outside rear view
mirrors will quickly clear the mirror surface. (See Rear window
and outside rear view mirror defogger switchº on page 49.)
CAUTION
�Do not adjust the mirror while the vehicle is moving.
Doing so may cause the driver to mishandle the
vehicle and an accident may occur resulting in death
or serious injuries.
�Since the mirror surfaces can get hot, do not touch
them when the rear window and outside rear view
mirror defogger switch is on.
Power rear view mirror control
�1Control switch2Master switch
To adjust the power rear view mirror, first place the master
switch at Lº (left) or Rº (right), and push the control
switch on the desired side.
The power rear view mirror can be adjusted when the key is in
the ACCº or ONº position.
NOTICE
If ice should jam the mirror, do not operate the control
or scrape the mirror face. Use a spray de-icer to free the
mirror.
Page 236 of 482
AUDIO
211
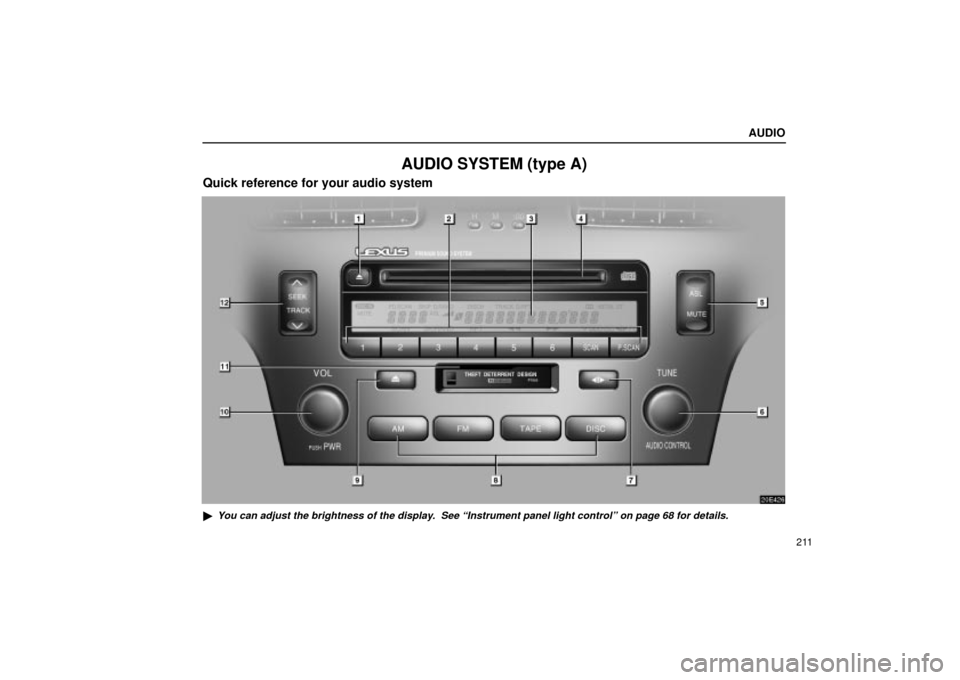
AUDIO SYSTEM (type A)
Quick reference for your audio system
20E426
�You can adjust the brightness of the display. See Instrument panel light controlº on page 68 for details.
Page 237 of 482
 AUDIO
212
1Ejecting a compact disc
(See page 224 for details.)
2Function buttons
1 Ð 6:Station selector buttons
(See page 220 for details.)
SCAN:Scan tuning
(See page 221 for details.)
P.SCAN:Preset")
AUDIO
212
1Ejecting a compact disc
(See page 224 for details.)
2Function buttons
1 Ð 6:Station selector buttons
(See page 220 for details.)
SCAN:Scan tuning
(See page 221 for details.)
P.SCAN:Preset scan tuning
(See page 221 for details.)
3Display of functions in TAPE or CD mode
:DOLBY NR
(See page 222 for details.)
��:Rewinding or reversing
(See page 222 or 227 for details.)
��:Fast forwarding
(See page 222 or 227 for details.)
RPT:Automatic repeat
(See page 223 or 228 for details.)
SKIP:Automatic skip of blank portions of tape
(See page 223 for details.)
:Disc selection
(See page 226 for details.)
RAND:Random access
(See page 228 for details.)
SCAN:Scan selection
(See page 227 for details.)
4Compact disc slot
(See page 224 for details.)
5Automatic sound levelizer/Mute
(See page 214 or 216 for details.)
6TUNE/AUDIO CONTROL knob
(See page 215 for details.)
7
��:Side change
(See page 222 for details.)
8Mode selectors
(See page 215 for details.)
9Stopping and ejecting a cassette tape
(See page 221 for details.)
10Turning the system on and adjusting the volume
(See page 214 for details.)
11Cassette tape slot
(See page 221 for details.)
12Radio mode:Seek tuning
(See page 220 for details.)
TAPE mode:Direct access to a desired program
(See page 223 for details.)
CD mode:Direct access to a desired program
(See page 227 for details.)
Page 260 of 482
AUDIO
235
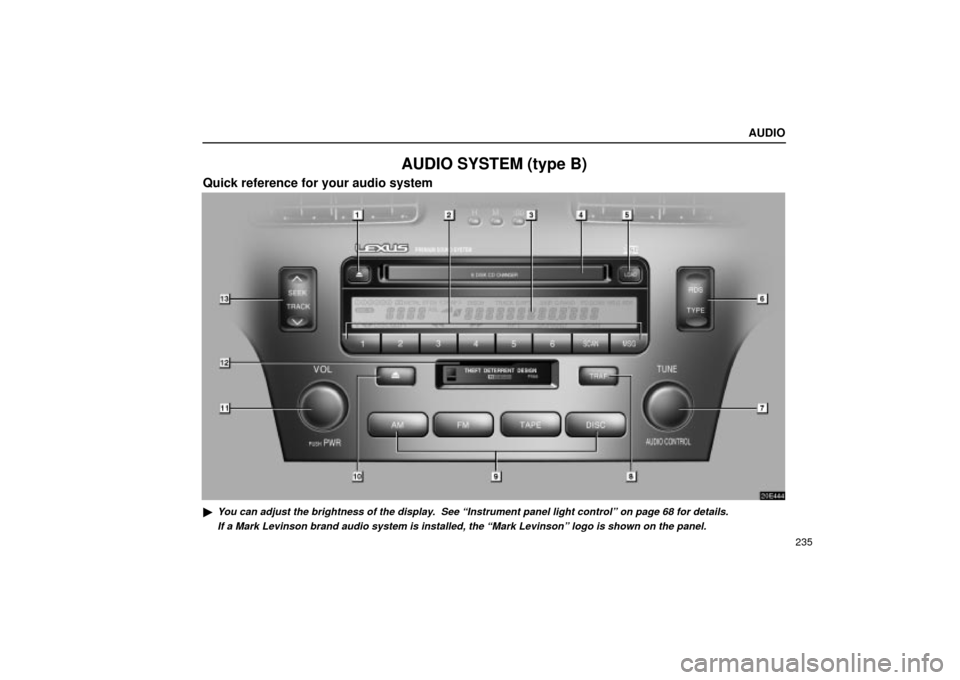
AUDIO SYSTEM (type B)
Quick reference for your audio system
20E444
�You can adjust the brightness of the display. See Instrument panel light controlº on page 68 for details.
If a Mark Levinson brand audio system is installed, the Mark Levinsonº logo is shown on the panel.
Page 261 of 482
 AUDIO
236
1Ejecting a compact disc
(See page 250 for details.)
2Function buttons
1 Ð 6:Station selector buttons
(See page 243 for details.)
SCAN:Scan tuning
(See page 244 for details.)
MSG:Message bu")
AUDIO
236
1Ejecting a compact disc
(See page 250 for details.)
2Function buttons
1 Ð 6:Station selector buttons
(See page 243 for details.)
SCAN:Scan tuning
(See page 244 for details.)
MSG:Message button
(See page 246 for details.)
3Display of functions in TAPE or CD mode
��:Side change
(See page 248 for details.)
:DOLBY NR
(See page 247 for details.)
��:Rewinding or reversing
(See page 248 or 253 for details.)
��:Fast forwarding
(See page 248 or 253 for details.)
RPT:Automatic repeat
(See page 248 or 253 for details.)
SKIP:Automatic skip of blank portions of tape
(See page 248 for details.)
:Disc selection
(See page 252 for details.)SCAN:Scan selection
(See page 252 for details.)
4Compact disc slot
(See page 250 for details.)
5Compact disc load button
(See page 250 for details.)
6Radio data system/program type
(See page 244 for details.)
7TUNE/AUDIO CONTROL knob
(See page 239 for details.)
8Traffic announcement
(See page 245 for details.)
9Mode selectors
(See page 238 for details.)
10Stopping and ejecting a cassette tape
(See page 247 for details.)
11Turning the system on and adjusting the volume
(See page 238 for details.)
12Cassette tape slot
(See page 247 for details.)
13Radio mode:Seek tuning
(See page 243 for details.)
TAPE mode:Direct access to a desired program
(See page 249 for details.)
CD mode:Direct access to a desired program
(See page 253 for details.)
Page 293 of 482
 STARTING AND DRIVING
268
BEFORE STARTING THE ENGINE
1. Check the area around the vehicle before entering it.
2. Adjust seat position, seatback angle, seat cushion angle,
seat cushion height, head rest")
STARTING AND DRIVING
268
BEFORE STARTING THE ENGINE
1. Check the area around the vehicle before entering it.
2. Adjust seat position, seatback angle, seat cushion angle,
seat cushion height, head restraint height and steering wheel
angle.
3. Vehicles with power adjustable pedals Ð Adjust the position
of the accelerator and brake pedals.
4. Adjust the inside and outside rear view mirrors.
5. Lock all doors.
6. Fasten seat belts.
Remember to check that the service reminder indicators
function when turning the key to ONº, and check the fuel
gauge to see that you have sufficient fuel.
IGNITION SWITCH WITH STEERING
LOCK
STARTº Ð Starter motor on. The key will return to the
ONº position when released.
For starting tips, see page 270.
ONº Ð Engine on and all accessories on.
This is the normal driving position.
NOTICE
Do not leave the key in the ONº position if the engine
is not running. The battery will discharge and the
electronic ignition system could be damaged.
ACCº Ð Accessories such as the radio operate, but the
engine is off.If you leave the key in the ACCº or LOCKº position and open
the driver's door, a buzzer will remind you to remove the key.
Page 294 of 482
 STARTING AND DRIVING
269
LOCKº Ð Engine is off and the steering wheel is locked.
The ignition key can be removed only at this position.
To turn the ignition switch from ACCº to the LOCKº positi")
STARTING AND DRIVING
269
LOCKº Ð Engine is off and the steering wheel is locked.
The ignition key can be removed only at this position.
To turn the ignition switch from ACCº to the LOCKº position,
you must put the transmission selector lever in the Pº position.
Once you remove the key, the engine immobilizer system is
automatically set. See Engine immobilizer systemº on page
16.
When starting the engine, the key may seem stuck at the
LOCKº position. To free it, first be sure the key is pushed all
the way in, and then rock the steering wheel slightly while
turning the key gently.
If, in an emergency, you must turn the engine off while the
vehicle is moving, turn the key only to ACCº.
PARKING BRAKE
�1U.S.A.2Canada
To set: Hold the brake pedal down with your right foot.
Push down the parking brake pedal with your left foot.
To release: Hold the brake pedal down with your right foot
and push the parking brake pedal with your left foot. When
you lift your left foot, the parking brake pedal will follow it
to the released position.
Before leaving your vehicle, firmly apply the parking brake.
To remind you that the parking brake is set, the parking brake
reminder light in the instrument panel remains on until you
release the parking brake.
CAUTION
Before driving, make sure the parking brake is fully
released and that the parking brake reminder light is off.