Page 94 of 296

383
1
2
3
4
5
6
7
8
9
Knowing your vehicle
Opening the hood:1. Pull the release lever on the lowerleft side of the instrument panel to
unlatch the hood. The hood
should pop open slightly. 2. Go to the front of the vehicle,
slightly raise the hood, pull (
➁) the
secondary latch (
➀) inside of the
hood center and lift the hood.
3. Raise the hood. It will raise com- pletely by itself after it has been
raised about halfway.
Closing the hood1. Before closing the hood, check thefollowing:
All filler caps in engine compart- ment must be correctly installed.
Gloves, rags or any other com- bustible material must be
removed from the engine com-
partment.
2. Lower the hood halfway and push down to securely lock in place.
Make sure the hood is properly
locked before driving.
HOOD
1GHA2023
2GHN2024
➀
➁
WARNING
Before closing the hood, make
sure that all engine parts and
tools have been removed from
the engine area and that no
one’ s hands are near the hood
opening.
Do not leave gloves, rags or
any other combustible materi-
al in the engine compartment.
Doing so may cause a heat-
induced fire.
Opirus-ENG (CAN) 3.qxd 7/8/03 1:56 PM Page 83
Page 95 of 296

Knowing your vehicle84
3
1
2
3
4
5
6
7
8
9
1. Stop the engine.
2. To open the fuel filler lid, push the
release button located on the dri-
ver ’s lower door. 3. Pull the fuel filler lid out to open.
4. To remove the cap, turn the fuel
tank cap counter-clockwise.
5. Refuel as needed.
6. To install the cap, turn it clockwise until it “clicks”. This indicates that
the cap is securely tightened.
7. Close the fuel filler lid and push it lightly and make sure that it is
securely closed.FUEL FILLER LID
1GHA2021
MMSA3049
WARNING
To avoid injury from sharp
objects, it is recommended that
protective gloves be worn when
opening the fuel filler door man-
ually.
WARNING
- Refueling
If pressurized fuel sprays out,
it can cause serious injuries.
Always remove the fuel cap
carefully and slowly. If the cap
is venting fuel or if you hear a
hissing sound, wait until the
condition stops before com-
pletely removing the cap.
Fuel vapor is very hazardous
and can explode. When refuel-
ing, always stop the engine.
Never allow sparks or open
flames near the filler neck.
Always put out cigarettes and
other smoking materials
before refueling.
Opirus-ENG (CAN) 3.qxd 7/8/03 1:56 PM Page 84
Page 96 of 296

385
1
2
3
4
5
6
7
8
9
Knowing your vehicle
✽ ✽NOTICE• Make sure to refuel with gasoline
(unleaded fuel) only for the gaso-
line engine vehicles.
• Check to make sure the fuel filler cap is securely closed after refuel-
ing.
• If the fuel filler cap requires replacement, use only a genuine
Kia cap or the equivalent specified
for your vehicle. An incorrect fuel
filler cap can result in a serious
malfunction of the fuel system or
emission control system. Correct
replacement caps are available at
authorized Kia dealers.
• Do not spill fuel on the exterior surfaces of the vehicle. Any type of
fuel spilled on painted surfaces
may damage the paint. (Continued)(Continued)
• A loose fuel filler cap may cause
the “Check Engine” (Malfunction
Indicator) light in the instrument
panel to illuminate unnecessarily.
• If the fuel filler lid will not open in cold weather because the area
around it is frozen, push or lightly
tap the lid.
When fuel filler lid does not open
with the release button1. Open the trunk.
2. Pull the emergency hook for fuel filler lid inside the trunk.
1GHA2022
Opirus-ENG (CAN) 3.qxd 7/8/03 1:56 PM Page 85
Page 103 of 296

Knowing your vehicle92
3
1
2
3
4
5
6
7
8
9
✽ ✽
NOTICE• To avoid possible theft, do not
leave valuables in the storage com-
partment.
• Since stored items may move while driving, be sure to position them
in the storage compartment so
that they do not make noise or
cause a potential safety hazard
when the vehicle is moving.
• Always keep the storage compart- ment covers closed while driving.
Do not attempt to place many
items in the storage compartment
that the storage compartment
cover can not close securely.
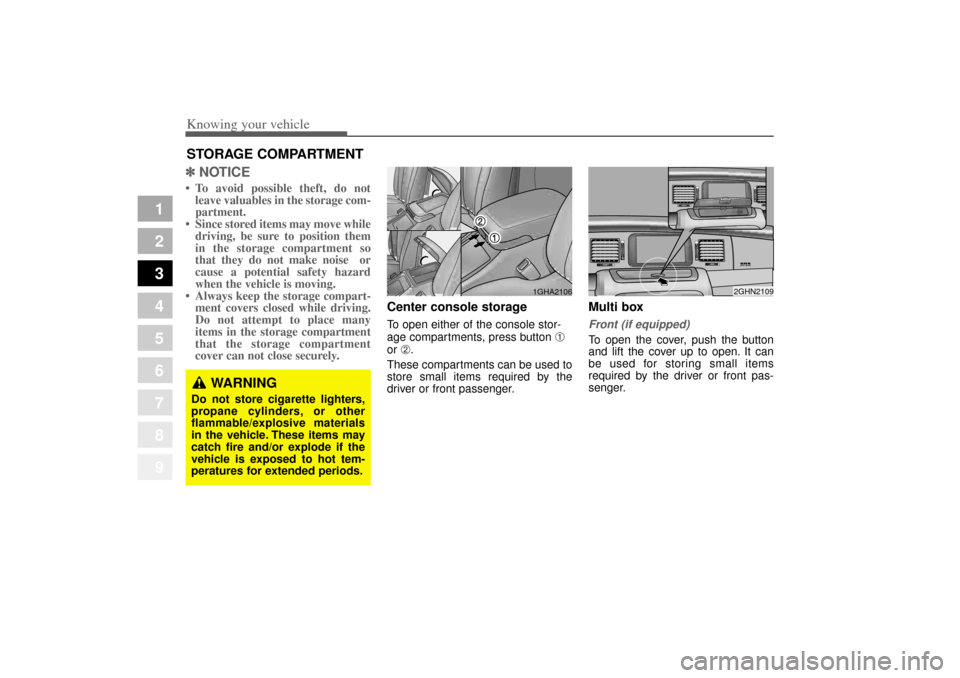
Center console storageTo open either of the console stor-
age compartments, press button
➀
or
➁.
These compartments can be used to
store small items required by the
driver or front passenger.
Multi boxFront (if equipped)To open the cover, push the button
and lift the cover up to open. It can
be used for storing small items
required by the driver or front pas-
senger.
STORAGE COMPARTMENT
WARNING
Do not store cigarette lighters,
propane cylinders, or other
flammable/explosive materials
in the vehicle. These items may
catch fire and/or explode if the
vehicle is exposed to hot tem-
peratures for extended periods.
1GHA2106
2GHN2109
Opirus-ENG (CAN) 3.qxd 7/8/03 1:56 PM Page 92
Page 107 of 296
Knowing your vehicle96
3
1
2
3
4
5
6
7
8
9
Cup holderCups or small beverage cans may be
placed in the cup holders.
FrontTo open the cup holder cover, press
the cover and it will automatically
open. Push the cover to close after
use.
WARNING
- Ashtray use
Do not use the vehicle ’s ash-
trays as waste receptacles.
Putting lit cigarettes or match-
es in an ashtray with other
combustible materials may
cause a fire.
WARNING
- Hot liquids
Do not place uncovered cups
of hot liquid in the cup holder
while the vehicle is in motion.
If the hot liquid spills, you
could be burned. Such a burn
to the driver could cause a
loss of control of the vehicle.
To reduce the risk of personal
injury in the event of sudden
stop or collision, do not place
uncovered or insecure bot-
tles, glasses, cans, etc., in the
cup holder while the vehicle is
in motion.
2GHN2088
Opirus-ENG (CAN) 3.qxd 7/8/03 1:56 PM Page 96
Page 109 of 296
Knowing your vehicle98
3
1
2
3
4
5
6
7
8
9
✽ ✽
NOTICEClose the vanity mirror cover
securely and return the sunvisor to
its original position after use. If the
vanity mirror is not closed securely,
the lamp will stay on and could
result in battery discharge and pos-
sible sunvisor damage.
Power socket (if equipped)The power outlets are designed to
provide power for mobile telephones
or other devices designed to operate
with vehicle electrical systems. The
devices should draw less than 10
amps with the engine running.
2GHN33401GHA2234
Front (if equipped)Rear
2GHN3350
Center (if equipped)
Opirus-ENG (CAN) 3.qxd 7/8/03 1:56 PM Page 98
Page 123 of 296

49
1
2
3
4
5
6
7
8
9
Driving your vehicle
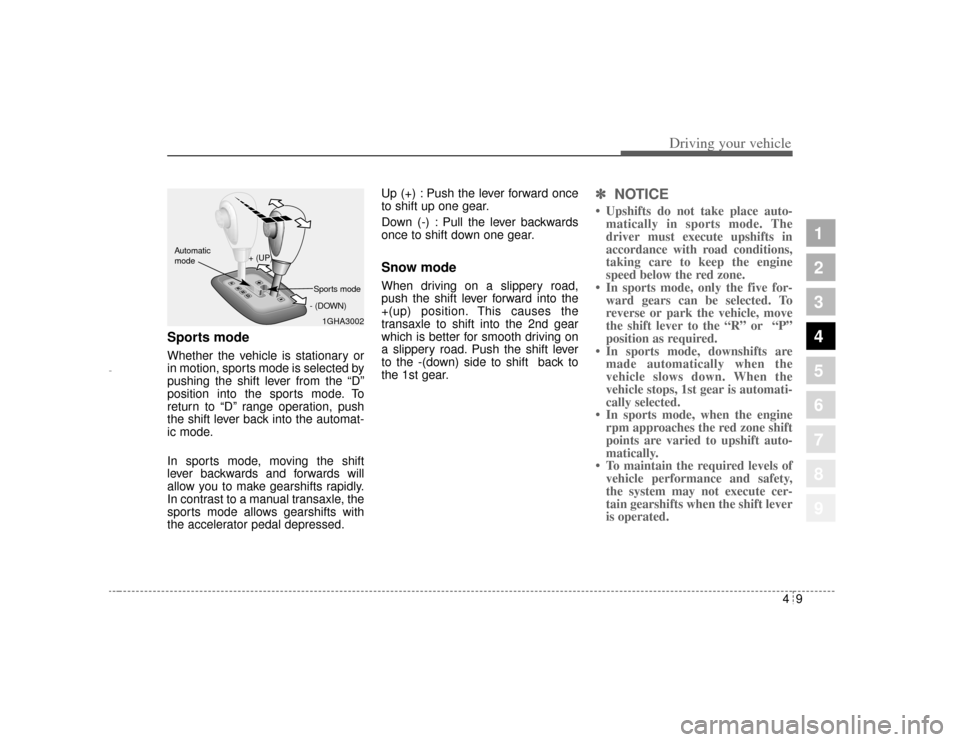
Sports modeWhether the vehicle is stationary or
in motion, sports mode is selected by
pushing the shift lever from the “D”
position into the sports mode. To
return to “D” range operation, push
the shift lever back into the automat-
ic mode.
In sports mode, moving the shift
lever backwards and forwards will
allow you to make gearshifts rapidly.
In contrast to a manual transaxle, the
sports mode allows gearshifts with
the accelerator pedal depressed.Up (+) : Push the lever forward once
to shift up one gear.
Down (-) : Pull the lever backwards
once to shift down one gear.
Snow modeWhen driving on a slippery road,
push the shift lever forward into the
+(up) position. This causes the
transaxle to shift into the 2nd gear
which is better for smooth driving on
a slippery road. Push the shift lever
to the -(down) side to shift back to
the 1st gear.
✽ ✽
NOTICE• Upshifts do not take place auto-
matically in sports mode. The
driver must execute upshifts in
accordance with road conditions,
taking care to keep the engine
speed below the red zone.
• In sports mode, only the five for- ward gears can be selected. To
reverse or park the vehicle, move
the shift lever to the “R” or “P”
position as required.
• In sports mode, downshifts are made automatically when the
vehicle slows down. When the
vehicle stops, 1st gear is automati-
cally selected.
• In sports mode, when the engine rpm approaches the red zone shift
points are varied to upshift auto-
matically.
• To maintain the required levels of vehicle performance and safety,
the system may not execute cer-
tain gearshifts when the shift lever
is operated.
1GHA3002
+ (UP)
- (DOWN)
Automatic
modeSports mode
Opirus-ENG (CAN) 4.qxd 7/8/03 2:19 PM Page 9
Page 127 of 296

413
1
2
3
4
5
6
7
8
9
Driving your vehicle
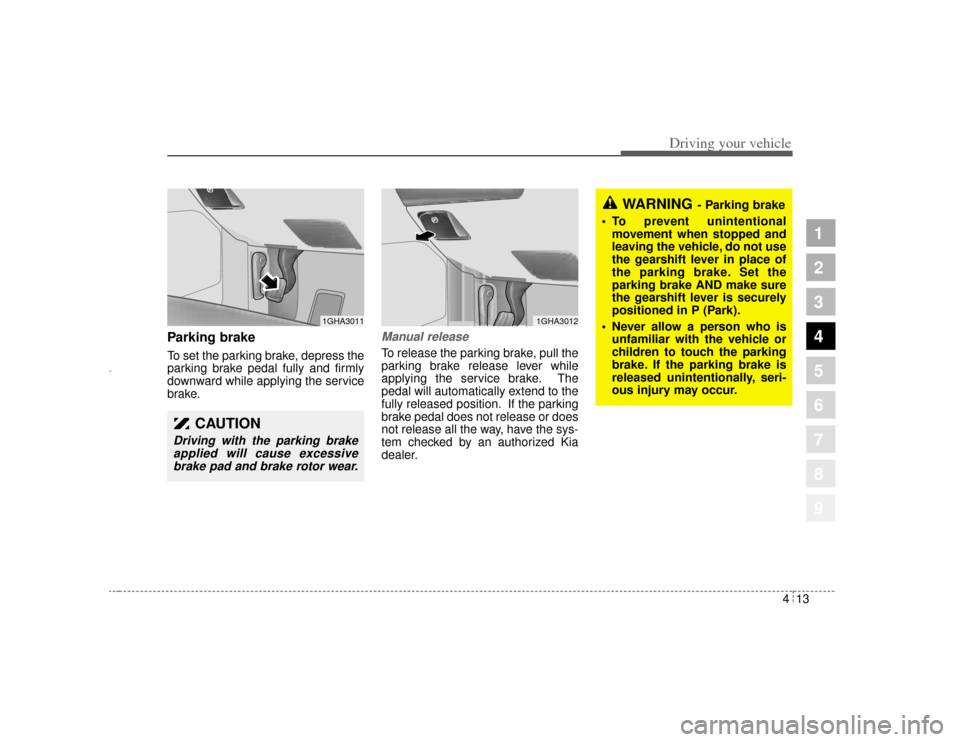
Parking brake To set the parking brake, depress the
parking brake pedal fully and firmly
downward while applying the service
brake.
Manual releaseTo release the parking brake, pull the
parking brake release lever while
applying the service brake. The
pedal will automatically extend to the
fully released position. If the parking
brake pedal does not release or does
not release all the way, have the sys-
tem checked by an authorized Kia
dealer.
CAUTION
Driving with the parking brakeapplied will cause excessivebrake pad and brake rotor wear.
1GHA3011
1GHA3012
WARNING
- Parking brake
To prevent unintentional movement when stopped and
leaving the vehicle, do not use
the gearshift lever in place of
the parking brake. Set the
parking brake AND make sure
the gearshift lever is securely
positioned in P (Park).
Never allow a person who is unfamiliar with the vehicle or
children to touch the parking
brake. If the parking brake is
released unintentionally, seri-
ous injury may occur.
Opirus-ENG (CAN) 4.qxd 7/8/03 2:19 PM Page 13