Page 194 of 315
Driving your vehicle
82
4
1 23456789
Then the indicator light in the air
intake control button will blink 3 times
with 0.5 second of interval. It indi-
cates that the defogging logic is can-
celed or returned to the programmed
status.
If the battery has been discharged or
disconnected, it is reset as the defog
logic status.Automatic climate control system
To reduce the probability of fogging up inside of the windshield, the air
intake control is set to outside (fresh)
air position automatically if any of fol-
lowing occur.
The ignition switch is turned on.
The OFF button is pushed.
The mode is selected to the or
position.
In this case, the air conditioning will
automatically operate if the mode is
selected to the or .
If you don’t want the air-conditioning or outside (fresh) air position, press
the corresponding button to cancel
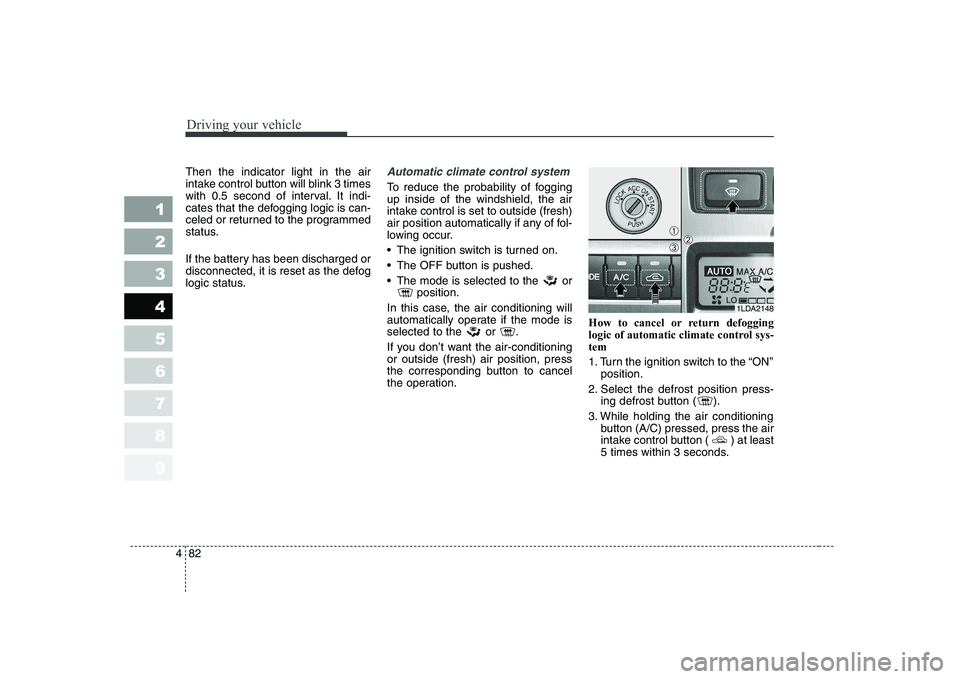
the operation. How to cancel or return defogging
logic of automatic climate control sys-tem
1. Turn the ignition switch to the “ON”
position.
2. Select the defrost position press- ing defrost button ( ).
3. While holding the air conditioning button (A/C) pressed, press the air
intake control button ( ) at least
5 times within 3 seconds.
1LDA2148
➀➁➂
Page 255 of 315
Maintenance
10
7
1 23456789
OWNER MAINTENANCE
Owner maintenance schedule
The following lists are vehicle checks and inspections that should be per-
formed by the owner or an
Authorized Kia Dealer at the fre-quencies indicated to help ensure
safe, dependable operation of your
vehicle.
Any adverse conditions should be
brought to the attention of your deal-
er as soon as possible.
These Owner Maintenance Checks
are generally not covered by war-
ranties and you may be charged for
labor, parts and lubricants used.
When you stop for fuel:
Check the engine oil level.
Check coolant level in coolant reservoir.
Check the windshield washer fluid level.
Look for low or under-inflated tires.
While operating your vehicle:
Note any changes in the sound of the exhaust or any smell of
exhaust fumes in the vehicle.
Check for vibrations in the steering wheel. Notice any increased steer-
ing effort or looseness in the steer-
ing wheel, or change in its straight-ahead position.
Notice if your vehicle constantly turns slightly or “pulls” to one side
when traveling on smooth, levelroad.
When stopping, listen and check for strange sounds, pulling to one
side, increased brake pedal travel
or “hard-to-push” brake pedal.
If any slipping or changes in the operation of your transaxle occurs,
check the transaxle fluid level.
Check automatic transaxle P (Park) function.
Check parking brake.
Check for fluid leaks under your vehicle (water dripping from the air conditioning system after use is
normal).
WARNING
Be careful when checking your
engine coolant level when the
engine is hot. Scalding hot
coolant and steam may blow out
under pressure. This could
cause serious injury.
Page 256 of 315
711
Maintenance
1 23456789
At least monthly:
Check coolant level in the coolantrecovery reservoir.
Check the operation of all exterior lights, including the stoplights, turn
signals and hazard warning flash-
ers.
Check the inflation pressures of all tires including the spare.
At least twice a year
(i.e., every Spring and Fall) :
Check radiator, heater and air con- ditioning hoses for leaks or da-
mage.
Check windshield washer spray and wiper operation. Clean wiper
blades with clean cloth dampened
with washer fluid.
Check headlight alignment.
Check muffler, exhaust pipes, shields and clamps.
Check the lap/shoulder belts for wear and function.
Check for worn tires and loose wheel lug nuts.
At least once a year :
Clean body and door drain holes.
Lubricate door hinges and checks,and hood hinges.
Lubricate door and hood locks and latches.
Lubricate door rubber weather- strips.
Check the air conditioning system before the warm weather season.
Check the power steering fluid level.
Inspect and lubricate automatic transaxle linkage and controls.
Clean battery and terminals.
Check the brake fluid level.
Page 269 of 315
Maintenance
24
7
1 23456789
DRIVE BELTS
Drive belts should be checked peri-
odically for proper tension and
adjusted if necessary. At the same
time, belts should be examined for
cracks, wear, fraying or other evi-
dence of deterioration and replaced
if necessary.
Belt routing should also be checked
to be sure there is no interference
between the belts and other parts of
the engine. After a belt is replaced,
the new belt should be adjusted
again after two or three weeks to
eliminate slack resulting from initial
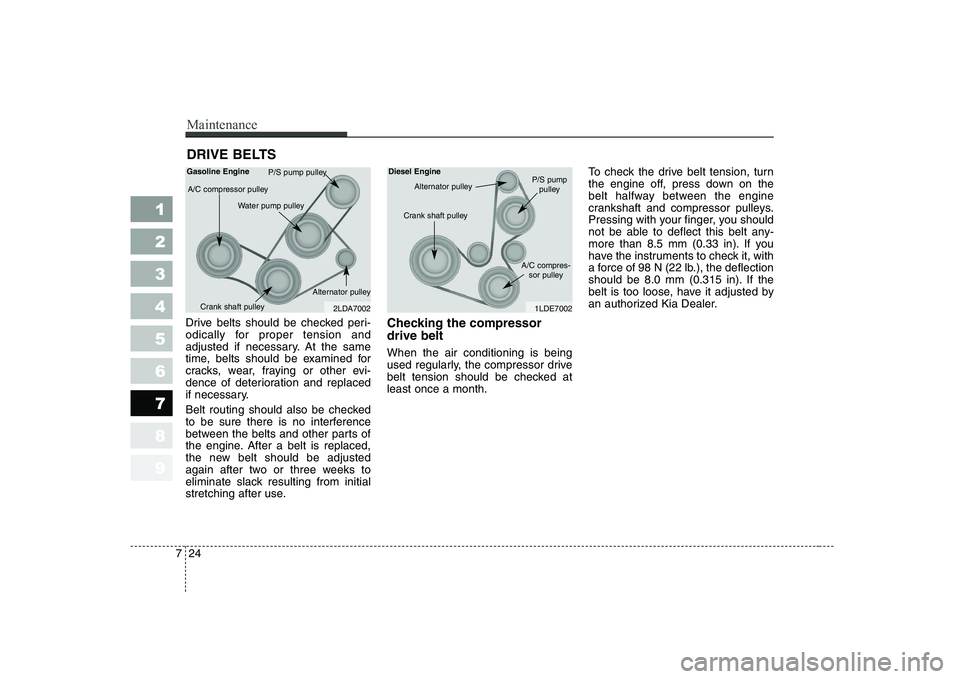
stretching after use. Checking the compressor drive belt When the air conditioning is being
used regularly, the compressor drive
belt tension should be checked atleast once a month.To check the drive belt tension, turn
the engine off, press down on the
belt halfway between the engine
crankshaft and compressor pulleys.
Pressing with your finger, you should
not be able to deflect this belt any-
more than 8.5 mm (0.33 in). If you
have the instruments to check it, with
a force of 98 N (22 lb.), the deflection
should be 8.0 mm (0.315 in). If the
belt is too loose, have it adjusted by
an authorized Kia Dealer.
2LDA7002
A/C compressor pulley
P/S pump pulley
Water pump pulley
Crank shaft pulley Alternator pulley
Gasoline Engine
1LDE7002
Diesel Engine
Crank shaft pulley
Alternator pulleyP/S pumppulley
A/C compres- sor pulley
Page 280 of 315
735
Maintenance
1 23456789
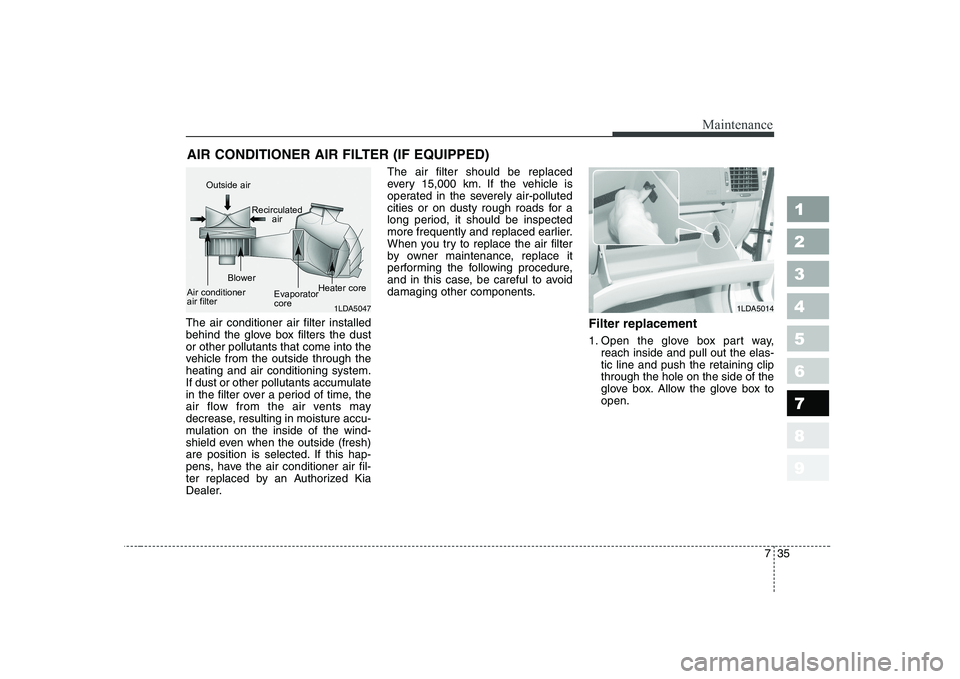
AIR CONDITIONER AIR FILTER (IF EQUIPPED)
The air conditioner air filter installed
behind the glove box filters the dustor other pollutants that come into the
vehicle from the outside through theheating and air conditioning system.
If dust or other pollutants accumulate
in the filter over a period of time, the
air flow from the air vents may
decrease, resulting in moisture accu-
mulation on the inside of the wind-
shield even when the outside (fresh)
are position is selected. If this hap-
pens, have the air conditioner air fil-
ter replaced by an Authorized Kia
Dealer. The air filter should be replaced
every 15,000 km. If the vehicle is
operated in the severely air-polluted
cities or on dusty rough roads for a
long period, it should be inspected
more frequently and replaced earlier.
When you try to replace the air filter
by owner maintenance, replace it
performing the following procedure,
and in this case, be careful to avoid
damaging other components.
Filter replacement
1. Open the glove box part way,reach inside and pull out the elas- tic line and push the retaining clipthrough the hole on the side of the
glove box. Allow the glove box toopen.
1LDA50141LDA5047
Outside air
Recirculatedair
Air conditioner air filter Blower
EvaporatorcoreHeater core
Page:
< prev 1-8 9-16 17-24