Page 63 of 315
Knowing your vehicle
52
3
1 23456789
3. Route the lap belt through the
restraint according to the seat
manufacturer’s instructions.
4. Buckle the seat belt and adjust the lap belt for a snug hold on the child
restraint by pulling on the loose
end of the belt. After installation of
the child restraint system, try to
move it in all directions to be sure
the child restraint system issecurely installed.
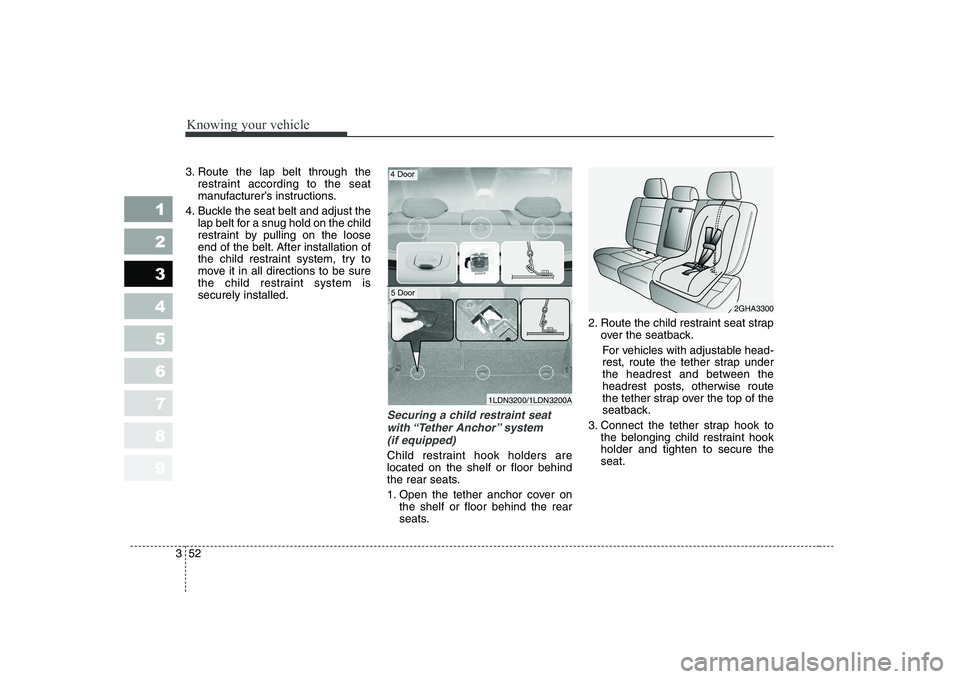
Securing a child restraint seat
with “Tether Anchor” system (if equipped)
Child restraint hook holders are located on the shelf or floor behind
the rear seats.
1. Open the tether anchor cover on the shelf or floor behind the rear
seats. 2. Route the child restraint seat strap
over the seatback.
For vehicles with adjustable head-
rest, route the tether strap under
the headrest and between the
headrest posts, otherwise route
the tether strap over the top of the
seatback.
3. Connect the tether strap hook to the belonging child restraint hookholder and tighten to secure theseat.
1LDN3200/1LDN3200A
2GHA3300
4 Door
5 Door
Page 64 of 315
353
1 23456789
Knowing your vehicle
Securing a child restraint systemwith “ISOFIX” system and “TetherAnchorage” system (if equipped)
ISOFIX is a standardised method of fitting child seats that eliminates theneed to use the standard adult seat
belt to secure the seat in the vehicle.
This enables a much more secure
and positive location with the added
benefit of easier and quicker installa-tion. An ISOFIX-seat can only be installed
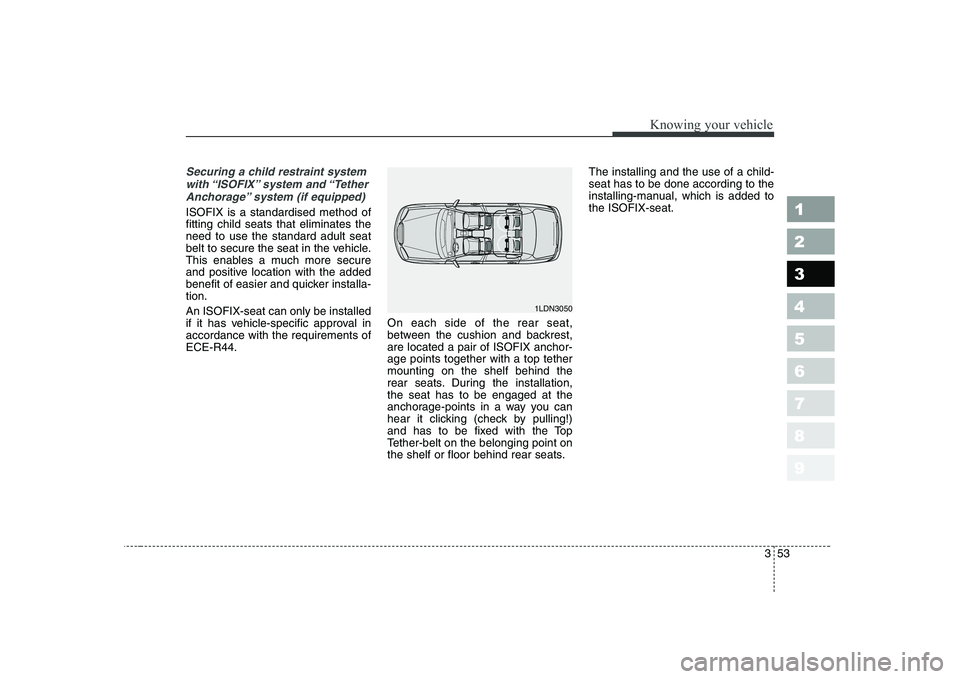
if it has vehicle-specific approval inaccordance with the requirements ofECE-R44. On each side of the rear seat,
between the cushion and backrest,are located a pair of ISOFIX anchor-age points together with a top tethermounting on the shelf behind the
rear seats. During the installation,the seat has to be engaged at the
anchorage-points in a way you can
hear it clicking (check by pulling!)
and has to be fixed with the Top
Tether-belt on the belonging point on
the shelf or floor behind rear seats.The installing and the use of a child-seat has to be done according to the
installing-manual, which is added tothe ISOFIX-seat.
1LDN3050
Page 65 of 315
Knowing your vehicle
54
3
1 23456789
(Continued)
Do not mount more than one
child restraint to a child
restraint lower anchorage
point. The improper increased
load may cause the anchorage
points or tether anchor to
break, causing serious injuryor death.
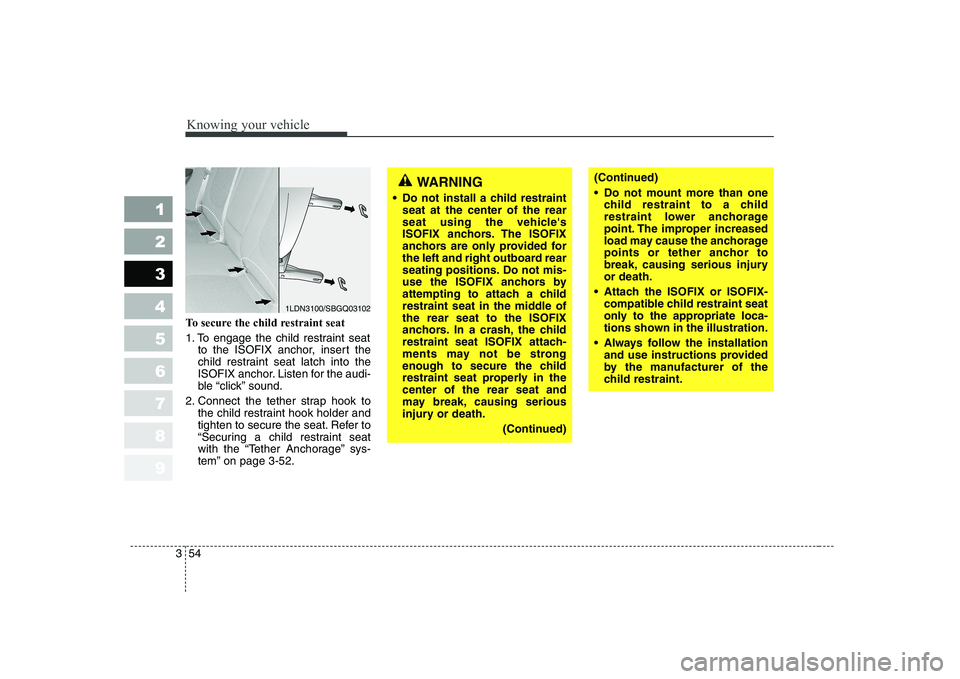
Attach the ISOFIX or ISOFIX- compatible child restraint seat
only to the appropriate loca-
tions shown in the illustration.
Always follow the installation and use instructions provided
by the manufacturer of the
child restraint.
To secure the child restraint seat
1. To engage the child restraint seat
to the ISOFIX anchor, insert the
child restraint seat latch into the
ISOFIX anchor. Listen for the audi-
ble “click” sound.
2. Connect the tether strap hook to the child restraint hook holder and
tighten to secure the seat. Refer to
“Securing a child restraint seat
with the “Tether Anchorage” sys-
tem” on page 3-52.
1LDN3100/SBGQ03102
WARNING
Do not install a child restraint seat at the center of the rear
seat using the vehicle's
ISOFIX anchors. The ISOFIX
anchors are only provided for
the left and right outboard rear
seating positions. Do not mis-
use the ISOFIX anchors by
attempting to attach a child
restraint seat in the middle ofthe rear seat to the ISOFIX
anchors. In a crash, the child
restraint seat ISOFIX attach-
ments may not be strong
enough to secure the child
restraint seat properly in thecenter of the rear seat and
may break, causing serious
injury or death.
(Continued)
Page 74 of 315
363
1 23456789
Knowing your vehicle
If the curtain airbag deploys, itremains inflated for approximately
3 seconds. The curtain airbag
deployment occurs only on the
side of the vehicle affected by theimpact.
The side airbags (side and/or cur- tain airbags) are not designed to
deploy during collisions from the
front or rear of the vehicle or in
most rollover situations.
The curtain airbags are designed to deploy only during certain side-
impact collisions, depending on the
crash severity, angle, speed and
impact. The curtain airbags are not
designed to deploy in all side
impact situations.WARNING
In order for side airbags (side and curtain airbags) to pro-
vide its best protection, both
front seat occupants and both
outboard rear occupantsshould sit in an upright posi-
tion with the seat belts proper-
ly fastened. Especially, chil-
dren should sit in a proper
child restraint system.
When children are seated in the rear outboard seats, they
must be seated in the proper
child restraint system. Make
sure to put the child restraint
system as far away from the
door side as possible, and
secure the child restraint sys-
tem to be locked in position.
(Continued)(Continued)
Do not allow the passengersto lean their heads or bodies
onto doors, put their arms on
the doors, stretch their arms
out of the window, or place
objects between the doors
and passengers when they areseated on the seats where
side airbags are equipped.
Never try to open or repair any components of the side cur-
tain airbag system. This
should be done only by an
authorized Kia dealer.
Failure to follow the above men-tioned instructions can result in
injury or death to the vehicleoccupants in an accident.
Page 82 of 315
371
1 23456789
Knowing your vehicle
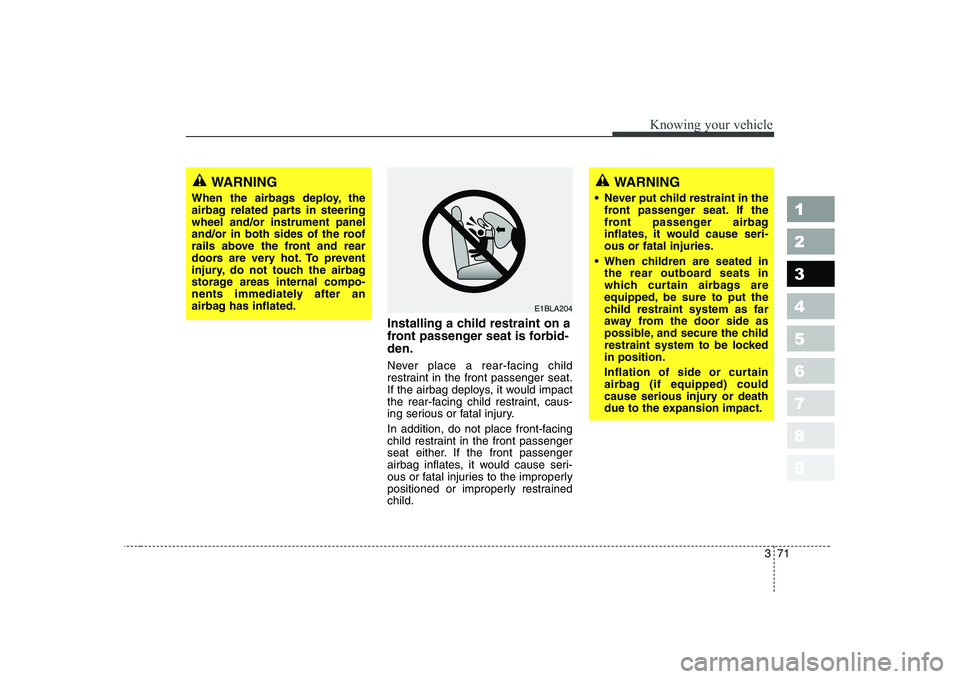
Installing a child restraint on a
front passenger seat is forbid-den.
Never place a rear-facing child
restraint in the front passenger seat.
If the airbag deploys, it would impact
the rear-facing child restraint, caus-
ing serious or fatal injury.
In addition, do not place front-facing
child restraint in the front passenger
seat either. If the front passenger
airbag inflates, it would cause seri-
ous or fatal injuries to the improperly
positioned or improperly restrainedchild.
WARNING
Never put child restraint in the front passenger seat. If the
front passenger airbag
inflates, it would cause seri-ous or fatal injuries.
When children are seated in the rear outboard seats in
which curtain airbags are
equipped, be sure to put the
child restraint system as far
away from the door side as
possible, and secure the child
restraint system to be lockedin position.
Inflation of side or curtain
airbag (if equipped) could
cause serious injury or death
due to the expansion impact.WARNING
When the airbags deploy, the
airbag related parts in steeringwheel and/or instrument panel
and/or in both sides of the roof
rails above the front and rear
doors are very hot. To prevent
injury, do not touch the airbag
storage areas internal compo-
nents immediately after an
airbag has inflated.
E1BLA204
Page 86 of 315
375
1 23456789
Knowing your vehicle
Outside the vehicle
To open the trunk, insert the keyinto the lock and turn it clockwise (➀ ). To close the trunk, use both hands
to push the trunk lid down. Check
to see if the trunk is completelyshut.
Trunk can be opened with transmit- ter (if equipped).Trunk room lamp
Trunk room lamp turns on when the
trunk is opened. It remains on until
the trunk is securely closed.
TRUNK (IF EQUIPPED)
1LDN20141LDA2015
Page 87 of 315
Knowing your vehicle
76
3
1 23456789
✽✽
NOTICE
Make sure to close the trunk secure-
ly. If it remains open while engine isnot running, it may cause battery
discharge because trunk room lamp
remains on.
Inside the vehicle
To open the trunk from inside the
vehicle push trunk lid release switch.
WARNING - Exhaust fumes
If you drive with the trunk lid
open, you will draw dangerous
exhaust fumes into your vehicle
causing serious injury or death
to vehicle occupants. Open
trunk lids can also dangerously
obscure rear view vision.
If you must drive with the trunk
lid open, keep the air vents open
so that additional outside air
comes into the vehicle.
1LDN2016
Page 90 of 315
379
1 23456789
Knowing your vehicle
Closing the hood
1. Before closing the hood, check thefollowing:
ment must be correctly installed.
bustible material must be
removed from the engine com-
partment.
2. Secure the support rod in its clip.
3. Lower the hood to about 30 cm (12 inches) height and then let it
drop to properly lock in place.
Make sure the hood is properly
locked before driving.CAUTION
Before closing the hood, make sure that all engine parts andtools have been removed fromthe engine area and that noone’s hands are near the hood opening.
Do not leave gloves, rags or any other combustible materi-al in the engine compartment.Doing so may cause a heat- induced fire.