Page 500 of 4449

TROUBLE DIAGNOSIS
ATC-71
C
D
E
F
G
H
I
K
L
MA
B
AT C
Revision: 2004 November 2004 FX35/FX45
SYSTEM DESCRIPTION
Component Parts
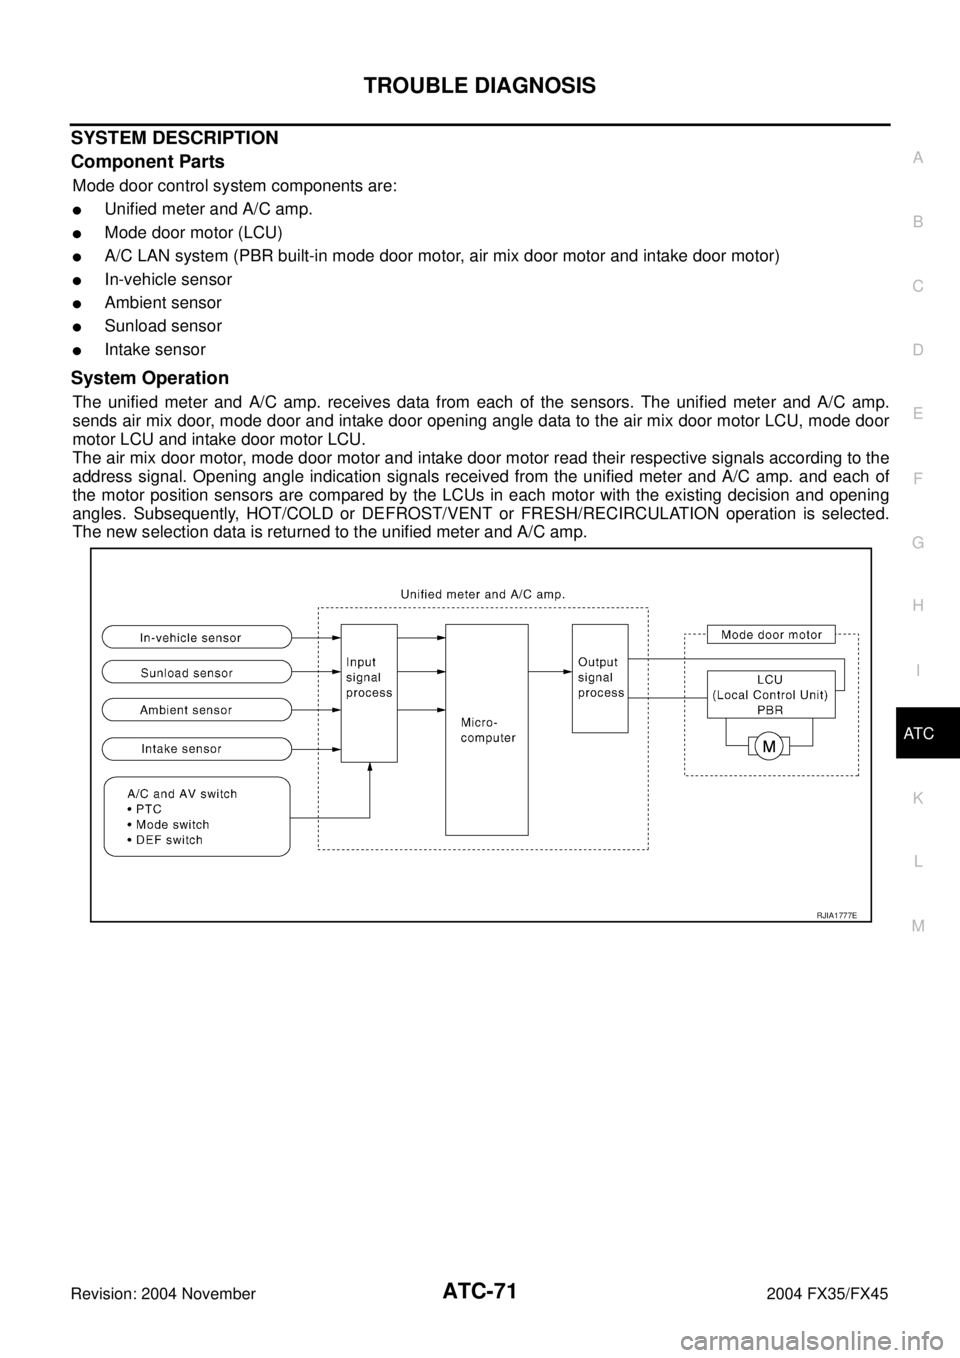
Mode door control system components are:
�Unified meter and A/C amp.
�Mode door motor (LCU)
�A/C LAN system (PBR built-in mode door motor, air mix door motor and intake door motor)
�In-vehicle sensor
�Ambient sensor
�Sunload sensor
�Intake sensor
System Operation
The unified meter and A/C amp. receives data from each of the sensors. The unified meter and A/C amp.
sends air mix door, mode door and intake door opening angle data to the air mix door motor LCU, mode door
motor LCU and intake door motor LCU.
The air mix door motor, mode door motor and intake door motor read their respective signals according to the
address signal. Opening angle indication signals received from the unified meter and A/C amp. and each of
the motor position sensors are compared by the LCUs in each motor with the existing decision and opening
angles. Subsequently, HOT/COLD or DEFROST/VENT or FRESH/RECIRCULATION operation is selected.
The new selection data is returned to the unified meter and A/C amp.
RJIA1777E
Page 503 of 4449

ATC-74
TROUBLE DIAGNOSIS
Revision: 2004 November 2004 FX35/FX45
SYSTEM DESCRIPTION
Component Parts
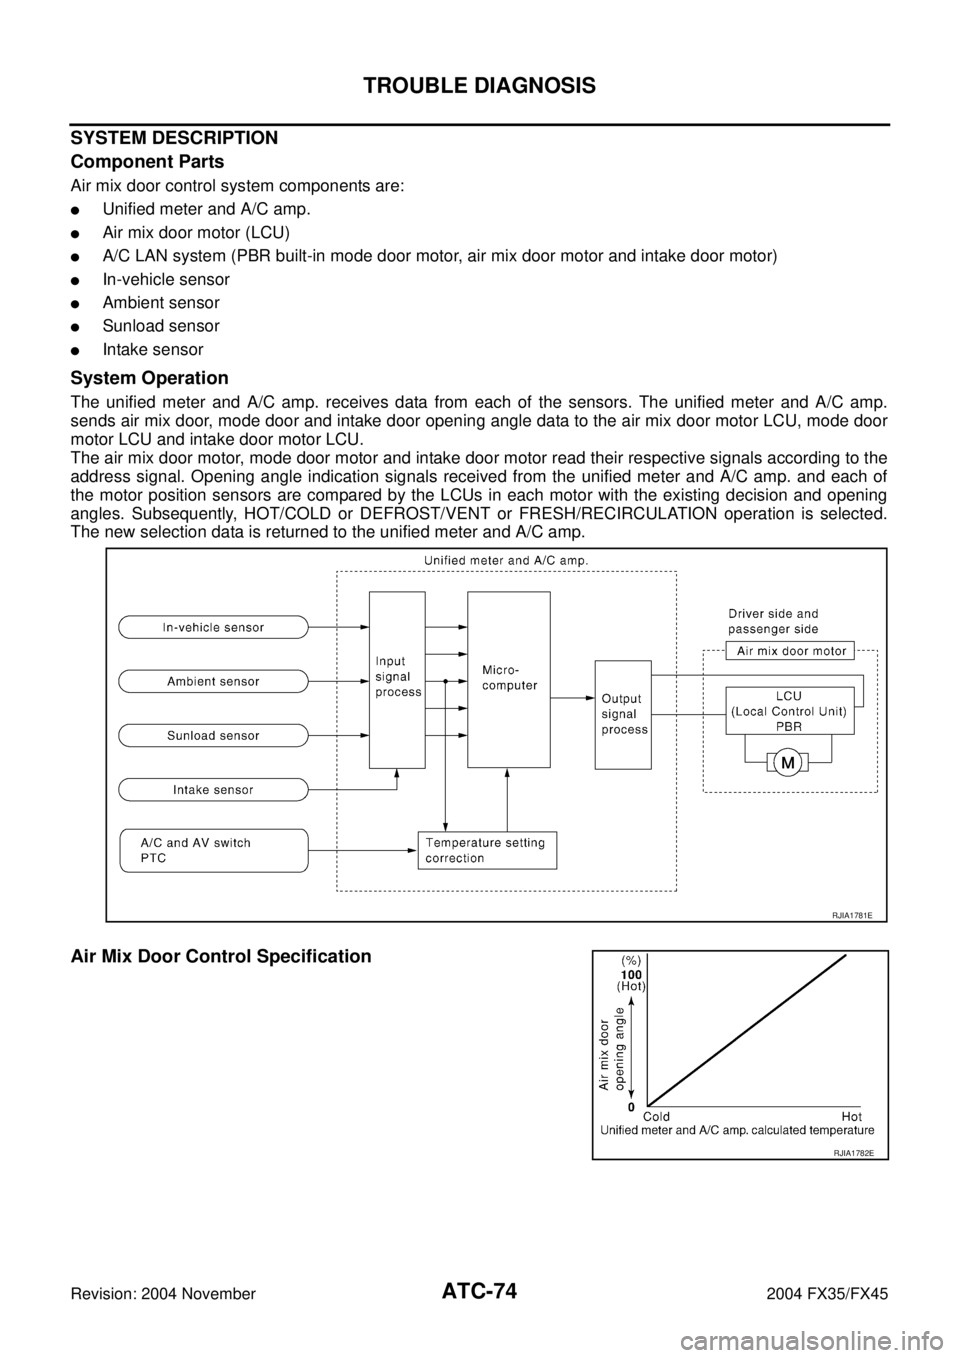
Air mix door control system components are:
�Unified meter and A/C amp.
�Air mix door motor (LCU)
�A/C LAN system (PBR built-in mode door motor, air mix door motor and intake door motor)
�In-vehicle sensor
�Ambient sensor
�Sunload sensor
�Intake sensor
System Operation
The unified meter and A/C amp. receives data from each of the sensors. The unified meter and A/C amp.
sends air mix door, mode door and intake door opening angle data to the air mix door motor LCU, mode door
motor LCU and intake door motor LCU.
The air mix door motor, mode door motor and intake door motor read their respective signals according to the
address signal. Opening angle indication signals received from the unified meter and A/C amp. and each of
the motor position sensors are compared by the LCUs in each motor with the existing decision and opening
angles. Subsequently, HOT/COLD or DEFROST/VENT or FRESH/RECIRCULATION operation is selected.
The new selection data is returned to the unified meter and A/C amp.
Air Mix Door Control Specification
RJIA1781E
RJIA1782E
Page 511 of 4449

ATC-82
TROUBLE DIAGNOSIS
Revision: 2004 November 2004 FX35/FX45
1. CHECK POWER SUPPLY FOR BLOWER MOTOR
1. Disconnect blower motor connector.
2. Turn ignition switch ON.
3. Check voltage between blower motor harness connector M78
terminal 1 (L/W) and ground.
OK or NG
OK >> GO TO 2.
NG >> Check power supply circuit and 15A fuses [Nos. 10 and
11, located in the fuse block (J/B)]. Refer to PG-83,
"FUSE BLOCK - JUNCTION BOX (J/B)" .
�If OK, check for open circuit in wiring harness. Repair or replace if necessary.
�If NG, replace fuse and check wiring harness for short circuit. Repair or replace if necessary.
2. CHECK BLOWER MOTOR GROUND CIRCUIT
1. Turn ignition switch OFF.
2. Check continuity between blower motor harness connector M78
terminal 3 (B) and ground.
OK or NG
OK >> GO TO 3.
NG >> Repair harness or connector.
3. CHECK CIRCUIT CONTINUITY BETWEEN BLOWER MOTOR AND UNIFIED METER AND A/C AMP.
1. Disconnect unified meter and A/C amp. connector.
2. Check continuity between blower motor harness connector M78
terminal 2 (G) and unified meter and A/C amp. harness connec-
tor M57 terminal 53 (G).
OK or NG
OK >> GO TO 4.
NG >> Repair harness or connector.
4. CHECK UNIFIED METER AND A/C AMP. OUTPUT SIGNAL
1. Reconnect blower motor connector and unified meter and A/C amp. connector.
2. Turn ignition switch ON.
3. Vary the fan speed between Lo and Hi and confirm the duty
ratios between blower motor harness connector M78 terminal 21 – Ground : Battery voltage
RJIA1997E
3 – Ground : Continuity should exist.
RJIA1998E
2 – 53 : Continuity should exist.
RJIA1999E
RJIA2000E
Page 514 of 4449
TROUBLE DIAGNOSIS
ATC-85
C
D
E
F
G
H
I
K
L
MA
B
AT C
Revision: 2004 November 2004 FX35/FX45
SYSTEM DESCRIPTION
Unified meter and A/C amp. controls compressor operation by ambient temperature, intake air temperature
and signal from ECM.
Low Temperature Protection Control
Unified meter and A/C amp. will turn the compressor ON or OFF as determined by a signal detected by ambi-
ent sensor and intake sensor.
When ambient temperature is higher than −2°C (28°F), the compres-
sor turns ON. The compressor turns OFF when ambient temperature
is lower than −5°C (23°F).
When intake air temperature is higher than 1°C (34°F), the compres-
sor turns ON. The compressor turns OFF when intake air tempera-
ture is lower than −5°C (23°F).
DIAGNOSTIC PROCEDURE FOR MAGNET CLUTCH
SYMPTOM: Magnet clutch does not engage when A/C switch is ON.
RHA094GB
SJIA0267E
RJIA2003E
Page 516 of 4449

TROUBLE DIAGNOSIS
ATC-87
C
D
E
F
G
H
I
K
L
MA
B
AT C
Revision: 2004 November 2004 FX35/FX45
5. CHECK BCM INPUT (COMPRESSOR ON) SIGNAL
Check compressor ON/OFF signal. Refer to AT C - 4 0 , "
CONSULT-II" .
OK or NG
OK >> GO TO 8.
NG >> GO TO 6.
6. CHECK CIRCUIT CONTINUITY BETWEEN BCM AND UNIFIED METER AND A/C AMP.
1. Turn ignition switch OFF.
2. Disconnect BCM connector and unified meter and A/C amp.
connector.
3. Check continuity between BCM harness connector M3 terminal
27 (R/Y) and unified meter and A/C amp. harness connector
M57 terminal 42 (R/Y).
OK or NG
OK >> GO TO 7.
NG >> Repair harness or connector.
7. CHECK VOLTAGE FOR UNIFIED METER AND A/C AMP. (COMPRESSOR ON SIGNAL)
1. Reconnect BCM connector and unified meter and A/C amp.
connector.
2. Turn ignition switch ON.
3. Check voltage between unified meter and A/C amp. harness
connector M57 terminal 42 (R/Y) and ground.
OK or NG
OK >> GO TO 8.
NG-1 >> If the voltage is approx. 5V when A/C switch is ON: Replace unified meter and A/C amp.
NG-2 >> If the voltage is approx. 0V when A/C switch is OFF: Replace BCM.A/C SW ON : AIR COND SW ON
A/C SW OFF : AIR COND SW OFF
R J I A 1111 E
27 – 42 : Continuity should exist.
RJIA2006E
Terminals
Condition Voltage (+)
(−) Unified meter
and A/C amp.
connectorTerminal No.
(wire color)
M57 42 (R/Y) GroundA/C switch: ON Approx. 0V
A/C switch: OFF Approx. 5V
RJIA2007E
Page 517 of 4449

ATC-88
TROUBLE DIAGNOSIS
Revision: 2004 November 2004 FX35/FX45
8. CHECK REFRIGERANT PRESSURE SENSOR
WITH CONSULT-II
1. Start the engine.
2. Check voltage of refrigerant pressure sensor. Refer to EC-125, "
CONSULT-II Reference Value in Data
Monitor" (VQ35DE) or EC-775, "CONSULT-II Reference Value in Data Monitor" (VK45DE).
WITHOUT CONSULT-II
1. Start the engine.
2. Check voltage between ECM harness connector F101 terminal
70 (L/R) and ground.
OK or NG
OK >>�WITH CONSULT-II
GO TO 9.
�WITHOUT CONSULT-II
GO TO 10.
NG >> Refer to EC-609, "
REFRIGERANT PRESSURE SENSOR" (VQ35DE) or EC-1287, "REFRIGER-
ANT PRESSURE SENSOR" (VK45DE).
9. CHECK BCM INPUT (FAN ON) SIGNAL
Check FAN ON/OFF signal. Refer to AT C - 4 0 , "
CONSULT-II" .
OK or NG
OK >> GO TO 12.
NG >> GO TO 10.
10. CHECK CIRCUIT CONTINUITY BETWEEN BCM AND UNIFIED METER AND A/C AMP.
1. Turn ignition switch OFF.
2. Disconnect BCM connector and unified meter and A/C amp.
connector.
3. Check continuity between BCM harness connector M3 terminal
28 (BR/Y) and unified meter and A/C amp. harness connector
M57 terminal 57 (BR/Y).
OK or NG
OK >> GO TO 11.
NG >> Repair harness or connector.
Te r m i n a l s
Condition Voltage (+)
(−)
ECM con-
nectorTerminal No.
(wire color)
F101 70 (L/R) Ground A/C switch: ON Approx. 1 - 4V
PBIB1188E
FAN SW ON :FAN ON SIG ON
FAN SW OFF :FAN ON SIG OFF
R J I A 1111 E
28 – 57 : Continuity should exist.
RJIA2009E
Page 518 of 4449

TROUBLE DIAGNOSIS
ATC-89
C
D
E
F
G
H
I
K
L
MA
B
AT C
Revision: 2004 November 2004 FX35/FX45
11 . CHECK VOLTAGE FOR UNIFIED METER AND A/C AMP. (FAN ON SIGNAL)
1. Reconnect BCM connector and unified meter and A/C amp.
connector.
2. Turn ignition switch ON.
3. Check voltage between unified meter and A/C amp. harness
connector M57 terminal 57 (BR/Y) and ground.
OK or NG
OK >> GO TO 12.
NG-1 >> If the voltage is approx. 5V when blower motor is ON: Replace unified meter and A/C amp.
NG-2 >> If the voltage is approx. 0V when blower motor is OFF: Replace BCM. Refer to BCS-15, "
Removal
and Installation of BCM" .
12. CHECK CAN COMMUNICATION
Check CAN communication. Refer to BCS-14, "
CAN Communication Inspection Using CONSULT-II (Self-
Diagnosis)" .
�BCM – ECM
�ECM – IPDM E/R
�ECM – Unified meter and A/C amp.
OK or NG
OK >> INSPECTION END
NG >> Repair or replace malfunctioning part(s).
Terminals
Condition Voltage (+)
(-) Unified meter
and A/C amp.
connectorTerminal No.
(wire color)
M57 57 (BR/Y) GroundA/C switch: ON
(Blower motor
operates)Approx. 0V
OFF switch: ON
(A/C system:
OFF)Approx. 5V
RJIA2010E
Page 528 of 4449

TROUBLE DIAGNOSIS
ATC-99
C
D
E
F
G
H
I
K
L
MA
B
AT C
Revision: 2004 November 2004 FX35/FX45
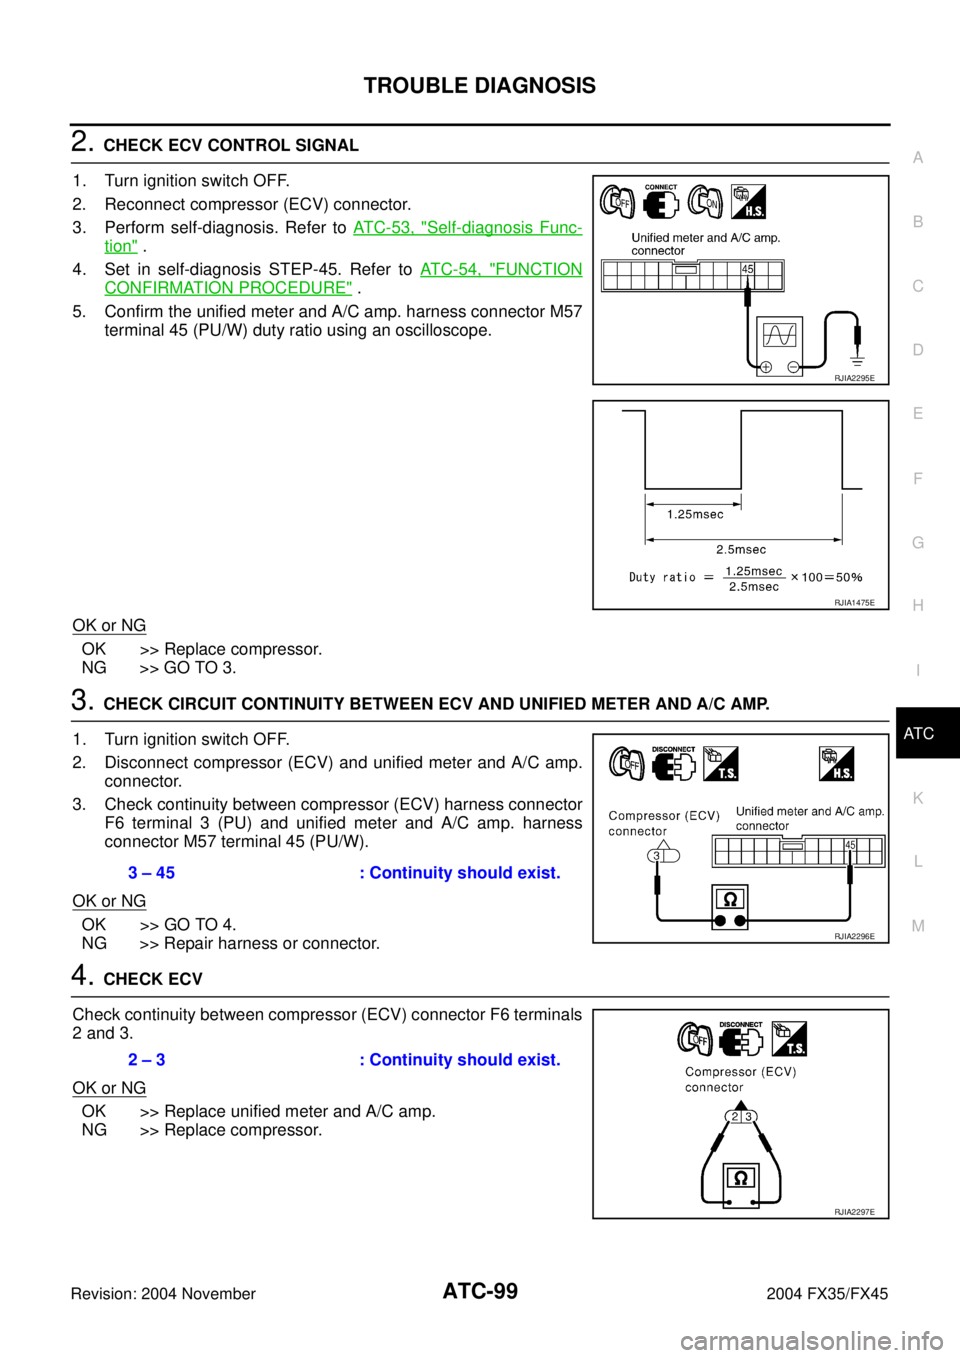
2. CHECK ECV CONTROL SIGNAL
1. Turn ignition switch OFF.
2. Reconnect compressor (ECV) connector.
3. Perform self-diagnosis. Refer to AT C - 5 3 , "
Self-diagnosis Func-
tion" .
4. Set in self-diagnosis STEP-45. Refer to AT C - 5 4 , "
FUNCTION
CONFIRMATION PROCEDURE" .
5. Confirm the unified meter and A/C amp. harness connector M57
terminal 45 (PU/W) duty ratio using an oscilloscope.
OK or NG
OK >> Replace compressor.
NG >> GO TO 3.
3. CHECK CIRCUIT CONTINUITY BETWEEN ECV AND UNIFIED METER AND A/C AMP.
1. Turn ignition switch OFF.
2. Disconnect compressor (ECV) and unified meter and A/C amp.
connector.
3. Check continuity between compressor (ECV) harness connector
F6 terminal 3 (PU) and unified meter and A/C amp. harness
connector M57 terminal 45 (PU/W).
OK or NG
OK >> GO TO 4.
NG >> Repair harness or connector.
4. CHECK ECV
Check continuity between compressor (ECV) connector F6 terminals
2 and 3.
OK or NG
OK >> Replace unified meter and A/C amp.
NG >> Replace compressor.
RJIA2295E
RJIA1475E
3 – 45 : Continuity should exist.
RJIA2296E
2 – 3 : Continuity should exist.
RJIA2297E