Page 3991 of 4449
RAX-10
REAR DRIVE SHAFT
Revision: 2004 November 2004 FX35/FX45
Disassembly and AssemblyADS000C8
DISASSEMBLY
Final Drive Side
1. Press shaft in a vice.
CAUTION:
When retaining drive shaft in a vise, always use copper or aluminum plates between vise and
shaft.
2. Remove boot bands.
3. If plug needs to be removed, move boot to wheel side, and drive it out with a plastic hammer.
4. Remove stopper ring with a flat-bladed screwdriver, and pull out
housing.
5. Remove snap ring, then remove ball cage/steel ball/inner race
assembly from shaft.
6. Remove boot from shaft.
7. Remove old grease on housing with paper towels.
1. Plug 2. Housing 3. Snap ring
4. Ball cage/Steel ball/Inner race
assembly5. Stopper ring 6. Boot band
7. Boot 8. Shaft 9. Circular clip
10. Joint sub-assembly
SDIA1488E
SRA249A
SFA514A
Page 3992 of 4449

REAR DRIVE SHAFT
RAX-11
C
E
F
G
H
I
J
K
L
MA
B
RAX
Revision: 2004 November 2004 FX35/FX45
Wheel Side
1. Place shaft in a vice.
CAUTION:
When retaining drive shaft in a vise, always use copper or aluminum plates between vise and
shaft.
2. Remove boot bands. Then remove boot from joint sub-assembly.
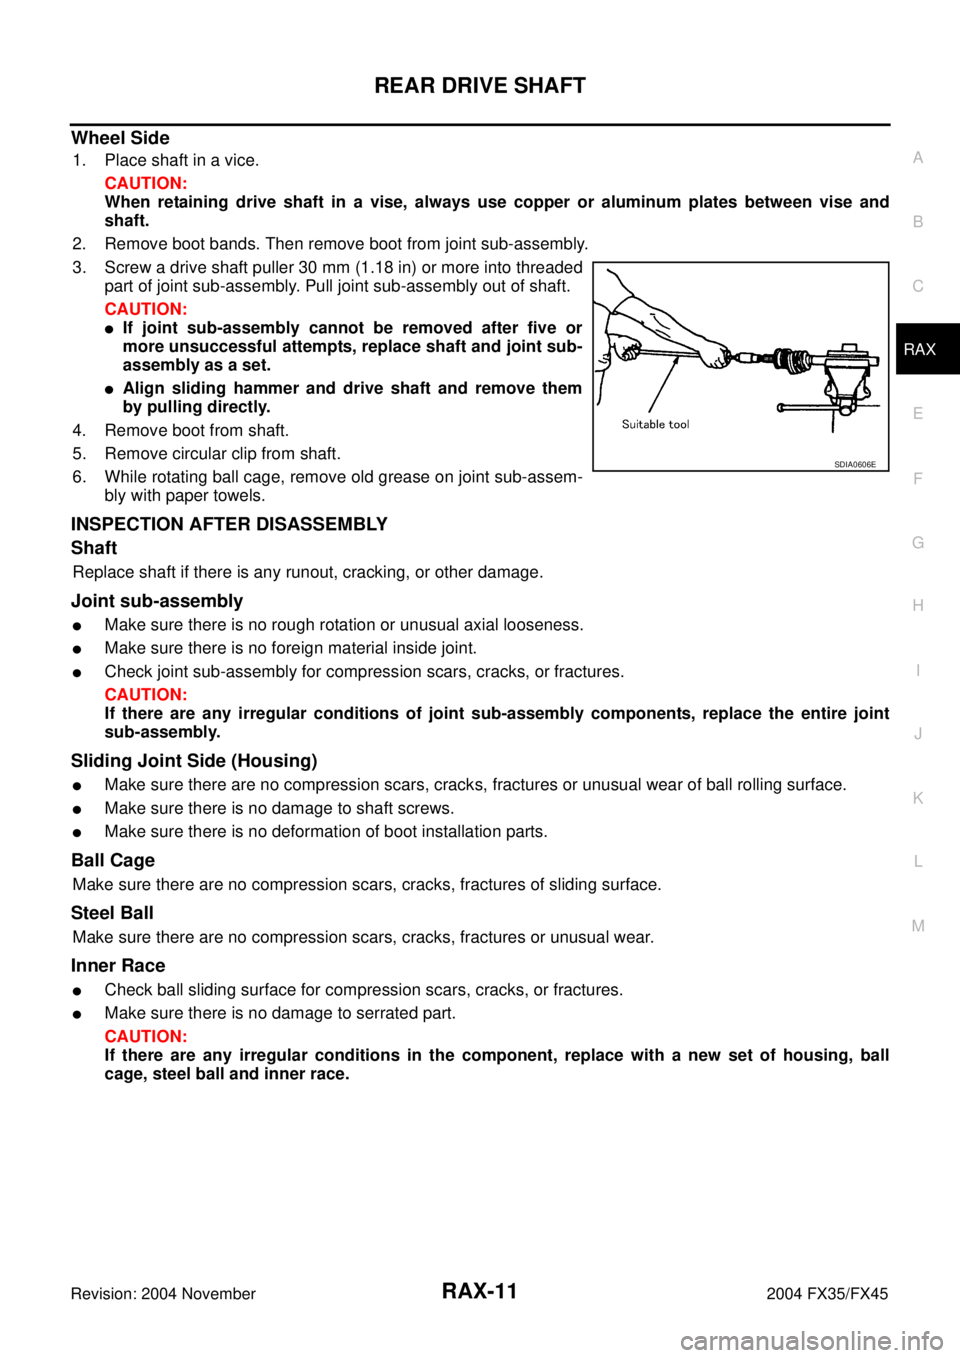
3. Screw a drive shaft puller 30 mm (1.18 in) or more into threaded
part of joint sub-assembly. Pull joint sub-assembly out of shaft.
CAUTION:
�If joint sub-assembly cannot be removed after five or
more unsuccessful attempts, replace shaft and joint sub-
assembly as a set.
�Align sliding hammer and drive shaft and remove them
by pulling directly.
4. Remove boot from shaft.
5. Remove circular clip from shaft.
6. While rotating ball cage, remove old grease on joint sub-assem-
bly with paper towels.
INSPECTION AFTER DISASSEMBLY
Shaft
Replace shaft if there is any runout, cracking, or other damage.
Joint sub-assembly
�Make sure there is no rough rotation or unusual axial looseness.
�Make sure there is no foreign material inside joint.
�Check joint sub-assembly for compression scars, cracks, or fractures.
CAUTION:
If there are any irregular conditions of joint sub-assembly components, replace the entire joint
sub-assembly.
Sliding Joint Side (Housing)
�Make sure there are no compression scars, cracks, fractures or unusual wear of ball rolling surface.
�Make sure there is no damage to shaft screws.
�Make sure there is no deformation of boot installation parts.
Ball Cage
Make sure there are no compression scars, cracks, fractures of sliding surface.
Steel Ball
Make sure there are no compression scars, cracks, fractures or unusual wear.
Inner Race
�Check ball sliding surface for compression scars, cracks, or fractures.
�Make sure there is no damage to serrated part.
CAUTION:
If there are any irregular conditions in the component, replace with a new set of housing, ball
cage, steel ball and inner race.
SDIA0606E
Page 3994 of 4449

REAR DRIVE SHAFT
RAX-13
C
E
F
G
H
I
J
K
L
MA
B
RAX
Revision: 2004 November 2004 FX35/FX45
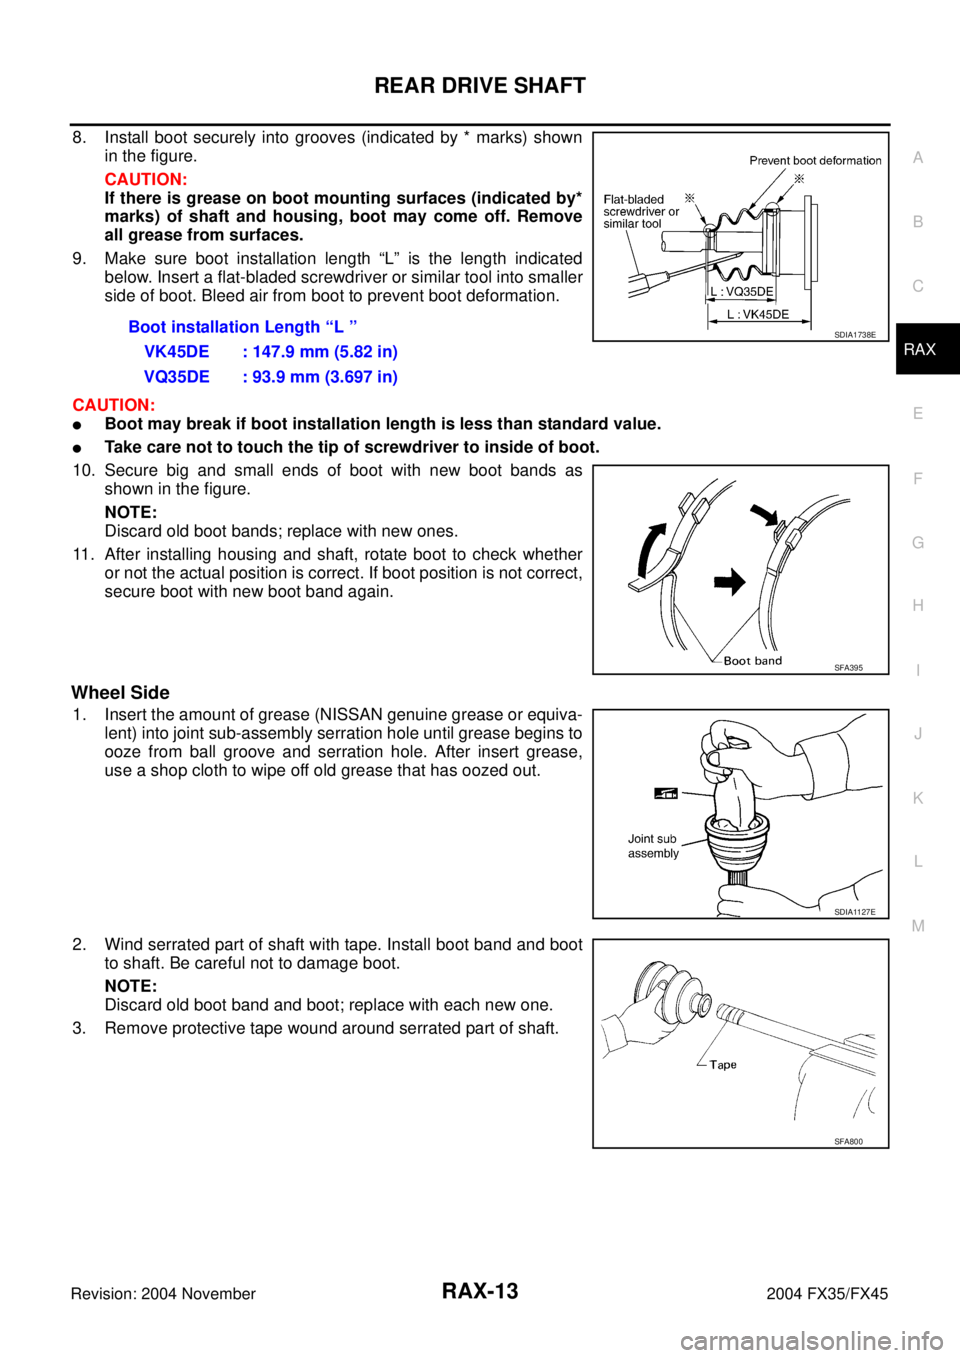
8. Install boot securely into grooves (indicated by * marks) shown
in the figure.
CAUTION:
If there is grease on boot mounting surfaces (indicated by*
marks) of shaft and housing, boot may come off. Remove
all grease from surfaces.
9. Make sure boot installation length “L” is the length indicated
below. Insert a flat-bladed screwdriver or similar tool into smaller
side of boot. Bleed air from boot to prevent boot deformation.
CAUTION:
�Boot may break if boot installation length is less than standard value.
�Take care not to touch the tip of screwdriver to inside of boot.
10. Secure big and small ends of boot with new boot bands as
shown in the figure.
NOTE:
Discard old boot bands; replace with new ones.
11. After installing housing and shaft, rotate boot to check whether
or not the actual position is correct. If boot position is not correct,
secure boot with new boot band again.
Wheel Side
1. Insert the amount of grease (NISSAN genuine grease or equiva-
lent) into joint sub-assembly serration hole until grease begins to
ooze from ball groove and serration hole. After insert grease,
use a shop cloth to wipe off old grease that has oozed out.
2. Wind serrated part of shaft with tape. Install boot band and boot
to shaft. Be careful not to damage boot.
NOTE:
Discard old boot band and boot; replace with each new one.
3. Remove protective tape wound around serrated part of shaft.Boot installation Length “L ”
VK45DE : 147.9 mm (5.82 in)
VQ35DE : 93.9 mm (3.697 in)
SDIA1738E
SFA395
SDIA1127E
SFA800
Page 3996 of 4449
SERVICE DATA
RAX-15
C
E
F
G
H
I
J
K
L
MA
B
RAX
Revision: 2004 November 2004 FX35/FX45
SERVICE DATAPFP:00030
Wheel BearingADS000C9
Drive ShaftADS000KS
Axial end play0 mm (0 in)
Rotational torqueAt a load of 49,033 N (5,000 kg, 11,000 lb)
Less than 2.7 N·m (0.28 kg-m, 24 in-lb)
Measurement of spring scale Less than 26.6 N (2.7 kg, 5.95 lb)
Measuring point (Brake caliper installation points)
SDIA0801E
Joint Wheel side Final drive side
Engine model VQ35DE VK45DE VQ35DE VK45DE
Grease quantity86 − 96 g
(3.03 − 3.39 oz)140 − 160 g
(4.93 − 5.64 oz)124 − 134 g
(4.37 − 4.73 oz)175 − 195 g
(6.17 − 6.88 oz)
Boots installed length 97 mm (3.82 in) 141.5 mm (5.57 in) 93.9 mm (3.697 in) 147.9 mm (5.82 in)
Page 4033 of 4449
RFD-6
NOISE, VIBRATION AND HARSHNESS (NVH) TROUBLESHOOTING
Revision: 2004 November 2004 FX35/FX45
NOISE, VIBRATION AND HARSHNESS (NVH) TROUBLESHOOTINGPFP:00003
NVH Troubleshooting ChartADS000JO
Use the chart below to help you find the cause of the symptom. If necessary, repair or replace these parts.
×: ApplicableReference page
Refer to RFD-18, "
INSPECTION
" .
Refer to RFD-24, "
TOOTH CONTACT
" .
Refer to RFD-18, "
INSPECTION
" .
Refer to RFD-13, "
Pre-Inspection
" .
—
Refer to MA-31, "
Checking Differential Gear Oil
" .
NVH in PR section.
NVH in FAX, RAX, FSU and RSU sections.
NVH in WT section.
NVH in WT section.
NVH in RAX section.
NVH in BR section.
NVH in PS section.
Possible cause and suspected parts
Rough gear tooth
Improper gear contact
Tooth surfaces worn
Incorrect backlash
Companion flange excessive runout
Improper gear oil
Propeller shaft
Axle and suspension
Tires
Road wheel
Drive shaft
Brakes
Steering
Symptom Differential Noise×××××××××××××
Page 4036 of 4449
SIDE OIL SEAL
RFD-9
C
E
F
G
H
I
J
K
L
MA
B
RFD
Revision: 2004 November 2004 FX35/FX45
SIDE OIL SEALPFP:33142
Removal and InstallationADS000JQ
REMOVAL
1. Remove side flange with the following procedure for press-fitting.
a. Remove ABS rear wheel sensor. Refer to BRC-57, "
WHEEL SENSORS" .
b. Remove drive shaft and axle assembly. Refer to RAX-9, "
REAR DRIVE SHAFT" and RAX-5, "WHEEL
HUB" .
c. Install axle stand to side flange, and then, pull out the side
flange with using a sliding hammer.
2. Remove side oil seal using a flat-bladed screwdriver.Engine model Toll number A Tool number B
VQ35DE KV40104100 ( – ) ST36230000
(J25840-A)
VK45DE KV40101000 ( – )
SDIA1582E
SDIA1583E
SDIA1584E
Page 4037 of 4449

RFD-10
SIDE OIL SEAL
Revision: 2004 November 2004 FX35/FX45
INSTALLATION
1. Apply multi-purpose grease to sealing lips of side oil seal.
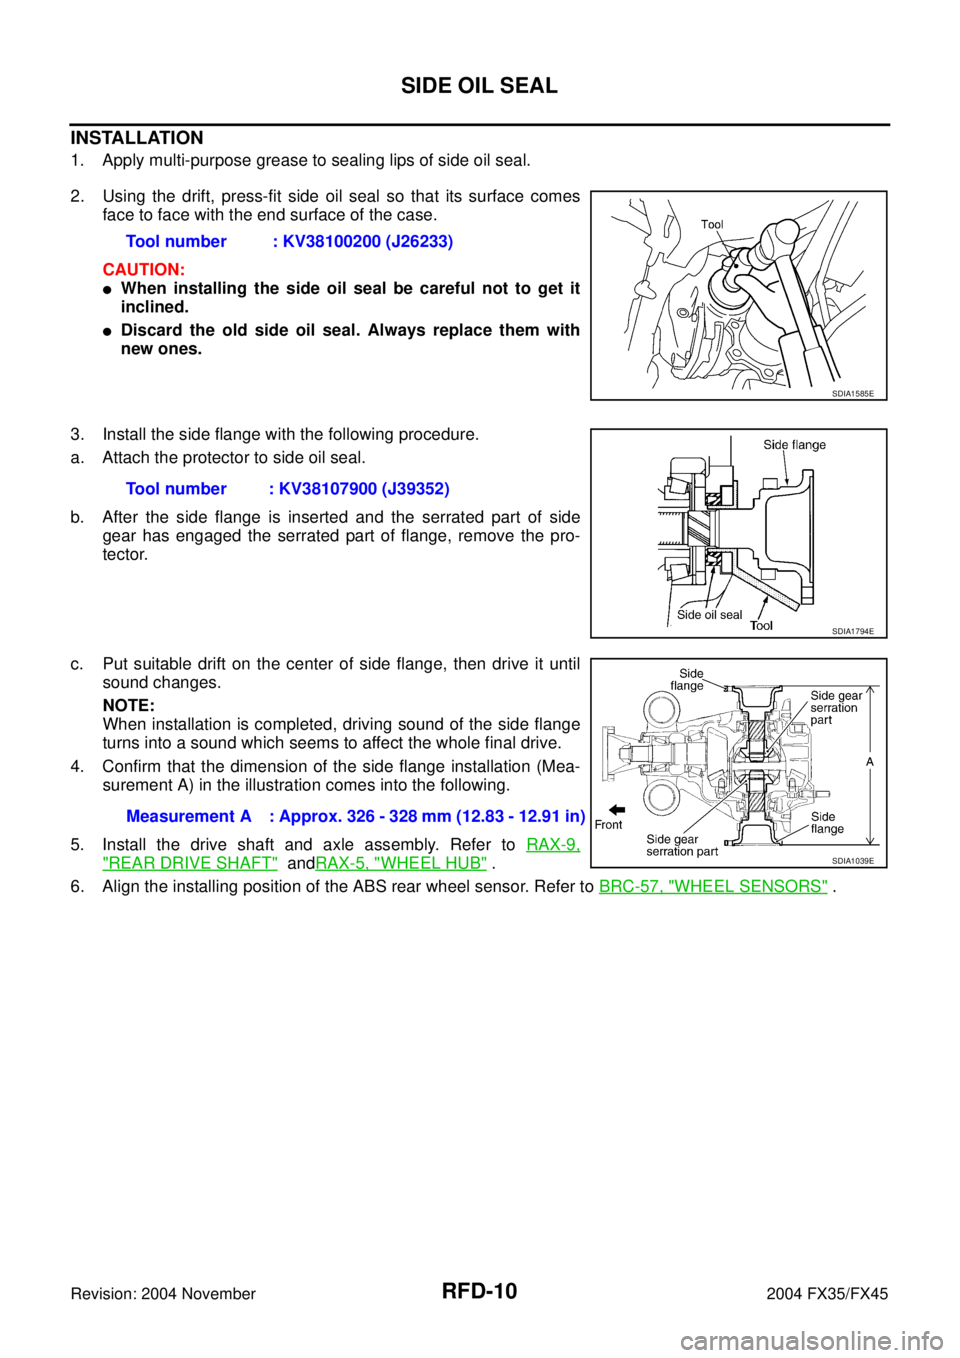
2. Using the drift, press-fit side oil seal so that its surface comes
face to face with the end surface of the case.
CAUTION:
�When installing the side oil seal be careful not to get it
inclined.
�Discard the old side oil seal. Always replace them with
new ones.
3. Install the side flange with the following procedure.
a. Attach the protector to side oil seal.
b. After the side flange is inserted and the serrated part of side
gear has engaged the serrated part of flange, remove the pro-
tector.
c. Put suitable drift on the center of side flange, then drive it until
sound changes.
NOTE:
When installation is completed, driving sound of the side flange
turns into a sound which seems to affect the whole final drive.
4. Confirm that the dimension of the side flange installation (Mea-
surement A) in the illustration comes into the following.
5. Install the drive shaft and axle assembly. Refer to RAX-9,
"REAR DRIVE SHAFT" andRAX-5, "WHEEL HUB" .
6. Align the installing position of the ABS rear wheel sensor. Refer to BRC-57, "
WHEEL SENSORS" . Tool number : KV38100200 (J26233)
SDIA1585E
Tool number : KV38107900 (J39352)
SDIA1794E
Measurement A : Approx. 326 - 328 mm (12.83 - 12.91 in)
SDIA1039E
Page 4038 of 4449

REAR FINAL DRIVE ASSEMBLY
RFD-11
C
E
F
G
H
I
J
K
L
MA
B
RFD
Revision: 2004 November 2004 FX35/FX45
REAR FINAL DRIVE ASSEMBLYPFP:38300
Removal and InstallationADS000JR
REMOVAL
1. Remove exhaust center tube. Refer to EX-3, "EXHAUST SYSTEM" .
2. Remove rear propeller shaft from the final drive. Refer to PR-8, "
REMOVAL" .
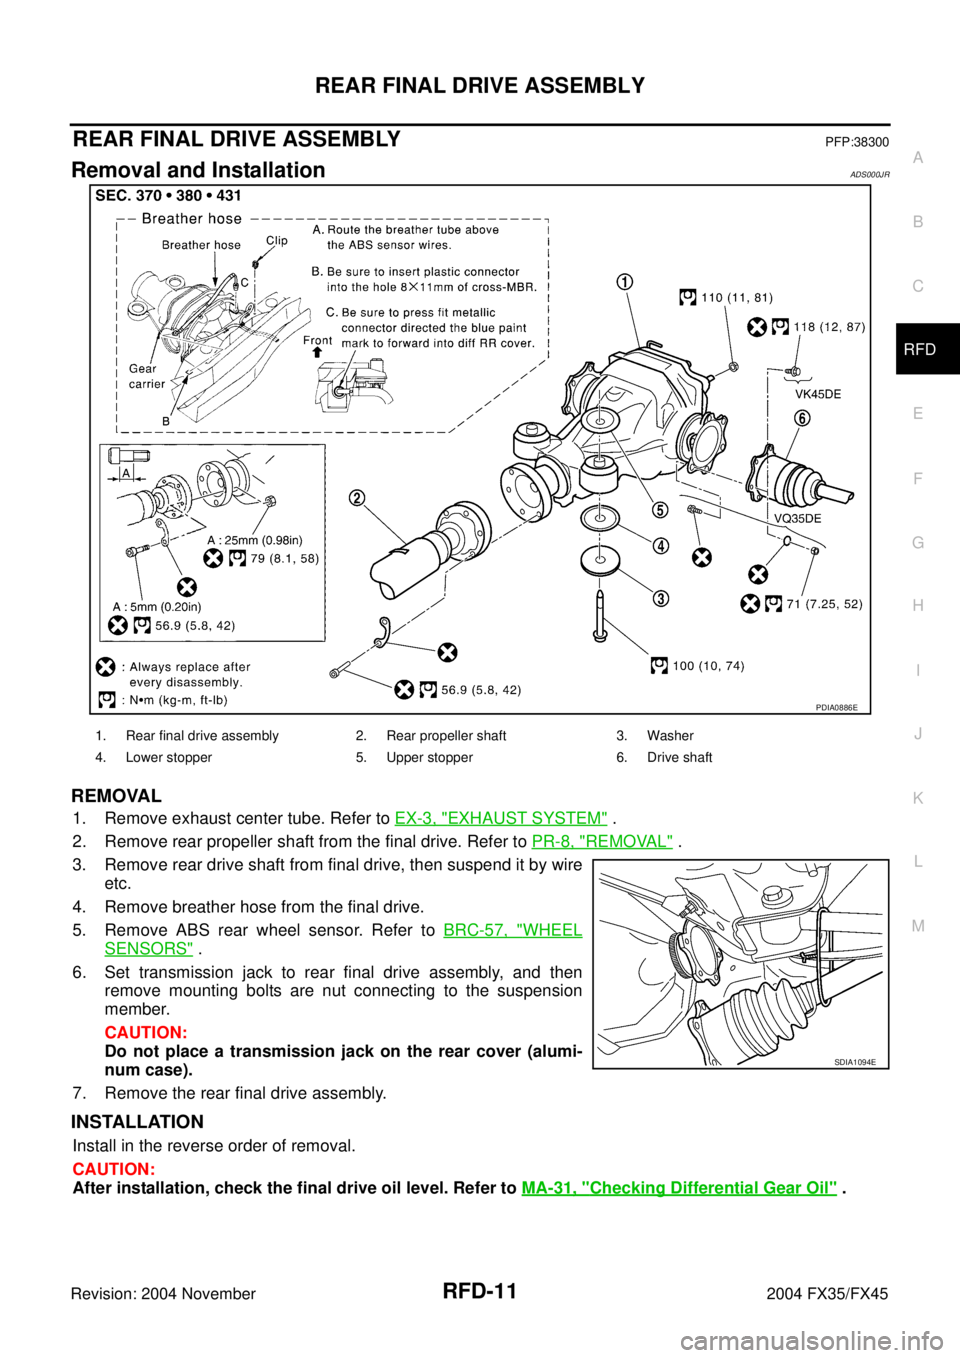
3. Remove rear drive shaft from final drive, then suspend it by wire
etc.
4. Remove breather hose from the final drive.
5. Remove ABS rear wheel sensor. Refer to BRC-57, "
WHEEL
SENSORS" .
6. Set transmission jack to rear final drive assembly, and then
remove mounting bolts are nut connecting to the suspension
member.
CAUTION:
Do not place a transmission jack on the rear cover (alumi-
num case).
7. Remove the rear final drive assembly.
INSTALLATION
Install in the reverse order of removal.
CAUTION:
After installation, check the final drive oil level. Refer to MA-31, "
Checking Differential Gear Oil" .
PDIA0886E
1. Rear final drive assembly 2. Rear propeller shaft 3. Washer
4. Lower stopper 5. Upper stopper 6. Drive shaft
SDIA1094E