Page 950 of 4449
INTELLIGENT KEY SYSTEM
BL-143
C
D
E
F
G
H
J
K
L
MA
B
BL
Revision: 2004 November 2004 FX35/FX45
2. DETENTION SWITCH CIRCUIT INSPECTION
1. Disconnect A/T device (detention switch) connector.
2. Check voltage between A/T device (detention switch) connector
M67 terminal 3 (R/Y) and ground. (Check harness for open.)
3. Check continuity between A/T device (detention switch) connec-
tor M67 terminals 3 (R/Y) and ground. (Check harness for
short.)
OK or NG
OK >> GO TO 3.
NG >> Repair or replace harness.
3. DETENTION SWITCH INSPECTION
Check continuity between A/T device (detention switch) terminals 2 and 3.
OK or NG
OK >> GO TO 4.
NG >> Replace back A/T device (detention switch).3 (R/Y) – Ground : Battery voltage
PIIA6806E
3 (R/Y) – Ground : Continuity should not exist.
PIIA6807E
Terminal Condition Continuity
2 – 3When selector lever is not
locked at the “P” positionNo
When selector lever is
locked at the “P” positionYe s
PIIA6808E
Page 951 of 4449

BL-144
INTELLIGENT KEY SYSTEM
Revision: 2004 November 2004 FX35/FX45
4. DETENTION SWITCH GROUND CIRCUIT INSPECTION
Check continuity between A/T device (detention switch) connector
M67 terminal 2 (B) and ground.
OK or NG
OK >> Check harness connection.
NG >> Repair or replace harness.
Check Select Unlock RelayAIS004NO
1. CHECK SELECT UNLOCK RELAY POWER SUPPLY
1. Turn ignition switch OFF.
2. Disconnect passenger side select unlock relay connector.
3. Check voltage between passenger side select unlock relay con-
nector M30 terminal 1 and ground.
OK or NG
OK >> GO TO 2.
NG >> Repair or replace passenger side select unlock relay power supply circuit.
2. CHECK HARNESS
1. Disconnect Intelligent Key unit connector.
2. Check continuity between passenger side select unlock relay
connector M30 terminal 2 and Intelligent Key unit connector
M34 terminal 40.
3. Check continuity between passenger side select unlock relay
connector M30 terminal 2 and ground.
OK or NG
OK >> Replace passenger side select unlock relay.
NG >> Repair or replace harness between passenger side select unlock relay and Intelligent Key unit.2 (B) – Ground : Continuity should exist.
PIIA6809E
1 (L/R) – Ground : Approx. 12V
PIIA6954E
2 (BR/W) – 40 (BR/W) : Continuity should exist.
2 (BR/W) – Ground : Continuity should not exist.
PIIA6955E
Page 956 of 4449

DOOR
BL-149
C
D
E
F
G
H
J
K
L
MA
B
BL
Revision: 2004 November 2004 FX35/FX45
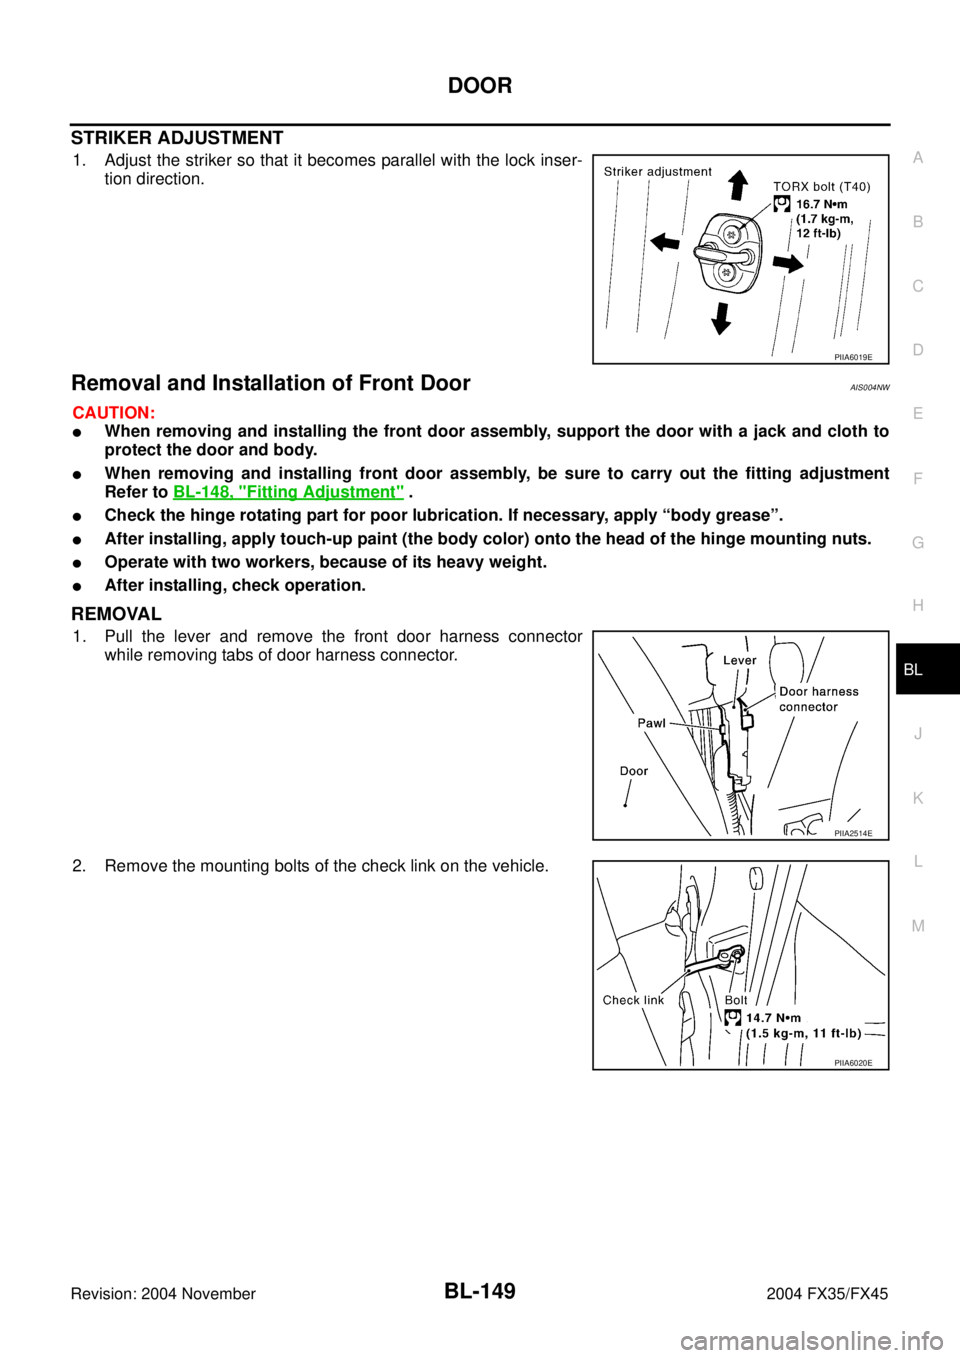
STRIKER ADJUSTMENT
1. Adjust the striker so that it becomes parallel with the lock inser-
tion direction.
Removal and Installation of Front DoorAIS004NW
CAUTION:
�When removing and installing the front door assembly, support the door with a jack and cloth to
protect the door and body.
�When removing and installing front door assembly, be sure to carry out the fitting adjustment
Refer to BL-148, "
Fitting Adjustment" .
�Check the hinge rotating part for poor lubrication. If necessary, apply “body grease”.
�After installing, apply touch-up paint (the body color) onto the head of the hinge mounting nuts.
�Operate with two workers, because of its heavy weight.
�After installing, check operation.
REMOVAL
1. Pull the lever and remove the front door harness connector
while removing tabs of door harness connector.
2. Remove the mounting bolts of the check link on the vehicle.
PIIA6019E
PIIA2514E
PIIA6020E
Page 959 of 4449

BL-152
FRONT DOOR LOCK
Revision: 2004 November 2004 FX35/FX45
FRONT DOOR LOCKPFP:80502
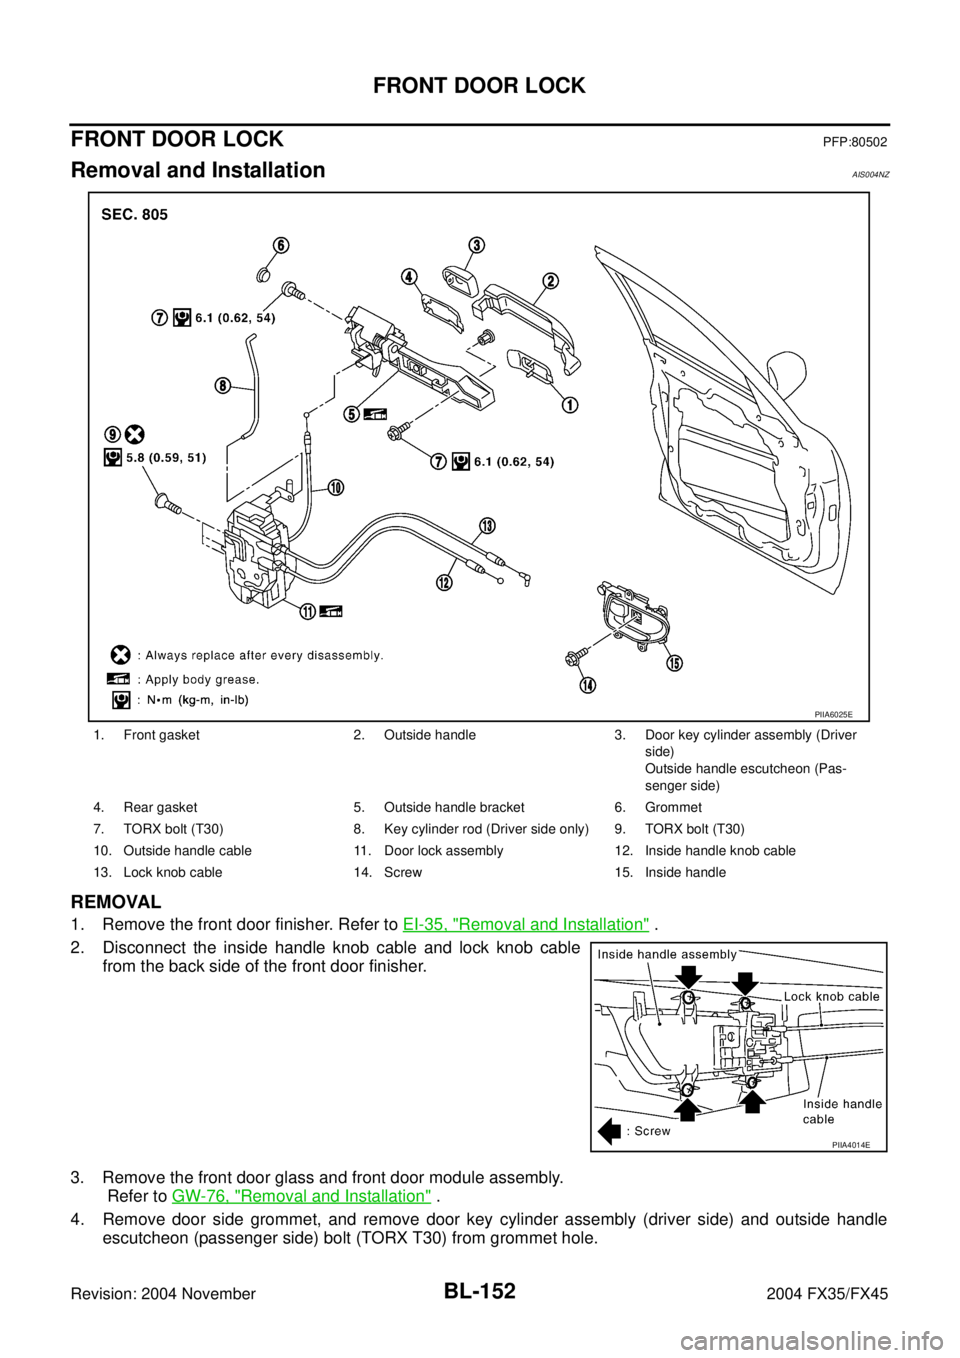
Removal and InstallationAIS004NZ
REMOVAL
1. Remove the front door finisher. Refer to EI-35, "Removal and Installation" .
2. Disconnect the inside handle knob cable and lock knob cable
from the back side of the front door finisher.
3. Remove the front door glass and front door module assembly.
Refer to GW-76, "
Removal and Installation" .
4. Remove door side grommet, and remove door key cylinder assembly (driver side) and outside handle
escutcheon (passenger side) bolt (TORX T30) from grommet hole.
1. Front gasket 2. Outside handle 3. Door key cylinder assembly (Driver
side)
Outside handle escutcheon (Pas-
senger side)
4. Rear gasket 5. Outside handle bracket 6. Grommet
7. TORX bolt (T30) 8. Key cylinder rod (Driver side only) 9. TORX bolt (T30)
10. Outside handle cable 11. Door lock assembly 12. Inside handle knob cable
13. Lock knob cable 14. Screw 15. Inside handle
PIIA6025E
PIIA4014E
Page 960 of 4449
FRONT DOOR LOCK
BL-153
C
D
E
F
G
H
J
K
L
MA
B
BL
Revision: 2004 November 2004 FX35/FX45
CAUTION:
Do not forcibly remove the TORX bolt (T30).
5. Reach to separate the key cylinder rod connection (on the handle).
6. While pulling the outside handle, remove door key cylinder
assembly (driver side) and outside handle escutcheon (passen-
ger side).
7. Disconnect the door request switch connector. (intelligent key only)
8. While pulling outside handle, slide toward rear of vehicle to
remove outside handle.
9. Remove the front gasket and rear gasket.
PIIA3553E
PIIA3554E
PIIA3555E
PIIA3557E
Page 961 of 4449
BL-154
FRONT DOOR LOCK
Revision: 2004 November 2004 FX35/FX45
10. Remove the TORX bolt (T30) of the outside handle bracket.
11. While pulling outside handle bracket, slide toward front of vehi-
cle to remove outside handle bracket.
12. Reach to separate outside handle cable connection.
13. Remove the TORX bolts (T30) of door lock assembly.
14. Disconnect the door lock actuator connector and remove door lock assembly.
INSTALLATION
Install in the reverse order of removal.
CAUTION:
To install each rod, be sure to rotate the rod holder until a click is felt.
PIIA7117E
PIIA3558E
PIIA6026E
PIIA1090E
Page 962 of 4449
FRONT DOOR LOCK
BL-155
C
D
E
F
G
H
J
K
L
MA
B
BL
Revision: 2004 November 2004 FX35/FX45
Disassembly and AssemblyAIS004O1
DOOR KEY CYLINDER ASSEMBLY
Remove the key cylinder escutcheon pawl and remove the door key cylinder.
1. Door key cylinder assembly 2. Key cylinder escutcheon 3. Door key cylinder
PIIA6431E
Page 963 of 4449
BL-156
REAR DOOR LOCK
Revision: 2004 November 2004 FX35/FX45
REAR DOOR LOCKPFP:82502
Removal and InstallationAIS004O2
REMOVAL
1. Remove the rear door finisher. Refer to EI-35, "Removal and Installation" .
2. Disconnect the inside handle knob cable and lock knob cable
from the back side of the front door finisher.
3. Remove the rear door sealing, glass and corner piece assembly. Refer to GW-80, "
Removal and Installa-
tion" .
4. Remove door side grommet, and remove outside handle escutcheon bolt (TORX T30) from grommet
hole.
1. Front gasket 2. Outside handle 3. Outside handle escutcheon
4. Rear gasket 5. Outside handle bracket 6. Grommet
7. TORX bolt (T30) 8. Outside handle cable 9. TORX bolts (T30)
10. Door lock assembly 11. Inside handle knob cable 12. Lock knob cable
13. Screw 14. Inside handle
PIIA6027E
PIIA4014E