2004 Hyundai Tiburon wheel
[x] Cancel search: wheelPage 149 of 224

3WHAT TO DO IN AN EMERGENCY
11IF YOUR CAR MUST BE TOWED
!
D080A01A-AAT D060I01E-AAT
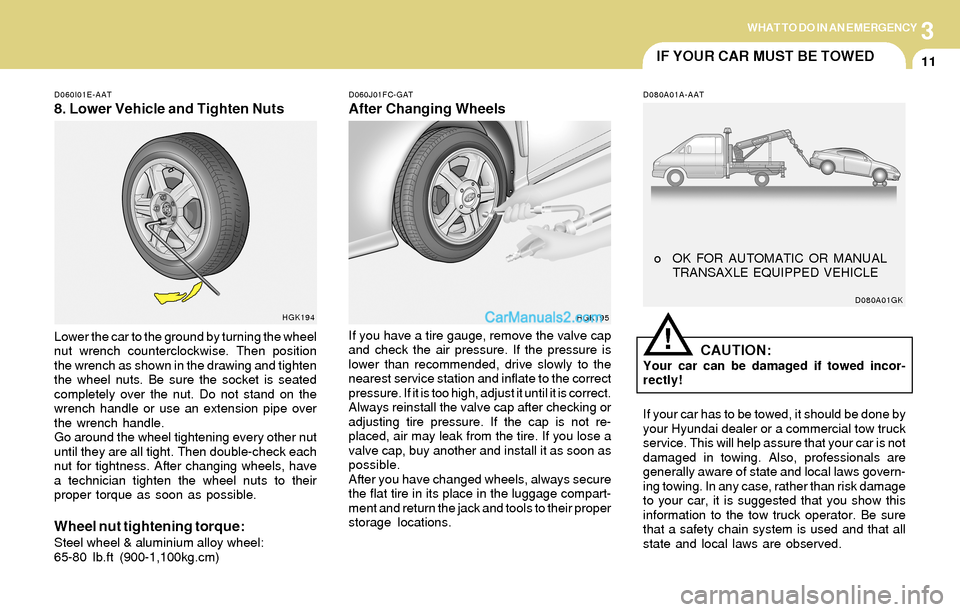
8. Lower Vehicle and Tighten Nuts
D060J01FC-GAT
After Changing Wheels
Lower the car to the ground by turning the wheel
nut wrench counterclockwise. Then position
the wrench as shown in the drawing and tighten
the wheel nuts. Be sure the socket is seated
completely over the nut. Do not stand on the
wrench handle or use an extension pipe over
the wrench handle.
Go around the wheel tightening every other nut
until they are all tight. Then double-check each
nut for tightness. After changing wheels, have
a technician tighten the wheel nuts to their
proper torque as soon as possible.
Wheel nut tightening torque:Steel wheel & aluminium alloy wheel:
65-80 lb.ft (900-1,100kg.cm)If you have a tire gauge, remove the valve cap
and check the air pressure. If the pressure is
lower than recommended, drive slowly to the
nearest service station and inflate to the correct
pressure. If it is too high, adjust it until it is correct.
Always reinstall the valve cap after checking or
adjusting tire pressure. If the cap is not re-
placed, air may leak from the tire. If you lose a
valve cap, buy another and install it as soon as
possible.
After you have changed wheels, always secure
the flat tire in its place in the luggage compart-
ment and return the jack and tools to their proper
storage locations.
CAUTION:Your car can be damaged if towed incor-
rectly!
If your car has to be towed, it should be done by
your Hyundai dealer or a commercial tow truck
service. This will help assure that your car is not
damaged in towing. Also, professionals are
generally aware of state and local laws govern-
ing towing. In any case, rather than risk damage
to your car, it is suggested that you show this
information to the tow truck operator. Be sure
that a safety chain system is used and that all
state and local laws are observed.
HGK194
HGK195D080A01GK
o OK FOR AUTOMATIC OR MANUAL
TRANSAXLE EQUIPPED VEHICLE
Page 150 of 224

3
12
WHAT TO DO IN AN EMERGENCY
NOTE:Before towing, check the level of the
transaxle fluid. If it is below the "HOT" mark
on the dipstick, add fluid. If you cannot add
fluid, a towing dolly must be used as de-
scribed above.
D080C01GK
o OK FOR AUTOMATIC OR MANUAL
TRANSAXLE EQUIPPED VEHICLE
D080B01A-AAT
Towing a Car With a Manual Transaxle
D080C02A-AAT
Towing a Car With an Automatic
Transaxle
o If the car is being towed with the rear wheels
on the ground, be sure the parking brake is
released.
o If the car is being towed with the front wheels
on the ground, be sure that the transaxle is
in neutral. Also, be sure that the ignition key
is in the "ACC" position. This is necessary to
prevent damage to the steering lock mecha-
nism, which is not designed to hold the front
wheels straight while the car is being towed.
o If any of the loaded wheels or suspension
components are damaged, a towing dolly
must be used.
CAUTION:A car with an automatic transaxle should
never be towed from the rear with the front
wheels on the ground. This can cause se-
rious damage to the transaxle. If the car
must be towed from the rear, a towing dolly
must be used under the front wheels.
If the car is being towed with the rear wheels on
the ground, be sure the parking brake is re-
leased.
HGK199
HGK200
o OK FOR AUTOMATIC OR MANUAL
TRANSAXLE EQUIPPED VEHICLE
WITH NO DAMAGE o NOT FOR AUTOMATIC TRANSAXLE
EQUIPPED VEHICLE
o OK FOR MANUAL TRANSAXLE
!
Page 151 of 224

3WHAT TO DO IN AN EMERGENCY
13EMERGENCY TOWING
!
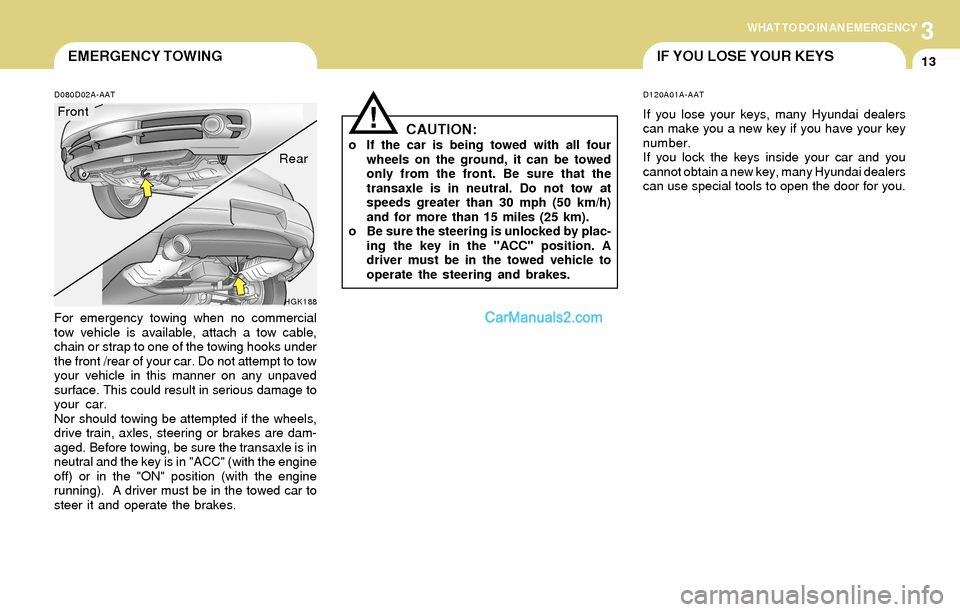
D080D02A-AAT
For emergency towing when no commercial
tow vehicle is available, attach a tow cable,
chain or strap to one of the towing hooks under
the front /rear of your car. Do not attempt to tow
your vehicle in this manner on any unpaved
surface. This could result in serious damage to
your car.
Nor should towing be attempted if the wheels,
drive train, axles, steering or brakes are dam-
aged. Before towing, be sure the transaxle is in
neutral and the key is in "ACC" (with the engine
off) or in the "ON" position (with the engine
running). A driver must be in the towed car to
steer it and operate the brakes.
CAUTION:o If the car is being towed with all four
wheels on the ground, it can be towed
only from the front. Be sure that the
transaxle is in neutral. Do not tow at
speeds greater than 30 mph (50 km/h)
and for more than 15 miles (25 km).
o Be sure the steering is unlocked by plac-
ing the key in the "ACC" position. A
driver must be in the towed vehicle to
operate the steering and brakes.
HGK188
IF YOU LOSE YOUR KEYS
D120A01A-AAT
If you lose your keys, many Hyundai dealers
can make you a new key if you have your key
number.
If you lock the keys inside your car and you
cannot obtain a new key, many Hyundai dealers
can use special tools to open the door for you. Front
Rear
Page 155 of 224

4CORROSION PREVENTION AND APPEARANCE CARE
4
E030D01A-AAT
When to Wax Again
You should polish and wax the car again when
water no longer beads on a clean surface but
spreads out over a larger area.
E030C01A-AATPolishing and Waxing
Always wash and dry the car before polishing
or waxing or using a combination cleaner and
wax. Use a good quality commercial product
and follow the manufacturer’s directions on the
container. Polish and wax the bright trim pieces
as well as the paint.
E030B01A-AAT
Spot Cleaning
Don’t use gasoline, strong solvents or corro-
sive cleaning agents. These can damage the
finish of the car. To remove road tar, use
turpentine on a clean, soft cloth or commercially
available bug and tar remover. Be gentle.
To remove dead insects or tree sap, use warm
water and mild soap or car-washing solution.
Soak the spot and rub gently. If the paint has lost
its luster, use a commercial car-cleaning polish. If you find any nicks or scratches in the paint,
use touch-up paint to cover them to prevent
corrosion. To protect the paintwork of the car
against corrosion, you must clean your Hyundai
(at least once a month). Give special attention
to the removal of salt, mud and other sub-
stances on the underside of the splashboards
of the car. Make sure that the outlets and the
underside of the doors are open. Paint damage
can be caused by small accumulation of tar,
industrial precipitation, tree resin, insects and
bird droppings, when not removed immediately.
If water alone is not strong enough to remove the
accumulated dirt, use a mild car washing solu-
tion. Be sure to rinse the surface after washing
to remove the solution. Never allow the solution
to dry on the painted surfaces. To clean whitewall tires, use a stiff brush or
soapy steel-wool scouring pad.
To clean plastic wheel covers, use a clean
sponge or soft cloth and water.
To clean cast aluminum alloy wheels, use a mild
soap or neutral detergent. Do not use abrasive
cleaners. Protect the bare-metal surfaces by
cleaning, polishing and waxing. Because alumi-
num is subject to corrosion, be sure to give
aluminum alloy wheels special attention in win-
ter. If you drive on salted roads, clean the
wheels thoroughly afterwards.
After washing, be sure to rinse thoroughly. If
soapy water dries on the finish, streaking will
result.
When the weather is warm and the humidity low,
you may find it necessary to rinse each section
immediately after washing to avoid streaking.
After rinsing, dry the car using a damp chamois
or soft, absorbent cloth. The reason for drying
the car is to remove water from the car so it will
dry without water spots. Don't rub, this can
damage the finish.
Page 166 of 224

5VEHICLE MAINTENANCE REQUIREMENTS
9
F070K01A-AAT
o Exhaust Pipe and Muffler
Visually inspect the exhaust pipes, muffler and
hangers for cracks, deterioration, or damage.
Start the engine and listen carefully for any
exhaust gas leakage. Tighten connections or
replace parts as necessary.
F070L01A-AAT
o Suspension Mounting Bolts
Check the suspension connections for loose-
ness or damage. Retighten to the specified
torque.
F070M01A-AAT
o Steering gear box, linkage &
boots/lower arm ball joint
With the vehicle stopped and engine off, check
for excessive free-play in the steering wheel.
Check the linkage for bends or damage. Check
the dust boots and ball joints for deterioration,
cracks, or damage. Replace any damaged
parts.
F070N01A-AAT
o Power Steering Pump, Belt and Hoses
Check the power steering pump and hoses for
leakage and damage. Replace any damaged or
leaking parts immediately. Inspect the power
steering belt for evidence of cuts, cracks, ex-
cessive wear, oiliness and proper tension.
Replace or adjust it if necessary.
F070P01A-AAT
o Driveshafts and Boots
Check the drive shafts, boots and clamps for
cracks, deterioration, or damage. Replace any
damaged parts and, if necessary, repack the
grease.
F070Q01A-AAT
o Air Conditioning Refrigerant
Check the air conditioning lines and connec-
tions for leakage and damage. Check air con-
ditioning performance according to the relevant
shop manual if necessary.
Page 170 of 224

6DO-IT-YOURSELF MAINTENANCE
4GENERAL CHECKS
G020C01A-AAT
Vehicle Interior
The following should be checked each time
when the vehicle is driven:
o Lights operation
o Windshield wiper operation
o Horn operation
o Defroster, heating system operation (and air
conditioning, if installed)
o Steering operation and condition
o Mirror condition and operation
o Turn signal operation
o Accelerator pedal operation
o Brake operation, including parking brake
o Manual transaxle operation, including clutch
operation
o Automatic transaxle operation, including
"Park" mechanism operation
o Seat control condition and operation
o Seat belt condition and operation
o Sunvisor operation
If you notice anything that does not operate
correctly or appears to be functioning incor-
rectly, inspect it carefully and seek assistance
from your Hyundai dealer if service is needed.
G020B01A-AAT
Vehicle Exterior
The following should be checked monthly:
o Overall appearance and condition
o Wheel condition and wheel nut torque
o Exhaust system condition
o Light condition and operation
o Windshield glass condition
o Wiper blade condition
o Paint condition and body corrosion
o Fluid leaks
o Door and hood lock condition
o Tire pressure and condition (including spare
tire)
G020A01A-AAT
Engine Compartment
The following should be checked regularly:
o Engine oil level and condition
o Transaxle fluid level and condition
o Brake fluid level
o Clutch fluid level
o Engine coolant level
o Windshield washer fluid level
o Accessory drive belt condition
o Engine coolant hose condition
o Fluid leaks (on or below components)
o Power steering fluid level
o Battery condition
o Air filter condition
Page 185 of 224

6DO-IT-YOURSELF MAINTENANCE
19
4. Replace the air conditioner filter with a new
one.
5. Installation is the reverse order of disassem-
bly.
HGK254
CAUTION:Be sure to install the air conditioner filter in
the direction of the arrow sign. Otherwise,
it may cause noise or deterioration.
!
CHECKING THE FREE-PLAY
G150A01A-AAT
Steering Wheel
To check the steering wheel free-play, stop the
car with the wheels pointed straight ahead and
gently move the steering wheel back and forth.
Use very light finger pressure and be sensitive
to changes in resistance that mark the limits of
the free-play. If the free-play is greater than
specified, have it inspected by your Hyundai
dealer and adjusted or repaired if necessary.
HGK218
1.18 in.
(30 mm)
G160A01A-AAT
Clutch Pedal
With the engine off, press lightly on the clutch
pedal until you feel a change in resistance. This
is the clutch pedal free-play. The free-play
should be within the limits specified in the illus-
tration. If it is not, have it inspected by your
Hyundai dealer and adjusted or repaired if
necessary.
G160A01E
0.24 ~ 0.51 in.
(6~13 mm)
Page 205 of 224

7EMISSION CONTROL SYSTEMS
2EMISSION CONTROL SYSTEM
H010D01A-AAT3. Exhaust Emission Control System
The Exhaust Emission Control System is a
highly effective system which controls exhaust
emissions while maintaining good vehicle per-
formance.
H010B01A-AAT
1. Crankcase Emission Control
System
The Positive Crankcase Ventilation System is
employed to prevent air pollution caused by
blow-by gases being emitted from the crank-
case. This system supplies fresh filtered air to
the crankcase through the air intake hose.
Inside the crankcase, the fresh air mixes with
blow-by gases, which then pass through the
PCV valve and into the induction system.
H010A01GK-AAT
Your Hyundai is equipped with an emission
control system to meet all requirements of the
U.S. Environmental Protection Agency or Cali-
fornia Air Resources Board.
There are three emission control systems which
are as follows.
1) Crankcase Emission Control System
2) Evaporative Emission Control System
3) Exhaust Emission Control System
In order to ensure the proper function of the
emission control systems, it is recommended
that you have your car inspected and main-
tained by an authorized Hyundai dealer in ac-
cordance with the maintenance schedule in this
manual.
Caution for the Inspection and Maintenance
Test (Vehicle with Traction Control Sys-
tem)
o To prevent the vehicle from misfiring
during dynamometer testing, discon-
nect the ABS connector located inside
of the wheel guard (driver side).
o For more information, see shop manual
(BR Group, Wheel Speed Sensor).Canister
Fuel vapors generated inside the fuel tank are
absorbed and stored in the onboard canister.
When the engine is running, the fuel vapors
absorbed in the canister are drawn into the
induction system through the purge control
solenoid valve.
Purge Control Solenoid Valve (PCSV)
The purge control solenoid valve is controlled
by the Engine Control Module (ECM); when the
engine coolant temperature is low during idling,
the PCSV closes so that evaporated fuel is not
taken into the engine. After the engine warms-
up during ordinary driving, the PCSV opens to
introduce evaporated fuel to the engine.
H010C01S-AAT
2. Evaporative Emission Control (Includ-
ing ORVR: Onboard Refueling Vapor
Recovery) System
The Evaporative Emission Control System is
designed to prevent fuel vapors from escaping
into the atmosphere.
(The ORVR system is designed to allow the
vapors from the fuel tank to be loaded into a
canister while refueling at the gas station, pre-
venting the escape of fuel vapors into the
atmosphere.)