Page 191 of 224

6DO-IT-YOURSELF MAINTENANCE
25HEADLIGHT AIMING ADJUSTMENT
G290A03GK G290A02GK-AAT
Before performing aiming adjustment, make
sure of the following.
1. Keep all tires inflated to the correct pressure.
2. Place the vehicle on level ground and press
the front bumper & rear bumper down sev-
eral times. Place vehicle at a distance of 118
in. (3m) from the test wall.
3. See that the vehicle is unloaded (except for
full levels of coolant, engine oil and fuel, and
spare tire, jack, and tools).
4. Clean the head light lenses and turn on the
headlights (low beam).
5. Open the hood.
!
6. Draw the vertical line (through the center of
each headlight beam pattern) and the hori-
zontal line (through the center of each head-
light beam pattern) on the aiming screen.
And then, draw the parallel line at 0.827 in. (21
mm) under the horizontal line.
7. Adjust each cut-off line of the low beam to the
parallel line with a phillips screwdriver -
VERTICAL AIMING.
WARNING:Horizontal aiming should be adjusted by an
authorized Hyundai Dealer. Low Beam
Vertical aiming
G290B01GK-AAT
Adjustment After Headlight Assembly
Replacement
If the vehicle has had front body repair and the
headlight assembly has been replaced, the
headlight aiming should be checked using an
aiming screen as shown in the illustration. Turn
on the headlight switch.
1. Adjust headlights so that main axis of light is
parallel to center line of the body and is
aligned with point "P" shown in the illustration.
2. Dotted lines in the illustration show the center
of headlights.
G290B01GK
L
W
H
H
Cut-off line
Ground line
"P"Horizontal line
Vertical line0.827 in. (21 mm)
Page 192 of 224

6DO-IT-YOURSELF MAINTENANCE
26
SPECIFICATION:"H"
Horizontal center line of headlights from ground:
Low Beam: 26.7 in. (679mm)
High Beam: 26.5 in. (672mm)
"W"
Distance between each headlight center :
Low Beam: 47.3 in. (1,202mm)
High Beam: 38.0 in. (966mm)
"L"
Distance between the headlights and the wall
that the lights are tested against : 118 in. (3,000
mm)
REPLACEMENT OF LIGHT BULBS
!
G260A02A-AAT
Before attempting to replace a light bulb, be sure
the switch is turned to the "OFF" position.
The next paragraph shows how to reach the
light bulbs so they may be changed. Be sure to
replace the burned-out bulb with one of the
same number and wattage rating.
See page 6-35 for the wattage description.
CAUTION:Keep the lamps out of contact with petro-
leum products, such as oil, gasoline, etc.
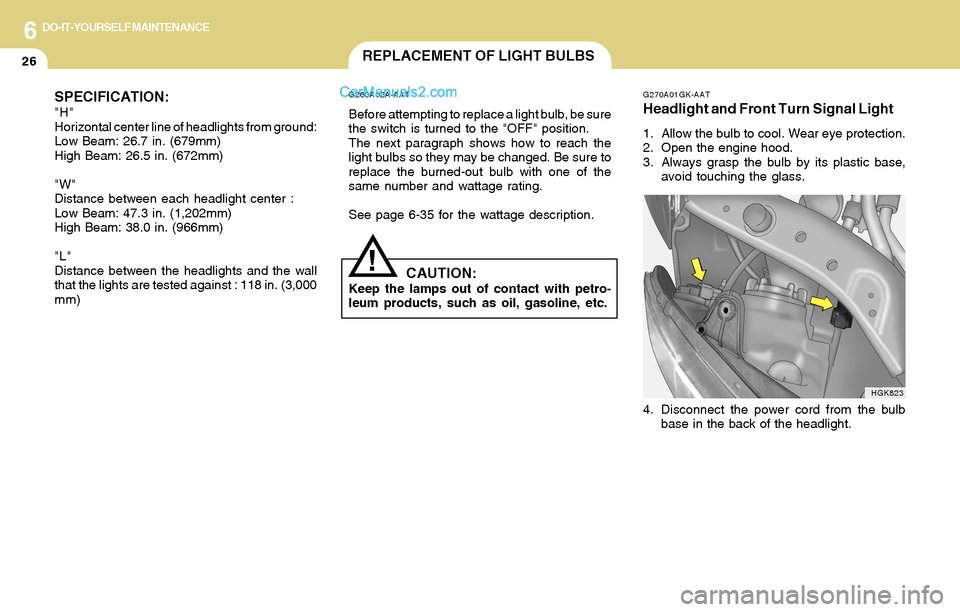
G270A01GK-AAT
Headlight and Front Turn Signal Light
1. Allow the bulb to cool. Wear eye protection.
2. Open the engine hood.
3. Always grasp the bulb by its plastic base,
avoid touching the glass.
4. Disconnect the power cord from the bulb
base in the back of the headlight.
HGK823
Page 202 of 224
6DO-IT-YOURSELF MAINTENANCE
36FUSE PANEL DESCRIPTION
G200C01GK-GAT
Engine Compartment
If installed
NOTE:Not all fuse panel descriptions in this manual may be applicable to your vehicle. It is accurate at the time of printing. When you inspect the
fuse box on your vehicle, refer to the fuse box label.
HGK205-E
PROTECTED COMPONENTS
Generator
Generator
Condenser Fan
Radiator Fan
Engine Control, ECM. ATM Control
Ignition, Start Relay
ABS
ABS
Blower
Injector
O
2 Sensor, ECM
DRL
Front Fog Light
TCM, ECM
Horn. A/Conditioner
Head Light (High)
Head Light (LOW) FUSERATING
120A
50A
30A
30A
30A
30A
30A
30A
30A
15A
10A
15A
15A
10A
15A
15A
15A DESCRIPTION
BATT
BATT
COND
RAD
ECU
IGN
ABS 1
ABS 2
BLOWER
INJ
SNSR
DRL
F/FOG
ECU
HORN,A/CON
H/LP (H1)
H/LP (LO)
Page 205 of 224

7EMISSION CONTROL SYSTEMS
2EMISSION CONTROL SYSTEM
H010D01A-AAT3. Exhaust Emission Control System
The Exhaust Emission Control System is a
highly effective system which controls exhaust
emissions while maintaining good vehicle per-
formance.
H010B01A-AAT
1. Crankcase Emission Control
System
The Positive Crankcase Ventilation System is
employed to prevent air pollution caused by
blow-by gases being emitted from the crank-
case. This system supplies fresh filtered air to
the crankcase through the air intake hose.
Inside the crankcase, the fresh air mixes with
blow-by gases, which then pass through the
PCV valve and into the induction system.
H010A01GK-AAT
Your Hyundai is equipped with an emission
control system to meet all requirements of the
U.S. Environmental Protection Agency or Cali-
fornia Air Resources Board.
There are three emission control systems which
are as follows.
1) Crankcase Emission Control System
2) Evaporative Emission Control System
3) Exhaust Emission Control System
In order to ensure the proper function of the
emission control systems, it is recommended
that you have your car inspected and main-
tained by an authorized Hyundai dealer in ac-
cordance with the maintenance schedule in this
manual.
Caution for the Inspection and Maintenance
Test (Vehicle with Traction Control Sys-
tem)
o To prevent the vehicle from misfiring
during dynamometer testing, discon-
nect the ABS connector located inside
of the wheel guard (driver side).
o For more information, see shop manual
(BR Group, Wheel Speed Sensor).Canister
Fuel vapors generated inside the fuel tank are
absorbed and stored in the onboard canister.
When the engine is running, the fuel vapors
absorbed in the canister are drawn into the
induction system through the purge control
solenoid valve.
Purge Control Solenoid Valve (PCSV)
The purge control solenoid valve is controlled
by the Engine Control Module (ECM); when the
engine coolant temperature is low during idling,
the PCSV closes so that evaporated fuel is not
taken into the engine. After the engine warms-
up during ordinary driving, the PCSV opens to
introduce evaporated fuel to the engine.
H010C01S-AAT
2. Evaporative Emission Control (Includ-
ing ORVR: Onboard Refueling Vapor
Recovery) System
The Evaporative Emission Control System is
designed to prevent fuel vapors from escaping
into the atmosphere.
(The ORVR system is designed to allow the
vapors from the fuel tank to be loaded into a
canister while refueling at the gas station, pre-
venting the escape of fuel vapors into the
atmosphere.)
Page 206 of 224

7EMISSION CONTROL SYSTEMS
3CATALYTIC CONVERTER
!WARNING:o Use unleaded fuel only.
o Maintain the engine in good operating
condition. Extremely high catalytic con-
verter temperatures can result from im-
proper operation of the electrical, igni-
tion or multiport electronic fuel injec-
tion.
o If your engine stalls, pings, knocks, or is
hard to start, have your Hyundai dealer
inspect and repair the problem as soon
as possible.
o Avoid driving with a very low fuel level.
Running out of gasoline may cause the
engine to misfire and result in damage to
the catalytic converter.
o Avoid idling the engine for periods
longer than 10 minutes.
o The vehicle should not be pushed or
pulled to get started. This may cause the
catalytic converter to overheat and cre-
ate a fire hazard.
o Do not touch the catalytic converter or
any other part of the exhaust system
while the catalytic converter is hot. Shut
off the engine, wait for at least one hour
before touching the catalytic converter
or any other part of the exhaust system.
o Remember that your Hyundai dealer is
your best source of assistance.
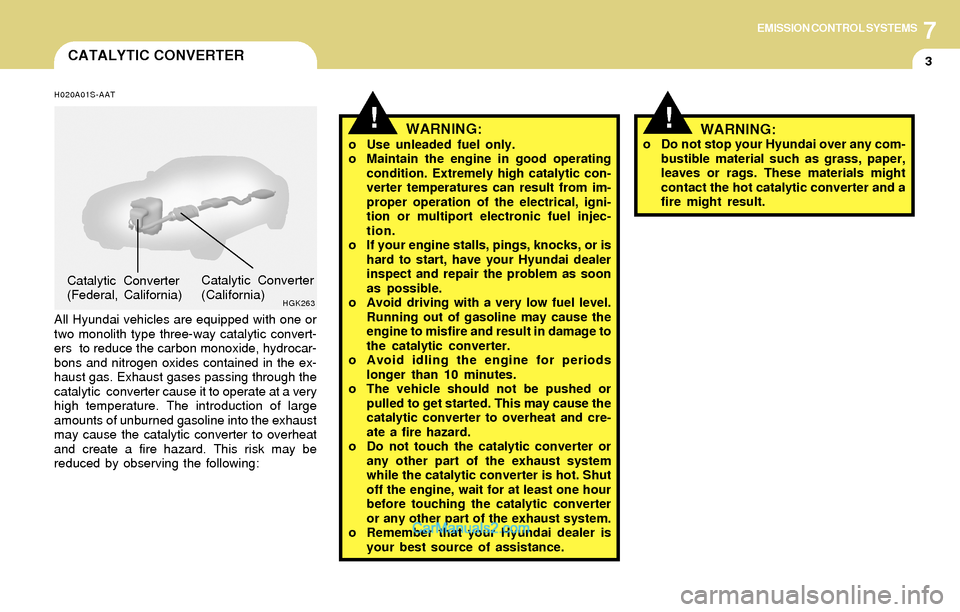
H020A01S-AAT
All Hyundai vehicles are equipped with one or
two monolith type three-way catalytic convert-
ers to reduce the carbon monoxide, hydrocar-
bons and nitrogen oxides contained in the ex-
haust gas. Exhaust gases passing through the
catalytic converter cause it to operate at a very
high temperature. The introduction of large
amounts of unburned gasoline into the exhaust
may cause the catalytic converter to overheat
and create a fire hazard. This risk may be
reduced by observing the following:
HGK263
Catalytic Converter
(California) Catalytic Converter
(Federal, California)
o Do not stop your Hyundai over any com-
bustible material such as grass, paper,
leaves or rags. These materials might
contact the hot catalytic converter and a
fire might result.WARNING:!
Page 207 of 224

Vehicle Identification Number (VIN) .............................. 8-2
Engine Number............................................................. 8-2
Recommended Inflation Pressures............................... 8-3
Snow Tires.................................................................... 8-3
Tire Chains.................................................................... 8-4
Tire Rotation .................................................................. 8-4
Tire Balancing............................................................... 8-5
Tire Traction.................................................................. 8-5
When to Replace Tires ................................................. 8-5
Spare Tire and Tools ..................................................... 8-6
Warranties for Your Hyundai Vehicle ............................ 8-6
Consumer Information................................................... 8-6
Reporting Safety Defects .............................................. 8-8
CONSUMER INFORMATION &
REPORTING SAFETY DEFECTS
8
8
Page 208 of 224
8CONSUMER INFORMATION & REPORTING SAFETY DEFECTS
2TIREENGINE NUMBERVEHICLE IDENTIFICATION
NUMBER (VIN)
I020A01A-AAT
TIRE INFORMATION
The tires supplied on your new Hyundai are
chosen to provide the best performance for
normal driving.
I010B01A-AAT I010A01A-AAT
The vehicle identification number (VIN) is the
number used in registering your car and in all
legal matters pertaining to its ownership, etc. It
can be found in three different places on your
car:
1. On the bulkhead between the engine and
passenger compartments.
2. On the left top side of the instrument panel
where it can be seen by looking down through
the windshield.
3. On the lower side of the center pillar outer
panel.The engine number is stamped on the engine
block as shown in the drawing.
HGK220A
I010B01GK
DOHC CVVT V6231
Page 215 of 224
VEHICLE SPECIFICATIONS
9
Measurement................................................................ 9-2
Engine........................................................................... 9-3
Lubrication Chart........................................................... 9-4
9