Page 46 of 224
1FEATURES OF YOUR HYUNDAI
33
1. Speedometer
2. Turn Signal Indicator Light
3. Odometer
4. Automatic Transaxle Position Indicator Light (If installed)
5. Coolant Temperature Gauge
6. Trip odometer
7. Fuel Gauge
8. Tachometer
9. Traction Control Indicator Light (If installed)
10.Door Ajar Warning Light
11.Trip Odometer Reset Knob12.Charging System Warning Light
13.SRS (Airbag) Warning Light
14.Seat Belt Warning Light
15.High Beam Indicator Light
16.Oil Pressure Warning Light
17.Malfunction Indicator Light
18.Low Fuel Warning Light
19.Parking Brake/Brake Fluid Level Warning Light
20.Cruise Indicator (If installed)
21.Tailgate Open Warning Light
22.Anti-Lock Brake Warning Light (If installed)
Page 52 of 224
1FEATURES OF YOUR HYUNDAI
39
B310B01GK-GAT
Odometer/Trip odometer
Function of digital odometer/trip odom-
eter
Pushing in the reset switch on the right side of
speedometer when the ignition switch is turned
"ON" will display the following sequence:
HGK028BA
1. Odometer
The odometer records the total driving distance
in kilometers or miles, and is useful for keeping
a record for maintenance intervals.
NOTE:Any alteration of the odometer may void
your warranty coverage.
2,3 Trip odometer
Records the distance of 2 trips in kilometers or
miles.
TRIP A: first distance you have traveled from
your origination point to a first destination.
TRIP B: Second distance from the first destina-
tion to the final destination.
To shift from TRIP A to TRIP B, press the reset
switch. When pressed for 1 second, it will reset
to 0. A Type
B Type
HGK055B
HGK055CA
A Type
B Type
Page 58 of 224

1FEATURES OF YOUR HYUNDAI
45DIGITAL CLOCK
B400A01F-AAT
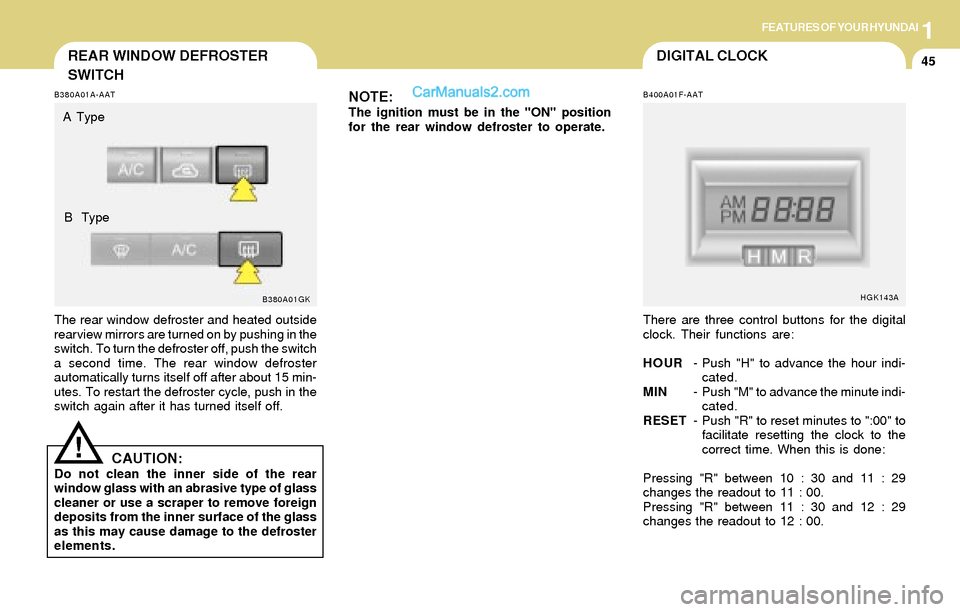
There are three control buttons for the digital
clock. Their functions are:
HOUR- Push "H" to advance the hour indi-
cated.
MIN- Push "M" to advance the minute indi-
cated.
RESET- Push "R" to reset minutes to ":00" to
facilitate resetting the clock to the
correct time. When this is done:
Pressing "R" between 10 : 30 and 11 : 29
changes the readout to 11 : 00.
Pressing "R" between 11 : 30 and 12 : 29
changes the readout to 12 : 00.
HGK143A
REAR WINDOW DEFROSTER
SWITCH
B380A01GK B380A01A-AAT
The rear window defroster and heated outside
rearview mirrors are turned on by pushing in the
switch. To turn the defroster off, push the switch
a second time. The rear window defroster
automatically turns itself off after about 15 min-
utes. To restart the defroster cycle, push in the
switch again after it has turned itself off.
NOTE:The ignition must be in the "ON" position
for the rear window defroster to operate.
CAUTION:Do not clean the inner side of the rear
window glass with an abrasive type of glass
cleaner or use a scraper to remove foreign
deposits from the inner surface of the glass
as this may cause damage to the defroster
elements.
!
A Type
B Type
Page 62 of 224

1FEATURES OF YOUR HYUNDAI
49INTERIOR LIGHT
B480A01GK-GAT
Map Light
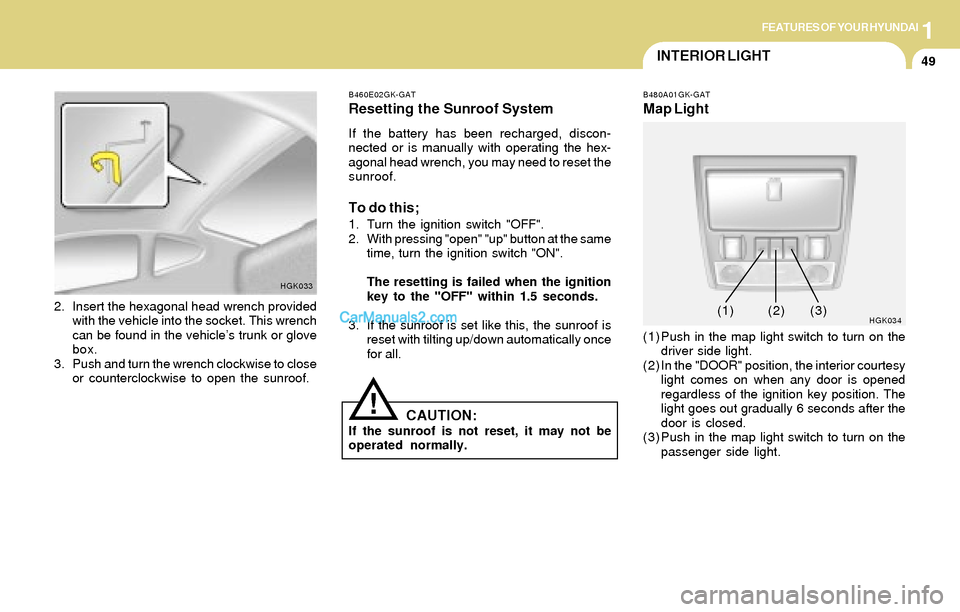
(1) Push in the map light switch to turn on the
driver side light.
(2) In the "DOOR" position, the interior courtesy
light comes on when any door is opened
regardless of the ignition key position. The
light goes out gradually 6 seconds after the
door is closed.
(3) Push in the map light switch to turn on the
passenger side light.
HGK0342. Insert the hexagonal head wrench provided
with the vehicle into the socket. This wrench
can be found in the vehicle’s trunk or glove
box.
3. Push and turn the wrench clockwise to close
or counterclockwise to open the sunroof.
HGK033B460E02GK-GAT
Resetting the Sunroof System
If the battery has been recharged, discon-
nected or is manually with operating the hex-
agonal head wrench, you may need to reset the
sunroof.
To do this;
1. Turn the ignition switch "OFF".
2. With pressing "open" "up" button at the same
time, turn the ignition switch "ON".
The resetting is failed when the ignition
key to the "OFF" within 1.5 seconds.
3. If the sunroof is set like this, the sunroof is
reset with tilting up/down automatically once
for all.
CAUTION:If the sunroof is not reset, it may not be
operated normally.
!
(1)(2) (3)
Page 72 of 224

1FEATURES OF YOUR HYUNDAI
59CRUISE CONTROL
B660A01S-AAT
(If Installed)
The cruise control system provides automatic
speed control for your comfort when driving on
freeways, tollroads, or other noncongested
highways. This system is designed to function
above approximately 25 mph (40 km/h).
B660A01GKB660B02E-AAT
To Set the Cruise Speed
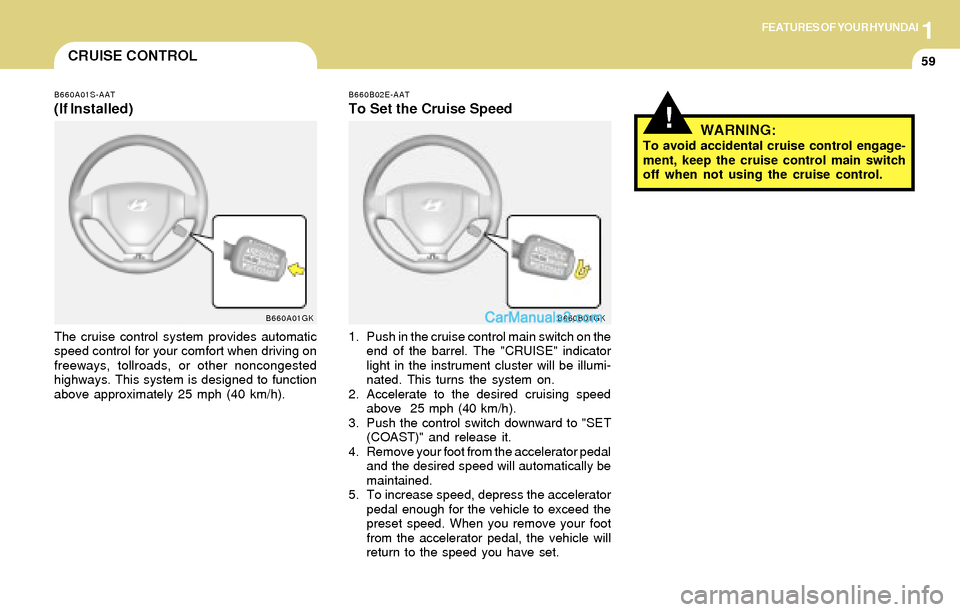
1. Push in the cruise control main switch on the
end of the barrel. The "CRUISE" indicator
light in the instrument cluster will be illumi-
nated. This turns the system on.
2. Accelerate to the desired cruising speed
above 25 mph (40 km/h).
3. Push the control switch downward to "SET
(COAST)" and release it.
4. Remove your foot from the accelerator pedal
and the desired speed will automatically be
maintained.
5. To increase speed, depress the accelerator
pedal enough for the vehicle to exceed the
preset speed. When you remove your foot
from the accelerator pedal, the vehicle will
return to the speed you have set.
B660B01GK
!WARNING:To avoid accidental cruise control engage-
ment, keep the cruise control main switch
off when not using the cruise control.
Page 73 of 224

1FEATURES OF YOUR HYUNDAI
60
B660E01E-AAT
To Reset at a Faster Speed
1. Push the control switch upward to "RE-
SUME (ACCEL)" position and hold it.
2. Accelerate to desired speed and release the
control switch. While the control switch is
held, the vehicle will gradually gain speed.
B660F01E-AAT
To Reset at a Slower Speed
1. Push the control switch downward to "SET
(COAST)" and hold it. The vehicle will decel-
erate.
2. When the desired speed is obtained, release
the control switch. While the control switch
is pushed, the vehicle speed will gradually
decrease.
B660B01GK
B660D01E-AAT
To Resume the Preset Speed
The vehicle will automatically resume the speed
set prior to cancellation when you push the
control switch upward to "RESUME (ACCEL)"
position and release it, providing the vehicle
speed is above 25 mph (40 km/h).
B660D01GK
B660C02E-AAT
To Cancel the Cruise Speed
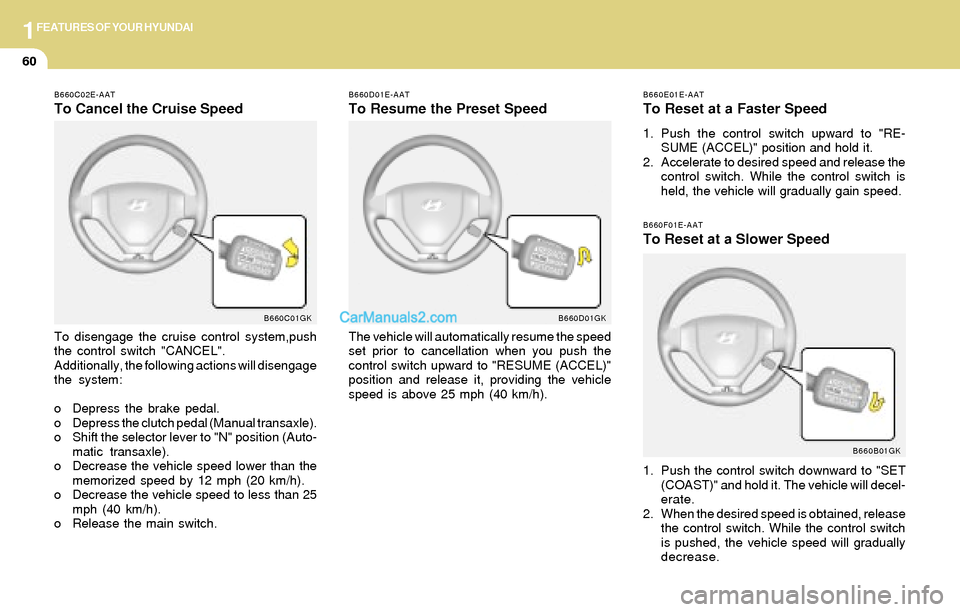
To disengage the cruise control system,push
the control switch "CANCEL".
Additionally, the following actions will disengage
the system:
o Depress the brake pedal.
o Depress the clutch pedal (Manual transaxle).
o Shift the selector lever to "N" position (Auto-
matic transaxle).
o Decrease the vehicle speed lower than the
memorized speed by 12 mph (20 km/h).
o Decrease the vehicle speed to less than 25
mph (40 km/h).
o Release the main switch.
B660C01GK
Page 85 of 224

1FEATURES OF YOUR HYUNDAI
72
B970C02E-AAT
Automatic Operation
The FATC (Full Automatic Temperature Con-
trol) system automatically controls heating and
cooling as follows:
1. Push the "AUTO" switch. The indicator light
will illuminate confirming that the Face, Floor
and/or Bi-Level modes as well as the blower
speed and, air conditioner will be controlled
automatically.
HGK0202. Push the "TEMP" button to set the desired
temperature.
The temperature will increase to the maxi-
mum 90°F(32°C) by pushing on the button.
Each push of the button will cause the tem-
perature to increase by 1°F(0.5°C).
The temperature will decrease to the mini-
mum 62°F(17°C) by pushing on the button.
Each push of the button will cause the tem-
perature to decrease by 1°F(0.5°C).
NOTE:If the battery has been discharged or dis-
connected, the temperature mode will reset
to centigrade degrees.
This is a normal condition and you can
change the temperature mode from centi-
grade to farenheit as follows;
Press the TEMP button down 3 seconds or
more with the button held down. The
display shows that the unit of temperature
is adjusted to centigrade or fahrenheit.
(°C
→ →→ →
→ °F or °F
→ →→ →
→ °C)
NOTE:Never place anything over the sensor which
is located on the instrument panel to en-
sure better control of the heating and cool-
ing system.
HGK014
G280A01GKPhoto sensor
OUTSIDE
TEMP
Page 94 of 224
1FEATURES OF YOUR HYUNDAI
81AUDIO SYSTEM
H260A01O-AAT
STEREO RADIO OPERATION (H260) (If installed)
H260A01O
1. POWER ON-OFF/VOLUME/BALANCE Control Knob 2. FADER Control Knob3. BASS/TREBLE Control Knob
4. SCAN Button
7. PRESET Buttons
5. TUNE/SEEK Select Button6. BAND Selector