2004 Hyundai Terracan headlight bulb
[x] Cancel search: headlight bulbPage 56 of 361

FEATURES OF YOUR HYUNDAI
1- 48
B340A01A-AAT COMBINATION TURN SIGNAL, HEADLIGHT AND HIGH-BEAM SWITCH Turn Signal Operation Pulling down on the lever causes the turn signals on the left side of the car to blink. Pushingupwards on the lever causes the turn signals onthe right side of the car to blink. As the turn iscompleted, the lever will automatically return tothe center position and turn off the turn signals atthe same time. If either turn signal indicator lightblinks more rapidly than usual, goes on but doesnot blink, or does not go on at all, there is amalfunction in the system. Check for a burned-out fuse or bulb or see your Hyundai dealer. B340B01A-AAT Lane Change Signal
B340B01HP
To indicate a lane change, move the lever up or down to a point where it begins flashing.The lever will automatically return to the centerposition when released.
To turn on the rear fog lights, push the switch.They will light when the headlight switch is in thesecond position or the front fog light is turned onand the key is in the "ON" position.
B360A01HP-GAT REAR FOG LIGHT SWITCH (If installed)
B360A01HP
B360B01HP
B360B01Y-AAT FRONT FOG LIGHT SWITCH To turn on the front fog lights, place the switch in the "ON" position. They will light when the head-light switch is in the first or second position.
Page 175 of 361

DO-IT-YOURSELF MAINTENANCE 6-23
G260A01HP-GAT
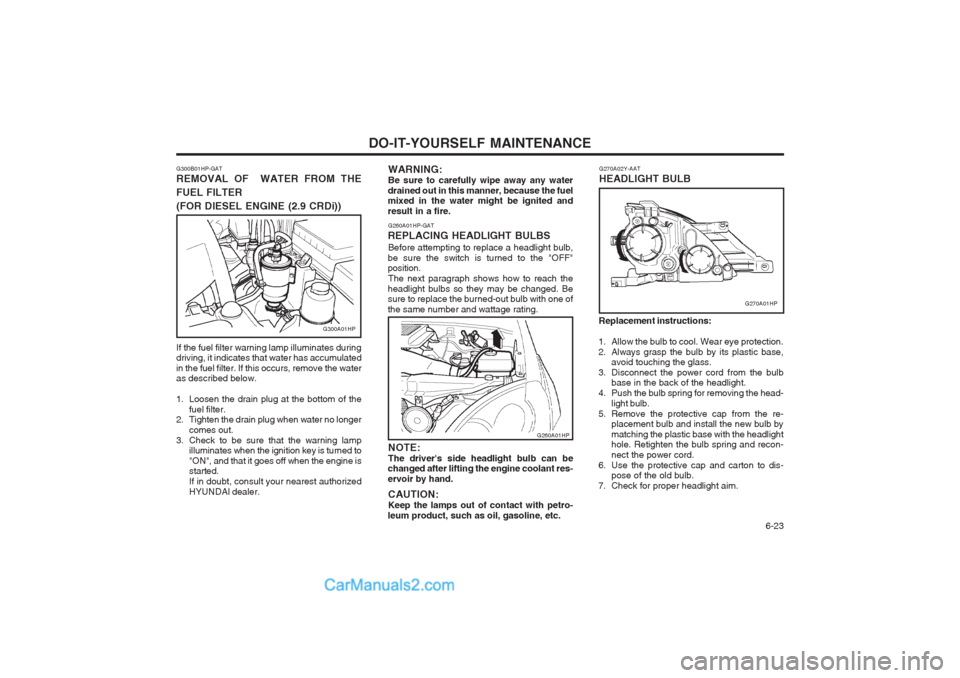
REPLACING HEADLIGHT BULBS Before attempting to replace a headlight bulb,
be sure the switch is turned to the "OFF" position. The next paragraph shows how to reach the
headlight bulbs so they may be changed. Besure to replace the burned-out bulb with one of the same number and wattage rating. WARNING:Be sure to carefully wipe away any water
drained out in this manner, because the fuel mixed in the water might be ignited and result in a fire.
NOTE:The driver's side headlight bulb can be
changed after lifting the engine coolant res-ervoir by hand.
CAUTION:Keep the lamps out of contact with petro-
leum product, such as oil, gasoline, etc.
G260A01HP Replacement instructions:
1. Allow the bulb to cool. Wear eye protection.
2. Always grasp the bulb by its plastic base, avoid touching the glass.
3. Disconnect the power cord from the bulb base in the back of the headlight.
4. Push the bulb spring for removing the head-
light bulb.
5. Remove the protective cap from the re- placement bulb and install the new bulb bymatching the plastic base with the headlight hole. Retighten the bulb spring and recon- nect the power cord.
6. Use the protective cap and carton to dis- pose of the old bulb.
7. Check for proper headlight aim. G270A02Y-AAT HEADLIGHT BULB
G270A01HP
G300B01HP-GAT REMOVAL OF WATER FROM THE FUEL FILTER
(FOR DIESEL ENGINE (2.9 CRDi))
G300A01HP
If the fuel filter warning lamp illuminates during driving, it indicates that water has accumulated in the fuel filter. If this occurs, remove the water as described below.
1. Loosen the drain plug at the bottom of the fuel filter.
2. Tighten the drain plug when water no longer
comes out.
3. Check to be sure that the warning lamp illuminates when the ignition key is turned to "ON", and that it goes off when the engine is started. If in doubt, consult your nearest authorizedHYUNDAI dealer.
Page 176 of 361

DO-IT-YOURSELF MAINTENANCE
6-24 6. Draw the vertical line (through the center of
each headlight) and the horizontal line (through the center of each headlight) on the aiming screen.
(1) Horizontal line dimension from ground :Low Beam : 894 mm (35.1 in.)
High Beam : 839 mm (33 in.)
(2) Distance between each vertical line : Low Beam : 1,316 mm (51.8 in.)
High Beam : 1,076 mm (42.4 in.)
And then, draw a parallel line at 38 mm (1.50 in.) under the horizontal line in case of adjusting the low beam or at 21 mm (0.83 in.) under the horizontal line in case of adjusting the high beam.
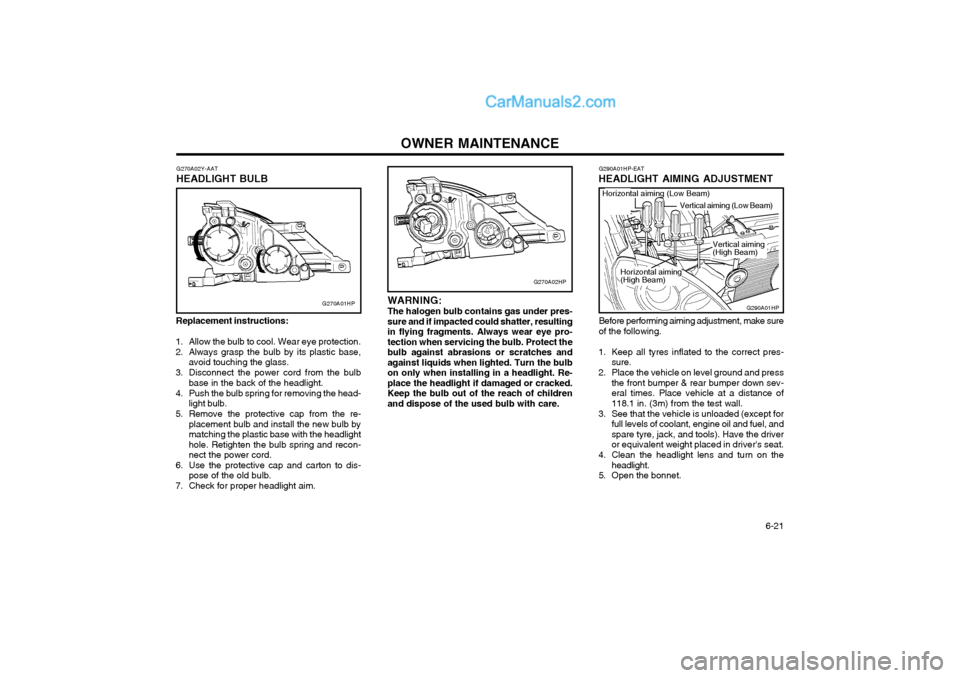
7. Adjust each cut-off line of the low beam to the parallel line with a phillips screwdriver - VERTICAL AIMING.
8. Adjust each cut-off line of the low beam to
the each vertical line with a phillips screw-driver - HORIZONTAL AIMING.
G290A01HP-GAT
HEADLIGHT AIMING ADJUSTMENT
G290A01HP
Horizontal aiming (Low Beam)
Vertical aiming (Low Beam)
Before performing aiming adjustment, make sure of the following.
1. Keep all tires inflated to the correct pres- sure.
2. Place the vehicle on level ground and press the front bumper & rear bumper down sev-eral times. Place vehicle at a distance of 3m (118.1 in.) from the test wall.
3. See that the vehicle is unloaded (except for
full levels of coolant, engine oil and fuel, andspare tire, jack, and tools). Have the driver or equivalent weight placed in driver's seat.
4. Clean the headlight lens and turn on the headlight.
5. Open the hood. Vertical aiming (High Beam)
Horizontal aiming(High Beam)
G270A02HP
WARNING: The halogen bulb contains gas under pres- sure and if impacted could shatter, resulting in flying fragments. Always wear eye pro- tection when servicing the bulb. Protect the bulb against abrasions or scratches and against liquids when lighted. Turn the bulb on only when installing in a headlight. Re- place the headlight if damaged or cracked. Keep the bulb out of the reach of children and dispose of the used bulb with care.
Page 344 of 361

OWNER MAINTENANCE
6-20
G260A01HP-DAT
REPLACING HEADLIGHT BULBS
Before attempting to replace a headlight bulb, be sure the switch is turned to the "OFF"position. The next paragraph shows how to reach the headlight bulbs so they may be changed. Besure to replace the burned-out bulb with one ofthe same number and wattage rating. NOTE: The passenger's side headlight bulb can be changed after lifting the engine coolant res-ervoir by hand. CAUTION: Keep the lamps out of contact with petro- leum product, such as oil, petrol, etc.
G260A01HP
G300B01HP-GAT
REMOVAL OF WATER FROM THE FUEL FILTER (FOR DIESEL ENGINE)
G300A01HP If the fuel filter warning lamp illuminates during
driving, it indicates that water has accumulated in the fuel filter. If this occurs, remove the wateras described below.
1. Loosen the drain plug at the bottom of the fuel filter.
2. Tighten the drain plug when water no longer comes out.
3. Check to be sure that the warning lamp illuminates when the ignition key is turned to "ON", and that it goes off when the engine isstarted.If in doubt, consult your nearest authorizedHYUNDAI dealer.
WARNING: Be sure to carefully wipe away any water
drained out in this manner, because the fuel mixed in the water might be ignited andresult in a fire.
1. Pump the hand prime pump with your hand
for one minute(about 20~30 times).
2. Turn the ignition key to the "START" posi- tion and release it 2~3 times shortly until theengine starts.
CAUTION: Do not hold the ignition key in the "START"
position for more than 15 seconds. Doing so may cause the engine and the injection pumpto damage.
Page 345 of 361

OWNER MAINTENANCE 6-21
G270A02HP
WARNING: The halogen bulb contains gas under pres- sure and if impacted could shatter, resultingin flying fragments. Always wear eye pro-tection when servicing the bulb. Protect thebulb against abrasions or scratches andagainst liquids when lighted. Turn the bulbon only when installing in a headlight. Re-place the headlight if damaged or cracked.Keep the bulb out of the reach of childrenand dispose of the used bulb with care.
Replacement instructions:
1. Allow the bulb to cool. Wear eye protection.
2. Always grasp the bulb by its plastic base, avoid touching the glass.
3. Disconnect the power cord from the bulb base in the back of the headlight.
4. Push the bulb spring for removing the head- light bulb.
5. Remove the protective cap from the re- placement bulb and install the new bulb by matching the plastic base with the headlighthole. Retighten the bulb spring and recon-nect the power cord.
6. Use the protective cap and carton to dis- pose of the old bulb.
7. Check for proper headlight aim. G270A02Y-AAT
HEADLIGHT BULB
G270A01HP
G290A01HP-EAT
HEADLIGHT AIMING ADJUSTMENT
G290A01HP
Horizontal aiming (Low Beam)
Vertical aiming (Low Beam)
Before performing aiming adjustment, make sure of the following.
1. Keep all tyres inflated to the correct pres- sure.
2. Place the vehicle on level ground and press the front bumper & rear bumper down sev-eral times. Place vehicle at a distance of118.1 in. (3m) from the test wall.
3. See that the vehicle is unloaded (except for full levels of coolant, engine oil and fuel, andspare tyre, jack, and tools). Have the driveror equivalent weight placed in driver's seat.
4. Clean the headlight lens and turn on the headlight.
5. Open the bonnet. Vertical aiming (High Beam)
Horizontal aiming(High Beam)
Page 358 of 361

INDEX
10-2 E Emission Control System
.......................................................... 7-1 ~ 7-2
Engine Before starting the engine ............................................................... 2-2 Compartment (3.5 V6) ..................................................................... 6-1
Compartment (2.9 CRDi) ................................................................ 6-2
Coolant ............................................................................................ 6-6
Coolant temperature gauge ........................................................... 1-44
If the engine overheats ................................................................... 3-2
Number ............................................................................................ 8-1
Oil .................................................................................................... 6-3 Starting ............................................................................................ 2-4
Engine Exhaust Can Be Dangerous ................................................... 2-1
F Fan Speed Con trol ................................................................... 1-68, 1-77
Fog Light
Front .............................................................................................. 1-45
Rear .............................................................................................. 1-46
Front Seats Adjustable headrests ..................................................................... 1-11
Adjusting seatback angle .............................................................. 1-11
Driver's seat lumbar support control .............................................1-11
Seat adjustment ............................................................................ 1-10
Seat cushion height adjustment .................................................... 1-12
Seat fore/aft adjustment ................................................................ 1-10Fuel
Capacity .......................................................................................... 9-1
Diesel .............................................................................................. 1-1
Gauge ............................................................................................ 1-44
Unleaded petrol ............................................................................... 1-1
Fuel Filler Lid
Remote release ............................................................................. 1-62
Full-time 4WD Operation .................... ................................... 2-11 ~ 2-14
Fuses ................................................................................................ 6-17
G Glove Box ......................................................................................... 1-56
H Hatchback Door ................................................................................ 1-60
Hazard Warning System ................................................................... 1-50
Headlight Aiming Adjustment ............................................................ 6-21
Headlight Bulbs Replacement ........................................................... 6-20
Headlight Leveling Device System ................................................... 1-65
Heated Rear Window ........................................................................ 1-51
Heating and Ventilation Air flow control .............................................. 1-69 ~ 1-70, 1-78 ~ 1-79
Air intake control .................................................................. 1-68, 1-77
Defrosting/Defogging ..................................................................... 1-72
Temperature control ...................................................................... 1-70
High-Mounted Rear Stoplight ............................................................ 1-62
Horn .................................................................................................. 1-64