2004 Hyundai Sonata automatic
[x] Cancel search: automaticPage 135 of 208

3- 2 WHAT TO DO IN AN EMERGENCY
!
!
D010A01A-AATIF THE ENGINE WILL NOT START
D010B01A-AATIf Engine Doesn't Turn Over or Turns
Over Slowly
D010C01Y-AATIf Engine Turns Over Normally but Does
Not Start
1. Check fuel level.
2. Check all connectors at ignition, coil and
spark plugs. Re-connect any that may be
disconnected or loose.
3. Check the fuel line in the engine room.
4. If engine still refuses to start, call a Hyundai
dealer or seek other qualified assistance.
D010D01A-AATIf Engine Stalls While Driving
1. Reduce your speed gradually, keeping a
straight line. Move cautiously off the road to
a safe place.
2. Turn on your emergency flashers.
3. Try to start the engine again. If your vehicle
will not start, contact a Hyundai dealer or
seek other qualified assistance.
WARNING:If the engine will not start, do not push or
pull the car to start it. This could result in a
collision or cause other damage. In addi-
tion, push or pull starting may cause the
catalytic converter to be overloaded and
create a fire hazard.
1. If your car has an automatic transaxle, be
sure the gear selector lever is in "N" or "P"
and the emergency brake is set.2. Check the battery connections to be sure
they are clean and tight.
3. Turn on the interior light. If the light dims or
goes out when you operate the starter, the
battery is discharged.
4. Check the starter connections to be sure
they are securely tightened.
5. Do not push or pull the vehicle to start it. See
instructions for "Jump Starting" on the fol-
lowing pages.
D020A02A-AATJUMP STARTING
WARNING:
The gas produced by the battery during the
jump-start operation is highly explosive. If
these instructions are not followed exactly,
serious personal injury and damage to the
vehicle may occur! If you are not sure how
to follow this procedure, seek qualified
assistance. Automobile batteries contain
sulfuric acid. This is poisonous and highly
corrosive. When jump starting, wear pro-
tective glasses and be careful not to get
acid on yourself, your clothing or on the car.
D010B02YHEF194
Battery
Page 138 of 208
WHAT TO DO IN AN EMERGENCY 3- 5
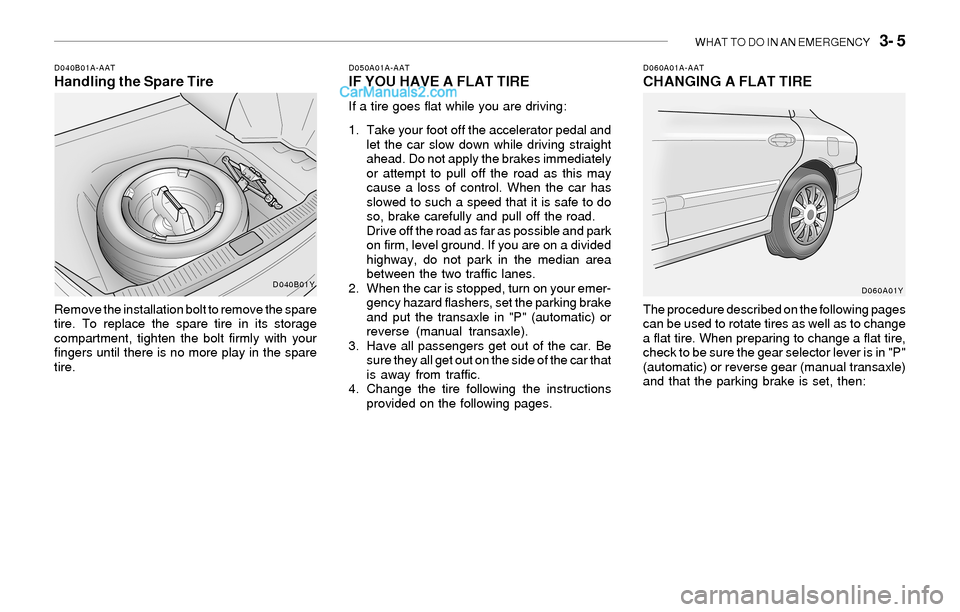
D040B01A-AATHandling the Spare Tire
Remove the installation bolt to remove the spare
tire. To replace the spare tire in its storage
compartment, tighten the bolt firmly with your
fingers until there is no more play in the spare
tire.
D050A01A-AATIF YOU HAVE A FLAT TIRE
If a tire goes flat while you are driving:
1. Take your foot off the accelerator pedal and
let the car slow down while driving straight
ahead. Do not apply the brakes immediately
or attempt to pull off the road as this may
cause a loss of control. When the car has
slowed to such a speed that it is safe to do
so, brake carefully and pull off the road.
Drive off the road as far as possible and park
on firm, level ground. If you are on a divided
highway, do not park in the median area
between the two traffic lanes.
2. When the car is stopped, turn on your emer-
gency hazard flashers, set the parking brake
and put the transaxle in "P" (automatic) or
reverse (manual transaxle).
3. Have all passengers get out of the car. Be
sure they all get out on the side of the car that
is away from traffic.
4. Change the tire following the instructions
provided on the following pages.
D060A01A-AATCHANGING A FLAT TIRE
The procedure described on the following pages
can be used to rotate tires as well as to change
a flat tire. When preparing to change a flat tire,
check to be sure the gear selector lever is in "P"
(automatic) or reverse gear (manual transaxle)
and that the parking brake is set, then:
D040B01Y
D060A01Y
Page 142 of 208

WHAT TO DO IN AN EMERGENCY 3- 9
D080A01A-AATIF YOUR CAR MUST BE TOWEDD060I01Y-AAT8. Lower Vehicle and Tighten NutsD060J01A-AATAfter Changing Wheels
Lower the car to the ground by turning the jack
handle counterclockwise. Then position the
wrench as shown in the drawing and tighten the
wheel nuts. Be sure the socket is seated com-
pletely over the nut. Do not stand on the wrench
handle or use an extension pipe over the wrench
handle.
Go around the wheel tightening every other nut
until they are all tight. Then double-check each
nut for tightness and reinstall the wheel cover.
After changing wheels, have a technician tighten
the wheel nuts to their proper torque as soon as
possible.
Wheel nut tightening torque:Steel wheel & aluminium alloy wheel:
65-80 lb.ft (900-1,100 kg.cm)If you have a tire gauge, remove the valve cap
and check the air pressure. If the pressure is
lower than recommended, drive slowly to the
nearest service station and inflate to the correct
pressure. If it is too high, adjust it until it is correct.
Always reinstall the valve cap after checking or
adjusting tire pressure. If the cap is not re-
placed, air may leak from the tire. If you lose a
valve cap, buy another and install it as soon as
possible.
After you have changed wheels, always secure
the flat tire in its place in the trunk and return the
jack, jack handle, and tools to their proper
storage locations.
CAUTION:Your car can be damaged if towed incor-
rectly!
If your car has to be towed, it should be done by
your Hyundai dealer or a commercial tow truck
service. This will help assure that your car is not
damaged in towing. Also, professionals are
generally aware of state and local laws govern-
ing towing. In any case, rather than risk damage
to your car, it is suggested that you show this
information to the tow truck operator. Be sure
that a safety chain system is used and that all
state and local laws are observed.
!
o OK FOR AUTOMATIC OR MANUAL
TRANSAXLE EQUIPPED VEHICLE
D060D02Y
D040B01YHEF-209
Page 143 of 208
3- 10 WHAT TO DO IN AN EMERGENCY
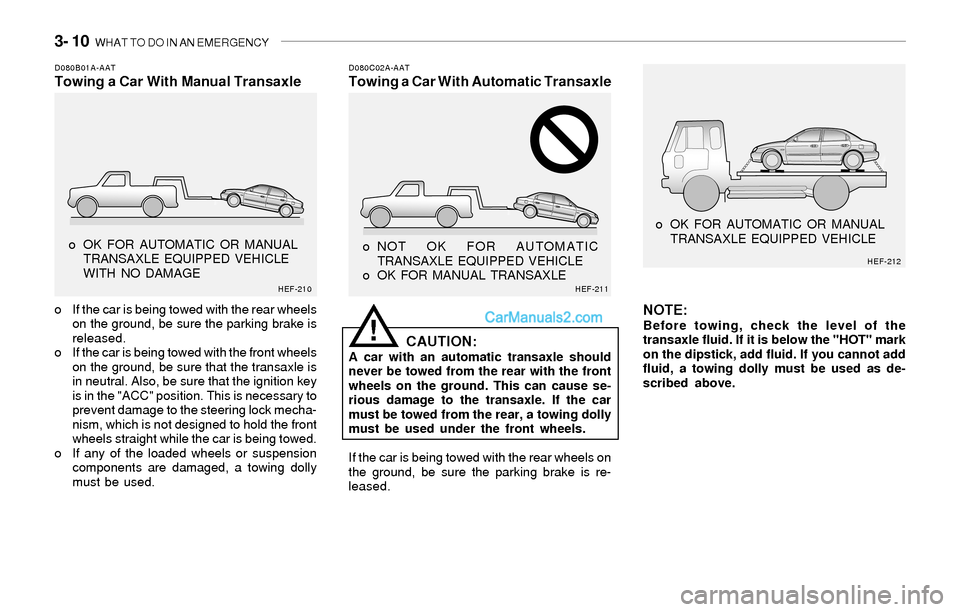
D080B01A-AATTowing a Car With Manual TransaxleD080C02A-AATTowing a Car With Automatic Transaxle
o If the car is being towed with the rear wheels
on the ground, be sure the parking brake is
released.
o If the car is being towed with the front wheels
on the ground, be sure that the transaxle is
in neutral. Also, be sure that the ignition key
is in the "ACC" position. This is necessary to
prevent damage to the steering lock mecha-
nism, which is not designed to hold the front
wheels straight while the car is being towed.
o If any of the loaded wheels or suspension
components are damaged, a towing dolly
must be used.
CAUTION:A car with an automatic transaxle should
never be towed from the rear with the front
wheels on the ground. This can cause se-
rious damage to the transaxle. If the car
must be towed from the rear, a towing dolly
must be used under the front wheels.
If the car is being towed with the rear wheels on
the ground, be sure the parking brake is re-
leased.
NOTE:Before towing, check the level of the
transaxle fluid. If it is below the "HOT" mark
on the dipstick, add fluid. If you cannot add
fluid, a towing dolly must be used as de-
scribed above.!
o OK FOR AUTOMATIC OR MANUAL
TRANSAXLE EQUIPPED VEHICLE
WITH NO DAMAGE o NOT OK FOR AUTOMATIC
TRANSAXLE EQUIPPED VEHICLE
o OK FOR MANUAL TRANSAXLE o OK FOR AUTOMATIC OR MANUAL
TRANSAXLE EQUIPPED VEHICLE
HEF-210HEF-211HEF-212
Page 154 of 208
VEHICLE MAINTENANCE REQUIREMENTS 5- 5
Note :
*1. FOR CALIFORNIA, THIS MAINTENANCE IS RECOMMENDED, BUT NOT REQUIRED.
*2. FOR EVERY 12 MONTHS OR 12,000 MILES (20,000 KM), WHICHEVER OCCURS FIRST : "R"
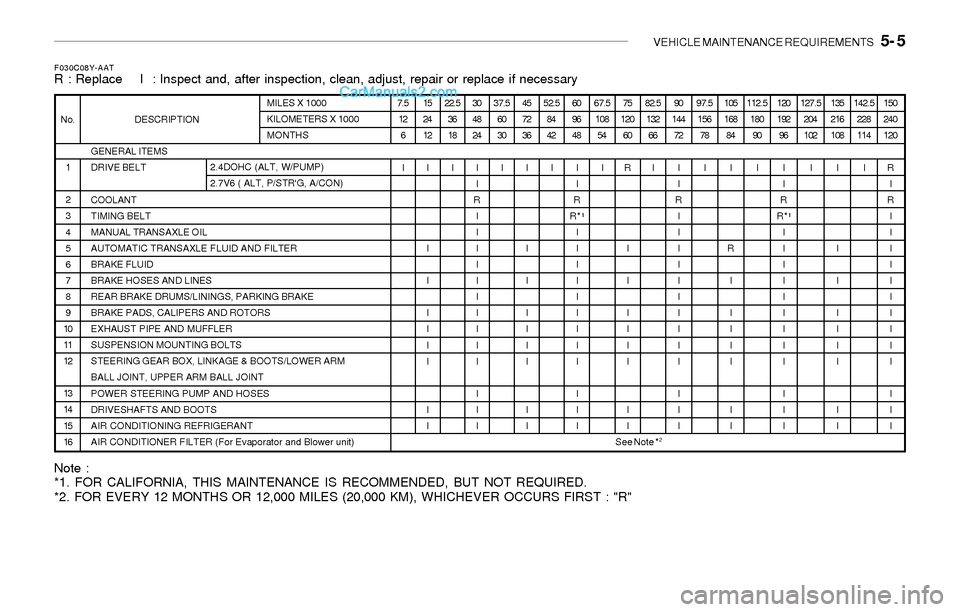
F030C08Y-AATR : Replace I : Inspect and, after inspection, clean, adjust, repair or replace if necessary
GENERAL ITEMS
DRIVE BELT
COOLANT
TIMING BELT
MANUAL TRANSAXLE OIL
AUTOMATIC TRANSAXLE FLUID AND FILTER
BRAKE FLUID
BRAKE HOSES AND LINES
REAR BRAKE DRUMS/LININGS, PARKING BRAKE
BRAKE PADS, CALIPERS AND ROTORS
EXHAUST PIPE AND MUFFLER
SUSPENSION MOUNTING BOLTS
STEERING GEAR BOX, LINKAGE & BOOTS/LOWER ARM
BALL JOINT, UPPER ARM BALL JOINT
POWER STEERING PUMP AND HOSES
DRIVESHAFTS AND BOOTS
AIR CONDITIONING REFRIGERANT
AIR CONDITIONER FILTER (For Evaporator and Blower unit) 1
2
3
4
5
6
7
8
9
10
11
12
13
14
15
16 No. DESCRIPTIONMILES X 1000
KILOMETERS X 1000
MONTHS
2.4DOHC (ALT, W/PUMP)
2.7V6 ( ALT, P/STR'G, A/CON)7.5
12
6
I15
24
12
I
I
I
I
I
I
I
I
I22.5
36
18
I30
48
24
I
I
R
I
I
I
I
I
I
I
I
I
I
I
I
I37.5
60
30
I45
72
36
I
I
I
I
I
I
I
I
I52.5
84
42
I60
96
48
I
I
R
R*¹
I
I
I
I
I
I
I
I
I
I
I
I67.5
108
54
I75
120
60
R
I
I
I
I
I
I
I
I82.5
132
66
I90
144
72
I
I
R
I
I
I
I
I
I
I
I
I
I
I
I
I97.5
156
78
I105
168
84
I
R
I
I
I
I
I
I
I112.5
180
90
I120
192
96
I
I
R
R*¹
I
I
I
I
I
I
I
I
I
I
I
I127.5
204
102
I135
216
108
I
I
I
I
I
I
I
I
I142.5
228
114
I150
240
120
R
I
R
I
I
I
I
I
I
I
I
I
I
I
I
I
See Note *
2
Page 155 of 208
5- 6 VEHICLE MAINTENANCE REQUIREMENTS
SEVERE DRIVING CONDITIONSA - Repeated short distance driving
B - Extensive idling
C - Driving in dusty, rough roads
D - Driving in areas using salt or other corrosive materials or in
very cold weather
E - Driving in sandy areas
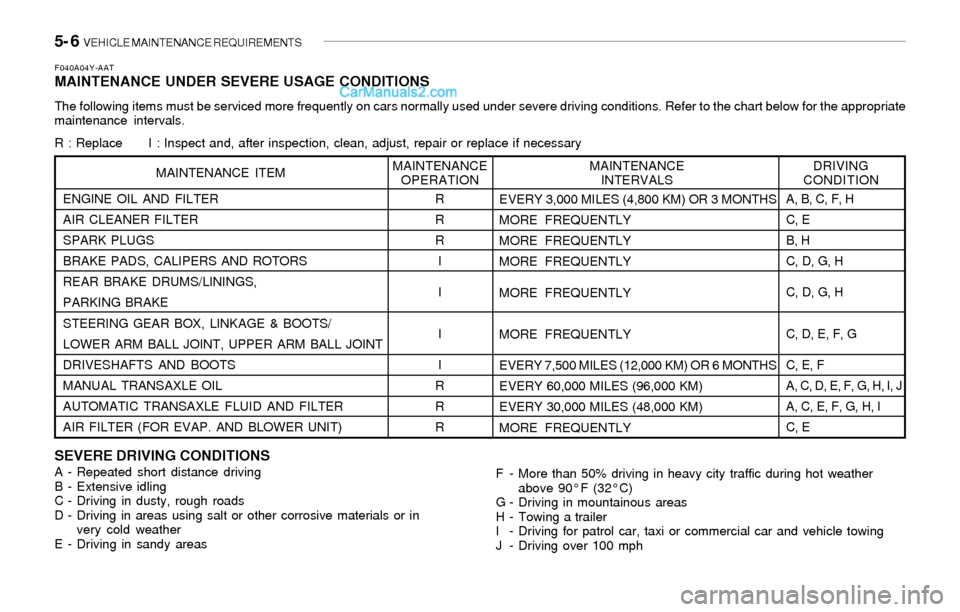
F040A04Y-AATMAINTENANCE UNDER SEVERE USAGE CONDITIONS
The following items must be serviced more frequently on cars normally used under severe driving conditions. Refer to the chart below for the appropriate
maintenance intervals.
R : Replace I : Inspect and, after inspection, clean, adjust, repair or replace if necessary
F - More than 50% driving in heavy city traffic during hot weather
above 90°F (32°C)
G - Driving in mountainous areas
H - Towing a trailer
I - Driving for patrol car, taxi or commercial car and vehicle towing
J - Driving over 100 mph ENGINE OIL AND FILTER
AIR CLEANER FILTER
SPARK PLUGS
BRAKE PADS, CALIPERS AND ROTORS
REAR BRAKE DRUMS/LININGS,
PARKING BRAKE
STEERING GEAR BOX, LINKAGE & BOOTS/
LOWER ARM BALL JOINT, UPPER ARM BALL JOINT
DRIVESHAFTS AND BOOTS
MANUAL TRANSAXLE OIL
AUTOMATIC TRANSAXLE FLUID AND FILTER
AIR FILTER (FOR EVAP. AND BLOWER UNIT)
MAINTENANCE ITEM
R
R
R
I
I
I
I
R
R
REVERY 3,000 MILES (4,800 KM) OR 3 MONTHS
MORE FREQUENTLY
MORE FREQUENTLY
MORE FREQUENTLY
MORE FREQUENTLY
MORE FREQUENTLY
EVERY 7,500 MILES (12,000 KM) OR 6 MONTHS
EVERY 60,000 MILES (96,000 KM)
EVERY 30,000 MILES (48,000 KM)
MORE FREQUENTLY
DRIVING
CONDITION MAINTENANCE
INTERVALS MAINTENANCE
OPERATION
A, B, C, F, H
C, E
B, H
C, D, G, H
C, D, G, H
C, D, E, F, G
C, E, F
A, C, D, E, F, G, H, I, J
A, C, E, F, G, H, I
C, E
Page 157 of 208
5- 8 VEHICLE MAINTENANCE REQUIREMENTS
F070M01Y-AATo Steering Gear Box, Linkage & Boots/
Lower Arm Ball Joint, Upper Arm Ball
Joint
With the vehicle stopped and engine off, check
for excessive free-play in the steering wheel.
Check the linkage for bends or damage. Check
the dust boots and ball joints for deterioration,
cracks, or damage. Replace any damaged
parts.
F070G02A-AATo Brake Fluid
Check brake fluid level in the brake fluid reser-
voir. The level should be between "MIN" and
"MAX" marks on the side of the reservoir. Use
only hydraulic brake fluid conforming to DOT 3
or DOT 4.
F070D01A-AATo Manual transaxle oil
Inspect the manual transaxle oil according to
the maintenance schedule.
NOTE:If the oil level is low, check for possible leaks
before adding oil. Do not overfill.
F070F01A-AATo Brake Hoses and Lines
Visually check for proper installation, chafing,
cracks, deterioration and any leakage. Replace
any deteriorated or damaged parts immedi-
ately.
F070E04A-AATo Automatic Transaxle Fluid and Filter
The fluid level should be in the "HOT" range of
the dipstick, after the engine and transaxle are
at normal operating temperature. Check the
automatic transaxle fluid level with the engine
running and the transaxle in neutral, with the
parking brake properly applied. Use Genuine
Hyundai ATF or DIAMOND ATF SP-III or SK
ATF SP-III when adding or changing fluid.
F070K01A-AATo Exhaust Pipe and Muffler
Visually inspect the exhaust pipes, muffler and
hangers for cracks, deterioration, or damage.
Start the engine and listen carefully for any
exhaust gas leakage. Tighten connections or
replace parts as necessary.
F070J01A-AAT
o Brake Pads, Calipers and Rotors
Check the pads for excessive wear, discs for
run out and wear, and calipers for fluid leakage.
F070H01A-AAT
o Rear Brake Drums and Linings/
Parking Brake
Check the rear brake drums and linings for
scoring, burning, leaking fluid, broken parts,
and excessive wear. Inspect the parking brake
system including the parking brake lever and
cables. For detailed service procedures, refer
to the Shop Manual.
F070L01A-AAT
o Suspension Mounting Bolts
Check the suspension connections for loose-
ness or damage. Retighten to the specified
torque.
Page 159 of 208

6. Do-It-Yourself Maintenance
Engine compartment ........................................................................ 6-2
General checks ................................................................................ 6-4
Checking the engine oil .................................................................... 6-5
Changing the oil and filter ................................................................. 6-6
Checking and changing the engine coolant ...................................... 6-7
Spark plugs ...................................................................................... 6-9
Changing the air cleaner filter .........................................................6-11
Checking the transaxle oil (Manual)...............................................6-12
Checking the transaxle fluid (Automatic) .......................................6-13
Checking the brakes......................................................................6-14
Air conditioning care.......................................................................6-15
Checking drive belts......................................................................6-18
Checking and replacing fuses ........................................................6-18
Replacement of bulbs....................................................................6-21
Junction Box description................................................................6-29
6