2004 Hyundai Sonata ignition
[x] Cancel search: ignitionPage 120 of 208
DRIVING YOUR HYUNDAI 2- 5
!
C050B01A-AATNormal Conditions:
The Starting Procedure:
1. Insert key, and fasten the seat belt.
2. Depress the clutch pedal fully and place the
gearshift lever (manual transaxle) in neutral
or the selector lever (automatic transaxle) in
"P" (park) position.
3. After turning the ignition key to the "ON"
position, make certain all warning lights and
gauges are functioning properly before start-
ing the engine.
WARNING:Be sure that the clutch is fully depressed
when starting a manual transaxle vehicle.
Your manual transaxle equipped vehicle
will not start unless the clutch pedal is fully
depressed. On a manual transaxle equipped
vehicle that can be started without de-
pressing the clutch, there is the potential to
cause
damage to the vehicle or injury to someone
inside or outside the vehicle as a result of
the forward or backward movement of the
vehicle that will occur if the clutch is not
depressed when the vehicle is started.4. Turn the ignition key to the "Start" position
and release it when the engine starts.
After the engine has started, allow the engine
to run for 10 to 20 seconds prior to placing
the vehicle in gear.
The starter should not be operated for more
than 15 seconds at a time. Wait 15-30 sec-
onds between starting attempts to protect
the starter from overheating.
C070A02A-AAT
OPERATING THE MANUAL
TRANSAXLE
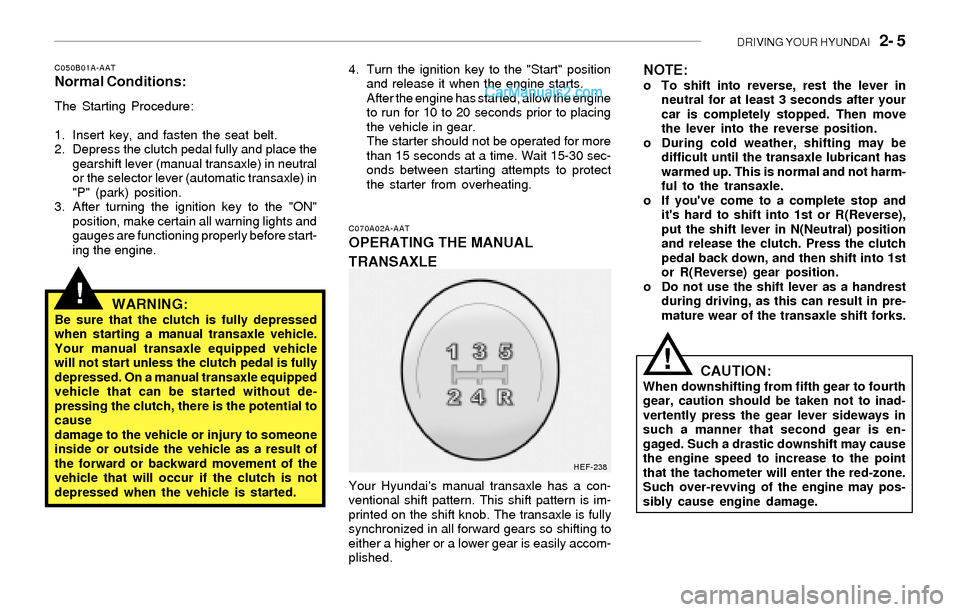
Your Hyundai's manual transaxle has a con-
ventional shift pattern. This shift pattern is im-
printed on the shift knob. The transaxle is fully
synchronized in all forward gears so shifting to
either a higher or a lower gear is easily accom-
plished.
NOTE:o To shift into reverse, rest the lever in
neutral for at least 3 seconds after your
car is completely stopped. Then move
the lever into the reverse position.
o During cold weather, shifting may be
difficult until the transaxle lubricant has
warmed up. This is normal and not harm-
ful to the transaxle.
o If you've come to a complete stop and
it's hard to shift into 1st or R(Reverse),
put the shift lever in N(Neutral) position
and release the clutch. Press the clutch
pedal back down, and then shift into 1st
or R(Reverse) gear position.
o Do not use the shift lever as a handrest
during driving, as this can result in pre-
mature wear of the transaxle shift forks.
!CAUTION:When downshifting from fifth gear to fourth
gear, caution should be taken not to inad-
vertently press the gear lever sideways in
such a manner that second gear is en-
gaged. Such a drastic downshift may cause
the engine speed to increase to the point
that the tachometer will enter the red-zone.
Such over-revving of the engine may pos-
sibly cause engine damage.
HEF-238
Page 122 of 208
DRIVING YOUR HYUNDAI 2- 7
C090A03Y-AATAUTOMATIC TRANSAXLE
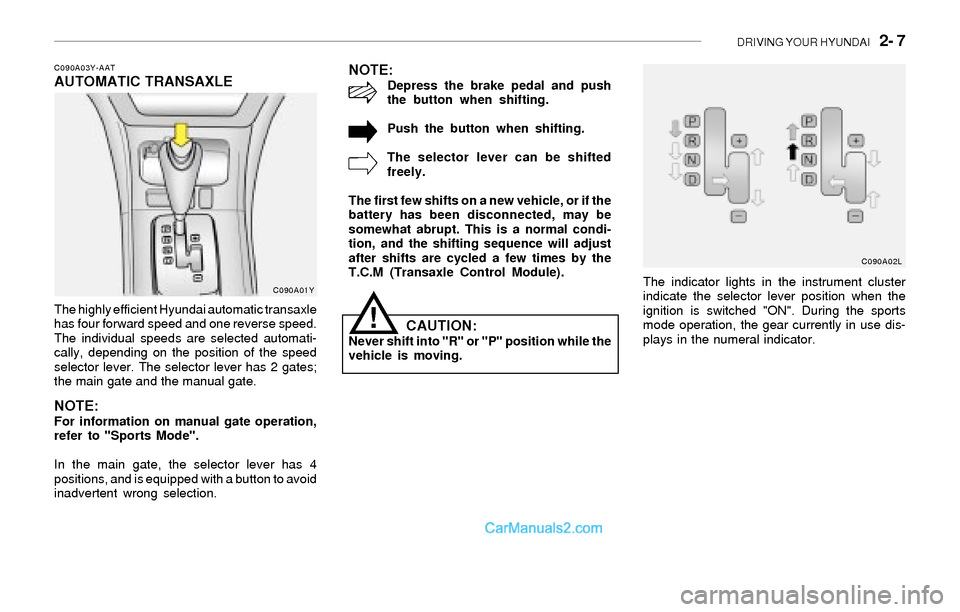
The highly efficient Hyundai automatic transaxle
has four forward speed and one reverse speed.
The individual speeds are selected automati-
cally, depending on the position of the speed
selector lever. The selector lever has 2 gates;
the main gate and the manual gate.
NOTE:For information on manual gate operation,
refer to "Sports Mode".
In the main gate, the selector lever has 4
positions, and is equipped with a button to avoid
inadvertent wrong selection.
NOTE:Depress the brake pedal and push
the button when shifting.
Push the button when shifting.
The selector lever can be shifted
freely.
The first few shifts on a new vehicle, or if the
battery has been disconnected, may be
somewhat abrupt. This is a normal condi-
tion, and the shifting sequence will adjust
after shifts are cycled a few times by the
T.C.M (Transaxle Control Module).
CAUTION:Never shift into "R" or "P" position while the
vehicle is moving.
!
The indicator lights in the instrument cluster
indicate the selector lever position when the
ignition is switched "ON". During the sports
mode operation, the gear currently in use dis-
plays in the numeral indicator.C090A01YC090A02L
Page 124 of 208
DRIVING YOUR HYUNDAI 2- 9
CAUTION:o In sports mode, the driver must execute
upward shifts in accordance with pre-
vailing road conditions, taking care to
keep the engine speed below the red
zone.
o For engine protection, upward shifts are
made automatically when the engine
rpm reaches the red zone.
o By rapidly moving the selector lever back-
wards (-) twice it is possible to skip one
gear, i.e., 3rd to 1st, 4th to 2nd. Since
sudden engine braking and/or rapid ac-
celeration can cause a loss of traction,
however, downshifts must be made care-
fully in accordance with the vehicle's
speed.
!
C090H01L-GATNOTE:o For smooth and safe operation, depress
the brake pedal when shifting from "Neu-
tral" position or "Park" position to a
forward or reverse gear.
o The ignition key must be in the "ON"
position and the brake pedal fully de-
pressed in order to move the shift lever
from the "P" (Park) position to any of the
other positions.
o It is always possible to shift from "R",
"N", "D" position to "P" position. The
vehicle must be fully stopped to avoid
transaxle damage.
C090I02L-GAT
CAUTION:
o Shift into "R" and "P" position only when
the vehicle has completely stopped.
o Do not accelerate the engine in reverse
or any of the forward positions with the
brakes applied.
o Always apply the footbrake when shift-
ing from "P" or "N", to "R", "D"position.
o Do not use the "P" (Park) position in
place of the parking brake. Always set
the parking brake, shift the transaxle
into "P" (Park) position and turn off the
ignition when you leave the vehicle, even
momentarily. Never leave the vehicle
unattended while the engine is running.
o Check the automatic transaxle fluid level
regularly, and add fluid as necessary.
o See the maintenance schedule for the
proper fluid recommendation.
!
NOTE:o In sports mode, only the four forward
gears can be selected. To reverse or park
the vehicle, move the selector lever to
the "R" or "P" position as required.
o In sports mode, downward shifts are
made automatically when the vehicle
slows down. When the vehicle stops, 1st
gear is automatically selected.
o To maintain the required levels of ve-
hicle performance and safety, the sys-
tem may not execute certain gearshifts
when the selector lever is operated.o Before driving away from a stop on a
slippery road, push the selector lever
forward into the +(UP) position. This
causes the transaxle to shift into 2nd
gear which is better for smooth driving
away on a slippery road. Push the selec-
tor lever to the -(DOWN) side to shift
back to 1st gear.
Page 127 of 208
2- 12 DRIVING YOUR HYUNDAI
!
C130A01A-AATGOOD BRAKING PRACTICES
WARNING:
Nothing should be carried on top of the
cargo area cover behind the rear seat. If
there were an accident or a sudden stop,
such objects could move forward and cause
damage to the vehicle or injure the occu-
pants.
o After being parked, check to be sure the
parking brake is not engaged and that the
parking brake indicator light is out before
driving away.
o Driving through water may get the brakes
wet. They can also get wet when the car is
washed. Wet brakes can be dangerous!
Your car will not stop as quickly if the brakes
are wet. Wet brakes may cause the car to
pull to one side. To dry the brakes, apply the
brakes lightly until the braking action returns
to normal, taking care to keep the car under
control at all times. If the braking action does
not return to normal, stop as soon as it is safe
to do so and call your Hyundai dealer for
assistance.
o Don't coast down hills with the car out of gear.
This is extremely hazardous. Keep the car
in gear at all times, use the brakes to slow
down, then shift to a lower gear so that engine
braking will help you maintain a safe speed.o Don't "ride" the brake pedal. Resting your
foot on the brake pedal while driving can be
dangerous because it can result in the brakes
overheating and losing their effectiveness. It
also increases the wear of the brake com-
ponents.
o If a tire goes flat while you are driving, apply
the brakes gently and keep the car pointed
straight ahead while you slow down. When
you are moving slowly enough for it to be safe
to do so, pull off the road and stop in a safe
place.
o If your car is equipped with an automatic
transaxle, don't let your car creep forward.
To avoid creeping forward, keep your foot on
the brake pedal when the car is stopped.
o Use caution when parking on a hill. Engage
the parking brake and place the gear selec-
tor lever in "P" (automatic transaxle) or in first
or reverse gear (manual transaxle). If your
car is facing downhill, turn the front wheels
into the curb to help keep the car from rolling.
If your car is facing uphill, turn the front
wheels away from the curb to help keep the
car from rolling. If there is no curb or if it is
required by other conditions to keep the car
from rolling, block the wheels.
o Under some conditions your parking brake
can freeze in the engaged position. This is
most likely to happen when there is an ac-
cumulation of snow or ice around or near the
rear brakes or if the brakes are wet. If there
is a risk that the parking brake may freeze,
apply it only temporarily while you put the
gear selector lever in "P" (automatic) or in
C300D02L-GATIndicator and Warning
The indicator should illuminate when the ignition
key is turned to "ON" or "start", but should go
out after three seconds.
If the indicator does not illuminate, have it checked
by an authorized Hyundai dealer.
Should there be any unusual conditions in the
device, TCS illuminates as a warning.
If TCS illuminates, pull your car to a safe place
and stop the engine.
Then, start the engine again to check if the TCS
indicator goes out.
If the indicator remains lit even after the engine
has been started, have your car checked by an
authorized Hyundai dealer.
NOTE:1) When TCS illuminates, traction control
is automatically deactivated for safety.
2) This warning function is not provided
when the driver selects the TCS-OFF
mode.
Page 129 of 208

2- 14 DRIVING YOUR HYUNDAI
C160G01A-AATTo Keep Locks from Freezing
To keep the locks from freezing, squirt an
approved de-icer fluid or glycerine into the key
opening. If a lock is covered with ice, squirt it with
an approved de-icing fluid to remove the ice. If
the lock is frozen internally, you may be able to
thaw it out by using a heated key. Handle the
heated key with care to avoid burning the
fingers.
C160D01A-AAT
Check Battery and Cables
Winter puts additional burdens on the battery
system. Visually inspect the battery and cables
as described in Section 6. The level of charge
in your battery can be checked by your Hyundai
dealer or a service station.
C160F01A-AATCheck Spark Plugs and Ignition
System
Inspect your spark plugs as described in Sec-
tion 6 and replace them if necessary. Also
check all ignition wiring and components to be
sure they are not cracked, worn or damaged in
any way.
C160E01A-AATChange to "Winter Weight" Oil if
Necessary
In some climates it is recommended that a lower
viscosity "winter weight" oil be used during cold
weather. See Section 9 for recommendations.
If you aren't sure what weight oil you should use,
consult your Hyundai dealer.
C160C01A-AATUse High Quality Ethylene Glycol
Coolant
Your Hyundai is delivered with high quality
ethylene glycol coolant in the cooling system. It
is the only type of coolant that should be used
because it helps prevent corrosion in the cool-
ing system, lubricates the water pump and
prevents freezing. Be sure to replace or replen-
ish your coolant in accordance with the main-
tenance schedule in Section 5. Before winter,
have your coolant tested to assure that its
freezing point is sufficient for the temperatures
anticipated during the winter.
C160B01A-AATSnowy or Icy Conditions
To drive your vehicle in deep snow, it may be
necessary to use snow tires or to install tire
chains on your tires. If snow tires are needed,
it is necessary to select tires equivalent in size
and type of the original equipment tires. Failure
to do so may adversely affect the safety and
handling of your car. Furthermore, speeding,
rapid acceleration, sudden brake applications,
and sharp turns are potentially very hazardous
practices.
During deceleration, use engine braking to the
fullest extent. Sudden brake applications on
snowy or icy roads may cause skids to occur.
You need to keep sufficient distance between
the vehicle in operation in front and your vehicle.
Also, apply the brake gently. It should be noted
that installing tire chains on the tire will provide
a greater driving force, but will not prevent side
skids.
NOTE:Tire chains are not legal in all states. Check
state laws before fitting tire chains.
Page 135 of 208

3- 2 WHAT TO DO IN AN EMERGENCY
!
!
D010A01A-AATIF THE ENGINE WILL NOT START
D010B01A-AATIf Engine Doesn't Turn Over or Turns
Over Slowly
D010C01Y-AATIf Engine Turns Over Normally but Does
Not Start
1. Check fuel level.
2. Check all connectors at ignition, coil and
spark plugs. Re-connect any that may be
disconnected or loose.
3. Check the fuel line in the engine room.
4. If engine still refuses to start, call a Hyundai
dealer or seek other qualified assistance.
D010D01A-AATIf Engine Stalls While Driving
1. Reduce your speed gradually, keeping a
straight line. Move cautiously off the road to
a safe place.
2. Turn on your emergency flashers.
3. Try to start the engine again. If your vehicle
will not start, contact a Hyundai dealer or
seek other qualified assistance.
WARNING:If the engine will not start, do not push or
pull the car to start it. This could result in a
collision or cause other damage. In addi-
tion, push or pull starting may cause the
catalytic converter to be overloaded and
create a fire hazard.
1. If your car has an automatic transaxle, be
sure the gear selector lever is in "N" or "P"
and the emergency brake is set.2. Check the battery connections to be sure
they are clean and tight.
3. Turn on the interior light. If the light dims or
goes out when you operate the starter, the
battery is discharged.
4. Check the starter connections to be sure
they are securely tightened.
5. Do not push or pull the vehicle to start it. See
instructions for "Jump Starting" on the fol-
lowing pages.
D020A02A-AATJUMP STARTING
WARNING:
The gas produced by the battery during the
jump-start operation is highly explosive. If
these instructions are not followed exactly,
serious personal injury and damage to the
vehicle may occur! If you are not sure how
to follow this procedure, seek qualified
assistance. Automobile batteries contain
sulfuric acid. This is poisonous and highly
corrosive. When jump starting, wear pro-
tective glasses and be careful not to get
acid on yourself, your clothing or on the car.
D010B02YHEF194
Battery
Page 143 of 208
3- 10 WHAT TO DO IN AN EMERGENCY
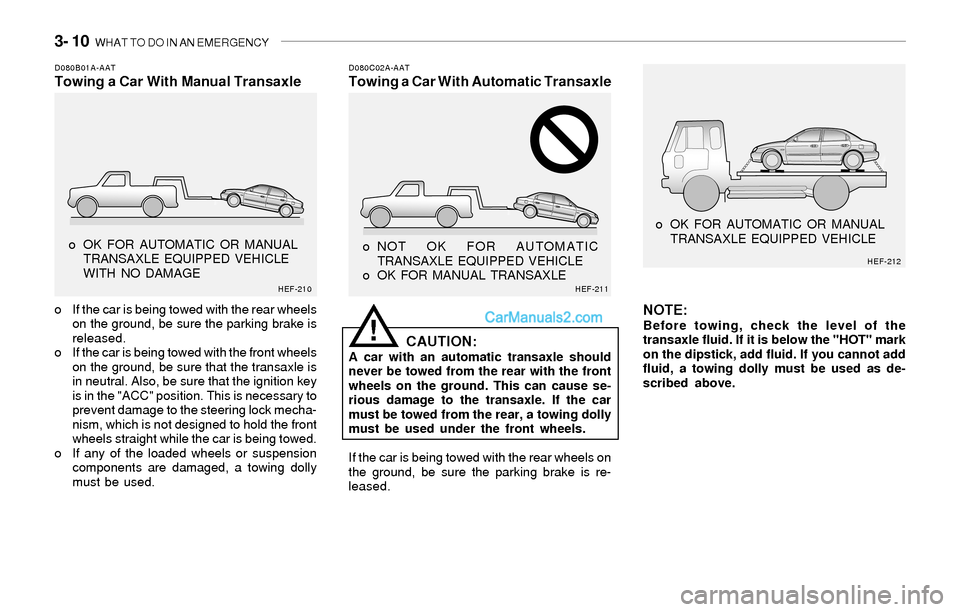
D080B01A-AATTowing a Car With Manual TransaxleD080C02A-AATTowing a Car With Automatic Transaxle
o If the car is being towed with the rear wheels
on the ground, be sure the parking brake is
released.
o If the car is being towed with the front wheels
on the ground, be sure that the transaxle is
in neutral. Also, be sure that the ignition key
is in the "ACC" position. This is necessary to
prevent damage to the steering lock mecha-
nism, which is not designed to hold the front
wheels straight while the car is being towed.
o If any of the loaded wheels or suspension
components are damaged, a towing dolly
must be used.
CAUTION:A car with an automatic transaxle should
never be towed from the rear with the front
wheels on the ground. This can cause se-
rious damage to the transaxle. If the car
must be towed from the rear, a towing dolly
must be used under the front wheels.
If the car is being towed with the rear wheels on
the ground, be sure the parking brake is re-
leased.
NOTE:Before towing, check the level of the
transaxle fluid. If it is below the "HOT" mark
on the dipstick, add fluid. If you cannot add
fluid, a towing dolly must be used as de-
scribed above.!
o OK FOR AUTOMATIC OR MANUAL
TRANSAXLE EQUIPPED VEHICLE
WITH NO DAMAGE o NOT OK FOR AUTOMATIC
TRANSAXLE EQUIPPED VEHICLE
o OK FOR MANUAL TRANSAXLE o OK FOR AUTOMATIC OR MANUAL
TRANSAXLE EQUIPPED VEHICLE
HEF-210HEF-211HEF-212
Page 177 of 208

DO-IT-YOURSELF MAINTENANCE 6- 19
!
If any of your car’s lights or other electrical
accessories stop working, a blown (open) fuse
could be the reason. If the fuse has opened, you
will see that the metal strip inside the fuse has
melted through. If you suspect a blown fuse,
follow this procedure:
1. Turn off the ignition and all other switches.
2. Open the instrument panel junction box and
examine each fuse. Remove each fuse by
pulling it toward you (a small "fuse puller" tool
is contained in the fuse box to simplify this
operation).
3. Be sure to check all other fuses even if you
find one that appears to have burned out.
4. Replace the blown fuse by pressing a new
fuse of the same rating into place. The fuse
should be a snug fit. If it is not, have the fuse
clip repaired or replaced by a Hyundai dealer.
HXGS416Fuse Puller
G210A01A-AATCHECKING THE BATTERY
WARNING:
Batteries can be dangerous! When working
with batteries, carefully observe the follow-
ing precautions to avoid serious injuries.
The fluid in the battery contains a strong solution
of sulfuric acid, which is poisonous and highly
corrosive. Be careful not to spill it on yourself or
the car. If you do spill battery fluid on yourself,
immediately do the following:
o If battery fluid is on your skin, flush the
affected areas with water for at least 15
minutes and then seek medical assistance.
o If battery fluid is in your eyes, rinse out your
eyes with water and get medical assistance
as soon as possible. While you are being
driven to get medical assistance, continue to
rinse your eyes by using a sponge or soft
cloth saturated with water.
o If you swallow battery fluid, drink a large
quantity of water or milk followed by milk of
magnesia, eat a raw egg or drink vegetable
oil. Get medical assistance as soon as
possible. If you do not have a spare fuse, you may be
able to borrow a fuse of the same or lower
rating from an accessory you can tempo-
rarily get along without (the radio or cigarette
lighter, for example). Always remember to
replace the borrowed fuse.
CAUTION:A burned-out fuse indicates that there is a
problem in the electrical circuit. If you re-
place a fuse and it blows as soon as the
accessory is turned on, the problem is
serious and should be referred to a Hyundai
dealer for diagnosis and repair. Never re-
place a fuse with anything except a fuse
with the same or a lower amperage rating.
A higher capacity fuse could cause damage
and create a fire hazard.
NOTE:See page 6-29 for the junction box descrip-
tions.
!
G200B03Y
GoodOpen-Replace