2004 Hyundai Santa Fe adding oil
[x] Cancel search: adding oilPage 125 of 253

1FEATURES OF YOUR HYUNDAI
112
8. Care of Your Compact Discs
Handle disc careful. Store them in their original
cases or other protective cases away from
direct sunlight and dust. If the surface of a disc
is soiled, dampen a clean, soft cloth in a mild,
neutral detergent solution and clean it, wiping
from the center to the edge.
Be sure never to touch the side without writing
when handling discs. Pick up discs by grasping
the outer edges or the edge of the hole and the
outer edge.
9. Care of Your Compact Disc Player
The use of CD lens cleaner discs is not advised,
due to the risk of contaminating the lens of the
CD optics with lubricants internal to the CD
mechanism.
10. CD Adapter Kits
It is possible to use a portable CD player adapter
kit with your cassette tape player after disabling
the tight/loose tape sensing feature on your tape
player.To disable the feature, use the following steps:
1. Turn the radio off.
2. Press and hold the TAPE CD Button. The
radio will display READY and flash the cas-
sette icon.
3. Insert the adapter into the cassette slot. It will
power up the radio and begin playing
This override routine will remain active until
EJECT button is pressed.
NOTE:Before you add any sound equipment to
your vehicle--like a tape player, CB radio,
mobile telephone or two-way radio--be sure
you can add what you want. If you can, it's
very important to do it properly. Added
sound equipment may interfere with the
operation of your vehicle's engine, Delphi
Electronics radio or other systems, and
even damage them. Your vehicle's systems
may interfere with the operation of sound
equipment that has been added improp-
erly. So, before adding sound equipment,
check with your dealer and be sure to check
federal rules covering mobile radio and
telephone units.
!CAUTION:o Do not insert warped or poor quality
discs into the CD player as damage to the
unit may occur.
o Do not insert anything like coins into the
player slot as damage to the unit may
occur.
o Do not place beverages close to the
audio system. The playback mechanism
may be damaged if you spill them.
o Do not impact on the audio system, or
the playback mechanism could be dam-
aged.
o Driving on the off-roads or other vibra-
tions may skip your compact disc.
Do not use the audio system on off-
roads as the discs could be scratched
and damaged.
o Do not grip or pull out the disc with your
hand while the disc is being pulled into
the unit by the self loading mechanism.
These can cause poor disc scratching to
occur or trouble in the compact disc
player.
o Avoid using CD-Recordable or CD-
Rewritable as the player could not be
operated in recording way of the CD
maker. When using the compact disc
player, genuine CDs are recommended.
Page 193 of 253

5VEHICLE MAINTENANCE REQUIREMENTS
8
F070D01A-AAT
o Manual Transaxle Oil
Inspect the manual transaxle oil according to
the maintenance schedule.
NOTE:If the oil level is low, check for possible leaks
before adding oil. Do not overfill.
F070F01A-AAT
o Brake Hoses and Lines
Visually check for proper installation, chafing,
cracks, deterioration and any leakage. Replace
any deteriorated or damaged parts immedi-
ately.
F070E03A-AATo Automatic Transaxle Fluid and Filter
The fluid level should be in the "HOT" range of
the dipstick, after the engine and transaxle are
at normal operating temperature. Check the
automatic transaxle fluid level with the engine
running and the transaxle in neutral, with the
parking brake properly applied. Use GENUINE
HYUNDAI ATF or DIAMOND ATF SP-III or SK
ATF SP-III when adding or changing fluid.
F070C01A-AATo Coolant
The coolant should be changed at the intervals
specified in the maintenance schedule.
F060E01A-AATo Timing Belt
Inspect all parts related to the timing belt for
damage and deformation. Replace any dam-
aged parts immediately.
F060J01A-AATo Spark Plugs
Make sure to install new spark plugs of the
correct heat range.
F060H01A-AAT
o Air Cleaner Filter
A Genuine Hyundai air cleaner filter is recom-
mended when the filter is replaced.
F060G01A-AAT
o Vapor Hose and Fuel Filler Cap
The vapor hose and fuel filler cap should be
inspected at those intervals specified in the
maintenance schedule. Make sure that a new
vapor hose or fuel filler cap is correctly re-
placed.
F065F01O-AAT
o Crankcase Ventilation Hose
Inspect the surface of hose for evidence of heat
and/or mechanical damage. Hard and brittle
rubber, cracking, tears, cuts, abrasions, and
excessive swelling indicate deterioration. Par-
ticular attention should be paid to examine that
hose surface nearest to high heat sources,
such as the exhaust manifold.
Inspect the hose routing to assure that the hose
does not come in contact with any heat source,
sharp edges or moving component which might
cause heat damage or mechanical wear. In-
spect all hose connections, such as clamps and
couplings, to make sure they are secure, and
that no leaks are present. Hose should be
replaced immediately if there is any evidence of
deterioration or damage.
Page 200 of 253

6DO-IT-YOURSELF MAINTENANCE
6CHECKING THE ENGINE OIL
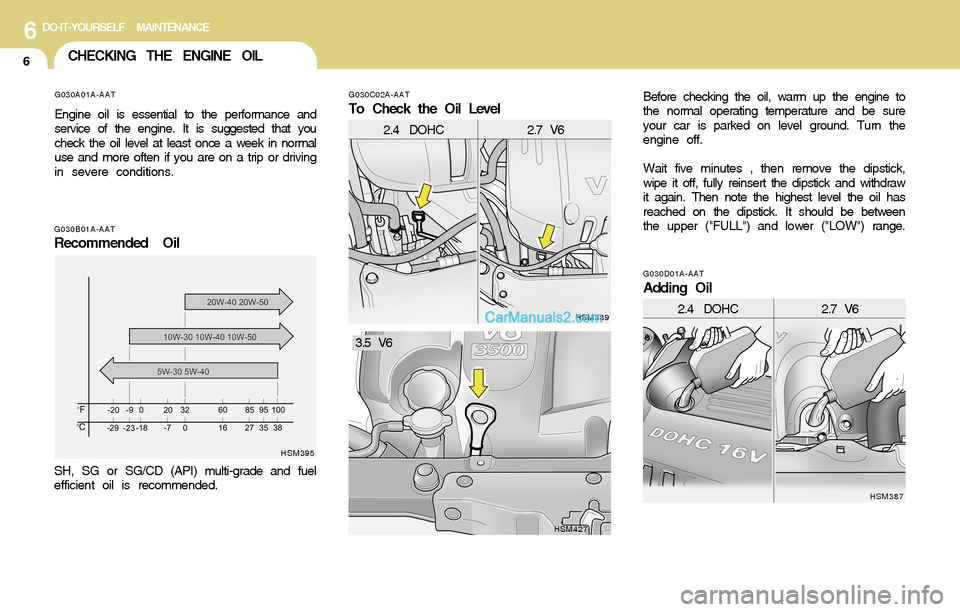
G030A01A-AAT
Engine oil is essential to the performance and
service of the engine. It is suggested that you
check the oil level at least once a week in normal
use and more often if you are on a trip or driving
in severe conditions.
G030C02A-AAT
To Check the Oil Level
G030B01A-AATRecommended Oil
SH, SG or SG/CD (API) multi-grade and fuel
efficient oil is recommended.Before checking the oil, warm up the engine to
the normal operating temperature and be sure
your car is parked on level ground. Turn the
engine off.
Wait five minutes , then remove the dipstick,
wipe it off, fully reinsert the dipstick and withdraw
it again. Then note the highest level the oil has
reached on the dipstick. It should be between
the upper ("FULL") and lower ("LOW") range.
HSM395HSM389G030D01A-AAT
Adding Oil
HSM387
2.4 DOHC2.7 V6
2.4 DOHC2.7 V6
HSM427
3.5 V6
Page 208 of 253

6DO-IT-YOURSELF MAINTENANCE
14CHECKING THE TRANSAXLE
FLUID (AUTOMATIC)
G110A01E-AAT
Transaxle fluid in the automatic transaxle should
be checked at those intervals specified in the
vehicle maintenance schedule in Section 5.
NOTE:Automatic transaxle fluid is basically red
color. As driving distance increases, the
fluid color turns darkish red gradually. It is
a normal condition and you should not
judge the need to replace based upon the
changing color.
You must replace the automatic transaxle
fluid in accordance with intervals specified
in the vehicle maintenance schedule in
section 5.
!
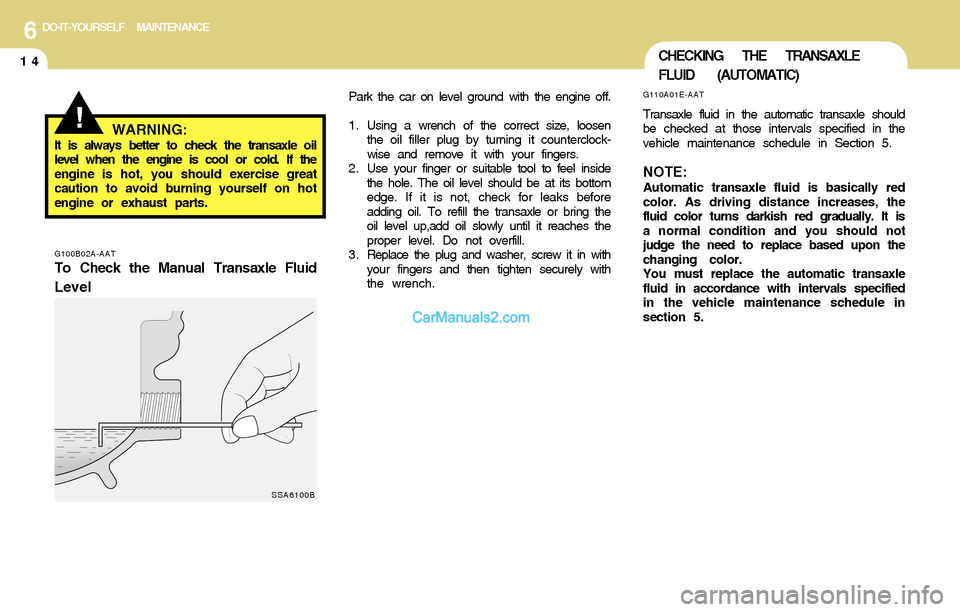
G100B02A-AAT
To Check the Manual Transaxle Fluid
LevelWARNING:
It is always better to check the transaxle oil
level when the engine is cool or cold. If the
engine is hot, you should exercise great
caution to avoid burning yourself on hot
engine or exhaust parts.Park the car on level ground with the engine off.
1 . Using a wrench of the correct size, loosen
the oil filler plug by turning it counterclock-
wise and remove it with your fingers.
2 . Use your finger or suitable tool to feel inside
the hole. The oil level should be at its bottom
edge. If it is not, check for leaks before
adding oil. To refill the transaxle or bring the
oil level up,add oil slowly until it reaches the
proper level. Do not overfill.
3 . Replace the plug and washer, screw it in with
your fingers and then tighten securely with
the wrench.
SSA6100B