2004 Hyundai Santa Fe parking brake
[x] Cancel search: parking brakePage 193 of 253

5VEHICLE MAINTENANCE REQUIREMENTS
8
F070D01A-AAT
o Manual Transaxle Oil
Inspect the manual transaxle oil according to
the maintenance schedule.
NOTE:If the oil level is low, check for possible leaks
before adding oil. Do not overfill.
F070F01A-AAT
o Brake Hoses and Lines
Visually check for proper installation, chafing,
cracks, deterioration and any leakage. Replace
any deteriorated or damaged parts immedi-
ately.
F070E03A-AATo Automatic Transaxle Fluid and Filter
The fluid level should be in the "HOT" range of
the dipstick, after the engine and transaxle are
at normal operating temperature. Check the
automatic transaxle fluid level with the engine
running and the transaxle in neutral, with the
parking brake properly applied. Use GENUINE
HYUNDAI ATF or DIAMOND ATF SP-III or SK
ATF SP-III when adding or changing fluid.
F070C01A-AATo Coolant
The coolant should be changed at the intervals
specified in the maintenance schedule.
F060E01A-AATo Timing Belt
Inspect all parts related to the timing belt for
damage and deformation. Replace any dam-
aged parts immediately.
F060J01A-AATo Spark Plugs
Make sure to install new spark plugs of the
correct heat range.
F060H01A-AAT
o Air Cleaner Filter
A Genuine Hyundai air cleaner filter is recom-
mended when the filter is replaced.
F060G01A-AAT
o Vapor Hose and Fuel Filler Cap
The vapor hose and fuel filler cap should be
inspected at those intervals specified in the
maintenance schedule. Make sure that a new
vapor hose or fuel filler cap is correctly re-
placed.
F065F01O-AAT
o Crankcase Ventilation Hose
Inspect the surface of hose for evidence of heat
and/or mechanical damage. Hard and brittle
rubber, cracking, tears, cuts, abrasions, and
excessive swelling indicate deterioration. Par-
ticular attention should be paid to examine that
hose surface nearest to high heat sources,
such as the exhaust manifold.
Inspect the hose routing to assure that the hose
does not come in contact with any heat source,
sharp edges or moving component which might
cause heat damage or mechanical wear. In-
spect all hose connections, such as clamps and
couplings, to make sure they are secure, and
that no leaks are present. Hose should be
replaced immediately if there is any evidence of
deterioration or damage.
Page 194 of 253

5VEHICLE MAINTENANCE REQUIREMENTS
9
F070L01A-AATo Suspension Mounting Bolts
Check the suspension connections for loose-
ness or damage. Retighten to the specified
torque.
F070G02A-AAT
o Brake Fluid
Check brake fluid level in the brake fluid reser-
voir. The level should be between "MIN" and
"MAX" marks on the side of the reservoir. Use
only hydraulic brake fluid conforming to DOT 3
or DOT 4.
F070K01A-AAT
o Exhaust Pipe and Muffler
Visually inspect the exhaust pipes, muffler and
hangers for cracks, deterioration, or damage.
Start the engine and listen carefully for any
exhaust gas leakage. Tighten connections or
replace parts as necessary.
F070J01A-AATo Brake Pads, Calipers and Rotors
Check the pads for excessive wear, discs for
run out and wear, and calipers for fluid leakage.
F070H01O-AAT
o Rear Brake Discs and Linings/
Parking Brake
Check the rear brake discs and linings for
scoring, burning, leaking fluid, broken parts,
and excessive wear. Inspect the parking brake
system including the parking brake lever and
cables. For detailed service procedures, refer
to the Shop Manual.
F070M01A-AAT
o Steering Gear Box, Linkage & Boots/
Lower Arm Ball Joint
With the vehicle stopped and engine off, check
for excessive free-play in the steering wheel.
Check the linkage for bends or damage. Check
the dust boots and ball joints for deterioration,
cracks, or damage. Replace any damaged
parts.
F070Q01A-AATo Air Conditioning Refrigerant
Check the air conditioning lines and connec-
tions for leakage and damage. Check air con-
ditioning performance according to the relevant
shop manual if necessary.
F070P01A-AATo Driveshafts and Boots
Check the drive shafts, boots and clamps for
cracks, deterioration, or damage. Replace any
damaged parts and, if necessary, repack the
grease.
F070N01A-AAT
o Power Steering Pump, Belt and Hoses
Check the power steering pump and hoses for
leakage and damage. Replace any damaged or
leaking parts immediately. Inspect the power
steering belt for evidence of cuts, cracks, ex-
cessive wear, oiliness and proper tension.
Replace or adjust it if necessary.
Page 199 of 253

6DO-IT-YOURSELF MAINTENANCE
5GENERAL CHECKS
G020C01A-AAT
Vehicle Interior
The following should be checked each time
when the vehicle is driven:
o Lights operation
o Windshield wiper operation
o Horn operation
o Defroster, heating system operation (and air
conditioning, if installed)
o Steering operation and condition
o Mirror condition and operation
o Turn signal operation
o Accelerator pedal operation
o Brake operation, including parking brake
o Manual transaxle operation, including clutch
operation
o Automatic transaxle operation, including
"Park" mechanism operation
o Seat control condition and operation
o Seat belt condition and operation
o Sunvisor operation
If you notice anything that does not operate
correctly or appears to be functioning correctly,
inspect it carefully and seek assistance from
your Hyundai dealer if service is needed.
G020B01A-AAT
Vehicle Exterior
The following should be checked monthly:
o Overall appearance and condition
o Wheel condition and wheel nut torque
o Exhaust system condition
o Light condition and operation
o Windshield glass condition
o Wiper blade condition
o Paint condition and body corrosion
o Fluid leaks
o Door and hood lock condition
o Tire pressure and condition
(including spare tire)
G020A01A-AAT
Engine Compartment
The following should be checked regularly:
o Engine oil level and condition
o Transaxle fluid level and condition
o Brake fluid level
o Clutch fluid level
o Engine coolant level
o Windshield washer fluid level
o Accessory drive belt condition
o Engine coolant hose condition
o Fluid leaks (on or below components)
o Power steering fluid level
o Battery condition
o Air filter condition
Page 201 of 253

6DO-IT-YOURSELF MAINTENANCE
7CHANGING THE OIL AND FILTER
!
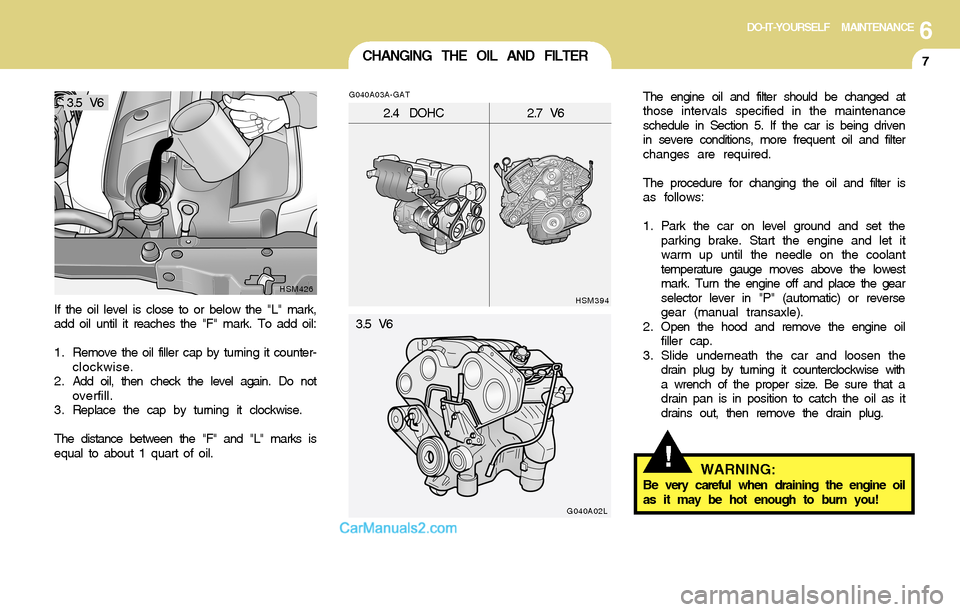
If the oil level is close to or below the "L" mark,
add oil until it reaches the "F" mark. To add oil:
1. Remove the oil filler cap by turning it counter-
clockwise.
2 . Add oil, then check the level again. Do not
overfill.
3 . Replace the cap by turning it clockwise.
The distance between the "F" and "L" marks is
equal to about 1 quart of oil.
HSM426G040A03A-GAT
The engine oil and filter should be changed at
those intervals specified in the maintenance
schedule in Section 5. If the car is being driven
in severe conditions, more frequent oil and filter
changes are required.
The procedure for changing the oil and filter is
as follows:
1. Park the car on level ground and set the
parking brake. Start the engine and let it
warm up until the needle on the coolant
temperature gauge moves above the lowest
mark. Turn the engine off and place the gear
selector lever in "P" (automatic) or reverse
gear (manual transaxle).
2 . Open the hood and remove the engine oil
filler cap.
3. Slide underneath the car and loosen the
drain plug by turning it counterclockwise with
a wrench of the proper size. Be sure that a
drain pan is in position to catch the oil as it
drains out, then remove the drain plug.
HSM394
2.4 DOHC2.7 V6
G040A02L
WARNING:Be very careful when draining the engine oil
as it may be hot enough to burn you! 3.5 V6
3.5 V6
Page 209 of 253

6DO-IT-YOURSELF MAINTENANCE
15
!
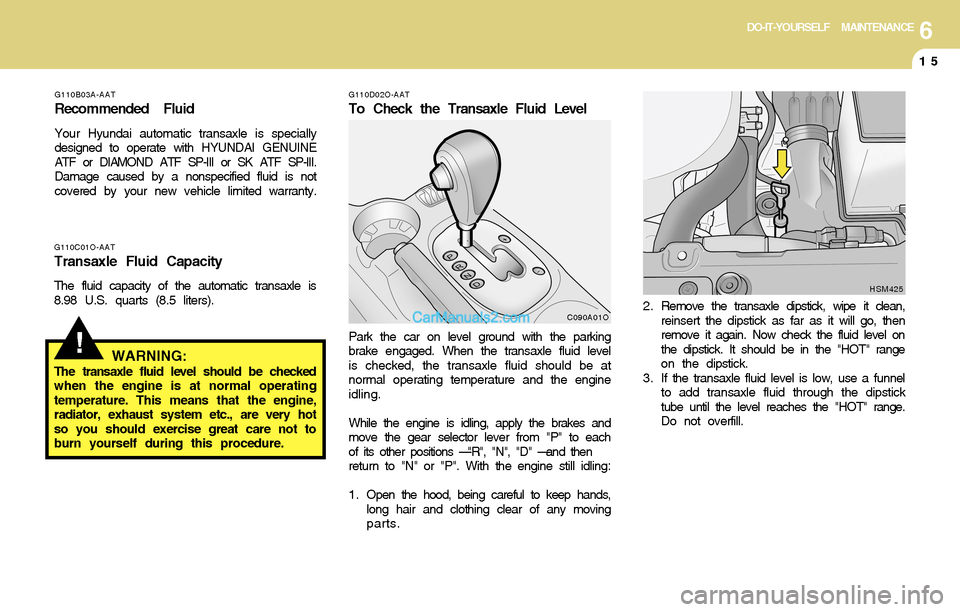
G110D02O-AAT
To Check the Transaxle Fluid Level
Park the car on level ground with the parking
brake engaged. When the transaxle fluid level
is checked, the transaxle fluid should be at
normal operating temperature and the engine
idling.
While the engine is idling, apply the brakes and
move the gear selector lever from "P" to each
of its other positions — "R", "N", "D" — and then
return to "N" or "P". With the engine still idling:
1 . Open the hood, being careful to keep hands,
long hair and clothing clear of any moving
parts.
C090A01O G110C01O-AAT
Transaxle Fluid Capacity
The fluid capacity of the automatic transaxle is
8.98 U.S. quarts (8.5 liters).
WARNING:The transaxle fluid level should be checked
when the engine is at normal operating
temperature. This means that the engine,
radiator, exhaust system etc., are very hot
so you should exercise great care not to
burn yourself during this procedure.
G110B03A-AAT
Recommended Fluid
Your Hyundai automatic transaxle is specially
designed to operate with HYUNDAI GENUINE
ATF or DIAMOND ATF SP-III or SK ATF SP-III.
Damage caused by a nonspecified fluid is not
covered by your new vehicle limited warranty.
HSM425
2 . Remove the transaxle dipstick, wipe it clean,
reinsert the dipstick as far as it will go, then
remove it again. Now check the fluid level on
the dipstick. It should be in the "HOT" range
on the dipstick.
3 . If the transaxle fluid level is low, use a funnel
to add transaxle fluid through the dipstick
tube until the level reaches the "HOT" range.
Do not overfill.
Page 243 of 253

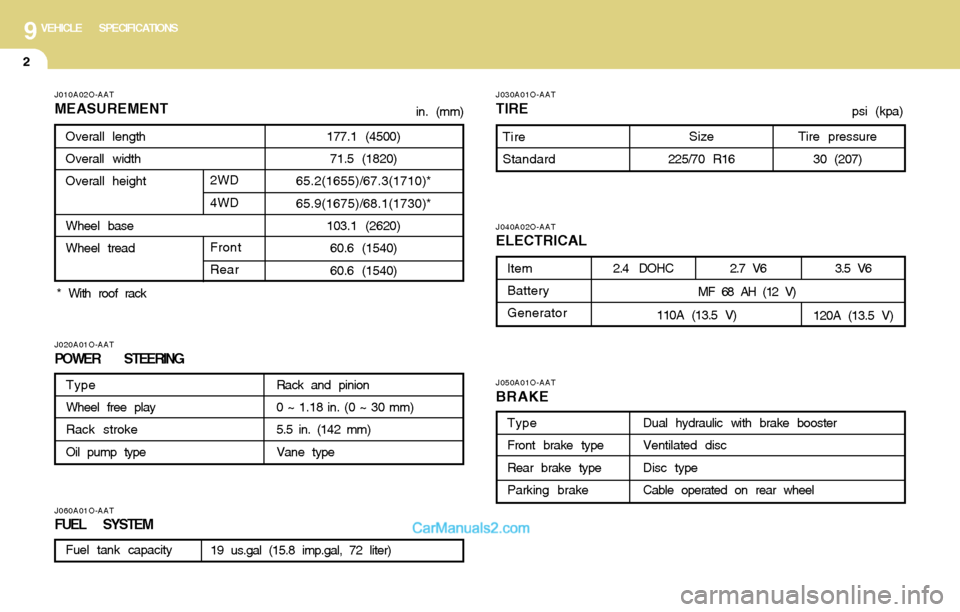
9VEHICLE SPECIFICATIONS
2
J060A01O-AATFUEL SYSTEM
J050A01O-AAT
BRAKE
J040A02O-AATELECTRICAL
J030A01O-AAT
TIRE
J020A01O-AATPOWER STEERING
J010A02O-AAT
MEASUREMENT
177.1 (4500)
71.5 (1820)
65.2(1655)/67.3(1710)*
65.9(1675)/68.1(1730)*
103.1 (2620)
60.6 (1540)
60.6 (1540) Overall length
Overall width
Overall height
Wheel base
Wheel tread
Front
Rear
Type
Wheel free play
Rack stroke
Oil pump typeRack and pinion
0 ~ 1.18 in. (0 ~ 30 mm)
5.5 in. (142 mm)
Vane type
Tire pressure
30 (207)Tire
Standard
Item
Battery
Generator2.4 DOHC2.7 V6
110A (13.5 V)
Dual hydraulic with brake booster
Ventilated disc
Disc type
Cable operated on rear wheel Type
Front brake type
Rear brake type
Parking brake
19 us.gal (15.8 imp.gal, 72 liter)psi (kpa)
Size
225/70 R16Fuel tank capacity
3.5 V6
120A (13.5 V)
MF 68 AH (12 V) 2WD
4WD* With roof rackin. (mm)
Page 248 of 253

10INDEX
2
A
Air bag ...............................................................................................1-31
Air Cleaner Filter ...............................................................................6-12
Air Conditioning
Care..............................................................................................6-18
Operation............................................................................ 1-85, 6-18
Switch...........................................................................................1-84
Antenna ..........................................................................................1-123
Ashtray..............................................................................................1-55
Audio System
Cassete tape player operation (D-285) ...................................1-106
Compact disc player operation (H260) .......................................1-99
Compact disc player operation (D-285) ...................................1-110
Compact disc player operation (D-295) ...................................1-116
Stereo radio operation (H260) .....................................................1-96
Stereo radio operation (D-285) ................................................1-103
Stereo radio operation (D-295) ................................................1-113
B
Battery..................................................................................... 2-23, 6-22
Brake
Anti-lock brake system ................................................................2-15
Brake traction control system (BTCS) ........................................2-15
Checking the brakes ....................................................................6-16
Fluid ..............................................................................................6-16
Pedal clearance ...........................................................................6-20
Pedal free-play .............................................................................6-19
Practices......................................................................................2-21
Breaking-In your New Hyundai .......................................................... 1-3C
Calendar ............................................................................................1-53
Care of Cassette Tapes ................................................................1-121
Care of Disc ...................................................................................1-121
Cargo Security Screen .....................................................................1-69
Catalytic Converter............................................................................. 7-3
Child-Protector Rear Door Lock ......................................................... 1-7
Child Restraint System .....................................................................1-24
Installing a Child Restraint Seat with the
"Tether Anchorage" System .....................................................1-26
Securing the Child Restraint Seat with the "ISOFIX" System ....1-27
Cigarette Lighter ................................................................................1-54
Clock.................................................................................................1-53
Clutch
Checking fluid ...............................................................................6-17
Pedal free-play .............................................................................6-19
Combination Light
Auto light .......................................................................................1-50
Headlight flasher ..........................................................................1-49
Headlight switch ...........................................................................1-49
High-beam switch ........................................................................1-49
Lane change signal ......................................................................1-49
Parking light auto off .....................................................................1-49
Turn signal operation ...................................................................1-48
Consumer Information ........................................................................ 8-6
Cooling Fans .....................................................................................6-23
Page 250 of 253

10INDEX
4
H
Hazard Warning System ..................................................................1-52
Heating and Cooling Control .............................................................1-78
Heating and Ventilation
Air flow control ..............................................................................1-80
Air intake control switch ...............................................................1-79
Bi-level heating .............................................................................1-84
Defrosting / Defogging .................................................................1-87
Fan speed control (Blower control) .............................................1-79
Temperature control ....................................................................1-83
High-Mounted Rear Stop Light .........................................................1-71
Homelink Mirror .................................................................................1-64
Hood Release ....................................................................................1-72
Horn.................................................................................................1-75
I
Ignition Switch ...................................................................................... 2-4
Instrument Cluster and Indicator Lights ................................. 1-38, 1-40
Instrument Panel Light Control (Rheostat) .......................................1-54
Interior Light .......................................................................................1-59
J
Jump Starting ...................................................................................... 3-2
K
Keys................................................................................................... 1-3
If you lose your keys ...................................................................3-13
Positions......................................................................................... 2-4L
Light Bulbs Replacement ..................................................................6-26
Limited-Slip Differential ......................................................................2-20
Luggage Compartment Light ............................................................1-68
Luggage Net ......................................................................................1-69
M
Maintenance Intervals
Explanation of scheduled maintenance items ............................... 5-7
Maintenance under severe usage conditions ............................... 5-6
Scheduled maintenance ................................................................ 5-4
Service requirements .................................................................... 5-2
Mirrors
Day-night inside rearview mirror .................................................1-63
Outside rearview mirror ...............................................................1-61
O
Odometer / Trip Odometer ...............................................................1-47
P
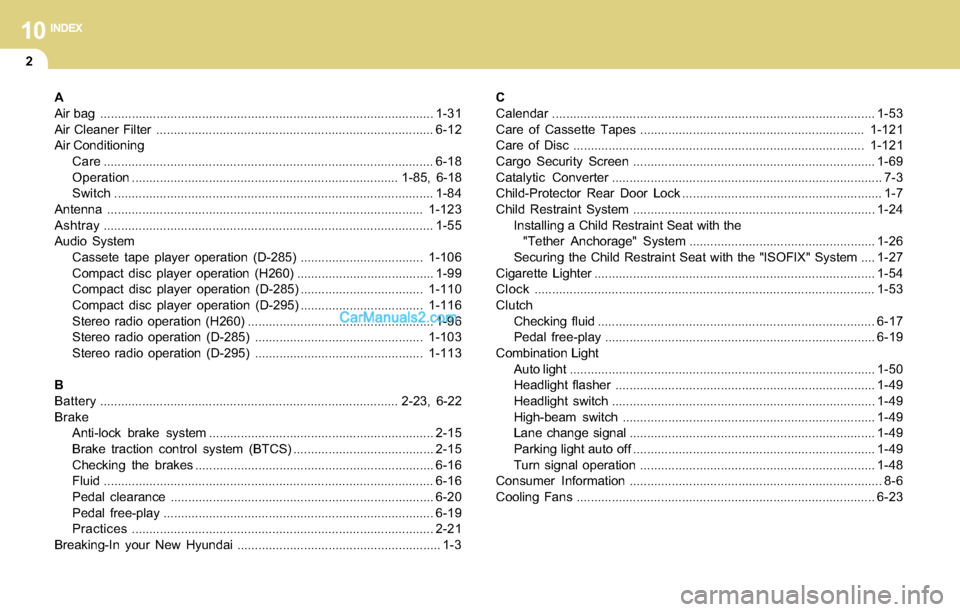
Parking Brake ....................................................................................1-67
Power Driver's Seat ..........................................................................1-14
Power Outlet ......................................................................................1-54
Power Steering Fluid Level ...............................................................6-24