Page 49 of 253

1FEATURES OF YOUR HYUNDAI
36
!
B240C01O-AAT
SRS Care
o The SRS is virtually maintenance free and
there are no parts you can safely service by
yourself. The entire SRS system must be
inspected by an authorized Hyundai dealer
in 10 years after the date that the vehicle was
manufactured.
o Any work on the SRS system, such as
removing, installing, repairing, or any work
on the steering wheel must be performed by
a qualified Hyundai technician. Improper
handling of the airbag system may result in
serious personal injury.WARNING:o Do not install a child restraint system in
the front passenger seat position.
A child restraint system must never be
placed in the front seat. The infant or
baby could be severely injured or killed
by an airbag deployment in case of an
accident.
o Modification to SRS components or wir-
ing, including the addition of any kind of
badges to the pad covers or modifica-
tions to the body structure, can ad-
versely affect SRS performance and lead
to possible injury.
o For cleaning the airbag pad covers, use
only a soft, dry cloth or one which has
been moistened with plain water. Sol-
vents or cleaners could adversely affect
the airbag covers and proper deploy-
ment of the system.
o No objects should be placed over or near
the airbag modules on the steering
wheel, instrument panel, and the front
passenger's panel above the glove box,
because any such object could cause
harm if the vehicle is in a crash severe
enough to cause the airbags to inflate.
o If the airbags inflate, they must be re-
placed by an authorized Hyundai dealer.
HSM393
WARNING:o For best protection from the side impact
airbag system and to avoid being injured
by the deploying side impact airbag,
both front seat occupants should sit in
an upright position with the seat belt
properly fastened. The driver's hands
should be placed on the steering wheel
at the 9:00 and 3:00 o'clock positions.
The passenger's arms and hands should
be placed on their laps.
o Do not use any accessory seat covers.
o Use of seat covers could reduce or pre-
vent the effectiveness of the system.
o Do not install any accessories on the
side or near the side impact airbag.
o Do not use excessive force on the side of
the seat.
o Do not place any objects over the airbag
or between the airbag and yourself.
o Do not place any objects (an umbrella,
bag, etc.) between the front door and the
front seat. Such objects may become
dangerous projectiles and cause injury
if the supplemental side impact air bag
inflates.
o To prevent unexpected deployment of
the side impact air bag that may result in
personal injury,avoid impact to the side
airbag sensor when the ignition key is on.
!
Page 50 of 253

1FEATURES OF YOUR HYUNDAI
37
WARNING:o Do not tamper with or disconnect SRS
wiring, or other components of the SRS
system. Doing so could result in injury,
due to accidental firing of the airbags or
by rendering the SRS inoperative.
o If components of the airbag system must
be discarded, or if the vehicle must be
scrapped, certain safety precautions
must be observed. Your Hyundai dealer
knows these precautions and can give
you the necessary information. Failure
to follow these precautions and proce-
dures could increase the risk of personal
injury.
o If you sell your vehicle, make certain that
this manual is transferred to the new
owner.
o If your car was flooded and has soaked
carpeting or water on the floor, you
shouldn't try to start the engine; have
the car towed to an authorized Hyundai
dealer.
o Do not replace the bumper or the bumper
guard with the one other than the Hyundai
genuine parts. Otherwise, it can ad-
versely affect SRS performance and lead
to unexpected injury.
!
Page 52 of 253
1FEATURES OF YOUR HYUNDAI
39
1. Coolant Temperature Gauge
2. Tachometer
3. Turn Signal Indicator Light
4. High Beam Indicator Light
5. Speedometer
6. Odometer / Trip Odometer
7. Fuel Gauge
8. Malfunction Indicator Light (MIL)
9. Cruise Indicator (If installed)
10. 4WD System Warning Light (If installed)
11. Low Oil Pressure Warning Light12. Supplemental Restraint System (Airbag)
Service Reminder Indicator (SRI)
13. Seat Belt Warning Light
14. Tail Gate Open Warning Light
15. Door Ajar Warning Light
16. Charging System Warning Light
17. Automatic Transaxle Position Indicator Light (If installed)
18. Parking Brake/Low Brake Fluid Level Warning Light
19. ABS Service Reminder Indicator (If installed)
20. Low Fuel Warning Light
21. Traction Control Indicator Light (If installed)
Page 54 of 253
1FEATURES OF YOUR HYUNDAI
41
1. Coolant Temperature Gauge
2. Tachometer
3. Turn Signal Indicator Light
4. High Beam Indicator Light
5. Speedometer
6. Odometer / Trip Odometer
7. Fuel Gauge
8. Malfunction Indicator Light (MIL)
9. Cruise Indicator (If installed)
10. 4WD System Warning Light (If installed)
11. Low Oil Pressure Warning Light
12. Supplemental Restraint System (Airbag)
Service Reminder Indicator (SRI)13. Seat Belt Warning Light
14. Tail Gate Open Warning Light
15. Automatic Transaxle Position Indicator Light (If installed)
16. Door Ajar Warning Light
17. Charging System Warning Light
18. Parking Brake/Low Brake Fluid Level Warning Light
19. ABS Service Reminder Indicator (If installed)
20. Traction Control Off indicator Light (If installed)
21. Low Fuel Warning Light
22. Traction Control Indicator Light (If installed)
Page 55 of 253

1FEATURES OF YOUR HYUNDAI
42WARNING AND INDICATOR LIGHTS
B260B01A-AAT
SRS (Airbag) Service
Reminder Indicator (SRI)
The SRS service reminder indicator (SRI) comes
on and flashes for about 6 seconds after the
ignition key is turned to the "ON" position or after
the engine is started, after which it will go out.
This light also comes on when the SRS is not
working properly. If the SRI does not come on,
or continuously remains on after flashing for
about 6 seconds when you turned the ignition
key to the "ON" position or started the engine,
or if it comes on while driving, have the SRS
inspected by an authorized Hyundai Dealer.
B260D01A-AAT
Turn Signal Indicator Lights
The blinking green arrows on the instrument
panel show the direction indicated by the turn
signals. If the arrow comes on but does not blink,
blinks more rapidly than normal, or does not
illuminate at all, a malfunction in the turn signal
system is indicated. Your dealer should be
consulted for repairs.
B260E02O-AAT
Seat Belt Reminder Light
and Chime
The seat belt reminder light blinks until your seat
belt is fastened when the ignition key is turned
from the "OFF" position to "ON" or "START" and
the warning chime will sound for 6 seconds.
B260F01A-AAT
High Beam Indicator Light
The high beam indicator light comes on when-
ever the headlights are switched to the high
beam or flash position.
B260G01A-AAT
Low Oil Pressure Warning Light
CAUTION:
If the low oil pressure warning light stays on
while the engine is running, serious engine
damage may result. The oil pressure warn-
ing light comes on whenever there is insuf-
ficient oil pressure. In normal operation, it
should come on when the ignition switch
is turned on, then go out when the engine
is started. If the oil pressure warning light
stays on while the engine is running, there
is a serious malfunction.
If this happens, stop the car as soon as it is
safe to do so, turn off the engine and check
the oil level. If the oil level is low, fill the
engine oil to the proper level and start the
engine again. If the light stays on with the
engine running, turn the engine off imme-
diately. In any instance where the oil light
stays on when the engine is running, the
engine should be checked by a Hyundai
dealer before the car is driven again.
!
Page 91 of 253
1FEATURES OF YOUR HYUNDAI
78HEATING AND COOLING CONTROL
HSM417 B710A01O-GAT
(If installed)
1. Side Ventilator
2. Side Defroster Nozzle
3. Windshield Defroster Nozzle
4. Center Ventilator
B710B02O-AAT
Center Ventilator
The center ventilators are located in the middle
of the dashboard. To change the direction of the
air flow, move the knob in the center of the vent
up-and-down and side-to-side. The vents are
opened when the vent knob is moved to " "
position. The vents are closed when the vent
knob is moved to " ". Keep these vents clear
of any obstructions.
B710C02O-AAT
Side Ventilator
The side ventilators are located on each side of
the front door. To change the direction of the air
flow, move the knob in the center of the vent up-
and-down and side-to-side. The vents are
opened when the vent knob is moved to " "
position. The vents are closed when the vent
knob is moved to " ". Keep these vents clear
of any obstructions.
12 3 4 12
Page 92 of 253

1FEATURES OF YOUR HYUNDAI
79HEATING AND VENTILATION
B670C02O-AAT
Air Intake Control Switch
This is used to select fresh outside air or
recirculating inside air.
Fresh
Recirculation
With the " " mode selected, air enters the
vehicle from outside and is heated or cooled
according to the other functions selected.
With the " " mode selected, air from within
the passenger compartment is drawn through
the heating system and heated or cooled ac-
cording to the other functions selected.
B670B01O-AAT
Fan Speed Control (Blower Control)
This is used to select the blower fan speed.
The blower fan speed, and therefore the volume
of air delivered from the system, may be con-
trolled manually by setting the blower control
between the "1" and "4" position.
B670B01O-1
B670C02O
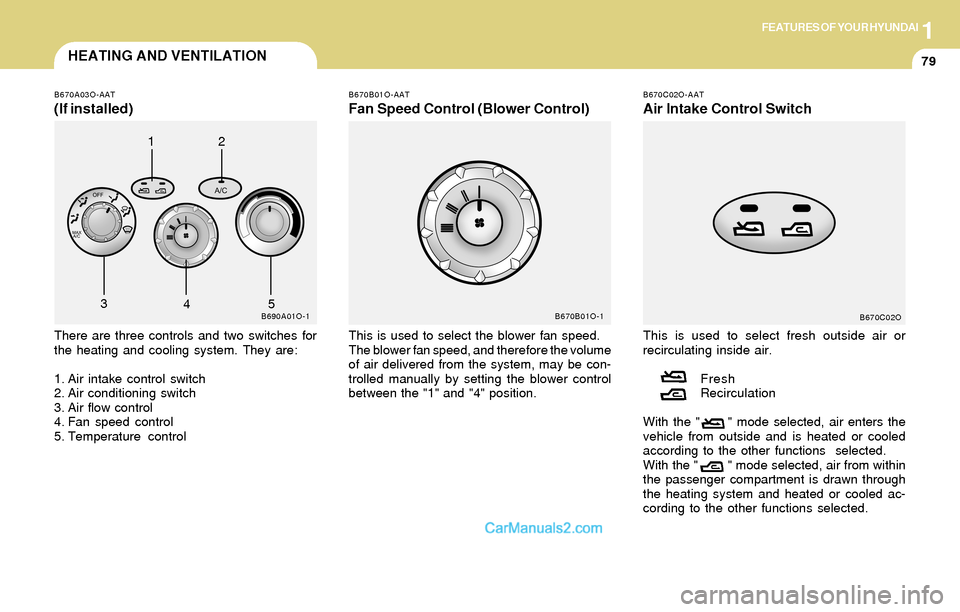
B670A03O-AAT
(If installed)
There are three controls and two switches for
the heating and cooling system. They are:
1. Air intake control switch
2. Air conditioning switch
3. Air flow control
4. Fan speed control
5. Temperature control
B690A01O-1
12
3
45
Page 93 of 253

1FEATURES OF YOUR HYUNDAI
80
B670D03O-AAT
Air Flow Control
This is used to turn the blower fan on/off and to
direct the flow of air. Air can be directed to the
floor, dashboard outlets, or windshield. Five
symbols are used to represent Face, Bi-Level,
Floor, Floor-Defrost and Defrost air position.
The MAX A/C mode is used to cool the inside of
the vehicle faster. The "OFF" mode is used to
turn the blower fan off.
B670D01O-1B670D02O
NOTE:o It should be noted that prolonged opera-
tion of the heating system in " " mode
will give rise to fogging of the wind-
shield and side windows and the air
within the passenger compartment will
become stale. In addition prolonged use
of the air conditioning with the " "
mode selected may result in the air within
the passenger compartment becoming
excessively dry.
o When the ignition switch is turned "ON"
the air intake control switch will change
to " " mode in floor, floor-defrost and
defrost position. This is normal opera-
tion. But, the air intake control switch
will change to " " mode when the
ignition switch is turned "ON" with the
MAX A/C mode selected.
Face-Level
Selecting the "Face" mode will cause air to be
discharged through the face level vents.