2004 Hyundai Grandeur air condition
[x] Cancel search: air conditionPage 182 of 235

VEHICLE MAINTENANCE REQUIREMENTS 5- 9
F070L01A-AAT
o Suspension Mounting Bolts
Check the suspension connections for looseness or damage. Retighten to the specified torque. F070M01Y-AAT
o Steering Gear Box, Linkage &
Boots / Lower Arm Ball Joint, Upper Arm Ball Joint
With the vehicle stopped and engine off, check for excessive free-play inthe steering wheel.Check the linkage for bends or dam-age. Check the dust boots and balljoints for deterioration, cracks, or dam- age. Replace any damaged parts. F070N01A-AAT
o Power Steering Pump, Belt
and Hoses
Check the power steering pump and
hoses for leakage and damage. Re- place any damaged or leaking parts immediately. Inspect the power steer- ing belt for evidence of cuts, cracks,excessive wear, oiliness and proper tension. Replace or adjust it if neces- sary. F070P01A-AAT
o Driveshafts and Boots Check the drive shafts, boots and clamps for cracks, deterioration, or damage. Replace any damaged parts and, if necessary, repack the grease. F070Q01A-AAT
o Air Conditioning Refrigerant Check the air conditioning lines and connections for leakage and damage. Check air conditioning performance according to the relevant shop manualif necessary.
F070J01A-AAT
o Brake Pads, Calipers and
Rotors
Check the pads for excessive wear,
discs for run out and wear, and cali-pers for fluid leakage.
F070K01A-AAT
o Exhaust Pipe and Muffler
Visually inspect the exhaust pipes,
muffler and hangers for cracks, dete-rioration, or damage. Start the engine and listen carefully for any exhaust gas leakage. Tighten connections orreplace parts as necessary.
Page 183 of 235

6. Do-It-Yourself Maintenance
Engine Compartment ..................................................................... 6-2
General Checks .............................................................................. 6-5
Checking the Engine Oil ................................................................ 6-6
Changing the Oil and Filter ........................................................... 6-7
Checking and Changing the Engine Coolant ............................... 6-8
Spark Plugs ..................................................................................6-10
Changing the Air Cleaner Filter ................................................... 6-11
Checking the Transaxle Oil (Manual) .......................................... 6-13
Checking the Transaxle Fluid (Automatic) .................................. 6-14
Checking the Brakes .................................................................... 6-15
Checking the Clutch Fluid ............................................................ 6-16
Air Conditioning Care ................................................................... 6-17
Changing the Air Filter (For Evaporator and Blower Unit) ......... 6-18
Checking Drive Belts .................................................................... 6-21
Checking and Replacing Fuses ................................................... 6-21
Power Steering Fluid Level .......................................................... 6-24
Headlight Aiming Adjustment ....................................................... 6-24
Replacement of Light Bulbs ......................................................... 6-26
Bulb Wattage ................................................................................ 6-33
Junction Box Description ............................................................. 6-34
6
Page 187 of 235

DO-IT-YOURSELF MAINTENANCE 6- 5
G020A02A-AAT
GENERAL CHECKS Engine Compartment
The following should be checked regu- larly:
o Engine oil level and condition
o Transaxle fluid level and condition
o Brake fluid level
o Clutch fluid level
o Coolant level
o Windshield washer fluid level
o Accessory drive belt condition
o Coolant hose condition
o Fluid leaks (on or below compo- nents)
o Power steering fluid level and con- dition
o Battery condition
o Air filter condition G020C01A-AAT Vehicle Interior The following should be checked each time when the vehicle is driven:
o Lights operation
o Windshield wiper operation
o Horn operation
o Defroster, heater system operation
(and air conditioning, if installed)
o Steering operation and condition
o Mirror condition and operation
o Turn signal operation
o Accelerator pedal operation
o Brake operation, including parking
brake
o Manual transaxle operation, includ- ing clutch operation
o Automatic transaxle operation, in- cluding "Park" mechanism opera-tion
o Seat control condition and opera- tion
o Seat belt condition and operation
o Sunvisor operation If you notice anything that does not operate correctly or appears to befunctioning incorrectly, inspect it care- fully and seek assistance from your Hyundai dealer if service is needed.
G020B01A-AAT
Vehicle Exterior
The following should be checked
monthly:
o Overall appearance and condition
o Wheel condition and wheel nut torgue
o Exhaust system condition
o Light condition and operation
o Windshield glass condition
o Wiper blade condition
o Paint condition and body corrosion
o Fluid leaks
o Door and hood lock condition
o Tire pressure and condition (including spare tire)
Page 197 of 235

DO-IT-YOURSELF MAINTENANCE 6- 15
G120A01A-AAT
CHECKING THE BRAKES
CAUTION:
Because brakes are essential to
the safe operation of the car, it is suggested that they be checked and inspected by your Hyundaidealer. The brakes should be checked and inspected for wear at those intervals specified in thevehicle maintenance schedule in Section 5.
G120B01A-A AT
Checking the Brake Fluid Level
WARNING:
Use caution when handling brakefluid. It can damage your vision if it gets into your eyes. It will alsodamage your vehicle's paint if spilled on it and not removed im- mediately.
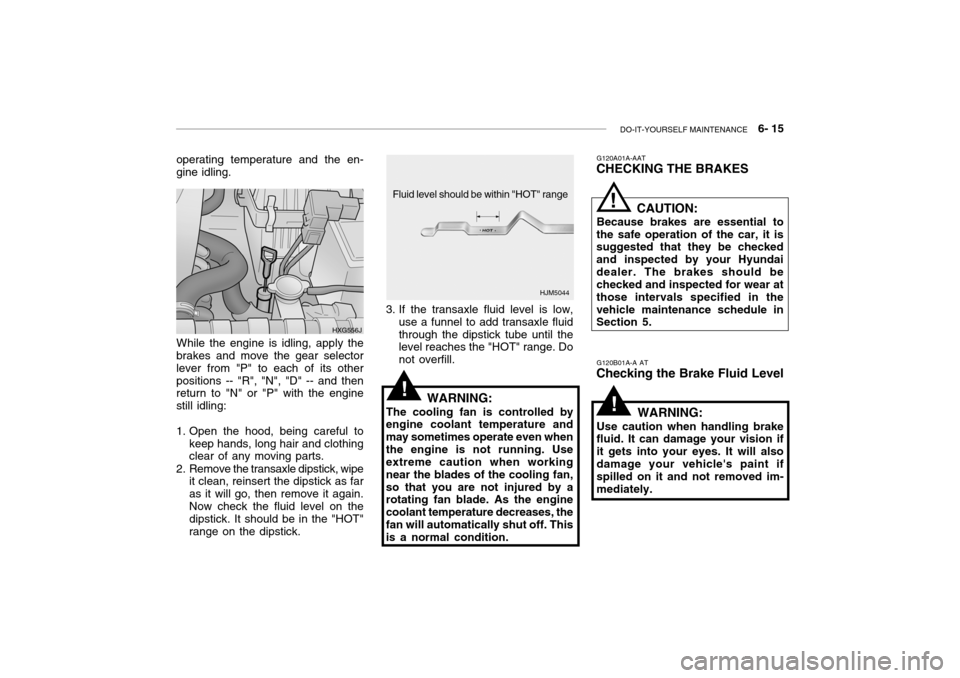
3. If the transaxle fluid level is low,
use a funnel to add transaxle fluidthrough the dipstick tube until the level reaches the "HOT" range. Do not overfill.
WARNING:
The cooling fan is controlled by
engine coolant temperature andmay sometimes operate even whenthe engine is not running. Use extreme caution when working near the blades of the cooling fan,so that you are not injured by a rotating fan blade. As the engine coolant temperature decreases, thefan will automatically shut off. This is a normal condition.
While the engine is idling, apply the
brakes and move the gear selector lever from "P" to each of its otherpositions -- "R", "N", "D" -- and then return to "N" or "P" with the engine still idling:
1. Open the hood, being careful to
keep hands, long hair and clothing clear of any moving parts.
2. Remove the transaxle dipstick, wipe it clean, reinsert the dipstick as far as it will go, then remove it again.Now check the fluid level on the dipstick. It should be in the "HOT" range on the dipstick. HXG556J
!
!
!
operating temperature and the en- gine idling.
HJM5044
Fluid level should be within "HOT" range
Page 199 of 235

DO-IT-YOURSELF MAINTENANCE 6- 17
G140A01A-AAT
AIR CONDITIONING CARE Keeping the Condenser Clean
The air conditioner condenser (and engine radiator) should be checkedperiodically for accumulation of dirt, dead insects, leaves, etc. These can interfere with maximum cooling effi-ciency. When removing such accu- mulations, brush or hose them away carefully to avoid bending the coolingfans. G140B01A-AAT
Checking the Air Conditioning Operation
1. Start the engine and let it run at
fast idle for several minutes with the air conditioning set at the maxi-mum cold setting.
2. If the air coming out of the in-dash vents is not cold, have the air con-ditioning system inspected by your Hyundai dealer. G140C01A-AAT Lubrication To lubricate the compressor and the seals in the system, the air condition-ing should be run for at least 10 minutes each week. This is particu- larly important during cool weatherwhen the air conditioning system is not otherwise in use.CAUTION:
Running the air conditioning sys- tem for extended periods of time with a low refrigerant level may damage the compressor.
G130B02A-AAT To Replace the Fluid Recommended brake fluid conform- ing to DOT 3 or DOT 4 specification should be used. The reservoir cap must be fully tightened to avoid con-tamination from foreign matter or moisture. NOTE: Do not allow any other liquids to contaminate the brake fluid. Sealdamage will result.
WARNING:
Use caution when handling brakefluid. It can damage your vision ifyou get it in your eyes. It will also damage your vehicle's paint if spilled on it and not removed im-mediately.
!
!
Page 200 of 235

6- 18 DO-IT-YOURSELF MAINTENANCE
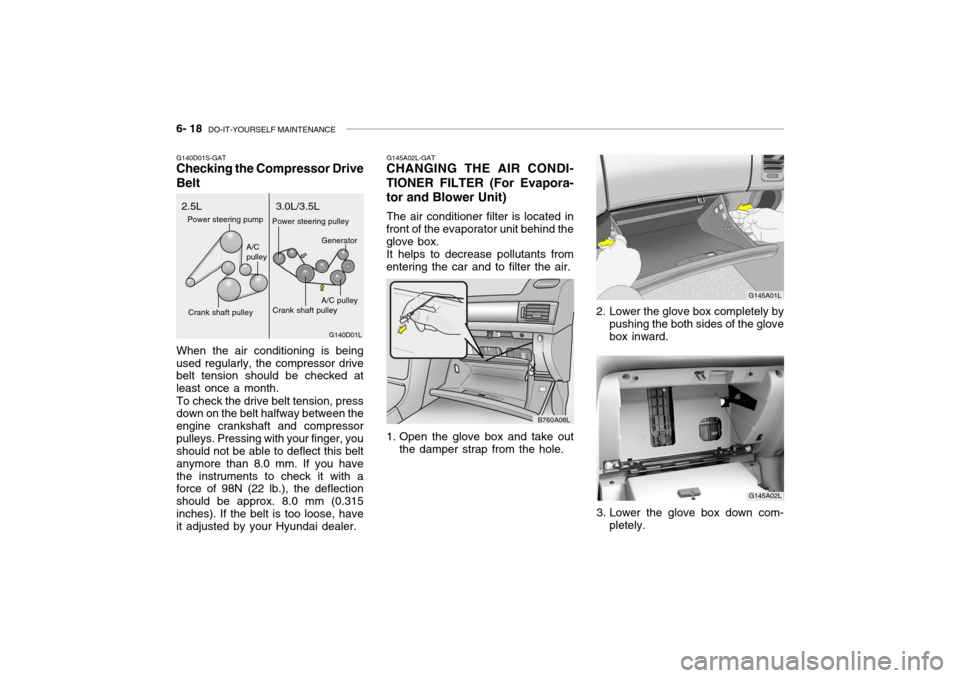
G145A02L-GAT
CHANGING THE AIR CONDI- TIONER FILTER (For Evapora- tor and Blower Unit)
The air conditioner filter is located in
front of the evaporator unit behind the glove box. It helps to decrease pollutants from
entering the car and to filter the air.
G145A01L
1. Open the glove box and take out the damper strap from the hole.
G145A02L
2. Lower the glove box completely by
pushing the both sides of the glovebox inward.
B760A08LG140D01S-GAT Checking the Compressor Drive Belt When the air conditioning is being used regularly, the compressor drive belt tension should be checked at least once a month. To check the drive belt tension, press down on the belt halfway between the engine crankshaft and compressorpulleys. Pressing with your finger, you should not be able to deflect this belt anymore than 8.0 mm. If you have
the instruments to check it with a force of 98N (22 lb.), the deflection should be approx. 8.0 mm (0.315inches). If the belt is too loose, have it adjusted by your Hyundai dealer. G140D01L
2.5L 3.0L/3.5L
Power steering pump
Crank shaft pulley A/C pulley
Crank shaft pulley
A/C pulley
Power steering pulley
Generator
3. Lower the glove box down com-pletely.
Page 201 of 235

DO-IT-YOURSELF MAINTENANCE 6- 19
G145A04L
G145A03L
!
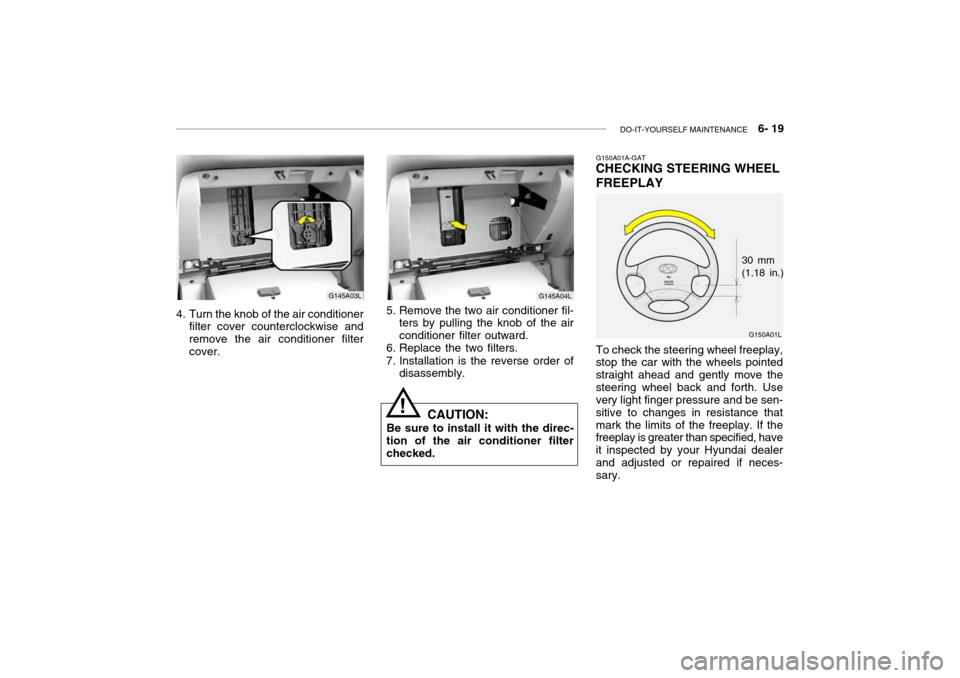
G150A01A-GAT CHECKING STEERING WHEEL FREEPLAY
G150A01L
To check the steering wheel freeplay, stop the car with the wheels pointed straight ahead and gently move thesteering wheel back and forth. Use very light finger pressure and be sen- sitive to changes in resistance thatmark the limits of the freeplay. If the freeplay is greater than specified, have it inspected by your Hyundai dealerand adjusted or repaired if neces- sary. 30 mm(1.18 in.)
4. Turn the knob of the air conditioner filter cover counterclockwise and remove the air conditioner filtercover. 5. Remove the two air conditioner fil-
ters by pulling the knob of the airconditioner filter outward.
6. Replace the two filters.
7. Installation is the reverse order of disassembly.
CAUTION:
Be sure to install it with the direc-
tion of the air conditioner filter checked.
Page 205 of 235

DO-IT-YOURSELF MAINTENANCE 6- 23
G210A01A-AAT
CHECKING THE BATTERY
WARNING:
Batteries can be dangerous! When working with batteries, care-
fully observe the following pre- cautions to avoid serious injuries.
The fluid in the battery contains a
strong solution of sulfuric acid, whichis poisonous and highly corrosive. Be careful not to spill it on yourself or thecar. If you do spill battery fluid on yourself, immediately do the follow- ing:
o If battery fluid is on your skin, flush the affected areas with water for at least 15 minutes and then seek medical assistance.
o If battery fluid is in your eyes, rinse
out your eyes with water and getmedical assistance as soon as possible. While you are being driven to get medical assistance, continueto rinse your eyes by using a sponge or soft cloth saturated with water. o If you swallow battery fluid, drink a
large quantity of water or milk fol-lowed by milk of magnesia, eat araw egg or drink vegetable oil. Get medical assistance as soon as pos- sible.
While batteries are being charged(either by a battery charger or by the vehicle's generator), they produce explosive gases. Always observethese warnings to prevent injuries from occurring:
o Charge batteries only in a well ven- tilated area.
o Do not permit flames, sparks or
smoking in the area.
o Keep children away from the area. G210B01A-AAT Checking the Battery Keep the battery clean. Any evidence of corrosion around the battery posts or terminals should be removed using a solution of household baking sodaand warm water. After the battery terminals are dry, cover them with a light coating of grease.
!
G220A01A-AAT
CHECKING ELECTRIC COOL- ING FANS
WARNING:
The cooling fan is controlled by
engine coolant temperature and may sometimes operate even whenthe engine is not running. Use extreme caution when working near the blades of the cooling fan,so that you are not injured by a rotating fan blade. As the coolant temperature decreases the fan willautomatically shut off. This is a normal condition.
G220B01A-AAT
Checking Engine Cooling Fan
The engine cooling fan should come
on automatically if the engine coolanttemperature is high.
G220C01A-AAT
Checking Condenser Cooling Fan
The condenser cooling fan should
come on automatically whenever the air conditioning is in operation.
!