2004 Hyundai Getz roof
[x] Cancel search: roofPage 315 of 445

FEATURES OF YOUR HYUNDAI 1- 57
2. Insert the hexagonal head wrench
provided with the vehicle into the
socket. This wrench can be found in
the vehicle’s trunk or glove box.
3. Turn the wrench counterclockwise to open or clockwise to close the
sunroof. HGK033B460E01TB-GAT
Resetting the Sunroof System
If the battery has been recharged,
disconnected, if the sunroof is oper-
ated with the hexagonal head wrench
manually, or if the sunroof operation is
stopped by that ignition key is turned to
the "OFF" position while it is moving,
you may need to reset the sunroof.
To do this;
1. Turn the ignition switch "OFF".
2. With pressing "open" "up" button at
the same time, turn the ignition
switch "ON".
3. If the sunroof is set like this, the
sunroof is reset with tilting up/down
automatically once for all.
! CAUTION:
If the sunroof is not reset, it may not
be operated properly.
B460D01TB-AAT
Manual Operation of Sunroof
If the sunroof does not electrically op-
erate:
HGK032
1. Remove the cap located in the rear roof panel by using a coin or screw
driver.
tbuk-1a.p65 3/23/04, 2:22 PM
57
Page 316 of 445

1- 58 FEATURES OF YOUR HYUNDAI
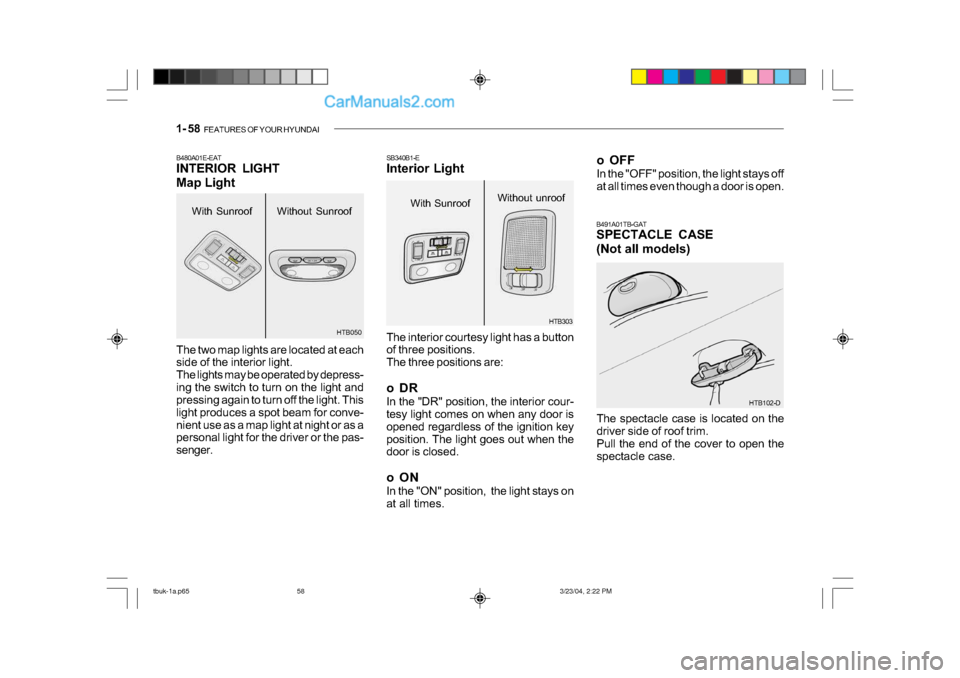
With Sunroof
B480A01E-EAT
INTERIOR LIGHT
Map Light
The two map lights are located at each
side of the interior light.
The lights may be operated by depress-
ing the switch to turn on the light and
pressing again to turn off the light. This
light produces a spot beam for conve-
nient use as a map light at night or as a
personal light for the driver or the pas-
senger.Without Sunroof
HTB050
HTB102-D
B491A01TB-GAT
SPECTACLE CASE
(Not all models)
The spectacle case is located on the
driver side of roof trim.
Pull the end of the cover to open the
spectacle case.
HTB303
With Sunroof
Without unroof
SB340B1-E
Interior Light
The interior courtesy light has a button
of three positions.
The three positions are:
oDR
In the "DR" position, the interior cour-
tesy light comes on when any door is
opened regardless of the ignition key
position. The light goes out when the
door is closed.
oON
In the "ON" position, the light stays on
at all times. o OFF
In the "OFF" position, the light stays off
at all times even though a door is open.
tbuk-1a.p65
3/23/04, 2:22 PM
58
Page 342 of 445

1- 84 FEATURES OF YOUR HYUNDAI
HTB111
B870D01FC-GAT
ANTENNA
Roof Antenna
Your car uses a roof antenna to re-
ceive both AM and FM broadcast sig-
nals.
This antenna is a removable type. To
remove the antenna, turn the antenna
counterclockwise. To install the an-
tenna, turn the antenna clockwise.
o The playback head, capstan and
pinch rollers will develop a coating
of tape residue that can result in
deterioration of sound quality, such
as a wavering sound. They should
be cleaned monthly using a com-
mercially available head cleaning
tape or special solution available
from audio specialty shops. Follow
the supplier's directions carefully and
never oil any part of the tape player
unit.
o Always be sure that the tape is tightly wound on its reel before in-
serting in the player. Rotate a pencil
in the drive sprockets to wind up any
slack. B860A03L
NOTE:
Look at a tape before you insert it.
If the tape is loose, tighten it by
turning one of the hubs with a pen-
cil or your finger.
If the label is peeling off, do not put
it in the drive mechanism.
Do not leave tapes sitting where
they are exposed to hot, warm, or
high humidity, such as on top of
the dashboard or in the player.
If a tape is exposed to extreme heat
or cold, let it reach a moderate tem-
perature before putting it in the
player.
tbuk-1b.p65 3/23/04, 2:24 PM
84
Page 343 of 445

FEATURES OF YOUR HYUNDAI 1- 85
CAUTION:
o Be sure to remove the antenna before washing the car in an au-
tomatic car wash or it may be
damaged.
o Before entering a place with a low height clearance, be sure to
adjust the roof antenna low.
o When reinstalling your antenna, it is important that it is fully tight-
ened to ensure proper reception.!
tbuk-1b.p65 3/23/04, 2:24 PM
85
Page 350 of 445

DRIVING YOUR HYUNDAI 2- 7
!
!
C055B01B-GAT STARTING AND STOPPING THE ENGINE FOR TURBO CHARGER INTERCOOLER (DIESEL EN-GINE)
(1) Do not race the engine or sudden
accelerate the engine immediately after start it. If the engine is cold,allow the engine to idle for severalseconds before it is driven to en-sure sufficient lubrication of the turbo charger unit.
(2) After high speed or extended driv- ing, requiring a heavy engine load, the engine should be allowed to idleabout 1 minute before turning it off.This idle time will allow the turbo charger to cool prior to shutting the engine off.
WARNING:
Do not turn the engine off immedi-ately after it has been subjected to a heavy load. Doing so may cause severe damage to the engine orturbo charger unit.
WARNING:
Be sure that the clutch is fully de-pressed when starting a manualtransaxle vehicle. Otherwise thereis the potential to cause damage tothe vehicle or injury to someone inside or outside the vehicle as a result of the forward or backwardmovement of the vehicle that willoccur if the clutch is not depressedwhen the vehicle is started. SC060B1-E FUEL ECONOMY The following suggestions are made to assist in achieving the greatest degreeof fuel economy.
o Maintaining a constant check on
fuel consumption will enable the most economical use pattern anddriving style to be adopted.
o Avoid using the vehicle for very short journeys if possible, particu-larly when a cold start is involved.
o Ensure that tyre pressures are main-
tained at the correct level.
o Use only the recommended grade
of fuel.
o Avoid carrying unnecessary weight,
and if a roof rack is in use, remove it as soon as possible after use.
o Anticipate the road and conditions ahead to enable adjustments in speed to be made smoothly. Avoidheavy acceleration and sharp brak-ing.
o Avoid cruising at unnecessary high
speeds.
5. Turn the ignition key to the "Start"
position and release it when theengine starts.
tbuk-2.p65 3/23/04, 4:55 PM
7
Page 383 of 445

5- 2 VEHICLE MAINTENANCE REQUIREMENTS
SF020A1-E MAINTENANCE AND SERVICING REQUIREMENTS To ensure the continued reliability and safety of the vehicle, certain routinemaintenance operations are required at specific mileage or time intervals. It is the responsibility of the vehicle owner to ensure that the maintenance schedules shown in both this OwnersManual and the Warranty and Service Passport are adhered to. The new vehicle warranty may be invalidated if the routine maintenance operations are not performed in line with the recommendations outlinedand the safety and durability of the vehicle adversely affected. It is recommended that all mainte- nance operations with the exception of the daily operating checks are en-trusted to a Hyundai dealer to ensure that the latest repair and maintenance procedures and specialized servicingtools are employed. In addition, the use of genuine Hyundai replacement parts will ensure that the vehicle safetyand performance will not be compro- mised. NOTE:
The inspection and testing of cer-
tain electronic fuel injection/engine management and automatic trans- mission control systems require specialised electronic equipmentspecifically designed for Hyundai vehicles. The use of general pur- pose electrical test equipment mayresult in damage to the control unit microprocessors.
SF020C1-E
Specified Scheduled Procedures
The Specified scheduled procedures
are listed in the maintenance charts beginning at page 5-3. The opera- tions specified must be performed at the time or mileage intervals shownirrespective of whether the mileage interval has been reached before the specified time interval. Certain lubricants and components
degrade with both time and mileage(e.g. engine oil and brake fluid) and therefore it is not permissable to base the maintenance schedule upon mile-age alone. It is strongly recommended that the maintenance operations are performed by the factory-trained ordistributor-trained technicians at your Hyundai dealer because of the needfor specialized knowledge and tooling and to ensure that no possibility of invalidating the manufacturers war-ranty exists.
The maintenance schedules relate to
vehicles operated under normal con- ditions, vehicles which are operated under adverse conditions will requiremore frequent maintenance which is described at page 5-6.
SF030B1-E
SERVICE HISTORY
It is important that all scheduled main-
tenance services are recorded in thewarranty and service passport to en- sure that proof of maintenance is avail-able when warranty service is required.
tbuk-5.p65 7/3/2008, 4:10 PM
2
Page 426 of 445

DO-IT-YOURSELF MAINTENANCE 6- 35
G200E01TB-GAT
Inner Panel
HTB260-DFUSE RATING10A
10A
10A
10A
10A
10A
10A
15A
10A
10A
20A
15A
10A
20A
10A
15A
15A
15A
20A
10A
10A
10A
30A
15A
10A
15A
15APROTECTED COMPONENTS
Air conditioner
Stop/Tail Light (LH)
A/Bag Indicator
Audio, Electronic Outside Mirror
Turn signal Light, Back-up Light
Stop/Tail Light (RH)
Cluster
Cigarette Lighter
PCM, ABS control
Air Bag
Door Lock System, Sunroof
Rear Wiper Motor
Start Relay, 9oTheft alarm system
Seat Warmer
Rear window Defroster
ECM
Stop Light, Power Window
Hazard Warning Light, ETACM
Front Wiper Motor
Rear Fog Light
Fog light, ETACM, Power Window, Headlight leveling Device
Blower, Sunroof
Rear window Defroster
Headlight (RH)
Front Fog Light
High Beam Light Indicator, Headlight (LH)
Room Lamp, Audio, Cluster
DESCRIPTION
A/C SW
TAIL LH
A/BAG IND
AUDIO
T/SIG
TAIL RH
CLUSTER C/LIGHT ECU 1
A/BAG
D/LOCK
RR/WPR STARTS/HTD
HTD MIR ECU2
STOP
HAZARD
FRT WPR R/FOG
IGNITION BLOWER PR/HTD
H/LP RH F/FOG
H/LP LH
POWER CONN & R/LP
tbuk-6.p65 3/23/04, 4:27 PM
35
Page 442 of 445

10- 2 INDEX
A
AIR BAG ................................................... ................1-30
AIR CONDITIONING SWI TCH ................................. 1-74
AIR CONDITIONING SYSTEM MAINTENANCE .....6-19
AIR CLEANER FILTER ............................................. 6-14
ANTENNA ................................................... ..............1-84
ANTI-LOCK BRAKE SYSTEM .................................. 2-13
ANTI-THEFT ALARM SYSTEM .................................. 1-7
ASHTRAY ................................................... ..............1-54
AUTO FUEL CUT SWITCH...................................... 1-68
AUTOMATIC TRANSAXLE ......................................... 2-9
AUTOMATIC TRANSAXLE FLUID .......................... .6-16
B
BATTERY MAINTENANCE ......................................6-25
BEFORE STARTING THE ENGINE........................... 2-3
BONNET RELEASE .................................................. 1-62
BRAKE PEDAL FREEPLAY ..................................... 6-22
BRAKE SYSTEM CHECKI NG ..................................6-18
C
CARE OF DI SC ................................................. ........1-82
CARE OF SEAT BELTS ........................................... 1-19
CARGO AREA COVER ............................................ 1-66
CATALYTIC CONVERTOR OPERATING PRECAUTIONS ................................................... ... 7-3
CENTRAL DOOR LOCKS .......................................... 1-5
CHANGING A FLAT TYRE ......................................... 3-6 CHILD-PROOF REAR DOOR LOCK
.......................... 1-5
CHILD RESTRAINT SYST EM ..................................1-22
CIGAR LIGHTER ................................................... ...1-53
CLUTCH PEDAL FREEPLAY ...................................6-22
COMBINATION IGNITION SWITCH AND STEERING LOCK ................................................... 2-3
CONSOLE TRAY ................................................... ...1-54
COOLANT TEMPERATURE GAUGE .......................1-44
D
DAILY OPERATING CHECKS .................................... 6-6
DIGITAL CLOCK ........ ............................................... 1-53
DOOR LOCKS ................................................... ......... 1-5
DOOR WINDOWS ................................................... .1-10
DRINK HOLDER ... ................................................... .1-54
DRIVE BELTS ................................................... ........6-23
DRIVING FOR ECONOMY .......................................2-14
E
EFFECTIVE BRAKING ............................................. 2-13
ELECTRIC COOLING FANS ....................................6-25
EMERGENCY TOWI NG ........................................... 3-12
EMISSION CONTROL SYSTEM ................................ 7-2
ENGINE COM PARTMENT......................................... 6-2
ENGINE COOLANT CHECKING AND REPLACI NG ................................................. ........6-10
ENGINE OIL AND FILTER REPLACEMENT .............. 6-9
ENGINE OIL CO NSUMPTION................................... 6-8
tbuk-10.p65 3/23/04, 4:31 PM
2