Page 1 of 208
 to navigate through\
this reference.
For a printed owners manual, click on authorized manuals or go to")
2004 S2000 Online Reference Owner's Manual
Use these links (and links throughout this manual) to navigate through\
this reference.
For a printed owner's manual, click on authorized manuals or go to www.h\
elminc.com.
Contents
Owner's Identification Form
Introduction ........................................................................\
................................................................. i
A Few Words About Safet y........................................................................\
.........................................ii
Your Vehicle at a Glanc e........................................................................\
.............................................2
Driver and Passenger Safety ........................................................................\
......................................5
Proper use and care of your vehicle's seat belts, and Supplemental Restr\
aint System.
Instruments and Control s........................................................................\
........................................ .37
Instrume nt panel indicator and gauge, and how to use dashboard and steering colu\
mn controls.
Comfort and Convenience Features ........................................................................\
....................... .73
How to operate the climate control system, the audio system, and other c\
onvenience features.
Before Driving........................................................................\
........................................................... .99
What gasoline to use, how to break -in your new vehicle, and how to load luggage and other cargo.
Driving ........................................................................\
..................................................................... .111
The proper way to start the engine, shift the transmission, and park, pl\
us towing a trailer.
Maintenance........................................................................\
.............................................................119
The Maintenance Schedule shows you when you need to take you r vehicle to the dealer.
Taking Care of the Unexpecte d........................................................................\
..............................153
This section covers several problems motorists sometimes experience, an d how to handle them.
Technical Informatio n........................................................................\
.............................................177
ID numbers, dimensions, capacities, and technical information.
Warranty and Customer Relations (U.S. and Canada)................................................................191
A summary of the warranties covering your new Acura, and how to contact \
us.
Authorized Manu als (U.S. only)........................................................................\
..............................195
How to order manuals and other technical literature.
Index........................................................................\
........................................................................\
...... I
Service Information Summary
A summary of information you need when you pull up to the fuel pump.
Page 50 of 208
�µ
�µ
�µ �µ
�µ �µ
�µ
�µ �µ
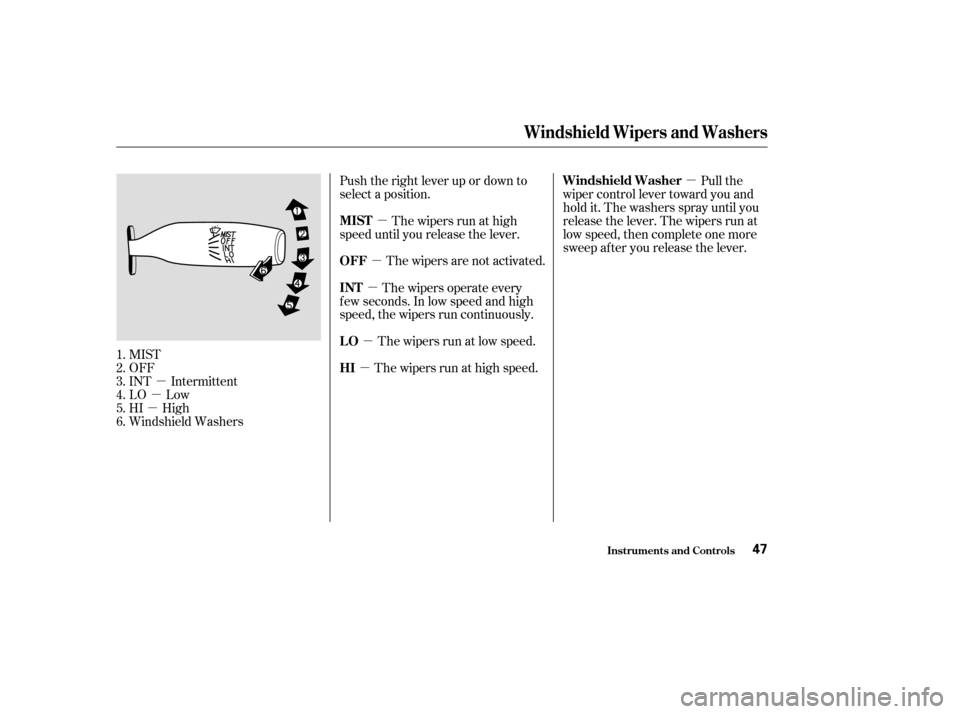
MIST
OFF
INT Intermittent
LO Low
HI High
Windshield Washers Push the right lever up or down to
select a position.
The wipers run at high
speed until you release the lever.
The wipers are not activated. Pull the
wiper control lever toward you and
hold it. The washers spray until you
release the lever. The wipers run at
low speed, then complete one more
sweep after you release the lever.
The wipers operate every
f ew seconds. In low speed and high
speed, the wipers run continuously.
The wipers run at high speed.The wipers run at low speed.
1.
2.
3.
4.
5.
6.
Windshield Wipers and Washers
Inst rument s and Cont rols
MIST
OFF Windshield Washer
INT
HI LO
47
Page 106 of 208
Wait a f ew minutes af ter turning the
engine of f bef ore you check the oil.Remove the dipstick (black
handle).
Wipe the dipstick with a clean
cloth or paper towel.
Insert it all the way back in its hole. Remove the dipstick again and
check the level. It should be
between the upper and lower
marks.
If it is near or below the lower mark,
see on page . Look at the coolant level in the
radiator reserve tank. Make sure it is
between the MAX and MIN lines. If
it is below the MIN line, see
on page f or
inf ormation on adding the proper
coolant.
Refer to on page f or inf ormation
on checking other items in your
Honda.
3. 4.
1.
2. 129132
122
Service Station Procedure
Oil Check
A dding OilEngine Coolant Check
A dding
Engine Coolant
Owner’s Maintenance
Checks
Bef ore Driving103
UPPER MARK
LOWER MARK
DIPSTICK
RESERVE TANK
MAX MIN
Page 114 of 208
This section gives you tips on
starting the engine under various
conditions, and how to operate the
manual transmission. It also includes
important inf ormation on parking
your vehicle, and the braking system.........................
Preparing to Drive .112
.......................
Starting the Engine .113
....
6-speed Manual Transmission . 114
...........................................
Parking .116
.............................
Braking System .116
...............
Anti-lock Brakes (ABS) . 117
...........................
Towing a Trailer .118
Driving
Driving111
Page 119 of 208

Make sure the convertible top and
windows are closed.
Turn of f the lights.
Place any packages, valuables, etc.,
in the trunk or take them with you.
Lock the doors.
Never park over dry leaves, tall
grass, or other f lammable
materials. The hot three way
catalytic converter could cause
these materials to catch on fire.If the vehicle is f acing uphill, turn
the f ront wheels away f rom the
curb, and put the transmission in
f irst gear.
If the vehicle is f acing downhill,
turn the front wheels toward the
curb, and put the transmission in
reverse gear.
Make sure the parking brake is
f ully released bef ore driving away.
Driving with the parking brake
partially set can overheat or
damage the rear brakes.
Your Honda is equipped with disc
brakes at all f our wheels. A power
assist helps reduce the ef f ort needed
on the brake pedal. The ABS helps
you retain steering control when
braking very hard.
Resting your f oot on the pedal keeps
the brakes applied lightly, builds up
heat, and reduces their ef f ectiveness.
It also keeps your brake lights on all
the time, conf using drivers behind
you.
Constant application of the brakes
when going down a long hill builds
up heat and reduces their ef f ective-
ness. Use the engine to assist the
brakes by taking your f oot of f the
accelerator and downshif ting to a
lower gear.
Always use the parking brake when
you park your vehicle. Make sure
the parking brake is set f irmly or
your vehicle may roll if it is on an
incline.
Parking, Braking System
Parking
Parking T ips
Braking System
Driving116
Page 121 of 208

If the ABS indicator comes on, the
anti-lock f unction of the braking
system has shut down. The brakes
still work like a conventional system,
but without anti-lock. You should
have the dealer inspect your vehicle
as soon as possible.It only helps with the
steering control during braking.
such as trying to take a
corner too f ast or making a sudden
lane change.
Always steer moderately
when you are braking hard. Severe
or sharp steering wheel movement
can still cause your vehicle to veer
into oncoming traffic or off the road.
on loose or
uneven surf aces, such as gravel or
snow, than a vehicle without anti-
lock. Your vehicle is not designed to tow a
trailer. Attempting to do so can void
your warranties.
Anti-Lock Brakes (ABS), Towing a Trailer
ABS Indicator
A BS does not reduce the time or
distance it takes to stop the
vehicle.
A BS will not prevent a skid that
results f rom changing direction
abruptly,
A BS cannot prevent a loss of
stability.
A vehicle with A BS may require a
longer distance to stopTowing a TrailerImport ant Saf et y Reminders
Driving118
ANTI-LOCK BRAKE SYSTEM
INDICATOR
Page 147 of 208
Check the condition of the wiper
blades at least every six months.
Replace them if you f ind signs of
cracking in the rubber, areas that are
getting hard, or if they leave streaks
and unwiped areas when used.Raise the wiper arm of f the
windshield.
Disconnect the blade assembly
fromthewiperarmbypushingin
the lock tab. Hold the lock tab in
while you push the blade assembly
toward the base of the arm.Remove the blade f rom its holder
by grasping the tabbed end of the
blade. Pull f irmly until the tabs
come out of the holder.
1.
2.3.
Windshield Washers
Maint enance144
LOCK TABBLADE
Page 154 of 208

�µ
Check the condition of the battery
monthlybylookingatthetest
indicator window. The label on the
battery explains the test indicator’s
colors. Check the terminals f or corrosion (a
white or yellowish powder). To
remove it, cover the terminals with a
solution of baking soda and water. It
will bubble up and turn brown. When
this stops, wash it of f with plain
water. Dry off the battery with a
cloth or paper towel. Coat the
terminals with grease to help prevent
f uture corrosion.
If additional battery maintenance is
needed, see your Honda dealer or a
qualif ied technician.
Battery posts,
terminals, and related accessories
contain lead and lead compounds. If you need to connect the battery to
a charger, disconnect both cables to
prevent damaging your vehicle’s
electrical system. Always disconnect
the negative ( ) cable first, and
reconnect it last.
Checking the Battery
Maint enance
WARNING:
Wash your hands af ter handling.
151
TEST INDICATOR WINDOW
The battery gives off explosive
hydrogen gas during normal
operation.
A spark or flame can cause the
battery to explode with enough
force to kill or seriously hurt you.
Wear protective clothing and a
face shield, or have a skilled
mechanic do the battery
maintenance.
.
Wipe the dipstick with a clean
cloth or paper towel.
Insert it all the way back in its")

