Page 241 of 296

Use the compact spare tire as a
temporary replacement only. Get
your regular tire repaired or replaced
and put it back on your vehicle as
soon as you can.
Check the inf lation pressure of the
compact spare tire every time you
check the other tires. It should be
inf lated to:
Follow these precautions:Never exceed 50 mph (80 km/h)
under any circumstances.
This tire gives a harsher ride and
less traction on some road sur-
f aces. Use greater caution while
driving. Do not mount snow chains on it.
Do not use the compact spare tire
if you are towing a trailer.
Do not use your compact spare
tire on another vehicle unless it is
thesamemakeandmodel.
Turn off the Traction Control
System (see page ). Driving
withthecompactsparetiremay
activate the TCS.
Replace the tire when you can see
the tread wear indicator bars. The
replacement should be the same size
and design tire, mounted on the
same wheel. The spare tire is not
designed to be mounted on a regular
wheel, and the spare wheel is not
designed f or mounting a regular tire.
193
Compact Spare Tire
T aking Care of t he Unexpect ed238
INDICATOR LOCATION MARK
TREAD WEAR INDICATOR BAR
60 psi (420 kPa , 4.2 kgf/cm)
Page 244 of 296
CONT INUED
Remove the spare tire basket.
Unscrew the wing bolt, and take
the spare tire out of its well. After
you have removed the spare tire,
screw this wing bolt back into
place.If you are changing a rear tire,
close the sliding door. Then turn
of f the sliding door MAIN switch.
Loosen each wheel nut 1/2 turn
with the wheel wrench.
Open either of the rear sliding
doors. Pull the f loor carpet up by
lif ting up on the edge, then raise
the f loor lid by pulling up on the
handle. To keep the f loor carpet
and lid out of the way, pull out the
hook on the back of the f loor lid
and attach it into the seat-back
handle on the driver’s seat.
8.
9.
11.
12.
10.
On EX and EX-L models
On EX and EX-L models
Changing a Flat T ire
T aking Care of t he Unexpect ed241
HOOK
HANDLESPARE TIRE
BASKET
SPARE TIRE WING BOLT WHEEL NUTS
Page 245 of 296
�Ú
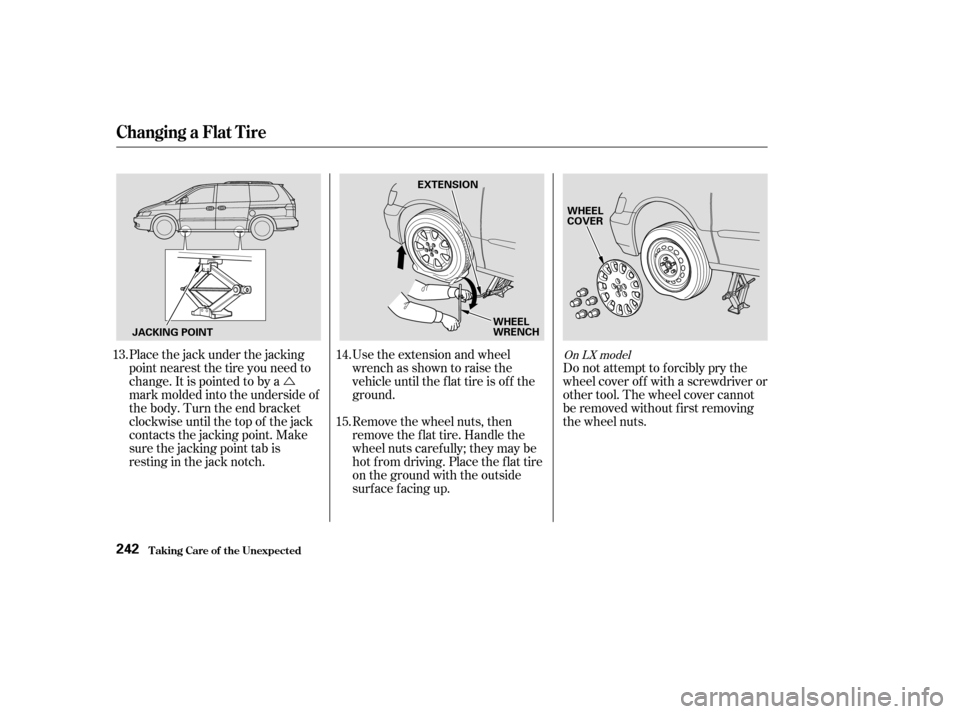
Place the jack under the jacking
point nearest the tire you need to
change. It is pointed to by a
mark molded into the underside of
the body. Turn the end bracket
clockwise until the top of the jack
contacts the jacking point. Make
sure the jacking point tab is
restinginthejacknotch. Use the extension and wheel
wrench as shown to raise the
vehicle until the f lat tire is of f the
ground.
Do not attempt to forcibly pry the
wheel cover of f with a screwdriver or
other tool. The wheel cover cannot
be removed without f irst removing
the wheel nuts.
Remove the wheel nuts, then
remove the f lat tire. Handle the
wheel nuts caref ully; they may be
hot f rom driving. Place the flat tire
on the ground with the outside
surface facing up.
13.
14.
15.
On LX model
Changing a Flat T ire
T aking Care of t he Unexpect ed242
JACKING POINT EXTENSION
WHEEL
WRENCHWHEEL
COVER
Page 246 of 296
Bef ore mounting the spare tire,
wipeanydirtoff themounting
surface of the wheel and hub with
a clean cloth. Wipe the hub
carefully;itmaybehotfrom
driving.Put on the spare tire. Put the
wheel nuts back on f inger-tight,
then tighten them in a crisscross
pattern with the wheel wrench
until the wheel is f irmly against
the hub. Do not try to tighten
them f ully.
Lower the vehicle to the ground
and remove the jack.
Tighten the wheel nuts securely in
the same crisscross pattern. Have
the wheel nut torque checked at
the nearest automotive service
f acility.
Tighten the wheel nuts to:
16. 17.
18. 19.
CONT INUED
Changing a Flat T ire
T aking Care of t he Unexpect ed243
HAB
80 lbf·ft (108 N·m , 11 kgf·m)
Page 248 of 296
Adjust the seat-back of the third
seat to the upright position (see
page ). Install the bracket and
the bracket mounting bolt to the
attachment point as shown, and
tighten the bolt. Make sure the
bracket is securely locked.Install the flat tire on the bracket
with the inside of the wheel facing
toward you. Put the tire mounting
wing bolt in the attachment point
through one of the f ive wheel nut
holes and the bracket as shown.
Poke holes in the vinyl bag. Secure
the f lat tire by tightening the wing
bolt.When the third seat is f olded, the
f lat tire is secured to the f loor on
topof thefoldedseat.Pullupthe
carpet on the attachment point and
remove the plastic screw as
described in the previous
procedure.
Remove the wing bolt from the
bracket that is attached to the
spare tire lid.
23.
90Storing the Flat Tire on the Floor
CONT INUED
Changing a Flat T ire
T aking Care of t he Unexpect ed245
BRACKET
TIRE MOUNTING WING BOLT
Page 249 of 296

Place the flat tire face down on the
attachment point. Put the tire
mountingwingboltinthe
attachment point through one of
the f ive wheel nut holes as shown.
Poke holes in the vinyl bag. Secure
the f lat tire by tightening the wing
bolt.Store the jack in its holder. Turn
the jack’s end bracket clockwise to
lock it in place. Store the tools.
Replace the cover.
Close the tailgate.
Store the plastic screw in the spare
tire well.
Store the wheel cover in the spare
tire well. Make sure it will not get
scratched or damaged.
Storethesparetirebasketinthe
spare tire well.
Unclip the hook f rom the seat
back handle on the driver’s seat,
and lower the f loor lid and the
carpet.
Make sure to adjust the f ront
seats properly bef ore you start
driving (see page ).
24.
25.
26.
27.
89
On LX modelOn EX and EX-L models
Changing a Flat T ire
T aking Care of t he Unexpect ed246
TIRE MOUNTING WING BOLT
ATTACHMENT POINT
Loose items can fly around the
interiorinacrashandcould
seriously injure the occupants.
Store the wheel, jack, and tools
securely before driving.
Page 257 of 296

However, if the brake pedal does not
f eel normal, you should take
immediate action. A problem in one
part of the system’s dual circuit
design will still give you braking at
two wheels. You will f eel the brake
pedal go down much f arther bef ore
the vehicle begins to slow down and
you will have to press harder on the
pedal.
Slow down by shif ting to a lower
gear, and pull to the side of the road
when it is saf e. Because of the long
distance needed to stop, it is
hazardous to drive the vehicle. You
should have it towed and repaired as
soon as possible (seeon page ). If you must drive the vehicle a short
distance in this condition, drive
slowly and caref ully.
If the ABS indicator and the TCS
indicator come on with the brake
system indicator, have the vehicle
inspected by your dealer
immediately.
If the brake system indicator comes
on while driving, the brake f luid level
is probably low. Press lightly on the
brake pedal to see if it f eels normal.
If it does, check the brake f luid level
thenexttimeyoustopataservice
station (see page ).
If the f luid level is low, take the
vehicle to your dealer and have the
brake system inspected f or leaks or
worn brake pads. The brake system
indicator normally
comesonwhenyou
turn the ignition switch to ON (II),
and as a reminder to check the
parking brake. It will stay lit if you do
not f ully release the parking brake.
255
218
Brake System Indicator
T aking Care of t he Unexpect ed
Emergency
Towing
254
U.S. Canada
Page 258 of 296

�µ�µ
�µ
CONT INUED
If your vehicle needs to be towed,
call a prof essional towing service or
organization. Never tow your vehicle
with just a rope or chain. It is very
dangerous.
There are three popular types of
prof essional towing equipment. The tow
truck uses two pivoting arms that go
under the tires (f ront or rear) and lif t
them of f the ground. The other two
tires remain on the ground. The tow
truck uses metal cables with hooks
on the ends. These hooks go around
parts of the f rame or suspension and
the cables lif t that end of the vehicle
of f the ground. Your vehicle’s sus-
pension and body can be seriously
damaged.
Release the parking brake.
Start the engine.
ShifttoD,thentoN.
Turn of f the engine.
The operator
loads your vehicle on the back of a
truck. If your Honda cannot be transported
by f latbed, it should be towed by
wheel-lif t equipment with the f ront
wheels of f the ground. If , due to
damage, your vehicle must be towed
with the f ront wheels on the ground,
do the f ollowing:With the f ront wheels on the ground,
it is best to tow the vehicle no farther
than 50 miles (80 km), and keep the
speedbelow35mph(55km/h).
Emergency T owing
T aking Care of t he Unexpect ed
Wheel-lif t EquipmentSling-t ype Equipment
Flat bed Equipment
T his is
an acceptable way to tow your
Honda. T his method of towing
is unacceptable.
T his is the best way to
transport your Honda.
255
NOTICE: Improper towing preparation
will damage the transmission. Follow
the above procedure exactly. If you
cannot shif t the transmission or start
the engine, your vehicle must be
transported with the f ront wheels of f
the ground.


. Install the bracket and
the bracket mounting bolt to the
attachment point as shown, and
tighten the bolt. Make sure the
brac")