Page 179 of 296
�Î
�Î �Î
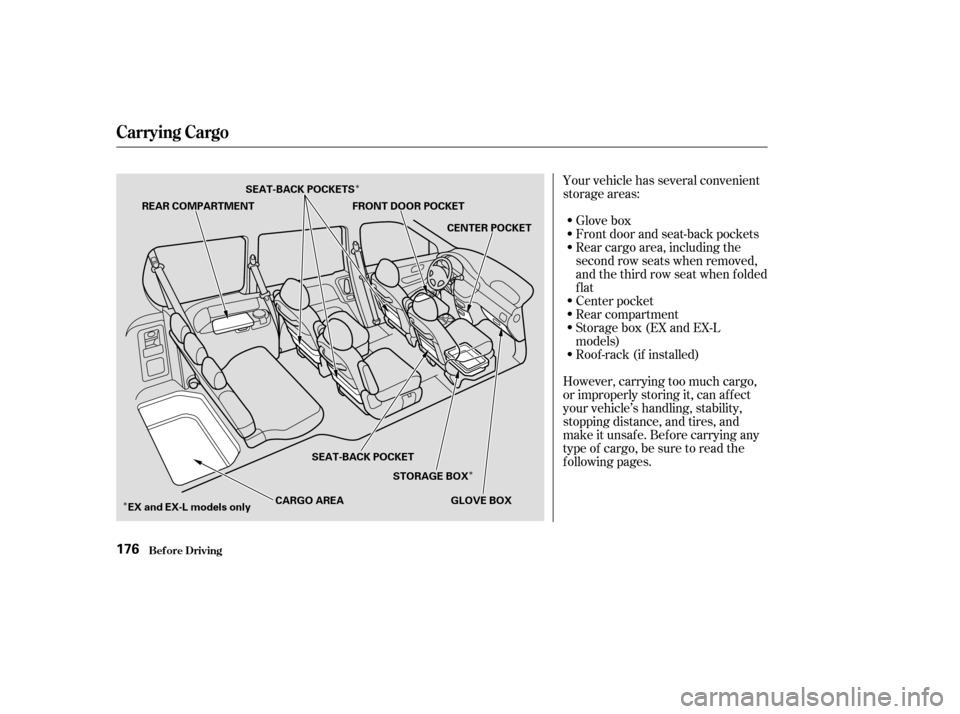
Your vehicle has several convenient
storage areas:
Glove box
Front door and seat-back pockets
Rear cargo area, including the
second row seats when removed,
andthethirdrowseatwhenfolded
flat
Center pocket
Rear compartment
Storage box (EX and EX-L
models)
Roof -rack (if installed)
However, carrying too much cargo,
or improperly storing it, can af f ect
your vehicle’s handling, stability,
stopping distance, and tires, and
make it unsaf e. Bef ore carrying any
type of cargo, be sure to read the
f ollowing pages.
Carrying Cargo
Bef ore Driving176
REAR COMPARTMENT FRONT DOOR POCKET
CENTER POCKET
GLOVE BOX
STORAGE BOX
SEAT-BACK POCKET
EX and EX-L models only CARGO AREA
SEAT-BACK POCKETS
Page 180 of 296
. This f igure
includes the total weight of all
occupants, cargo, accessories, and
the tongue weight if you are towing a
trailer.
To dete")
�·�µ
The maximum load f or your vehicle
is 1,158 lbs (525 kg). This f igure
includes the total weight of all
occupants, cargo, accessories, and
the tongue weight if you are towing a
trailer.
To determine the correct cargo and
luggage load limit:
Locate the statement, ‘‘the
combined weight of occupants and
cargo should never exceed 1,158
lbs (525 kg)’’ on your vehicle’s
placard (on the driver’s doorjamb).
Determine the combined weight
of the driver and passengers that
will be riding in your vehicle.
(Seven is the seating capacity of
your vehicle.) Subtract the combined weight of
the driver and passengers f rom
1,158 lbs (525 kg).
The resulting f igure equals the
available amount of cargo and
luggage load capacity.
For example, if there will be f ive 150
lbs (70 kg) occupants in your vehicle,
the amount of available cargo and
luggage load capacity is 408 lbs (175
kg).
5 150 lbs (70 kg) = 750 lbs (350
kg)
1,158 lbs (525 kg) 750 lbs (350 kg)
= 408 lbs (175 kg) Determine the combined weight
of accessories, luggage, and cargo
beingloadedinthevehicle.The
weight may not saf ely exceed the
available cargo and luggage load
capacity calculated in step 4 [408
lbs(175kg)inthisexample]. If your vehicle will be towing a
trailer, the load f rom your trailer
will be transf erred to your vehicle.
Consult this manual to determine
how this reduces the available
cargo and luggage load capacity of
your vehicle.
The total weight must not exceed
theGrossVehicleWeightRating
(GVWR). The load f or the f ront and
rear axles also must not exceed the
Gross Axle Weight Rating (GAWR)
(see page ).
1.
2. 3.
4.
5.6.
195
Carrying Cargo
Bef ore Driving177
Overloading or improper
loading can affect handling and
stability and cause a crash in
which you can be hurt or killed.
Follow all load limits and other
loading guidelines in this
manual.
Page 181 of 296

Store or secure all items that could
be thrown around and hurt
someone during a crash.
Be sure items placed on the f loor
behind the f ront seats cannot roll
under the seats and interf ere with
the pedals or seat operation.
Keep the glove box closed while
driving. If it is open, a passenger
could injure their knees during a
crash or sudden stop.Distribute cargo evenly on the
f loor of the cargo area, placing the
heaviest items on the bottom and
as f ar f orward as possible. Tie
down items that could be thrown
about the vehicle during a crash or
sudden stop.
If you carry large items that
prevent you f rom closing the
tailgate, exhaust gas can enter the
passenger area. To avoid the
possibility of
, f ollow the instructions
on page .
If you carry any items on a roof
top carrier, be sure the total
weight of the rack and the items
does not exceed 150 lb (68 kg). If you use an accessory roof top
carrier, the roof top carrier weight
limit may be lower. Ref er to the
inf ormation that came with your roof
top carrier.
54
Carrying Items in the Passenger
Compartment
carbon monoxide
poisoning
Carrying Cargo in the Cargo A rea
or on a Roof T op Carrier
Carrying Cargo
Bef ore Driving178
Page 182 of 296
The side cargo net can be installed
on the driver’s side panel in the
cargo area to secure small items. To
install the side cargo net, hook each
loop on the f our corners of the net to
the tabs on the lef t side panel. When
youfolddownthethirdseat,store
the head restraints in the side cargo
net.You can use the cargo net to secure
items in the cargo area, and store
small items between the two halves
of the net. To install the cargo net,
hook the loops on the f our corners of
the net to the tabs at both sides of
the tailgate sill.There are cargo hooks f or plastic
grocery bags on the back of the third
row seat. They are designed to hold
light items. Heavy objects may
damage the hooks.On EX and EX-L models
Carrying Cargo
Side Cargo Net
Cargo Net Cargo Hooks
Bef ore Driving179
CARGO HOOKS
Page 185 of 296
Youshoulddothefollowingchecks
and adjustments bef ore you drive
your vehicle.Make sure all windows, mirrors,
and outside lights are clean and
unobstructed. Remove f rost, snow,
or ice.
Check that the hood is f ully closed.
Visually check the tires. If a tire
looks low, use a gauge to check its
pressure.
Check that any items you may be
carrying are stored properly or
f astened down securely. Check the seat adjustment (see
page ).
Check the adjustment of the
inside and outside mirrors (see
page ).
Check the steering wheel
adjustment (see page ).
Make sure the doors and the
tailgate are securely closed and
locked.
Fasten your seat belt. Check that
your passengers have f astened
their seat belts (see page ).
When you start the engine, check
the gauges and indicators in the
instrument panel (see page ).
3.
2.
1.
4. 5.
6.
7.
8.
9.
10. 88
102 74
1460
Preparing to Drive
Driving182
Page 204 of 296

This section explains why it is
important to keep your vehicle well
maintained and how to f ollow basic
maintenance saf ety precautions.
This section also includes
Maintenance Schedules f or normal
driving and severe driving conditions,
a Maintenance Record, and instruc-
tions f or simple maintenance tasks
you may want to take care of
yourself .
If you have the skills and tools to per-
f orm more complex maintenance
tasks on your Honda, you may want
to purchase the Service Manual. See
page f or inf ormation on how to
obtain a copy, or see your Honda
dealer.......................
Maintenance Saf ety .202
.................
Maintenance Schedule . 203
....................
Maintenance Record .207
..............................
Fluid Locations .210
........................
Adding Engine Oil .211
.........
Changing the Oil and Filter . 212
..............................
Engine Coolant .214
....................
Windshield Washers .216
....
Automatic Transmission Fluid . 216
....................................
Brake Fluid .218
....................
Power Steering Fluid . 219
....................................
Timing Belt .219
....................................
Hood Latch .220
.............................................
Lights .220
.......................................
Seat Belts .226
.....................................
Floor Mats .226
..............................
Audio Antenna .227
..................
Dust and Pollen Filter . 227
.................................
Wiper Blades .228
...............................................
Tires .230
........................
Check the Battery .235
.............................
Vehicle Storage .236
281
Maintenance
Maint enance201
Page 229 of 296
Clean dirty seat belts with a sof t
brush and a mixture of mild soap and
warm water. Do not use bleach, dye,
or cleaning solvents. They can
weaken the belt material. Let the
belts air dry bef ore you use the
vehicle.Dirt build-up in the loops of the seat
belt anchors can cause the belts to
retract slowly. Wipe the insides of
the loops with a clean cloth
dampened in mild soap and warm
water or isopropyl alcohol.
The driver’s f loor mat that came
with your vehicle hooks over the
f loor mat anchor. This keeps the
f loor mat f rom sliding f orward and
possibly interf ering with the pedals.
If you remove the driver’s f loor mat,
make sure to re-anchor it when you
putitbackinyourvehicle.
Seat Belt s, Floor Mat s
Maint enance
Seat Belts Floor Mats
226
LOOP
Page 243 of 296
Thetoolsandjackarebehinda
cover in the cargo area on the
driver’s side. Remove the cover by
turning the handle
counterclockwise, then pulling out
the cover.Take the tools out of the storage
compartment.
Turn the jack’s end bracket
counterclockwise to loosen it, then
remove the jack.The spare tire is stored under the
f loor between the f irst and second
row of seats. If the f ront seats are
adjusted to the rear-most position,
move the seats forward slightly
and adjust the seat-backs to an
upright position (see page ).
Lift up the center table (see page
).
Open the tailgate. Remove the
cargo net.
3.
4. 5.
6.7.
105 89
Changing a Flat T ire
T aking Care of t he Unexpect ed240
COVER