Page 57 of 256

This section gives inf ormation about
the controls and displays that
contribute to the daily operation of
your Honda. All the essential
controls are within easy reach............................
Control Locations .54
............................
Instrument Panel .55
.............................................
Gauges .61
...................................
Trip Meter .61
.....................................
Odometer .61
..................................
Fuel Gauge .61
...................
Temperature Gauge . 62
Outside Temperature ..................................
Indicator .62
Controls Near the Steering .......................................
Wheel .63
......................
Wipers and Washers .64
.........
Turn Signals and Headlights . 65
........
Instrument Panel Brightness . 66
.................
Hazard Warning Button . 66
.................
Rear Window Def ogger . 66
.................................
Parking Brake .67
..........
Steering Wheel Adjustment . 68
...............................
Keys and Locks .69
........................
Immobilizer System .70
................................
Ignition Switch .71
......................................
Door Locks .72
......................
Power Door Locks .72
..............
Childproof Door Locks . 72
...........
Tailgate and Hatch Glass . 73
.......................
Remote Transmitter .74 ....................................
Seat Heaters .76
.................................................
Seats .77
........................
Seat Adjustments .77
Driver’s Seat Height ..............................
Adjustment .78
......................................
Armrests .78
..........................
Head Restraints .79
..........
Reclining the Front Seats . 80
...
Folding the Rear Seats Down . 81
..........
Folding the Rear Seat Up . 82
.....................
Detachable Anchor .84
..............................
Power Windows .86
........................................
Grove Box .87
.........................................
Moonroof .88
.............................................
Mirrors .89
....
Adjusting the Power Mirrors . 89
................
Power Mirror Heaters . 90
...........
Interior Convenience Items . 91
.............................
Beverage Holder .92
...................................
Built-in Table .92
.....................................
Storage Box .94
..........................
Sunglasses Holder .94
....................................
Center Table .94
..............
Accessory Power Sockets . 95
Instruments and Controls
Inst rument s and Cont rols53
Page 80 of 256
Do not use the seat heaters when the
engine is of f or when idling f or a
long period of time. They can drain
the battery, making your vehicle
hard to start.
Because of the sensors f or the side
airbag system, there is no heaters in
the passenger’s seat-backs.
Both f ront seats are equipped with
seat heaters. The ignition switch in
the ON (II) position to use them.
Push the heater switch to turn the
power on or of f . The indicators will
comeonandremainonwhilethe
heaters are on.
On EX-L model in Canada
Inst rument s and Cont rols
Seat Heaters
76
DRIVER’S SEAT HEATER SWITCH
PASSENGER’S SEAT HEATER SWITCH
Page 81 of 256
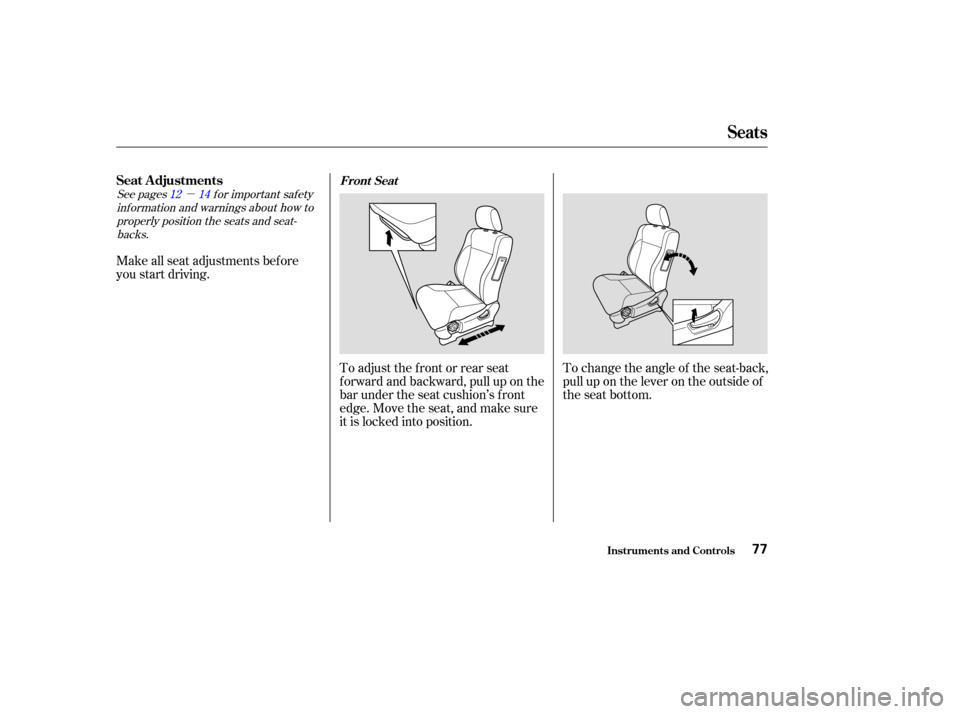
�µ
See pages f or important saf ety
inf ormation and warnings about how toproperly position the seats and seat-backs. 12 14
Make all seat adjustments bef ore
you start driving.
To adjust the front or rear seat
f orward and backward, pull up on the
bar under the seat cushion’s f ront
edge. Move the seat, and make sure
it is locked into position.To change the angle of the seat-back,
pull up on the lever on the outside of
the seat bottom.
Seats
Inst rument s and Cont rols
Seat A djustmentsFront Seat
77
Page 82 of 256
To adjust the height of the driver’s
seat, turn the dial on the outside of
the seat bottom.
To change the angle of the rear seat-
back, pull up on the release lever on
the outside of the seat-back. The rear seat armrest is located in
the center of the rear seat. Pivot it
down to use it.
Each front seat has an armrest on
thesideof theseat-back.Touseit,
pivotitdown.
When using the center seating
position, adjust the lef t and right side
of the rear seats to the same position.
Make sure all rear shoulder belts are
positioned in f ront of the rear seat-
backs af ter you adjust the rear seats.
Only on vehicles with an automatic
transmission
Seats
Inst rument s and Cont rols
Driver’s Seat Height A djustment A rmrestsRear Seat
78
Page 83 of 256
See page f or important saf etyinf ormation and a warning about how toproperly position the head restraints. 16
To remove a f ront head restraint or a
head restraint in one of the rear
outboard seating positions f or
cleaning or repair, pull it up as f ar as
it will go. Push the release button,
then pull the restraint out of the seat-
back.
Your vehicle is equipped with head
restraints in all seating positions.
The head restraints help protect you
and your passengers f rom whiplash
and other injuries. They are most
ef f ective when you adjust them so
the back of the occupant’s head rests
against the center of the restraint. The head restraints in the front and
rear outboard seating positions
adjust for height. To raise it, pull
upward. To lower the restraint, push
the release button sideways and
push the restraint down.To remove the rear center head
restraint, pull it up and out of the
seat-back.
Seats
Inst rument s and Cont rols
Head Restraints
79
RELEASE BUTTON
Page 84 of 256
You can recline the seat-backs on the
f ront seats so they are level with the
rear seat cushions, making a large
cushioned area. To do this:Adjust the rear seats as f ar back
as they will go. Remove the head restraints f rom
the f ront seats (see page ), and
store them in the f ront seat-back
pockets.Adjust the front seats forward as
f ar as they will go. Pull up the seat-
back angle adjustment lever and
pivot the seat-back backward until
it is level with the rear seat
cushion.
Move the f ront seat backward
until it touches the rear seat.
Adjust the rear seat-back to the
desired position.
Reverse this procedure to return the
f ront and rear seats to the upright
position. Make sure you install the
head restraints and the seats are
locked securely bef ore driving.
When you return the seat-back to
the upright position, hold the seat-
back to keep it f rom going up too
quickly.
2.
1. 793.
4.
5.
Seats
Inst rument s and Cont rols
Reclining the Front Seats
80
Page 85 of 256
The rear seat-back can be f olded
down to give more cargo room. Each
side f olds down separately. So you
can still carry a passenger in the rear
seat.
You can also f old up each of the rear
seats separately to create further
cargo space (see page ).Push the seat belt buckles into the
seat cushion.When you are f olding the right half
of the rear seat, use the latch plate to
release the center seat belt from the
detachable anchor (see page ).
Allow the seat belt to retract into the
holder on the ceiling and store the
buckles in it.
1.
84
82
CONT INUED
Folding the Rear Seats Down
Seats
Inst rument s and Cont rols81
BUCKLE LATCH PLATE
Page 86 of 256
Lower the head restraint to its
lowest position.
Pull up on the release lever on the
outside of the seat-back.
Fold the seat-back forward.
Do not put any heavy items on the
seat-back when it is folded. Reverse this procedure to return the
seat-back to the upright position.
Make sure the seat is secured and
the seat belt in f ront of the seat-back
bef ore driving.
To f old up the rear seat:Pull up the bar under the seat
cushion and slide the rear seat
backward. The rear seat will not
f old up if it is not back as f ar as it
will go.
Follow steps 1 through 4 on pages and f or f olding down the
seat-back.
3. 2.
4.
2. 1.
8281
Folding the Rear Seat Up
Seats
Inst rument s and Cont rols82
RELEASE LEVER
SLIDE BAR