Page 55 of 221

See page . This indicator comes on with thehigh beam headlights. See pagef or inf ormation on the headlight
controls.
On Canadian models, this indicator
comes on with reduced brightness
when the Daytime Running Lights
(DRL) are on (see page ).
This lights when you set the cruise
control. See page f or inf ormation
on operating the cruise control. This light comes on if the trunk lid is
not closed tightly.
This indicator comes on as a
reminder that you must ref uel soon.
This indicator comes on when the
washer f luid level is low. Add washer
fluidwhenyouseethisindicator
come on (see page ).
The lef t or right turn signal indicator
blinks when you signal a lane change
or turn. If the indicators do not blink
or blinks rapidly, it usually means
one of the turn signal bulbs is
burned out (see page ). Replace
the bulb as soon as possible, since
other drivers cannot see that you are
signaling.
WhenyouturnontheHazard
Warning switch, both turn signal
indicators blink. All turn signals on
the outside of the vehicle should
flash. 183
63
63
107 148
155
Only on models equipped with Cruise
Control System Canadian models only
Instrument Panel L ights
Malf unction Indicator
Lamp
Turn Signal and
Hazard Warning
Indicators High Beam Indicator
Cruise Control Indicator Trunk-open Indicator
Low Fuel Indicator
Washer Level Indicator
Inst rument s and Cont rols56
�����—�����—�����y�
������
������y���
�(�����������y���������y
Page 66 of 221

Youshouldhavereceivedakey
number tag with your set of keys.
You will need this key number if you
ever have to get a key replaced use
only Honda-approved key blanks.These keys contain electronic
circuits that are activated by the
Immobilizer System. They will not
work to start the engine if the
circuits are damaged.
Protect the keys f rom direct
sunlight, high temperature, and
high humidity.
Donotdropthekeysorsetheavy
objects on them.
Keep the keys away f rom liquids.
If they get wet, dry them
immediately with a sof t cloth.
The keys do not contain batteries.
Do not try to take them apart.
The master key fits all the locks on
your vehicle.
The valet key works only in the
ignition and the door locks. You can
keep the trunk, trunk release handle
and rear seat trunk access locked
when you leave your vehicle and the
valet key at a parking f acility.
Keys and Locks
Inst rument s and Cont rols67
MASTER
KEYS
(Black)
VALET
KEY
(Gray)
KEY
NUMBERTAG
�����—�����—�����y�
�������������y���
�(�����������y���������y
Page 70 of 221
To open the trunk, pull the trunk
releasehandletotheleftof the
driver’s seat. To protect items in the
trunk when you need to give the key
to someone else, lock the trunk
releasehandlewiththemasterkey
and give the other person the valetkey.
To close the trunk, press down on
the trunk lid.You can also use the master key to
open the trunk lock.
Keep the trunk lid closed at all times
while driving to avoid damaging it
and to prevent exhaust gas from
getting into the interior. See Carbon
Monoxide Hazard, page .
Parents should decide if their
children should be shown how to use
this feature.
As a saf ety f eature, your vehicle has
a release lever on the trunk latch so
the trunk can be opened f rom inside.
To open the trunk, push the release
lever to the lef t.
46
Door L ocks
Inst rument s and Cont rols
Trunk Emergency Trunk Opener
71
TRUNK RELEASE HANDLE
Pull
MASTER KEY
MASTER KEY
�����—�����—�����y�
�������������y���
�(�����������y���������y
Page 75 of 221
When storing cargo, you can move
therearcentershoulderbeltoutof
the way by removing the belt f rom
the guide.
The left and right halves can be
f olded separately f rom inside the
vehicle or inside the trunk. To f old
down the seat-back f rom inside the
vehicle, insert the master key in the
lock on the rear shelf . To f old down
the driver’s side, turn the key
clockwise, pull down the top of the
seat-back, then release the key. To
f old down the passenger’s side, turn
the key counter clockwise and
perf orm the same procedure.
The lid of the console compartment
canbeusedasanarmrest.
Make sure the passenger’s hands or
fingersareawayfromthearmrest
bef ore pushing it down.
It is optional on other models.
Standard on LX and EX models in the
U.S., and DX-G, LX and Si models in
Canada
Seats
Inst rument s and Cont rols
Armrest Folding Rear Seat
76
MASTER KEY GUIDE
CENTER SHOULDER BELT
�����—�����—�����y�
�������������y���
�(�����������y���������y
Page 76 of 221
To release the seat-back from inside
the trunk, pull the release under the
trunk panel. Push the seat-back
down, then let go of the release.
To lock the seat-back upright, push it
f irmly against the trunk panel. Make
sure it is latched in place by pulling
on the top of the seat.Make sure all rear shoulder belts are
positioned in f ront of the rear seat-
back whenever it is in the upright
position.
Do not put any heavy items on the
seat-back when it is folded.
Make sure all items in the trunk, or
items extending through the opening
into the back seat, are secured.
Looseitemscanflyforwardand
cause injury if you have to brake
hard. See on page
.
Never drive with the seat-back
f olded down and the trunk lid open.
See on
page . 119
46
Seats
Inst rument s and Cont rols
Carrying Cargo
Carbon Monoxide Hazard
77
Pull
Pull
RELEASE
�����—�����—�����y�
�������������y���
�(�����������y���������y
Page 118 of 221
�Î�Î
�Î
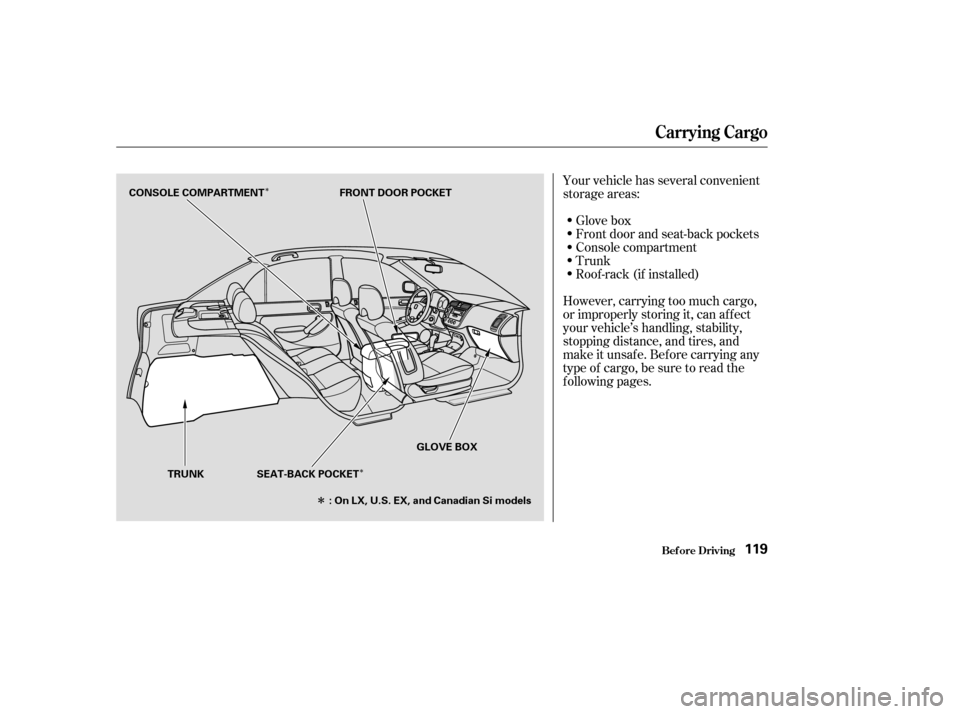
Your vehicle has several convenient
storage areas:Glove box
Front door and seat-back pockets
Console compartment
Trunk
Roof -rack (if installed)
However, carrying too much cargo,
or improperly storing it, can af f ect
your vehicle’s handling, stability,
stopping distance, and tires, and
make it unsaf e. Bef ore carrying any
type of cargo, be sure to read the
f ollowing pages.
Carrying Cargo
Bef ore Driving119
FRONT DOOR POCKET
TRUNK GLOVE BOX
CONSOLE COMPARTMENT
SEAT-BACK POCKET: On LX, U.S. EX, and Canadian Si models
�����—�����—�����y�
������
������y���
�(�����������y���
�����y
Page 119 of 221
’’ on your vehicle’s pla")
�·�µ
To determine the correct cargo and
luggage load limit:
Locate the statement, ‘‘the
combined weight of occupants and
cargo should never exceed 850 lbs
(395 kg)’’ on your vehicle’s placard
(on the driver’s doorjamb).
Determine the combined weight
of the driver and passengers that
will be riding in the vehicle.
(Five is seating capacity of your
vehicle.)
Subtract the combined weight of
the driver and passengers f rom
850 lbs (395 kg).
The resulting f igure equals the
available load capacity. Store or secure all items that could
be thrown around and hurt
someone during a crash.
Be sure items placed on the f loor
behind the f ront seats cannot roll
under the seats and interf ere with
the pedals or seat operation.
Keep the glove box closed while
driving. If it is open, a passenger
could injure their knees during a
crash or sudden stop.
For example, if there will be f our 150
lbs (70 kg) occupants in your vehicle,
the amount of available cargo and
luggage load capacity is 250 lbs (115
kg).
4 150 lbs (70 kg) = 600 lbs (280
kg)
850 lbs (395 kg) 600 lbs (280 kg) =
250 lbs (115 kg)
The maximum load f or your vehicle
is 850 lbs (395 kg). This f igure
includes total weight of all occupants,
cargo, and accessories.
Determine the combined weight
of accessories, luggage, and cargo
beingloadedinthevehicle.The
weight may not saf ely exceed the
available cargo and luggage load
capacity calculated in step 4.Do not put any items on top of the
trunk panel. They can block your
view and be thrown around the
vehicle during a crash.
1. 2.3. 4. 5.
Carrying Cargo
Bef ore Driving
Carrying Items in the Passenger
Compartment
120
Overloading or improper
loading can affect handling and
stability and cause a crash in
which you can be hurt or killed.
Follow all load limits and other
loading guidelines in thismanual.
�����—�����—�����y�
������
������y���
�(�����������y���
�����y
Page 120 of 221
Distribute cargo evenly on the
f loor of the trunk, placing the
heaviest items on the bottom and
as far forward as possible.
If youfolddownthebackseat,tie
down items that could be thrown
about the vehicle during a crash or
sudden stop.
If you carry large items that
prevent you f rom closing the trunk
lid, exhaust gas can enter the
passenger area. To avoid the
possibility of, f ollow the instructions
on page . 46
Carrying Cargo
Bef ore Driving
Carrying Cargo in the Trunk or on
a Roof Rack
carbon monoxide
poisoning
121
�����—�����—�����y�
�������������y���
�(�����������y���
�����y