This section gives inf ormation about
the controls and displays that
contribute to the daily operation of
your Honda. All the essential
controls are within easy reach............................
Control Locations .50
............................
Instrument Panel .51
.............................................
Gauges .59
.....................................
Odometer .60
...................................
Trip Meter .60
.................
Current Fuel Mileage . 60
................................
Trip Mileage .60
Turning Of f the Mileage .....................................
Display .61
..................................
Fuel Gauge .61
.........
IMA Battery Level Gauge . 62
................
Charge/Assist Gauge . 63
...................
Temperature Gauge . 63
Controls Near the Steering ...........................................
Wheel .64
.
Windshield Wipers and Washers . 65
...........
Turn Signal and Headlights . 66
........
Instrument Panel Brightness . 67
.................
Hazard Warning Button . 67
.................
Rear Window Def ogger . 68
..........
Steering Wheel Adjustment . 69
...............................
Keys and Locks .70
........................
Immobilizer System .71
................................
Ignition Switch .72 ......................................
Door Locks .73
..................................
Door Locks .73
......................
Power Door Locks .73
..............
Childproof Door Locks . 73
...........................................
Trunk .74
........
Emergency Trunk Opener . 74
.......................
Remote Transmitter .75
.................................................
Seats .77
..............................
Power Windows .79
.............................................
Mirrors .81
.................................
Parking Brake .82
.................................
Interior Lights .83
...........
Interior Convenience Items . 84
.......................
Beverage Holders .85
..........
Accessory Power Sockets . 85
....................................
Glove Box .85
...............
Console Compartment . 85
Instruments and Controls
Inst rument s and Cont rols49
�µ
�´ �´
Although this seems like a simple
procedure, you should take several
precautions.
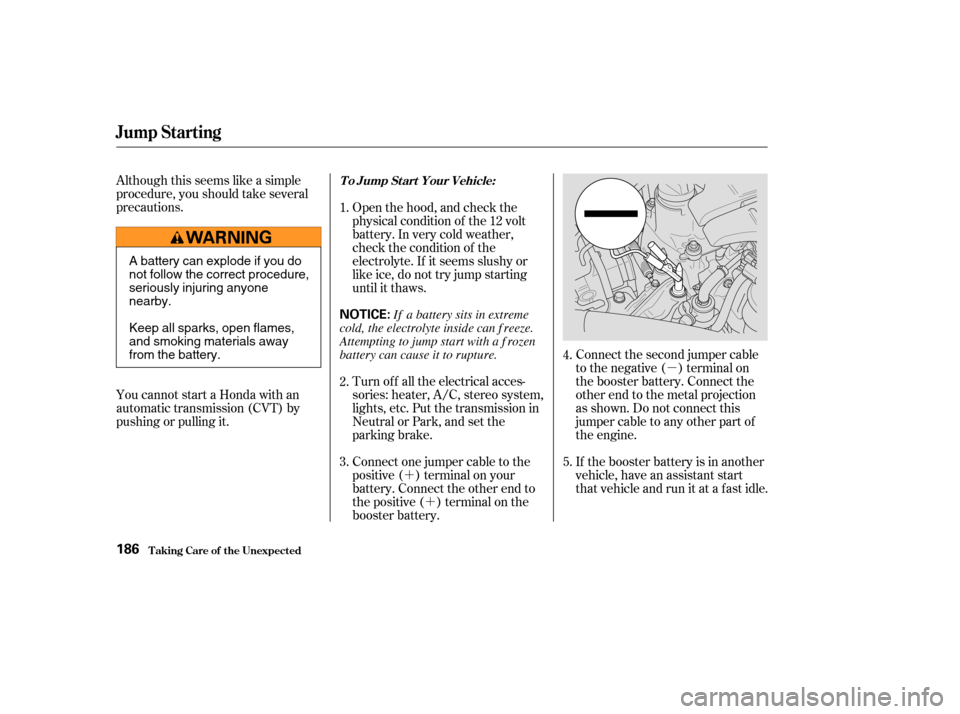
If the booster battery is in another
vehicle, have an assistant start
that vehicle and run it at a fast idle. Connect the second jumper cable
to the negative ( ) terminal on
the booster battery. Connect the
other end to the metal projection
as shown. Do not connect this
jumper cable to any other part of
the engine.
You cannot start a Honda with an
automatic transmission (CVT) by
pushing or pulling it. Open the hood, and check the
physical condition of the 12 volt
battery. In very cold weather,
check the condition of the
electrolyte. If it seems slushy or
like ice, do not try jump starting
until it thaws.
Connect one jumper cable to the
positive ( ) terminal on your
battery. Connect the other end to
the positive ( ) terminal on the
booster battery. Turn of f all the electrical acces-
sories: heater, A/C, stereo system,
lights, etc. Put the transmission in
Neutral or Park, and set the
parking brake.
1.
2.
3.
4.
5.
Jump Starting
T aking Care of t he Unexpect ed
To Jump Start Your Vehicle:
186
NOTICE:
A battery can explode if you do
not follow the correct procedure,
seriously injuring anyone
nearby.
Keep all sparks, open flames,
and smoking materials away
from the battery.
If a battery sits in extreme
cold, the electrolyte inside can f reeze.
Attempting to jump start with a f rozen
battery can cause it to rupture.