Page 42 of 231
Place the child seat on the vehicle
seat, and attach the seat to the
lower anchors according to the
child seat maker’s instructions.Other LATCH-compatible seats have
a f lexible-type connection as shown
above.
Whatever type you have, f ollow
the child seat maker’s instructions
f or adjusting or tightening the f it.
Some LATCH-compatible seats
have a rigid-type connection as
shown above.
Lif t the rear head restraint, then
route the tether strap over the
seat-back between the legs of the
head restraint, making sure the
strap is not twisted.Attach the tether strap hook to the
tether anchor, then tighten the
strap as instructed by the child
seat maker.
Push and pull the child seat
f orward and f rom side-to-side to
verif y that it is secure.
6.
5.
3.
4.7.
Installing a Child Seat
Driver and Passenger Saf ety39
ANCHORAGE
POINT
TETHER STRAP
HOOK
Rigid type Flexible type Front
Page 43 of 231
When not using the LATCH system,
all child seats must be secured to the
vehicle with the lap part of a lap/
shoulder belt.
In addition, the lap/shoulder belts in
the back seating positions, and in the
f ront passenger seat, have a locking
mechanism that must be activated to
secure a child seat.With the child seat in the desired
seating position, route the belt
through the child seat according
to the seat maker’s instructions,
then insert the latch plate into the
buckle.To activate the lockable retractor,
slowly pull the shoulder part of the
belt all the way out until it stops,
then let the belt f eed back into the
retractor.
Af ter the belt has retracted, tug on
it. If the belt is locked, you will not
be able to pull it out. If you can pull
the belt out, it is not locked and
you will need to repeat these steps.
1.
2.
3.
Installing a Child Seat
Driver and Passenger Saf ety
Installing a Child Seat with a L ap/
Shoulder Belt
40
Page 44 of 231

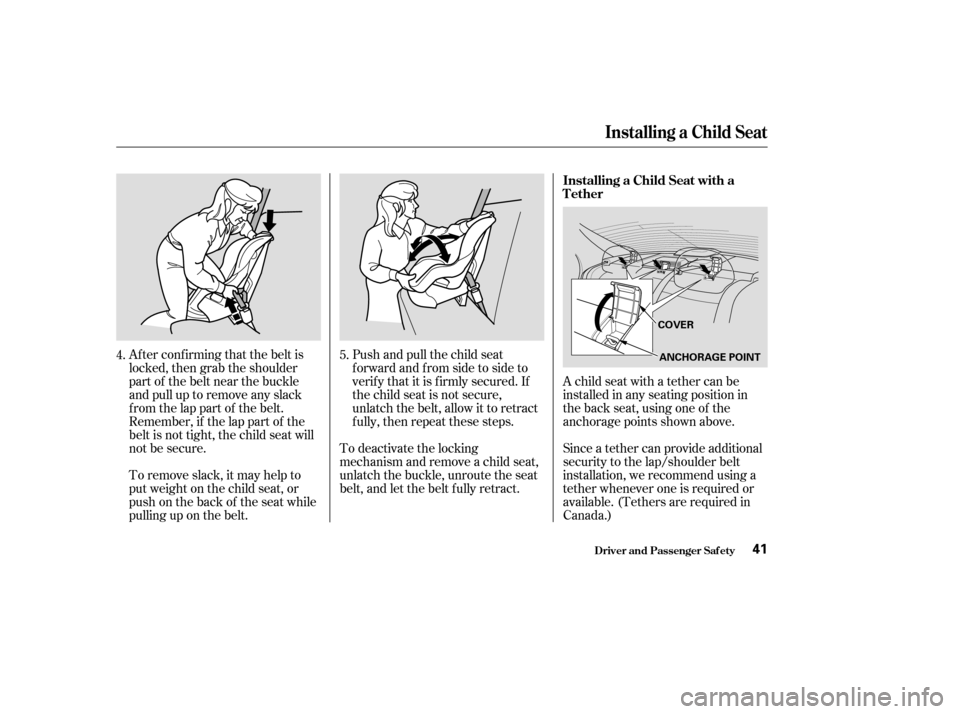
Af ter conf irming that the belt is
locked,thengrabtheshoulder
part of the belt near the buckle
andpulluptoremoveanyslack
f rom the lap part of the belt.
Remember, if the lap part of the
belt is not tight, the child seat will
not be secure.Push and pull the child seat
f orward and f rom side to side to
verif y that it is f irmly secured. If
the child seat is not secure,
unlatch the belt, allow it to retract
f ully, then repeat these steps.
To deactivate the locking
mechanism and remove a child seat,
unlatch the buckle, unroute the seat
belt, and let the belt f ully retract. A child seat with a tether can be
installed in any seating position in
the back seat, using one of the
anchorage points shown above.
Since a tether can provide additional
security to the lap/shoulder belt
installation, we recommend using a
tether whenever one is required or
available. (Tethers are required in
Canada.)
To remove slack, it may help to
putweightonthechildseat,or
push on the back of the seat while
pulling up on the belt.
4.
5.
Installing a Child Seat
Driver and Passenger Saf ety
Installing a Child Seat with a
Tether
41
COVER
ANCHORAGE POINT
Page 45 of 231

When a child reaches the
recommended weight or height limit
for a forward-facing child seat, the
child should sit in a back seat on a
booster and wear a lap/shoulder belt.
The f ollowing pages give
instructions on how to check proper
seat belt f it, what kind of booster
seat to use if one is needed, and
important precautions f or a child
who must sit in f ront.
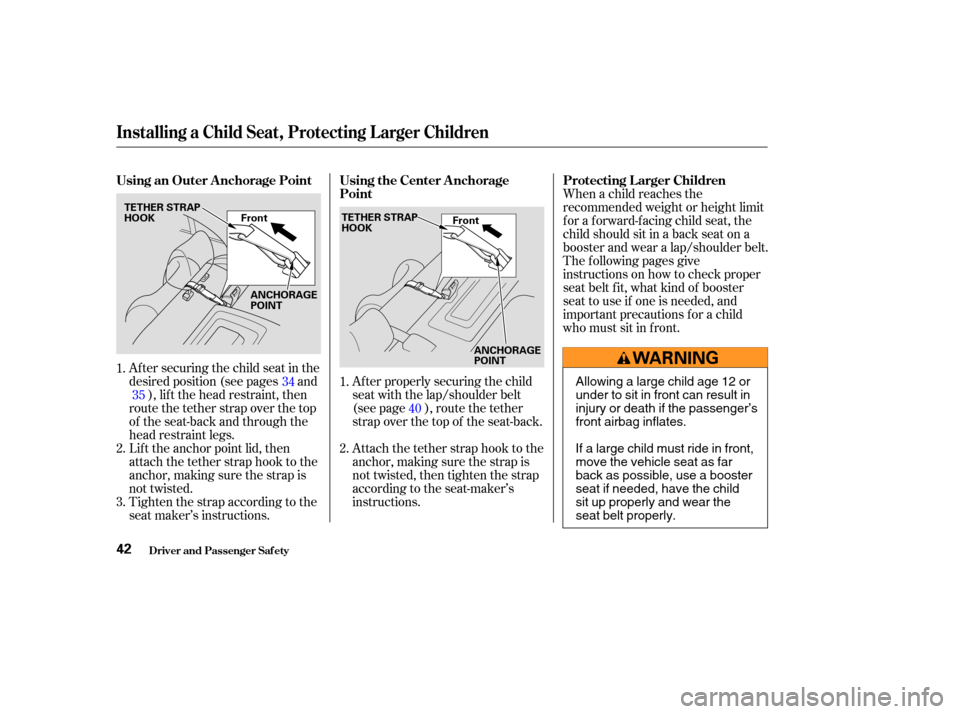
Lif t the anchor point lid, then
attach the tether strap hook to the
anchor, making sure the strap is
not twisted.
Tighten the strap according to the
seat maker’s instructions. Attach the tether strap hook to the
anchor, making sure the strap is
not twisted, then tighten the strap
according to the seat-maker’s
instructions. Af ter properly securing the child
seat with the lap/shoulder belt
(see page ), route the tether
strap over the top of the seat-back.
Af ter securing the child seat in the
desired position (see pages and
), lif t the head restraint, then
route the tether strap over the top
of the seat-back and through the
head restraint legs.
1.
2. 1.
3. 2.
40
34
35
Installing a Child Seat, Protecting L arger Children
Driver and Passenger Saf ety
Using an Outer A nchorage Point Protecting L arger Children
Using the Center A nchorage
Point
42
TETHER STRAP
HOOK
ANCHORAGE
POINT Front
Front
TETHER STRAP
HOOK
ANCHORAGE
POINT
Allowing a large child age 12 or
under to sit in front can result in
injury or death if the passenger’s
front airbag inflates.
If a large child must ride in front,
move the vehicle seat as far
back as possible, use a booster
seat if needed, have the child
sit up properly and wear the
seat belt properly.
Page 48 of 231

If you decide that a child can saf ely
ride up f ront, be sure to:Caref ully read the owner’s manual
and make sure you understand all
seat belt instructions and all saf ety
inf ormation.
Move the vehicle seat to the rear-
most position.
Have the child sit up straight, back
against the seat, and feet on or
near the f loor.
Check that the child’s seat belt is
properly positioned and secured. This could result in
serious neck injuries during a crash.
This could cause
very serious injuries during a crash.
It also increases the chance that the
child will slide under the belt in a
crash and be injured.
If they do, they could
be very seriously injured in a crash.
Devices intended to improve a
child’s comf ort or reposition the
shoulder part of a seat belt can make
the belt less ef f ective, and increase
the chance of serious injury in a
crash.
Of course, children vary widely. And
while age may be one indicator of
when a child can saf ely ride in the
f ront. There are other important
f actors you should consider.
To saf ely ride in f ront, a child must
be able to f ollow the rules, including
sitting properly, and wearing the seat
belt properly throughout a ride.
Physically, a child must be large
enough f or the lap/shoulder belt to
properly f it (see page ). If the seat
belt does not f it properly, with or
without the child sitting on a booster,
the child should not sit in the f ront. Supervise the child. Even mature
children sometimes need to be
reminded to f asten the seat belts
or sit properly.
43
Protecting L arger Children
Driver and Passenger Saf ety
Additional Saf ety Precautions
Do not let a child wear a seat belt
across t he neck.
Do not let a child put the shoulderpart of a seat belt behind t he back orunder t he arm.
T wo children should never use t hesame seat belt .
Do not put any accessories on a seatbelt.
Maturity
Physical Size
45
Page 72 of 231
See page f or important saf etyinf ormation about how to properlyposition the steering wheel. 16
Make any steering wheel adjustment
bef ore you start driving.
To adjust the steering wheel upward
or downward:Push the lever under the steering
column all the way down. Push the lever up to lock the
steering wheel in that position.
Make sure you have securely
locked the steering wheel in place
by trying to move it up and down.
Move the steering wheel so it
points to your chest, not toward
your f ace. Make sure you can see
the instrument panel gauges and
indicators.
1. 4.
2. 3.
Steering Wheel A djustment
Inst rument s and Cont rols69
Adjusting the steering wheel
position while driving may
cause you to lose control of the
vehicle and be seriously injured
inacrash.
Adjust the steering wheel only
when the vehicle is stopped.
Page 120 of 231
Park the vehicle, and set the
parking brake. Pull the hood
release handle located under the
lower lef t corner of the dashboard.
The hood will pop up slightly.
Put your f ingers between the f ront
edge of the hood and the f ront
grille. The hood latch handle is
above the ‘‘H’’ logo. Push this
handle up until it releases the
hood. Lif t the hood.If the hood latch handle moves
stif f ly, or if you can open the hood
without lifting the handle, the
mechanism should be cleaned and
lubricated.
Lif t it up slightly to remove the
support rod f rom the hole. Put the
support rod back into its holding clip.
Lower the hood to about a f oot (30
cm) above the f ender, then let it
drop. Make sure it is securely
latched.
Pull the support rod out of its clip,
and insert the end into the hole on
the f ront lef t side of the hood.
2. 1.
3.
Opening the Hood
T o Close the Hood
Service Station Procedures
Bef ore Driving117
HOOD
RELEASE
HANDLELATCH
GRIP
SUPPORT ROD CLIP
Page 127 of 231

�·�µ
To determine the correct cargo and
luggage load limit:
Locate the statement, ‘‘the
combined weight of occupants and
cargo should never exceed 850 lbs
(395 kg)’’ on your vehicle’s placard
(on the driver’s doorjamb).
Determine the combined weight
of the driver and passengers that
will be riding in the vehicle.
(Five is seating capacity of your
vehicle.)
Subtract the combined weight of
the driver and passengers f rom
850 lbs (395 kg).
The resulting f igure equals the
available load capacity. Store or secure all items that could
be thrown around and hurt
someone during a crash.
Be sure items placed on the f loor
behind the f ront seats cannot roll
under the seats and interf ere with
the pedals or seat operation.
Keep the glove box closed while
driving. If it is open, a passenger
could injure their knees during a
crash or sudden stop.
For example, if there will be f our 150
lbs (70 kg) occupants in your vehicle,
the amount of available cargo and
luggage load capacity is 250 lbs (115
kg).
4 150 lbs (70 kg) = 600 lbs (280
kg)
850 lbs (395 kg) 600 lbs (280 kg) =
250 lbs (115 kg)
The maximum load f or your vehicle
is 850 lbs (395 kg). This f igure
includes total weight of all occupants,
cargo, and accessories.
Do not put any items on top of the
trunk panel. They can block your
view and be thrown around the
vehicle during a crash.
Determine the combined weight
of accessories, luggage, and cargo
beingloadedinthevehicle.The
weight may not saf ely exceed the
available cargo and luggage load
capacity calculated in step 4.
1.
2.
3.
4. 5.
Carrying Cargo
Bef ore Driving
Carrying Items in the Passenger
Compartment
124