Page 2 of 231
Your Vehicle at a Glance
3
HEADLIGHTS/TURN SIGNALS
MOONROOF
CRUISE CONTROL
MASTER SWITCH
MIRROR CONTROLS CRUISE CONTROL BUTTONSREAR WINDOW
DEFOGGER
WINDSHIELD WIPERS/WASHERS
AUDIO SYSTEMDIGITAL CLOCK
STEERING WHEEL ADJUSTMENT
(P. 65)
(P. 64) (P. 67)
(P. 94)
(P. 67)
(P. 82)
(P. 110)
(P. 83)
(P. 68)HAZARD WARNING BUTTON
(P. 108)
(P. 110)
�����—�����—�����y�
�������������y���
�(���%�������y���������y
Page 5 of 231

You’ll f ind many saf ety
recommendations throughout this
section, and throughout this manual.
Therecommendationsonthispage
are the ones we consider to be the
most important.Excessive speed is a major f actor in
crash injuries and deaths. Generally,
the higher the speed, the greater the
risk, but serious injuries can also
occur at lower speeds. Never drive
f aster than is saf e f or current
conditions, regardless of the
maximum speed posted.
While airbags can save lives, they
can cause serious or fatal injuries to
occupants who sit too close to them,
or are not properly restrained.
Inf ants, young children, and short
adults are at the greatest risk. Be
sure to f ollow all instructions and
warnings in this manual.
Having a tire blowout or a
mechanical f ailure can be extremely
hazardous. To reduce the possibility
of such problems, check your tire
pressures and condition f requently,
and perform all regularly scheduled
maintenance (see page ).
Alcohol and driving don’t mix. Even
one drink can reduce your ability to
respond to changing conditions, and
your reaction time gets worse with
every additional drink. So don’t drink
and drive, and don’t let your f riends
drink and drive, either.
Children age 12 and under should
ride properly restrained in a back
seat. Infants and small children
should be restrained in a child seat.
Larger children should use a booster
and a lap/shoulder belt until they canusethebeltproperlywithouta
booster (see page ).
A seat belt is your best protection in
all types of collisions. Airbags
supplement seat belts, but airbags
are designed to inf late only in a
moderate to severe f rontal collision.
So even though your vehicle is
equipped with airbags, make sure
you and your passengers always
wear your seat belts, and wear them
properly (see page ). 29
145
14
Important Saf ety Precautions
Restrain All Children Be Aware of Airbag Hazards
Control Your Speed
K eep Your Vehicle in Saf e
Condition
Always Wear Your Seat Belt
Don’t Drink and Drive
Driver and Passenger Saf ety6
�����—�����—�����y�
���������
���y���
�(���%�������y���������y
Page 30 of 231
�µ
To remind you of the passenger’s
f ront airbag hazards, and that
children must be properly restrained
in the back seat, your vehicle has
warninglabelsonthedashboardand
on the driver’s and f ront passenger’s
visors. Please read and f ollow the
instructions on these labels.To remind you of the f ront airbag
hazards, your vehicle has warning
labels on the driver’s and f ront
passenger’s visors. Please read and
f ollow the instructions on these
labels.
U.S. Models Canadian Models
Driver and Passenger Saf ety
Protecting Children General Guidelines
31
�����—�����—�����y�
���������
���y���
�(���%�������y���������y
Page 50 of 231

This section gives inf ormation about
the controls and displays that
contribute to the daily operation of
your Honda. All the essential
controls are within easy reach............................
Control Locations . 52
............................
Instrument Panel . 53
..........
Instrument Panel Indicators . 56
.............................................
Gauges . 60
...............
Odometer/Trip Meter . 60
..................................
Fuel Gauge . 60
...................
Temperature Gauge . 61
..
Maintenance Required Indicator . 62
Controls Near the Steering
...........................................
Wheel . 63
.
Windshield Wipers and Washers . 64
...........
Turn Signal and Headlights . 65
........
Instrument Panel Brightness . 66
.................
Hazard Warning Button . 67
.................
Rear Window Def ogger . 67
..........
Steering Wheel Adjustment . 68
...............................
Keys and Locks . 69
........................
Immobilizer System . 70
................................
Ignition Switch . 71
......................................
Door Locks . 72
......................
Power Door Locks . 72
...........................................
Trunk . 72
........
Emergency Trunk Opener . 73
.......................
Remote Transmitter . 74
.................................................
Seats . 76
..............................
Power Windows . 81 .........................................
Moonroof . 82
.............................................
Mirrors . 83
.................................
Parking Brake . 84
.................................
Interior Lights . 85
................................
Ceiling Light . 85
...........
Individual Interior Lights . 85
...........
Interior Convenience Items . 86
.......................
Beverage Holders . 87
....................................
Globe Box . 87
...............
Console Compertment . 87
.............................
Center Pocket . 88
...........
Accessory Power Socket . 88
..............................
Vanity Mirror . 88
Instruments and Controls
Inst rument s and Cont rols51
�����—�����—�����y�
�������������y���
�(���%�������y���������y
Page 57 of 231

See page .
WhenyouturnontheHazard
Warning switch, both turn signal
lights blink. All turn signals on the
outside of the vehicle should f lash.This indicator comes on with the
high beam headlights. See page
f or inf ormation on the headlight
controls.
On Canadian models, this indicator
comes on with reduced brightness
when the Daytime Running Lights
(DRL) are on (see page ).
This indicator comes on when you
set the cruise control. See page f or inf ormation on operating the
cruise control. This indicator comes on if the trunk
lid is not closed tightly.
This indicator comes on as a
reminder that you must ref uel soon.
The lef t or right turn signal indicator
blinks when you signal a lane change
or turn. If the indicator does not
blink or blinks rapidly, it usually
means one of the turn signal bulbs is
burned out (see page ). Replace
the bulb as soon as possible, since
other drivers cannot see that you are
signaling. This indicator comes on when the
washer f luid level is low. Add washer
fluidwhenyouseethisindicator
comes on (see page ).
73
196
166 65
110 156
Only on models equipped with Cruise
Control System Canadian models only
Malf unction Indicator
Lamp
Turn Signal and
Hazard Warning
Indicators High Beam Indicator
Cruise Control Indicator Trunk-open Indicator
Low Fuel Indicator
Washer Level Indicator
Inst rument s and Cont rols
Instrument Panel Indicators
58
�����—�����—�����y�
�������������y���
�(���%�������y�������
�y
Page 62 of 231
�Î
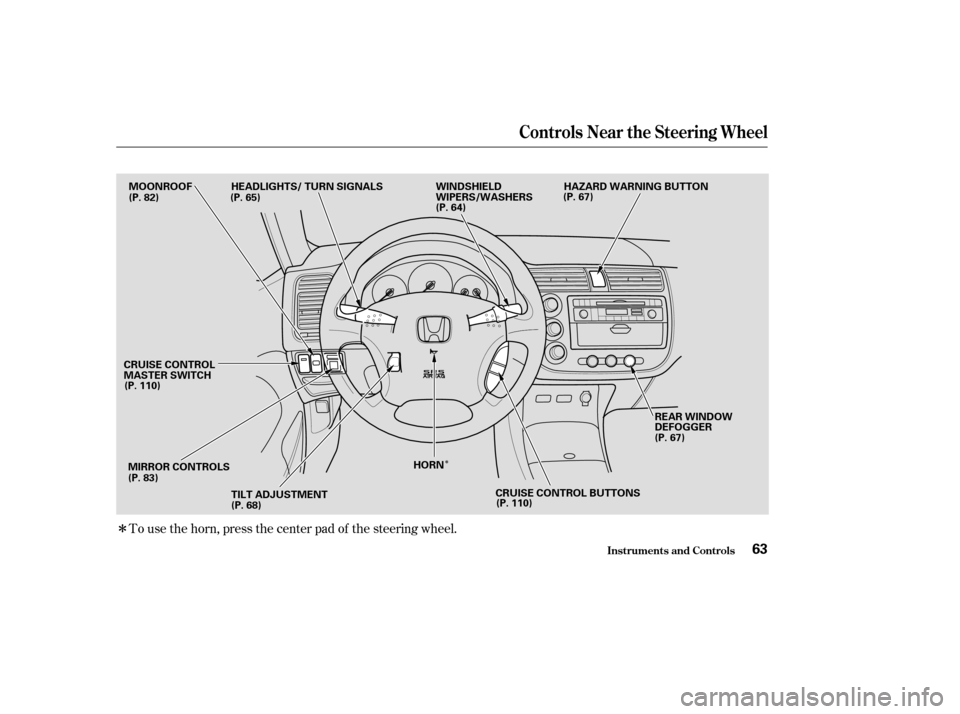
�ÎTo use the horn, press the center pad of the steering wheel.
Controls Near the Steering Wheel
Inst rument s and Cont rols63
MOONROOF
MIRROR CONTROLS TILT ADJUSTMENT HORN REAR WINDOW
DEFOGGER
WINDSHIELD
WIPERS/WASHERS
HEADLIGHTS/ TURN SIGNALS
CRUISE CONTROL
MASTER SWITCH (P. 82) (P. 65)
(P. 64)(P. 67)
(P. 110) (P. 83) (P. 68) (P. 67)
CRUISE CONTROL BUTTONS (P. 110) HAZARD WARNING BUTTON
�����—�����—�����y�
�������������y���
�(���%�������y���������y
Page 66 of 231

The rear window def ogger will clear
fog, frost, and thin ice from the
window. Push the def ogger button to
turn it on and of f . The light in the
button lights to show the def ogger is
on. If you do not turn it of f , the
def ogger will shut itself of f af ter
about15minutes.Italsoshutsoff
when you turn of f the ignition. You
have to turn it on again when you
restart the vehicle.Make sure the rear window is clear
and you have good visibility bef ore
starting to drive.
The def ogger and antenna wires on
the inside of the rear window can be
accidentally damaged. When
cleaning the glass, always wipe side
to side.
Push the button between the center
vents to turn on the hazard warning
lights (f our-way f lashers). This
causes all f our outside turn signals
and both indicators in the instrument
panel to f lash. Use the hazard
warning lights if you need to park in
a dangerous area near heavy traffic,
or if your vehicle is disabled. Rear Window Def ogger
Hazard Warning Button
Inst rument s and Cont rols
Hazard Warning Button, Rear Window Def ogger
67
�����—�����—�����y�
�������������y���
�(���%�������y���������y
Page 75 of 231
�µ
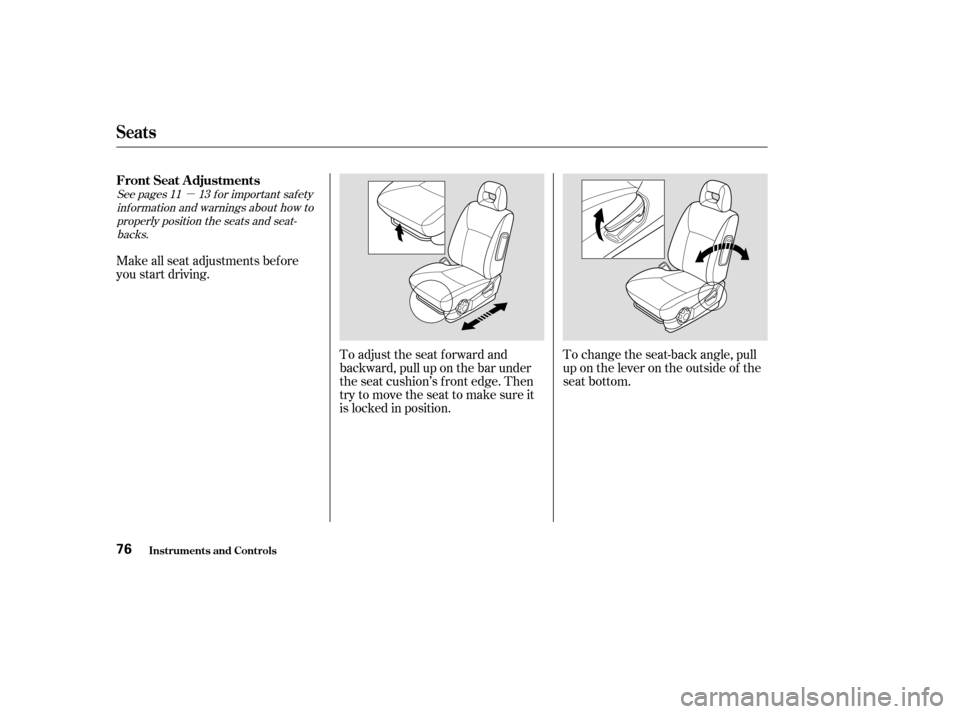
To adjust the seat forward and
backward, pull up on the bar under
the seat cushion’s f ront edge. Then
trytomovetheseattomakesureit
is locked in position.To change the seat-back angle, pull
up on the lever on the outside of the
seat bottom.
Make all seat adjustments bef ore
you start driving.
See pages f or important saf ety
inf ormation and warnings about how toproperly position the seats and seat-backs. 11 13
Seats
FrontSeatAdjustments
Inst rument s and Cont rols76
�����—�����—�����y�
�������������y���
�(���%�������y���������y