Page 2 of 231
Your Vehicle at a Glance
3
HEADLIGHTS/TURN SIGNALS
MOONROOF
CRUISE CONTROL
MASTER SWITCH
MIRROR CONTROLS CRUISE CONTROL BUTTONSREAR WINDOW
DEFOGGER
WINDSHIELD WIPERS/WASHERS
AUDIO SYSTEMDIGITAL CLOCK
STEERING WHEEL ADJUSTMENT
(P. 65)
(P. 64) (P. 67)
(P. 94)
(P. 67)
(P. 82)
(P. 110)
(P. 83)
(P. 68)HAZARD WARNING BUTTON
(P. 108)
(P. 110)
�����—�����—�����y�
�������������y���
�(���%�������y���������y
Page 51 of 231
Control L ocations
Inst rument s and Cont rols52
MOONROOF MIRRORCONTROLSHEATING/COOLING CONTROLS
HOOD RELEASE
HANDLE CRUISE CONTROL
BUTTONS
FUEL FILL DOOR RELEASE
A/T model is shown. POWER WINDOW
SWITCHES
POWER DOOR LOCK
SWITCH
CRUISE CONTROL
MASTER SWITCH
TRUNK RELEASE DIGITAL CLOCK
AUDIO SYSTEM
(P. 82)
(P. 72)
(P. 110)
(P. 81)
(P. 115)
(P. 72) (P. 116)
(P. 110)
(P. 83)
(P. 90)
(P. 94)
(P. 108)
�����—�����—�����y�
�������������y���
�(���%�������y���������y
Page 74 of 231

�´
�Õ �Ü
As required by the FCC:
This device complies with Part 15 of theFCC rules. Operation is subject to thef ollowing two conditions: (1) This devicemay not cause harmf ul interf erence, and(2) this device must accept anyinterf erence received, including
interf erence that may cause undesiredoperation.
Changes or modif ications not expresslyapproved by the party responsible f or
compliance could void the user’sauthority to operate the equipment.
This device complies with IndustryCanada Standard RSS-210.Operation is subject to the f ollowing twoconditions: (1) this device may not cause
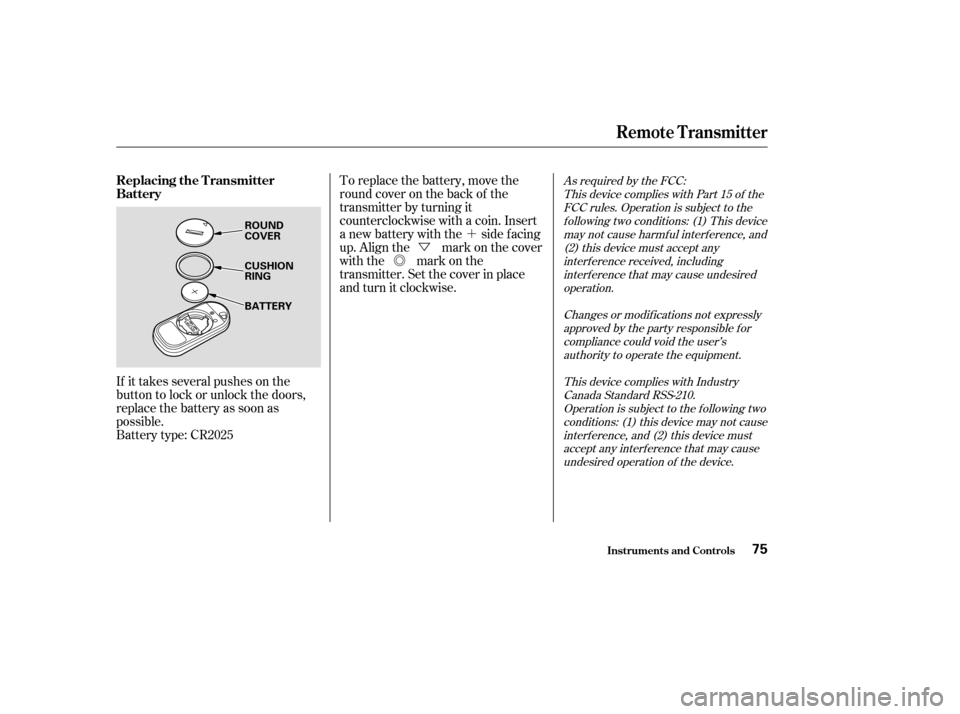
interf erence, and (2) this device mustaccept any interf erence that may causeundesired operation of the device.To replace the battery, move the
round cover on the back of the
transmitter by turning it
counterclockwise with a coin. Insert
a new battery with the side facing
up. Align the mark on the cover
with the mark on the
transmitter. Set the cover in place
andturnitclockwise.
Battery type: CR2025
If it takes several pushes on the
button to lock or unlock the doors,
replace the battery as soon as
possible.
Inst rument s and Cont rols
Remote Transmitter
Replacing the Transmitter
Battery
75
ROUND
COVER
CUSHION RING
BATTERY
�����—�����—�����y�
�������������y���
�(���%�������y���������y
Page 78 of 231
The lid of the console compartment
canbeusedasanarmrest.
Make sure the passenger’s hands or
fingersareawayfromthearmrest
bef ore pushing it down.The left and right halves can be
f olded separately f rom inside the
vehicle or inside the trunk. To f old
down the seat-back f rom inside the
vehicle, insert the master key in the
lock on the rear shelf . To f old down
the driver’s side, turn the key
clockwise, pull down the top of the
seat-back, then release the key. To
f old down the passenger’s side, turn
the key counterclockwise and
perf orm the same procedure.When storing cargo, you can move
therearcentershoulderbeltoutof
the way by removing the belt f rom
the guide.
CONT INUED
On LX and EX models in the U.S., and Si
models in Canada
Folding Rear Seat
Armrest
Inst rument s and Cont rols
Seats
79
GUIDE
CENTER SHOULDER BELT
�����—�����—�����y�
������
������y���
�(���%�������y���������y
Page 88 of 231

�Î
�ÎThe heating and air conditioning
systems in your Honda provide a
comf ortable driving environment in
all weather conditions.
The standard audio system has
many f eatures. This section de-
scribes those f eatures and how to
use them. (If you selected an
optional audio system, ref er to the
operating instructions that came
with it.)
Your Honda has an anti-thef t audio
system that requires a code number
to enable it. Air conditioning is standard on LX
andEXmodelsintheU.S.,andLX
and Si models in Canada. It is
optional on other models. ...............
Vents, Heating, and A/C . 90
.........................
Air Flow Buttons . 91
............................
Playing the Radio . 94
..............................
Radio Reception . 97
....................................
Playing a CD . 99
...................................
CD Changer . 100
....................
Protecting Your CDs . 101
.........
CD Player Error Messages . 102
CD Changer Error
...................................
Messages . 103
...............................
Playing a Tape . 104
.................
Radio Thef t Protection . 107
..........................
Setting the Clock . 108
...............................
Cruise Control . 110
Standard f or HX, LX and EX models in
the U.S., and LX and Si models in
Canada
Comf ort and Convenience Features
Comf ort and Convenience Feat ures89
�����—�����—�����y�
�������������y���
�(���%�������y���������y
Page 90 of 231

Turn this dial clockwise to increase
fan speed and increase the airflow.
Turning this dial clockwise increases
the temperature of the airflow.Air f low is divided between
the vents in the dashboard and the
f loor vents.
Air f lows f rom the f loor
vents. When you select , the
system automatically switches to
Fresh Air mode.
Air f low is divided between
the f loor vents and the def roster
vents at the base of the windshield.
Air f lows f rom the def roster
vents at the base of the windshield.
When you select or ,
the system automatically switches to
Fresh Air mode and turns on the
A/C. Air flows from the center
and corner vents in the dashboard.
This button turns the air
conditioning on and of f . The light in
thebuttonisonwhentheA/Cison.
When the light in the button is on,
air f rom the vehicle’s interior is sent
throughout the system again. When
the light is of f , air is brought in f rom
the outside of the vehicle (Fresh Air
mode). The outside air intakes f or the
heating and cooling system are at
the base of the windshield. Keep this
area clear of leaves and other debris.
ThesystemshouldbeleftinFresh
Air mode under almost all conditions.
Keeping the system in Recirculation
mode, particularly with the A/C of f ,
can cause the windows to fog up.
Switch to Recirculation mode when
driving through dusty or smoky
conditions, then return to Fresh Air
mode.
This button turns the rear window
def ogger of f and on (see page ).
Use the mode control dial to select
the vents the air flow from. Some air
will f low f rom the dashboard vents in
all modes.
67
Standard on LX and EX models in the
U.S.,andLXandSimodelsinCanadaOptional on other models
Air Flow Buttons
Fan Control Dial
T emperature Control Dial
Air Conditioning (A/C) Button
Recirculation Button Rear Window Def ogger Button
Mode Control Dial
Comf ort and Convenience Feat ures91
�����—�����—�����y�
�����������
�y���
�(���%�������y���������y
Page 107 of 231

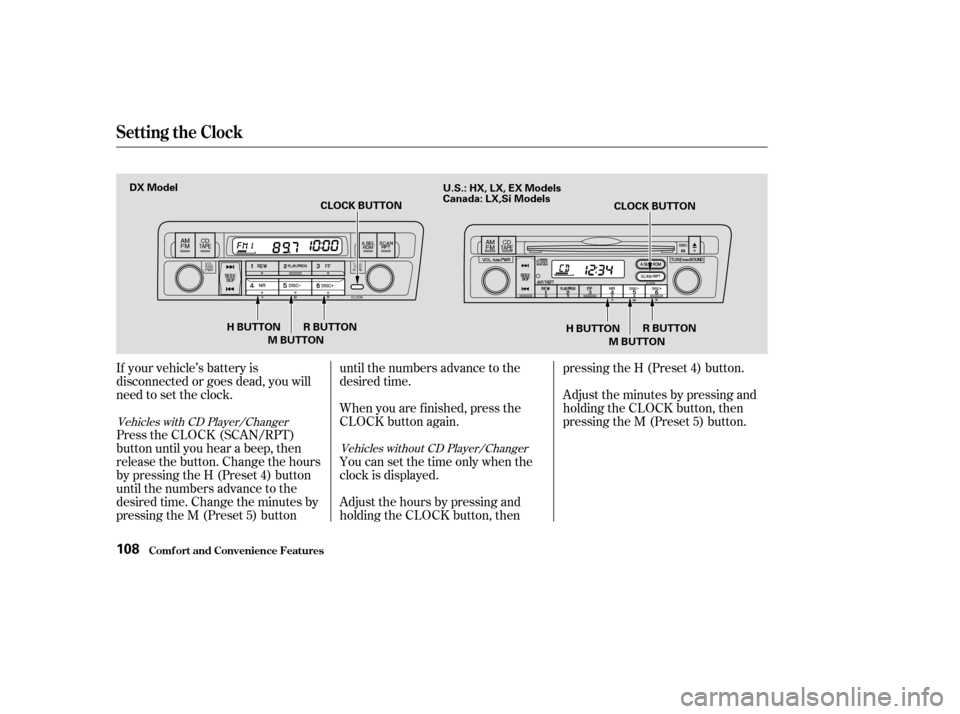
If your vehicle’s battery is
disconnected or goes dead, you will
need to set the clock.
Press the CLOCK (SCAN/RPT)
button until you hear a beep, then
release the button. Change the hours
by pressing the H (Preset 4) button
until the numbers advance to the
desired time. Change the minutes by
pressing the M (Preset 5) buttonuntil the numbers advance to the
desired time.
When you are f inished, press the
CLOCK button again.
You can set the time only when the
clock is displayed.
Adjust the hours by pressing and
holding the CLOCK button, thenpressing the H (Preset 4) button.
Adjust the minutes by pressing and
holding the CLOCK button, then
pressing the M (Preset 5) button.
Vehicles with CD Player/Changer
Vehicles without CD Player/Changer
Setting the Clock
Comf ort and Convenience Feat ures108
M BUTTON
H BUTTON R BUTTON CLOCK BUTTON
M BUTTON CLOCK BUTTON
DX Model
R BUTTON
H BUTTON
U.S.: HX, LX, EX Models
Canada: LX,Si Models
�����—�����—�����y�
�������������y���
�(���%�������y���
�
�
�y
Page 108 of 231
You can quickly set the time to the
nearest hour.
If the displayed time is before the
half hour, press the CLOCK (SCAN/
RPT) button until you hear a beep,
then press the R (Preset 6) button to
settheclockbacktotheprevious
hour. If the displayed time is af ter
the half hour, the clock sets forward
to the beginning of the next hour.
If the displayed time is before the
half hour, press and hold the
CLOCK button, then press the R
(Preset 6) button to set the clock
back to the previous hour. If the
displayed time is af ter the half hour,
the clock sets forward to the
beginning of the next hour.For example: 1:06 will reset to 1:00
1:52 will reset to 2:00
Vehicles with CD Player/Changer
Vehicles without CD Player/Changer
Setting the Clock
Comf ort and Convenience Feat ures109
�����—�����—�����y�
�������������y���
�(���%�������y���
�
���y