Page 2 of 231
Your Vehicle at a Glance
3
HEADLIGHTS/TURN SIGNALS
MOONROOF
CRUISE CONTROL
MASTER SWITCH
MIRROR CONTROLS CRUISE CONTROL BUTTONSREAR WINDOW
DEFOGGER
WINDSHIELD WIPERS/WASHERS
AUDIO SYSTEMDIGITAL CLOCK
STEERING WHEEL ADJUSTMENT
(P. 65)
(P. 64) (P. 67)
(P. 94)
(P. 67)
(P. 82)
(P. 110)
(P. 83)
(P. 68)HAZARD WARNING BUTTON
(P. 108)
(P. 110)
�����—�����—�����y�
�������������y���
�(���%�������y���������y
Page 51 of 231
Control L ocations
Inst rument s and Cont rols52
MOONROOF MIRRORCONTROLSHEATING/COOLING CONTROLS
HOOD RELEASE
HANDLE CRUISE CONTROL
BUTTONS
FUEL FILL DOOR RELEASE
A/T model is shown. POWER WINDOW
SWITCHES
POWER DOOR LOCK
SWITCH
CRUISE CONTROL
MASTER SWITCH
TRUNK RELEASE DIGITAL CLOCK
AUDIO SYSTEM
(P. 82)
(P. 72)
(P. 110)
(P. 81)
(P. 115)
(P. 72) (P. 116)
(P. 110)
(P. 83)
(P. 90)
(P. 94)
(P. 108)
�����—�����—�����y�
�������������y���
�(���%�������y���������y
Page 62 of 231
�Î
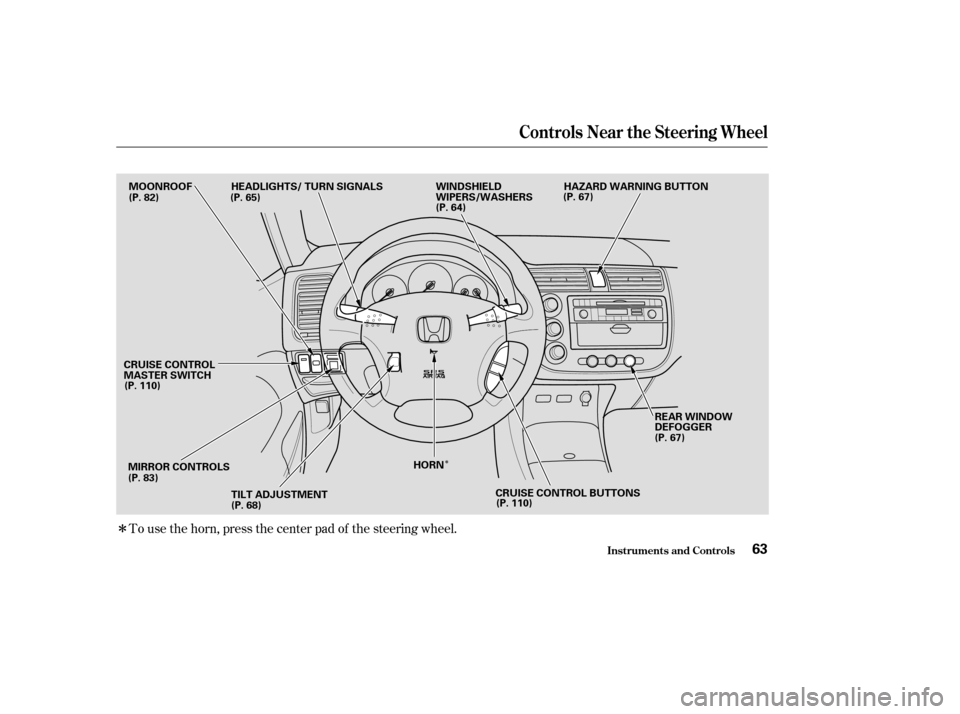
�ÎTo use the horn, press the center pad of the steering wheel.
Controls Near the Steering Wheel
Inst rument s and Cont rols63
MOONROOF
MIRROR CONTROLS TILT ADJUSTMENT HORN REAR WINDOW
DEFOGGER
WINDSHIELD
WIPERS/WASHERS
HEADLIGHTS/ TURN SIGNALS
CRUISE CONTROL
MASTER SWITCH (P. 82) (P. 65)
(P. 64)(P. 67)
(P. 110) (P. 83) (P. 68) (P. 67)
CRUISE CONTROL BUTTONS (P. 110) HAZARD WARNING BUTTON
�����—�����—�����y�
�������������y���
�(���%�������y���������y
Page 88 of 231

�Î
�ÎThe heating and air conditioning
systems in your Honda provide a
comf ortable driving environment in
all weather conditions.
The standard audio system has
many f eatures. This section de-
scribes those f eatures and how to
use them. (If you selected an
optional audio system, ref er to the
operating instructions that came
with it.)
Your Honda has an anti-thef t audio
system that requires a code number
to enable it. Air conditioning is standard on LX
andEXmodelsintheU.S.,andLX
and Si models in Canada. It is
optional on other models. ...............
Vents, Heating, and A/C . 90
.........................
Air Flow Buttons . 91
............................
Playing the Radio . 94
..............................
Radio Reception . 97
....................................
Playing a CD . 99
...................................
CD Changer . 100
....................
Protecting Your CDs . 101
.........
CD Player Error Messages . 102
CD Changer Error
...................................
Messages . 103
...............................
Playing a Tape . 104
.................
Radio Thef t Protection . 107
..........................
Setting the Clock . 108
...............................
Cruise Control . 110
Standard f or HX, LX and EX models in
the U.S., and LX and Si models in
Canada
Comf ort and Convenience Features
Comf ort and Convenience Feat ures89
�����—�����—�����y�
�������������y���
�(���%�������y���������y
Page 90 of 231

Turn this dial clockwise to increase
fan speed and increase the airflow.
Turning this dial clockwise increases
the temperature of the airflow.Air f low is divided between
the vents in the dashboard and the
f loor vents.
Air f lows f rom the f loor
vents. When you select , the
system automatically switches to
Fresh Air mode.
Air f low is divided between
the f loor vents and the def roster
vents at the base of the windshield.
Air f lows f rom the def roster
vents at the base of the windshield.
When you select or ,
the system automatically switches to
Fresh Air mode and turns on the
A/C. Air flows from the center
and corner vents in the dashboard.
This button turns the air
conditioning on and of f . The light in
thebuttonisonwhentheA/Cison.
When the light in the button is on,
air f rom the vehicle’s interior is sent
throughout the system again. When
the light is of f , air is brought in f rom
the outside of the vehicle (Fresh Air
mode). The outside air intakes f or the
heating and cooling system are at
the base of the windshield. Keep this
area clear of leaves and other debris.
ThesystemshouldbeleftinFresh
Air mode under almost all conditions.
Keeping the system in Recirculation
mode, particularly with the A/C of f ,
can cause the windows to fog up.
Switch to Recirculation mode when
driving through dusty or smoky
conditions, then return to Fresh Air
mode.
This button turns the rear window
def ogger of f and on (see page ).
Use the mode control dial to select
the vents the air flow from. Some air
will f low f rom the dashboard vents in
all modes.
67
Standard on LX and EX models in the
U.S.,andLXandSimodelsinCanadaOptional on other models
Air Flow Buttons
Fan Control Dial
T emperature Control Dial
Air Conditioning (A/C) Button
Recirculation Button Rear Window Def ogger Button
Mode Control Dial
Comf ort and Convenience Feat ures91
�����—�����—�����y�
�����������
�y���
�(���%�������y���������y
Page 93 of 231
Playing the Radio
Comf ort and Convenience Feat ures94
AM/FM BUTTONPWR/VOL KNOB PRESET BUTTONS
TUNE KNOBSCAN BUTTON
A.SEL BUTTON
SCAN INDICATOR
PWR/VOL KNOB SEEK BARPRESET BUTTONS
TUNE KNOB
SCAN INDICATOR
STEREO INDICATOR
A.SEL
BUTTON
SCAN
BUTTON
DX Model
AM/FM BUTTONSTEREO INDICATORSEEK BAR
U.S.: HX, LX, EX Models
Canada: LX, Si Models
�����—�����—�����y�
�������������y���
�(���%�������y���������y
Page 94 of 231
 or ON (II) position.
Turn the system on by pushing the
PWR/VOL knob or the AM/FM
button. Adjust the volume by turning
thesameknob.
The")
�µ�µ
�µ �µ
The ignition switch must be in the
ACCESSORY (I) or ON (II) position.
Turn the system on by pushing the
PWR/VOL knob or the AM/FM
button. Adjust the volume by turning
thesameknob.
The band and f requency that the
radio was last tuned to is displayed.
To change bands, press the AM/FM
button. On the FM band, ST will be
displayed if the station is broadcast-
ing in stereo. Stereo reproduction on
AM is not available.
You can use any of f ive methods to
f ind radio stations on the selected
band: the
preset buttons, and .
Use the TUNE knob to
tune the radio to a desired f requency.
Turn the knob right to tune to a
higher f requency, or lef t to tune to a lower f requency.
The SEEK f unction
searches up and down f rom the
current f requency to f ind a station
with a strong signal. To activate it,
press the or side of the
bar, then release it.
The SCAN f unction
samples all stations with strong
signals on the selected band. To
activate it, press the SCAN button,
then release it. You will see SCAN in
the display. The system will scan f or
a station with a strong signal. When
it f inds one, it will stop and play that
station f or about f ive seconds.
If you do nothing, the system will
then scan f or the next strong station
and play it for five seconds. When it
plays a station you want to listen to,
press the SCAN button again. Each preset button can
store one f requency on AM, and two
f requencies on FM.
Select the desired band, AM or
FM. FM1 and FM2 let you store
two f requencies with each preset
button.
UsetheTUNE,SEEK,orSCAN
function to tune the radio to a
desired station.
Pick a preset button, and hold it
until you hear a beep.
Repeat steps 1 to 3 to store a total
of six stations on AM and twelve
stations on FM.
The preset f requencies will be lost if
your vehicle’s battery goes dead, is
disconnected, or the radio f use is
removed.
1. 2. 3. 4.
Playing the Radio
Comf ort and Convenience Feat ures
To Play the Radio
To Select a Station
TUNE,SEEK,SCAN, AUTO SELECT
TUNE SEEK
SCAN
Preset
95
�����—�����—�����y�
�������������y���
�(���%�������y���������y
Page 95 of 231

�µ�µ
�µ
If you are
traveling far from home and can no
longer receive your preset stations,
you can use the Auto Select f eature
to find stations in the local area.
Press the A. SEL Button. ‘‘A.SEL’’
f lashes in the display, and the system
goes into scan mode f or several
seconds. It stores the f requencies of
six AM, and twelve FM stations in
the preset buttons.
You will see a ‘‘0’’ displayed af ter
pressing a preset button if Auto
Select cannot f ind a strong station
f or every preset button.
If you do not like the stations Auto
Select has stored, you can store
other f requencies on the preset
buttons. Use the TUNE, SEEK, or
SCAN functions to find stations, then
store them in the preset buttons as
described. press the
A. SEL button. This restores the
presets you originally set. These two
modes adjusts the strength of the
sound coming f rom each speaker.
BAL adjusts the side-to-side strength,
while FAD adjusts the f ront-to-back
strength.
You can use the instrument panel
brightness control knob to adjust the
illumination of the audio system (see
page ). The audio system
illuminates when the parking lights
are on, even if the radio is of f .
Press the SOUND (TUNE) knob
repeatedly to display the Bass (BAS),
Treble (TRE), Balance (BAL), and
Fader (FAD) setting.
Eachmodeisshowninthedisplayas
it changes. Turn the SOUND
(TUNE) knob to adjust the setting to
your liking. When the level reaches
the center, you will see ‘‘ ’’ in
the display. The system will
automatically return the display to
the selected audio mode about f ive
seconds af ter you stop adjusting a
mode.
Use the TRE/BAS
modes to adjust the tone to your
liking. 66To turn of f Auto Select,
Playing the Radio
Comf ort and Convenience Feat ures
AUTO SELECT
Adjusting the SoundBalance/Fader
A udio System L ighting
Treble/Bass
96
�����—�����—�����y�
�������������y���
�(���%�������y���������y