Page 50 of 231

This section gives inf ormation about
the controls and displays that
contribute to the daily operation of
your Honda. All the essential
controls are within easy reach............................
Control Locations . 52
............................
Instrument Panel . 53
..........
Instrument Panel Indicators . 56
.............................................
Gauges . 60
...............
Odometer/Trip Meter . 60
..................................
Fuel Gauge . 60
...................
Temperature Gauge . 61
..
Maintenance Required Indicator . 62
Controls Near the Steering
...........................................
Wheel . 63
.
Windshield Wipers and Washers . 64
...........
Turn Signal and Headlights . 65
........
Instrument Panel Brightness . 66
.................
Hazard Warning Button . 67
.................
Rear Window Def ogger . 67
..........
Steering Wheel Adjustment . 68
...............................
Keys and Locks . 69
........................
Immobilizer System . 70
................................
Ignition Switch . 71
......................................
Door Locks . 72
......................
Power Door Locks . 72
...........................................
Trunk . 72
........
Emergency Trunk Opener . 73
.......................
Remote Transmitter . 74
.................................................
Seats . 76
..............................
Power Windows . 81 .........................................
Moonroof . 82
.............................................
Mirrors . 83
.................................
Parking Brake . 84
.................................
Interior Lights . 85
................................
Ceiling Light . 85
...........
Individual Interior Lights . 85
...........
Interior Convenience Items . 86
.......................
Beverage Holders . 87
....................................
Globe Box . 87
...............
Console Compertment . 87
.............................
Center Pocket . 88
...........
Accessory Power Socket . 88
..............................
Vanity Mirror . 88
Instruments and Controls
Inst rument s and Cont rols51
�����—�����—�����y�
�������������y���
�(���%�������y���������y
Page 52 of 231
�Î
�Î
CONT INUED
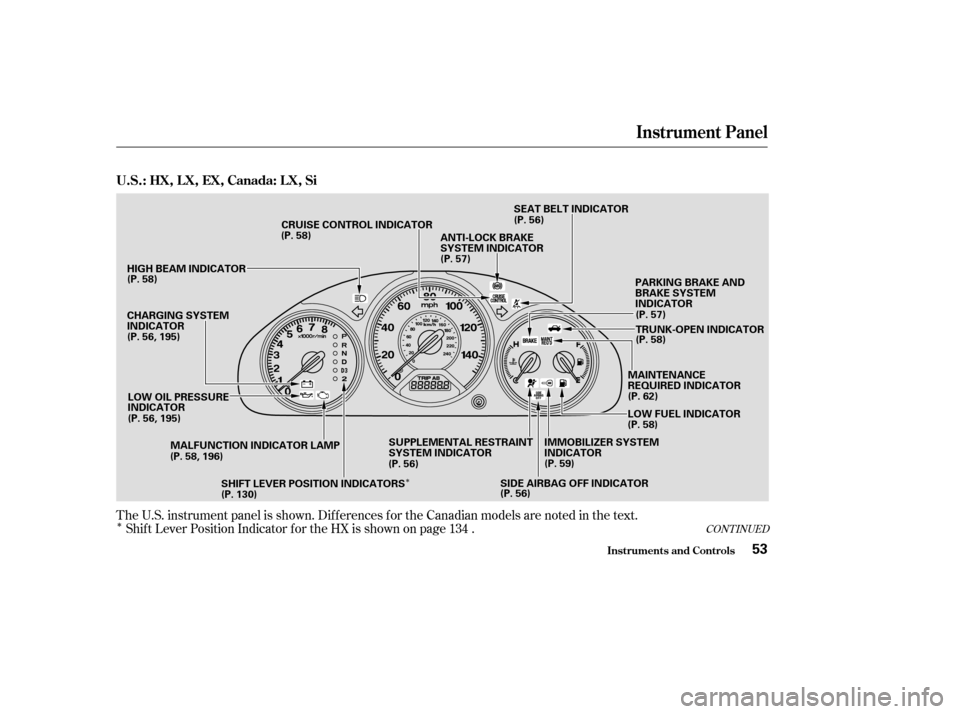
The U.S. instrument panel is shown. Dif f erences f or the Canadian models are noted in the text.
Shif t Lever Position Indicator f or the HX is shown on page 134 .
Instrument Panel
Inst rument s and Cont rols
U.S.:HX,LX,EX,Canada:LX,Si
53
IMMOBILIZER SYSTEM
INDICATOR MAINTENANCE
REQUIRED INDICATOR
SUPPLEMENTAL RESTRAINT
SYSTEM INDICATOR
HIGH BEAM INDICATOR
CHARGING SYSTEM
INDICATOR
LOW OIL PRESSURE
INDICATOR MALFUNCTION INDICATOR LAMP CRUISE CONTROL INDICATOR
TRUNK-OPEN INDICATOR
ANTI-LOCK BRAKE
SYSTEM INDICATOR
LOW FUEL INDICATORPARKING BRAKE AND
BRAKE SYSTEM
INDICATOR
(P. 58)
(P. 58)
(P. 56, 195)
(P. 130)
SHIFT LEVER POSITION INDICATORS (P. 56)
(P. 56)(P. 59) (P. 58)
(P. 62) (P. 58)
(P. 57)
(P. 56)
(P. 57)
SIDE AIRBAG OFF INDICATORSEAT BELT INDICATOR
(P. 58, 196)
(P. 56, 195)
�����—�����—�����y�
�������������y���
�(���%�������y���������y
Page 53 of 231
Instrument Panel
Inst rument s and Cont rols
Canada: DX
54
LOW OIL PRESSURE
INDICATORDAYTIME RUNNING
LIGHTS INDICATOR
MALFUNCTION INDICATOR LAMP WASHER LEVEL
INDICATOR
TRUNK-OPEN INDICATOR
IMMOBILIZER SYSTEM
INDICATOR
CHARGING SYSTEM
INDICATOR MAINTENANCE REQUIRED
INDICATORPARKING BRAKE AND
BRAKE SYSTEM
INDICATOR
LOW FUEL INDICATOR
SUPPLEMENTAL RESTRAINT SYSTEM INDICATOR
(P. 56)
(P. 59)
(P. 56, 195)
(P. 56, 195) HIGH BEAM INDICATOR(P. 58)
(P. 62) (P. 57)
(P. 58) (P. 58)
(P. 57)
(P. 56)
(P. 58)
SIDE AIRBAG OFF INDICATOR
(P. 58, 196) SEAT BELT INDICATOR
(P. 56)
�����—�����—�����y�
�������������y���
�(���%�������y���������y
Page 54 of 231
Instrument Panel
Inst rument s and Cont rols
U.S.: DX
55
SUPPLEMENTAL RESTRAINT SYSTEM INDICATOR
IMMOBILIZER SYSTEM
INDICATOR
LOW OIL PRESSURE
INDICATOR
MAINTENANCE REQUIRED INDICATOR
TRUNK-OPEN INDICATOR
PARKING BRAKE AND
BRAKE SYSTEM
INDICATOR
HIGH BEAM INDICATOR LOW FUEL INDICATOR
CHARGING SYSTEM
INDICATOR MALFUNCTION INDICATOR LAMP
(P. 56)
(P. 59)
(P. 56, 195)
(P. 56, 195)
(P. 56)(P. 58)
(P. 62) (P. 57)
(P. 58)
(P. 56)
(P. 58)
SIDE AIRBAG OFF INDICATOR
(P. 58, 196) SEAT BELT INDICATOR
�����—�����—�����y�
�������������y���
�(���%�������y���������y
Page 56 of 231
. It is a
reminder to check the parking
brake. Driving with the parking
brake not f ully released can
damage the brake")
This indicator has two f unctions:Itcomesonwhenyouturnthe
ignition switch ON (II). It is a
reminder to check the parking
brake. Driving with the parking
brake not f ully released can
damage the brakes and tires.
If it remains lit af ter you have f ully
released the parking brake while
the engine is running, or if it
comes on while driving, there
could be a problem with the brake
system. For complete inf ormation,
see page . This indicator comes on when you
turn the ignition switch to ON (II)
with the headlight switch off and the
parking brake set. It should go of f if
youturnontheheadlightsorrelease
the parking brake. If it comes on at
any other time, it means there is a
problem with the DRL. There may
also be a problem with the high
beam headlights.
This indicator normally comes on f or
a f ew seconds when you turn the
ignition switch to ON (II), and when
the ignition switch is turned to
START (III). If this indicator comes
on at any other time, there is a
problem in the ABS. If this happens,
take your vehicle to your dealer to
have it checked. With this indicator
on, your vehicle still has normal
braking ability but no anti-lock. For
complete inf ormation, see page .
1. 2.
197 139
Only on models equipped with ABS (see
page ) Canadian models only
139
CONT INUED
Parking Brake
and Brake
System
Indicator Anti-lock Brake System
(A BS) Indicator
‘‘Daytime Running
Lights’’ Indicator
Inst rument s and Cont rols
Instrument Panel Indicators
57
U.S. Canada
�����—�����—�����y�
�������������y���
�(���%�������y���������y
Page 64 of 231

�µ�µ�µ
Push down on the
lef t lever to signal a lef t turn and up
to signal a right turn. To signal a lane
change, push lightly on the lever in
the proper direction and hold it. The
lever will return to center when you
release it or complete a turn. To turn on, push
the lever f orward until you hear a
click. The blue high beam indicator
will light (see page ). Pull it back
to return to low beams. To flash the
high beams, pull the lever back
lightly, then release it. The high
beams will stay on as long as you
hold the lever back.
With the headlight switch off, the
high beam headlights come on with
reduced brightness when you turn
the ignition switch ON (II) and
release the parking brake. They
remain on until you turn the ignition
of f , even if you set the parking brake.
The headlights revert to normal
operation when you turn them on
with the switch.
Rotating switch
on the lef t lever controls to the
‘‘ ’’ position turns on the parking
lights, taillights, instrument panel
lights, side-marker lights, and rear
license plate lights. Turning the
switch to the ‘‘ ’’ position turns
on the headlights. If you leave the
lights on with the key removed f rom
the ignition switch, you will hear a
reminder tone when you open the
driver’s door.
Turn Signal
Of f
Parking and indicator lights
Headlights on
High beams
Flashhighbeams
1.2.3.4.5.6. 58
Turn Signal High Beams
Daytime Running L ights
(Canadian Models)
Headlights On
Inst rument s and Cont rols
Turn Signal and Headlights
65
�����—�����—�����y�
�������������y���
�(���%�������y���������y
Page 79 of 231
To release the seat-back from inside
the trunk, pull the release under the
trunk panel. Push the seat-back
down, then let go of the release.
To lock the seat-back upright, push it
f irmly against the trunk panel. Make
sure it is latched in place by pulling
on the top of the seat.Make sure all rear shoulder belts are
positioned in f ront of the rear seat-
back whenever it is in the upright
position.
Do not put any heavy items on the
seat-back when it is folded.
Make sure all items in the trunk, or
items extending through the opening
into the back seat, are secured.
Looseitemscanflyforwardand
cause injury if you have to brake
hard. See on page
.
Never drive with the seat-back
f olded down and the trunk lid open.
See on
page . 122
47
Seats
Inst rument s and Cont rols
Carrying Cargo
Carbon Monoxide Hazard
80
RELEASE Pull Pull
�����—�����—�����y�
������
������y���
�(���%�������y���������y
Page 83 of 231
The outside mirrors are heated to
remove fog and frost. With the
ignition switch in the ON (II)
position, turn on the heaters by
pressing the button. The indicator in
the button comes on as a reminder.
Press the button again to turn the
heaters off.To apply the parking brake, pull the
lever up f ully. To release it, pull up
slightly, push the button, and lower
the lever. The parking brake light on
the instrument panel should go out
when the parking brake is f ully
released (see page ).
57
On Canadian Si model
Power Mirror Heaters Parking Brake
Inst rument s and Cont rols
Mirrors, Parking Brake
84
NOTICE:
PARKING BRAKE LEVER
PARKING BRAKE LEVER
LX, U.S. DX VP, EX
and Canadian Si models DX, U.S. HX and Canada DX SE models
Driving the vehicle with the
parking brake applied can damage the
rear brakes and axles.
�����—�����—�����y�
������
������y���
�(���%�������y���������y


position, turn on the heaters by
pressing the button. The indicator in
the button comes on as a reminde")