Page 21 of 231
 f ront airbags. The driver’s
airbag is stored in the center of
the steering wheel; the f ront
passenger’sairbagisstoredinthe
da")
Your airbag system includes:Two SRS (Supplemental Restraint
System) f ront airbags. The driver’s
airbag is stored in the center of
the steering wheel; the f ront
passenger’sairbagisstoredinthe
dashboard. Both are marked ‘‘SRS
AIRBAG.’’
one f or the driver and one f or a
f ront passenger. The airbags are
stored in the outer edges of the
seat-backs. Both are marked
‘‘SIDE AIRBAG’’ (see page ).
Automatic front seat belt
tensioners (see page ).
Sensors that can detect a
moderate to severe frontal impact
or side impact in models equipped
with side airbags. A sophisticated electronic system
that continually monitors and
records inf ormation about the
sensors, the control unit, the
airbag activators, and driver and
frontpassengerseatbeltusewhen
the ignition is in the ON (II)
position.
If you ever have a moderate to
severe f rontal collision, sensors will
detect the vehicle’s rapid
deceleration. If the rate of
deceleration is high enough, the
control unit will instantly inf late the
driver’s and f ront passenger’s f ront
airbags, at the time and with the
f orce needed.
Emergency backup power in case
your vehicle’s electrical system is
disconnected in a crash.
An indicator on the instrument
panel that alerts you to a possible
problem with your airbags (see
page ).
an indicator on the dashboard that
alerts you that the passenger’s
side airbag has been turned of f
(see page ).
25
20 26
27
On models equipped with side airbags, On models equipped with side airbags,
Airbag System Components How Your Front Airbags Work
Additional Inf ormation About Your Airbags
Driver and Passenger Saf ety22
�����—�����—�����y�
������
������y���
�(���%�������y���������y
Page 50 of 231

This section gives inf ormation about
the controls and displays that
contribute to the daily operation of
your Honda. All the essential
controls are within easy reach............................
Control Locations . 52
............................
Instrument Panel . 53
..........
Instrument Panel Indicators . 56
.............................................
Gauges . 60
...............
Odometer/Trip Meter . 60
..................................
Fuel Gauge . 60
...................
Temperature Gauge . 61
..
Maintenance Required Indicator . 62
Controls Near the Steering
...........................................
Wheel . 63
.
Windshield Wipers and Washers . 64
...........
Turn Signal and Headlights . 65
........
Instrument Panel Brightness . 66
.................
Hazard Warning Button . 67
.................
Rear Window Def ogger . 67
..........
Steering Wheel Adjustment . 68
...............................
Keys and Locks . 69
........................
Immobilizer System . 70
................................
Ignition Switch . 71
......................................
Door Locks . 72
......................
Power Door Locks . 72
...........................................
Trunk . 72
........
Emergency Trunk Opener . 73
.......................
Remote Transmitter . 74
.................................................
Seats . 76
..............................
Power Windows . 81 .........................................
Moonroof . 82
.............................................
Mirrors . 83
.................................
Parking Brake . 84
.................................
Interior Lights . 85
................................
Ceiling Light . 85
...........
Individual Interior Lights . 85
...........
Interior Convenience Items . 86
.......................
Beverage Holders . 87
....................................
Globe Box . 87
...............
Console Compertment . 87
.............................
Center Pocket . 88
...........
Accessory Power Socket . 88
..............................
Vanity Mirror . 88
Instruments and Controls
Inst rument s and Cont rols51
�����—�����—�����y�
�������������y���
�(���%�������y���������y
Page 62 of 231
�Î
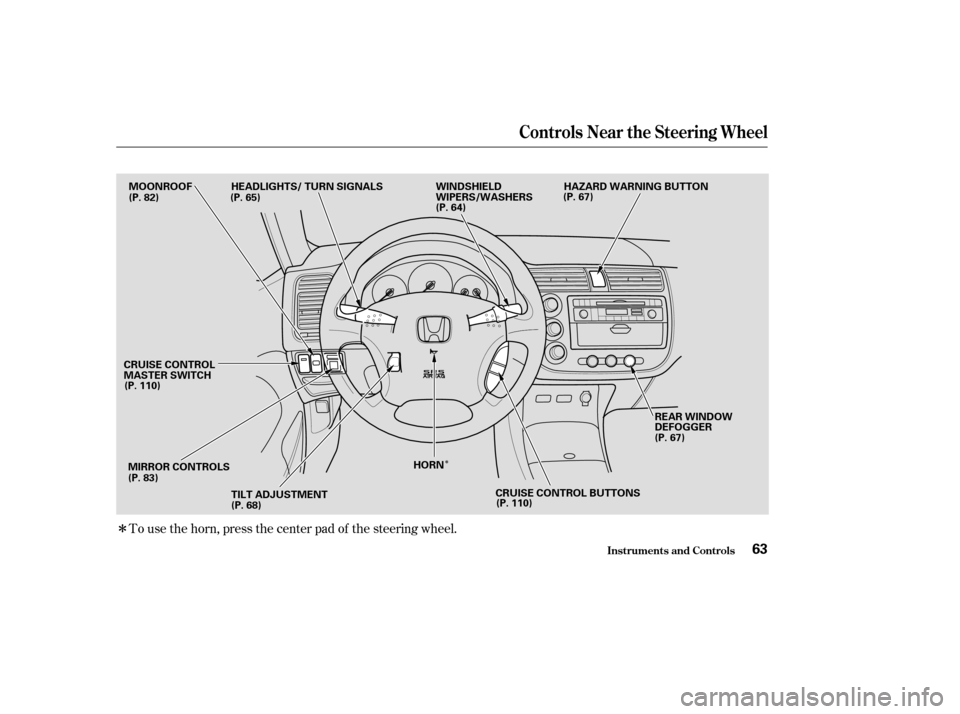
�ÎTo use the horn, press the center pad of the steering wheel.
Controls Near the Steering Wheel
Inst rument s and Cont rols63
MOONROOF
MIRROR CONTROLS TILT ADJUSTMENT HORN REAR WINDOW
DEFOGGER
WINDSHIELD
WIPERS/WASHERS
HEADLIGHTS/ TURN SIGNALS
CRUISE CONTROL
MASTER SWITCH (P. 82) (P. 65)
(P. 64)(P. 67)
(P. 110) (P. 83) (P. 68) (P. 67)
CRUISE CONTROL BUTTONS (P. 110) HAZARD WARNING BUTTON
�����—�����—�����y�
�������������y���
�(���%�������y���������y
Page 67 of 231
See page f or important saf etyinf ormation about how to properlyposition the steering wheel. 16
Make any steering wheel adjustment
bef ore you start driving.
To adjust the steering wheel upward
or downward:Push the lever under the steering
column all the way down. Push the lever up to lock the
steering wheel in that position.
Make sure you have securely
locked the steering wheel in place
by trying to move it up and down.
Move the steering wheel so it
points to your chest, not toward
your f ace. Make sure you can see
the instrument panel gauges and
lights.
1. 4.
3.
2.
Steering Wheel A djustment
Inst rument s and Cont rols68
Adjusting the steering wheel
position while driving may
cause you to lose control of the
vehicle and be seriously injured
inacrash.
Adjust the steering wheel only
when the vehicle is stopped.
�����—�����—�����y�
���������
���y���
�(���%�������y�������
�y
Page 70 of 231
, ACCESSORY
(I), ON (II), START (III) You will hear a reminder beeper if
you leave the key in the ignition
switch in the LOCK (0) or
AC")
�µ�µ
�µ
�µ
The ignition switch has f our
positions: LOCK (0), ACCESSORY
(I), ON (II), START (III) You will hear a reminder beeper if
you leave the key in the ignition
switch in the LOCK (0) or
ACCESSORY (I) position and open
the driver’s door. Remove the key to
turn of f the beeper. The shif t lever
must be in Park bef ore you can
remove the key from the ignition
switch.
You can insert or
remove the key only in this position.
To turn the key, you must push the
key in slightly. If your vehicle has an
automatic transmission, the shif t
lever must also be in park. If the f ront wheels are turned, the
anti-thef t lock may make it dif f icult
to turn the key. Firmly turn the
steering wheel to the lef t or right as
you turn the key.
You can
operate the audio system and the
accessory power sockets in this
position.
This is the normal key
position when driving. Several of the
lights on the instrument panel come
on as a test when you turn the
ignition switch f rom ACCESSORY
(I) to ON (II).
Use this position
only to start the engine. The switch
returns to ON (II) when you let go of
the key.
Inst rument s and Cont rols
Ignition Switch
LOCK (0) A CCESSORY (I)
ON (II)
ST A RT (III)
71
Removing the key from the
ignition switch while driving
locks the steering. This can
cause you to lose control.
Remove the key from the
ignition switch only whenparked.
�����—�����—�����y�
�������������y���
�(���%�������y���������y
Page 109 of 231
Cruise control allows you to maintain
asetspeedabove25mph(40km/h)
without keeping your f oot on the
accelerator pedal. It should be used
f or cruising on straight, open
highways. It is not recommended f or
city driving, winding roads, slippery
roads, heavy rain, or bad weather.Push in the Cruise Control Master
Switch. The indicator in the switch
will light.
Accelerate to the desired cruising
speedabove25mph(40km/h).Press and release the SET/decel
buttononthesteeringwheel.The
CRUISE CONTROL light on the
instrument panel comes on to
show the system is now activated.
1. 2. 3.
On HX, LX and EX models in the U.S.,
and LX and Si models in Canada
Cruise Control
Comf ort and Convenience Feat ures
Using the Cruise Control
110
CANCEL BUTTON
RESUME/ accel
BUTTON
SET/decel
BUTTON
Improper use of the cruise
control can lead to a crash.
Use the cruise control only
when traveling on open
highways in good weather.
�����—�����—�����y�
�����������
�y���
�(���%�������y���
�
���y
Page 111 of 231

Even with the cruise control turned
on, you can still use the accelerator
pedal to speed up f or passing. Af ter
completing the pass, take your foot
of f the accelerator pedal. The vehicle
will return to the set cruising speed.
Resting your f oot on the brake or
clutch pedal will cause the cruise
control to cancel.Pressing the Cruise Control Master
Switch turns the system completely
of f and erases the previous cruising
speed.
Youcancancelthecruisecontrolin
any of these ways:
Tap the brake or clutch pedal.
Push the CANCEL button on the
steering wheel.
Press the Cruise Control Master
Switch. When you push the CANCEL button,
or tap the brake or clutch pedal, the
system remembers the previously-
set cruising speed. To return to that
speed, accelerate to above 25 mph
(40 km/h) then press the RESUME/
accel button. The CRUISE
CONTROL light comes on, and the
vehicle will accelerate to the same
cruising speed as bef ore.
Cruise Control
Comf ort and Convenience Feat ures
Cancelling the Cruise Control
Resuming the Set Speed
112
�����—�����—�����y�
�����������
�y���
�(���%�������y���
�
���y
Page 120 of 231

Some examples are:Raising your vehicle with an
af termarket suspension kit can
af f ect the handling and stability.
Af termarket wheels, because they
are a universal design, can cause
excessive stress on suspension
components. Larger or smaller wheels and tires
can interf ere with the operation of
your vehicle’s anti-lock brakes and
other systems.
Removing parts f rom your vehicle,
or replacing components with non-
Honda (af termarket) components
could seriously af f ect your vehicle’s
handling, stability, and reliability.
Lowering your vehicle with an
aftermarket suspension kit that
signif icantly reduces ground
clearance can allow the
undercarriage to hit speed bumps
or other raised objects, which
could cause the airbags to deploy. Do not modif y your steering wheel
or any other part of your
Supplemental Restraint System.
Modif ications could make the
system inef f ective. See the saf ety
precautions on page .
If you plan to modif y your vehicle,
consult with your Honda dealer.
Improperly replacing
or covering f ront seat-back covers
can prevent your side airbags f rom
inf lating during a collision. 28
Modif ying Your Vehicle
Additional Saf ety Precaution
Bef ore Driving
A ccessories and Modif ications
Do not cover or replace f ront seat -back covers wit hout consult ing aHonda dealer.
121
�����—�����—�����y�
�������������y���
�(���%�������y���
�����y


without keeping your f oot on the
accelerator pedal. It should be used
f or cruising on straight, open
highways. It is not recommende")