Page 1 of 301
Your Vehicle at a Glance
2
HEATING/COOLING
CONTROLS
POWER DOOR LOCK
SWITCH
MIRROR CONTROLS
POWER WINDOW
SWITCHES DASH LIGHTS
GAUGES
HOOD RELEASE
HANDLE
TRUNK RELEASE HANDLE/
FUEL FILL DOOR RELEASE (P.62)
ACCESSORY POWER SOCKETS(P.110)
AUDIO SYSTEM
AUTOMATIC
TRANSMISSION
MANUAL
TRANSMISSION
AIRBAGS
(P.9/22)
(P.68)
(P.98)
(P.83)
(P.99)
(P.89/165) (P.166) (P.107)(P.180)
(P.182) (P.122)
�����—�����—�����y�
�
�����������y���
�(�������
���y���������y
Page 14 of 301

Position the lap part of the belt as
low as possible across your hips,
then pull up on the shoulder part of
the belt so the lap part f its snugly.
This lets your strong pelvic bones
take the force of a crash and reduces
the chance of internal injuries.
If necessary, pull up on the belt again
to remove any slack, then check that
the belt rests across the center of
your chest and over your shoulder.
This spreads the f orces of a crashover the strongest bones in your
upper body.
If the seat belt touches or crosses
your neck, or if it crosses your arm
instead of your shoulder, you need to
adjust the seat belt anchor height.
This could cause
very serious injuries in a crash. If a seat belt does not seem to work
as it should, it may not protect the
occupant in a crash.
Using a seat
belt that is not working properly can
result in serious injury or death.
Have your Honda dealer check the
belt as soon as possible.
See page f or additional
inf ormation about your seat belts
and how to take care of them.
To adjust the height of a f ront seat
belt anchor, press the release button
and slide the anchor up or down as
needed (the anchor has f our
positions).
19
CONT INUED
Protecting A dults and Teens
Driver and Passenger Saf ety
Never place t he shoulder port ion of alap/shoulder belt under your arm orbehind your back.
No one should sit in a seat wit h aninoperat ive seat belt .
15
RELEASE
BUTTONS
Improperly positioning the seat
belts can cause serious injury
or death in a crash.
Make sure all seat belts are
properly positioned beforedriving.
�����—�����—�����y�
�
���������
�y���
�(�������
���y�����
���y
Page 59 of 301
Control L ocations
Inst rument s and Cont rols60
PARKING BRAKE
POWER DOOR LOCK
SWITCHES
TRUNK RELEASE HANDLE/
FUEL FILL DOOR RELEASE HOOD RELEASE
HANDLE
POWER WINDOW
SWITCHES CRUISE CONTROL
INDICATOR LIGHTS
AND GAUGES
MIRROR CONTROLS
MOONROOF CONTROLS
ACCESSORY POWER SOCKETSHAZARD WARNING
LIGHTS
AUDIO SYSTEM
DIGITAL CLOCK
(P.110)
CLIMATE CONTROL
SYSTEM
HEATING/COOLING
CONTROLS
(P.62, 68)
(P.102)
(P.98)
(P.83)
(P.99)
(P.89/165) (P.166)
(P.103) (P.107)(P.119)
(P.76)
(P.153)
(P.155)
(P.122,130,140,145)
�����—�����—�����y�
�
�����������y���
�(�������
���y���������y
Page 61 of 301
 without f astening your seat belt,
the beeper starts to so")
The instrument panel has many
indicators to give you important
inf ormation about your vehicle.
If you turn the ignition switch to ON
(II) without f astening your seat belt,
the beeper starts to sound, and the
indicator starts to blink. The beeper
stops sounding several seconds later
but the indicator will remain lit.The engine can be severely damaged
if this indicator f lashes or stays on
when the engine is running. For
complete inf ormation, see page .
If this indicator comes on when the
engine is running, the battery is not
being charged. For more inf ormation,
see page .
See page .This indicator has two f unctions:
Itcomesonwhenyouturnthe
ignition switch to ON (II). It is a
reminder to check the parking
brake. If you drive at certain
speeds without f ully releasing the
parking brake, the beeper sounds
continuously. Driving with the
parking brake not f ully released
can damage the brakes and tires.
If you drive without your seat belt
f astened, the indicator remains on
and the beeper will sound every f ew
seconds.
If it remains lit af ter you f ully
release the parking brake while
the engine is running, or if it
comes on while driving, there
could be a problem with the brake
system. For complete inf ormation,
see page .
1. 2.
259
260 260
262
Instrument Panel L ights
Inst rument s and Cont rols
Seat Belt Reminder L ightL ow Oil Pressure
Indicator
Charging System
Indicator
Malf unction Indicator
LampParking Brake and Brake
System Indicator
62
U.S. Canada
�����—�����—�����y�
�
�����������y���
�(�������
���y���������y
Page 65 of 301
Canadian models only
This indicator comes on when you
turn the ignition switch to ON (II)
with the headlight switch off and the
parking brake set. It should go of f if
youturnontheheadlightsorrelease
the parking brake. If it comes on at
any other time, it means there is a
problem with the DRL. There may
also be a problem with the high
beam headlights.This indicator comes on with the
high beam headlights. See page
f or inf ormation on the headlight
controls.
On Canadian models, this indicator
comes on with reduced brightness
when the Daytime Running Lights
(DRL) are on (see page ).
This indicator comes on when the
security system is set. See page f or more inf ormation on the
security system. 154 76
75
Security System Indicator ‘‘Daytime Running
Lights’’ IndicatorHigh Beam Indicator
Instrument Panel L ights
Inst rument s and Cont rols66
SECURITY SYSTEM INDICATOR
�����—�����—�����y�
�
�����������y���
�(�������
���y���������y
Page 67 of 301

The odometer and the outside
temperature indicator use the same
display. To switch the display
between the odometer and the
outside temperature, press the
Select/Reset knob. When you turn
the ignition switch to ON (II), what
you last selected is displayed.The odometer shows the total dis-
tance your vehicle has been driven.
It measures miles in U.S. models and
kilometers in Canadian models.
It is illegal under U.S. f ederal law and
Canadian provincial regulations to
disconnect, reset, or alter the
odometer with the intent to change
the number of miles or kilometers
indicated.This indicator displays the outside
temperature in Fahrenheit (U.S.
models) or Centigrade (Canadian
models). To see the outside
temperature, press and release the
Select/Reset knob until the
temperature is displayed.
The temperature sensor is in the
f ront bumper. Theref ore, the
temperature reading can be af f ected
by heat ref lection f rom the road
surf ace, engine heat, and the
exhaust f rom surrounding traf f ic.
This can cause an incorrect
temperature reading when your
speed is under 19 mph (30 km/h).
When you start your trip, the sensor
is not f ully acclimatized, theref ore it
may take several minutes until the
proper temperature is displayed.
On 4-cylinder EX models with leather
interior and all 6-cylinder EX models
Odometer/Outside T emperature
Indicator OdometerOutside Temperature Indicator
Gauges
Inst rument s and Cont rols68
TACHOMETER
SPEEDOMETER FUEL GAUGE
TEMPERATURE
GAUGE
MAINTENANCE
REQUIRED
INDICATOR
TRIP METER
U.S. model is shown. SELECT/RESETKNOB
ODOMETER/OUTSIDE
TEMPERATURE INDICATOR
�����—�����—�����y�
�
�����������y���
�(�������
���y�������
�y
Page 68 of 301
 or kilometers (Canada)
driven since you last reset it.
There are two trip meters: Trip A
and Trip B. Switch between thes")
�¶�¶�µ�µ�µ�µ
�µ �µ�µ�µ This meter shows the number of
miles (U.S.) or kilometers (Canada)
driven since you last reset it.
There are two trip meters: Trip A
and Trip B. Switch between these
displays and the odometer/outside
temperature display by pressing the
Select/Reset knob repeatedly. Each
trip meter works independently, so
you can keep track of two dif f erent
distances.
This shows the temperature of the
engine’s coolant. During normal
operation, the pointer should rise
from the bottom white mark to about
the middle of the gauge. In severe
driving conditions, such as very hot
weather or a long period of uphill
driving, the pointer may rise into the
upperhalfofthegauge.Ifitreaches
the red (Hot) mark, pull safely to the
side of the road. Turn to page f or
instructions and precautions on
checking the engine’s cooling
system.
If the outside temperature is
incorrectly displayed, you can adjust
it up to 5°F ( 3°C) warmer or
cooler.
NOTE: The temperature must be
stabilized bef ore doing this
procedure.
Select the outside temperature
display, then press the Select/Reset
knob f or ten seconds. The f ollowing
sequence will appear f or one second
each:0,1,2,3,4,5, 5, 4, 3, 2,
1, 0, 1 (0, 1, 2, 3, 3, 2, 1, 0, 1).
When it reaches the desired value,
release the Select/Reset knob. You
should see the new outside
temperature displayed.
In certain weather conditions,
temperature readings near f reezing
(32°F, 0°C) could mean that ice is
f orming on the road surf ace. When you turn the ignition switch to
ON (II), what you last selected is
displayed.
To reset a trip meter, display it and
then press and hold the Select/Reset
knob until the number resets to ‘‘0.0’’.
Both trip meters will reset if the
vehicle’s battery goes dead or is
disconnected. 257
Trip Meter Temperature Gauge
Gauges
Inst rument s and Cont rols69
�����—�����—�����y�
�
�������
���y���
�(�������
���y���������y
Page 72 of 301
�µ
�µ
�µ �µ
�µ �µ
�µ
�µ �µ
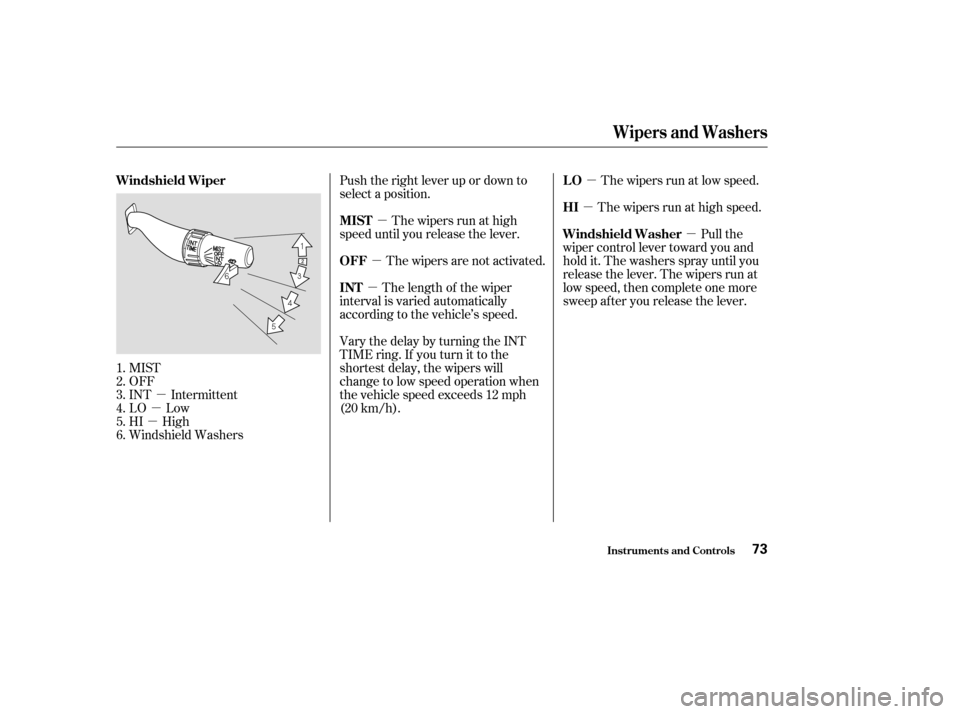
MIST
OFF
INT Intermittent
LO Low
HI High
Windshield Washers Push the right lever up or down to
select a position.
The wipers run at high
speed until you release the lever.
The wipers are not activated. The wipers run at low speed.
The wipers run at high speed.
The length of the wiper
interval is varied automatically
according to the vehicle’s speed.
Vary the delay by turning the INT
TIME ring. If you turn it to the
shortest delay, the wipers will
change to low speed operation when
the vehicle speed exceeds 12 mph
(20 km/h). Pull the
wiper control lever toward you and
hold it. The washers spray until you
release the lever. The wipers run at
low speed, then complete one more
sweep after you release the lever.
1.2.3.4.5.6.
Windshield Wiper
MIST
OFFLO HI
INT Windshield Washer
Wipers and Washers
Inst rument s and Cont rols73
�����—�����—�����y�
�
���������
�y���
�(�������
���y���������y


with the headlight switch off and the
parking brake set. It should go of f if
youturnontheheadlightsorrelease")