Page 153 of 301

The security system helps to protect
your vehicle and valuables f rom thef t.
The horn sounds and a combination
of headlights, parking lights, side
marker lights and taillights f lashes if
someone attempts to break into your
vehicleorremovetheradio.This
alarm continues f or two minutes,
then the system resets. To reset an
alarming system before the two
minutes have elapsed, unlock either
f ront door with the key or the
remote transmitter.
The security system automatically
sets 15 seconds after you lock the
doors, hood, and trunk. For the
system to activate, you must lock the
doors f rom the outside with the key,
lock tab, door lock switch, or remote
transmitter. The security system
light on the instrument panel starts
blinking immediately to show you
the system is setting itself.Once the security system is set,
opening any door (without using the
key or the remote transmitter), the
hood, or the trunk will cause it to
sound. It also sounds if the radio is
removed f rom the dashboard or the
wiring is cut.With the system set, you can still
open the trunk with the master key
or the remote transmitter without
triggering the alarm. The alarm will
sound if the trunk lock is f orced, or
the trunk is opened with the trunk
release handle.
The security system will not set if
the hood, trunk, or any door is not
f ully closed. If the system will not set,
check the Door Monitor on the
instrument panel (see page ), to
see if the doors and trunk are f ully
closed. Since it is not part of the
monitor display, manually check thehood.
Do not attempt to alter this system
or add other devices to it.
61
On EX, all V6, and Canadian LX-G
models
Security System
Features154
SECURITY SYSTEM LIGHT
�����—�����—�����y�
�
�����������y���
�(�������
���y���
�����y
Page 154 of 301
Cruise control allows you to maintain
asetspeedabove25mph(40km/h)
without keeping your f oot on the
accelerator pedal. It should be used
f or cruising on straight, open
highways. It is not recommended f or
city driving, winding roads, slippery
roads, heavy rain, or bad weather.Push in the Cruise Control Master
Buttononthesteeringwheel.The
CRUISE MAIN light on the
instrument panel comes on.
Accelerate to the desired cruising
speedabove25mph(40km/h).Press and release the DECEL/
SET button on the steering wheel.
The CRUISE CONTROL light on
the instrument panel comes on to
show the system is now activated.
1. 2. 3.
Except f or U.S. DX modelUsing the Cruise Control
Cruise Control
Features155
CRUISE CONTROL MASTER BUTTON
CANCEL
BUTTON RES/ACCEL
BUTTON
DECEL/SET
BUTTON
Improper use of the cruise
control can lead to a crash.
Use the cruise control only
when traveling on open
highways in good weather.
�����—�����—�����y�
�
�����������y���
�(�������
���y���
�����y
Page 155 of 301

Thecruisecontrolmaynotholdthe
set speed when you are going up and
down hills. If your speed increases
going down a hill, use the brakes to
slow down. This will cancel the
cruise control. To resume the set
speed, press the RES/ACCEL button.
The CRUISE CONTROL light on the
instrument panel will come back on.
You can increase the set cruising
speed in any of these ways:Press and hold the RES/ACCEL
button. When you reach the
desired cruising speed, release the
button. Push on the accelerator pedal. Ac-
celerate to the desired cruising
speed and press the DECEL/SET
button.
To increase your speed in very
small amounts, tap the RES/
ACCEL button. Each time you do
this, your vehicle will speed up
about 1 mph (1.6 km/h).
You can decrease the set cruising
speed in any of these ways:
Press and hold the DECEL/SET
button. Release the button when
you reach the desired speed.
To slow down in very small
amounts, tap the DECEL/SET
button repeatedly. Each time you
do this, your vehicle will slow
down about 1 mph (1.6 km/h). Tap the brake or clutch pedal
lightly with your f oot. The
CRUISE CONTROL light on the
instrument panel will go out.
When the car slows to the desired
speed, press the DECEL/SET
button.
Even with the cruise control turned
on, you can still use the accelerator
pedal to speed up f or passing. Af ter
completing the pass, take your foot
of f the accelerator pedal. The vehicle
will return to the set cruising speed.
Resting your f oot on the brake or
clutch pedal will cause the cruise
control to cancel.
Changing the Set Speed
Cruise Control
Features156
�����—�����—�����y�
�
�����������y���
�(�������
���y���
�����y
Page 156 of 301
When you push the CANCEL button,
or tap the brake or clutch pedal, the
system will remember the
previously-set cruising speed. To
return to that speed, accelerate to
above25mph(40km/h)thenpress
and release the RES/ACCEL button.
The CRUISE CONTROL light comes
on. The vehicle will accelerate to the
same cruising speed as bef ore.Pressing the Cruise Control Master
Switch turns the system of f and
erases the previous cruising speed.
Youcancancelthecruisecontrolin
any of these ways:
Tap the brake or clutch pedal.
Push the CANCEL button on the
steering wheel.
Press the Cruise Control Master
Switch.
Cancelling the Cruise Control Resuming the Set Speed
Cruise Control
Features157
�����—�����—�����y�
�
�����������y���
�(�������
���y���
�����y
Page 158 of 301
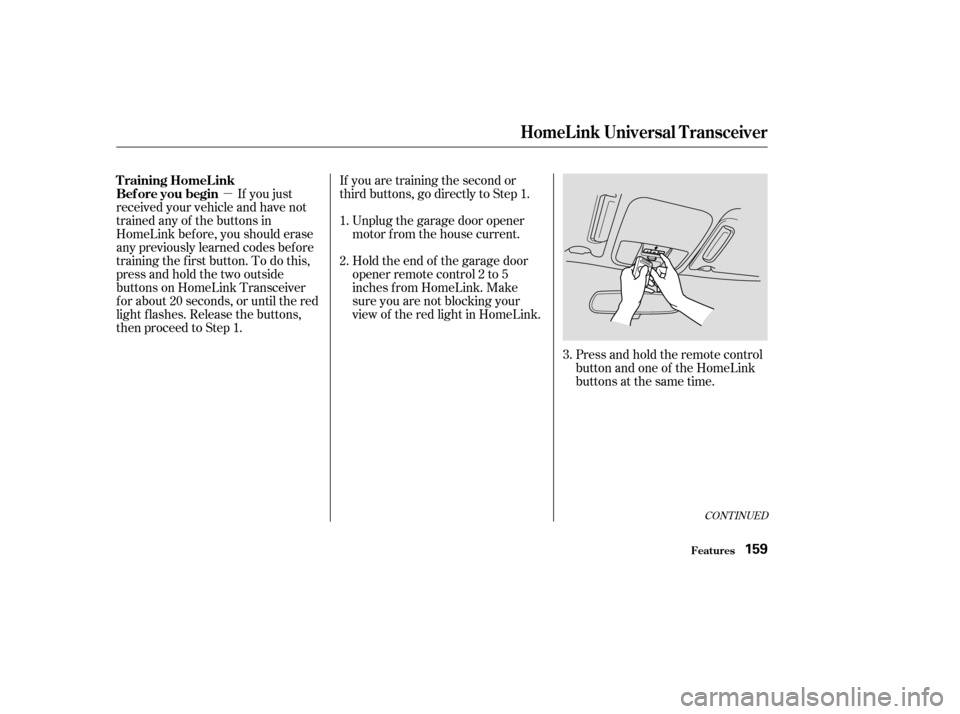
�µPress and hold the remote control
button and one of the HomeLink
buttons at the same time.
If you just
received your vehicle and have not
trained any of the buttons in
HomeLink bef ore, you should erase
any previously learned codes bef ore
training the f irst button. To do this,
press and hold the two outside
buttons on HomeLink Transceiver
f or about 20 seconds, or until the red
light f lashes. Release the buttons,
then proceed to Step 1. If you are training the second or
third buttons, go directly to Step 1.
Unplug the garage door opener
motor f rom the house current.
Holdtheendof thegaragedoor
opener remote control 2 to 5
inches f rom HomeLink. Make
sure you are not blocking your
view of the red light in HomeLink.
2.
3.
1.
CONT INUED
T raining HomeL ink
Bef ore you begin
HomeL ink Universal T ransceiver
Features159
�����—�����—�����y�
�
����
��
���y���
�(�������
���y���
�����y
Page 159 of 301

Canadian Owners:The remote control
you are training f rom may stop trans-
mitting after two seconds. This is not
enough f or HomeLink to learn the
code. Release and press the button
on the remote control every two
seconds until HomeLink has learned
the code.
The red light in HomeLink should
begin f lashing. It will f lash slowly
at first, then rapidly.
When the red light f lashes rapidly,
release both buttons. HomeLink
should have learned the code from
the remote control.
Plug in the garage door opener
motor, then test the HomeLink
Transceiver button by pushing it. If the button does not work, repeat
this procedure to train it again. If it
still does not work, you may have a
variable or rolling code garage
door opener. See if you do by
pressing and holding the
HomeLink transceiver button you
just trained. If the red light blinks
f or two seconds, then stays on,
you have a rolling code garage
door opener. Go to ‘‘Training With
a Rolling Code System’’.
For security purposes, newer garage
door opening systems use a ‘‘rolling’’
or variable code. Inf ormation f rom
the remote control and the garage
door opener are needed bef ore
HomeLink can operate the garage
door opener.
The ‘‘Training HomeLink’’
procedure trains HomeLink to the
proper garage door opener code.
The f ollowing procedure
synchronizes HomeLink to the
garage door opener so they send and
receive the correct codes.
Repeat these steps to train the
other two HomeLink buttons to
operate any other remotely-
controlled devices around your
home (lighting, automatic gate,
security system, etc.).
5. 6.
8.
7. T raining With a Rolling Code
System
HomeL ink Universal T ransceiver
Features160
�����—�����—�����y�
�
����
������y���
�(�������
���y���
�����y
Page 160 of 301
�µ�µ
Make sure you have properly
completed the ‘‘Training
HomeLink’’ procedure.
Find the ‘‘Training’’ button on your
garage door opener unit. The
location will vary, depending on
the manufacturer.
Press the Training button on the
garage door opener unit until the
light next to the button comes on,
then release it. The light may blink,
or come on and stay on. You then
have approximately 30 seconds to
complete the f ollowing steps.Press and hold the button on
HomeLink f or 3 4 seconds.
Press and hold the HomeLink
button again f or 3 4 seconds.
This should turn of f the training
light on the garage door opener
unit. (Some systems may require
youtopressthebuttonuptothree
times.)
Press the HomeLink button again.
It should operate the garage door.
6.
2.
4. 5.
1.
3.
HomeL ink Universal T ransceiver
Features161
TRAINING BUTTON
�����—�����—�����y�
�
����
������y���
�(�������
���y���
�����y
Page 161 of 301

Toerasethecodesstoredinallthree
buttons, press and hold the two
outside buttons until the red light
begins to f lash, then release the
buttons.
Youshoulderaseallthreecodes
bef ore selling the vehicle.
Totrainanalreadyprogrammed
transceiver button with a new device,
you do not have to erase all the
memory. Train the selected button
over the existing memory code
f ollowing the steps under. If you have problems with training
the HomeLink Wireless Control
System, or would like inf ormation on
home products that can be operated
by the transmitter, call (800) 355-
3515. On the Internet, go to www.
homelink.com.
As required by the FCC:
This device complies with Part 15 of theFCC rules. Operation is subject to thef ollowing two conditions: (1) This devicemay not cause harmf ul interf erence, and(2) this device must accept anyinterf erence received, including
interf erence that may cause undesiredoperation.
Changes or modif ications not expresslyapproved by the party responsible f or
compliance could void the user’sauthority to operate the equipment.
This device complies with IndustryCanada Standard RSS-210.Operation is subject to the f ollowing twoconditions: (1) this device may not cause
interf erence, and (2) this device mustaccept any interf erence that may causeundesired operation of the device.Erasing Codes
Retraining a Button
T raining
HomeL ink Customer Assistance
HomeL ink Universal T ransceiver
Features162
�����—�����—�����y�
�
����
������y���
�(�������
���y���
�����y

without keeping your f oot on the
accelerator pedal. It should be used
f or cruising on straight, open
highways. It is not recommende")
thenpress
and r")