2004 GMC SIERRA air outlet
[x] Cancel search: air outletPage 165 of 588

Instrument Panel Overview...............................3-4
Hazard Warning Flashers................................3-6
Other Warning Devices...................................3-6
Horn.............................................................3-7
Tilt Wheel.....................................................3-7
Turn Signal/Multifunction Lever.........................3-7
Exterior Lamps.............................................3-14
Interior Lamps..............................................3-19
Accessory Power Outlets...............................3-20
Ashtrays and Cigarette Lighter........................3-21
Climate Controls............................................3-21
Climate Control System.................................3-21
Dual Climate Control System..........................3-22
Dual Automatic Climate Control System...........3-26
Warning Lights, Gages and Indicators.............3-33
Warning Lights, Gages, and Indicators.............3-33
Instrument Panel Cluster................................3-34
Speedometer and Odometer...........................3-35
Tachometer.................................................3-35
Safety Belt Reminder Light.............................3-36
Air Bag Readiness Light................................3-36Air Bag Off Light..........................................3-37
Passenger Air Bag Status Indicator.................3-40
Battery Warning Light....................................3-42
Voltmeter Gage............................................3-42
Up-Shift Light...............................................3-43
Brake System Warning Light..........................3-43
Anti-Lock Brake System Warning Light.............3-45
Traction Off Light..........................................3-45
Engine Coolant Temperature Gage..................3-46
Transmission Temperature Gage.....................3-47
Malfunction Indicator Lamp.............................3-49
Oil Pressure Gage........................................3-52
Cruise Control Light......................................3-53
Four-Wheel-Drive Light..................................3-53
Tow/Haul Mode Light....................................3-53
Overdrive Disable.........................................3-53
Fuel Gage...................................................3-54
Low Fuel Warning Light.................................3-54
Driver Information Center (DIC).......................3-55
DIC Operation and Displays...........................3-55
DIC Warnings and Messages.........................3-66
Section 3 Instrument Panel
3-1
Page 169 of 588
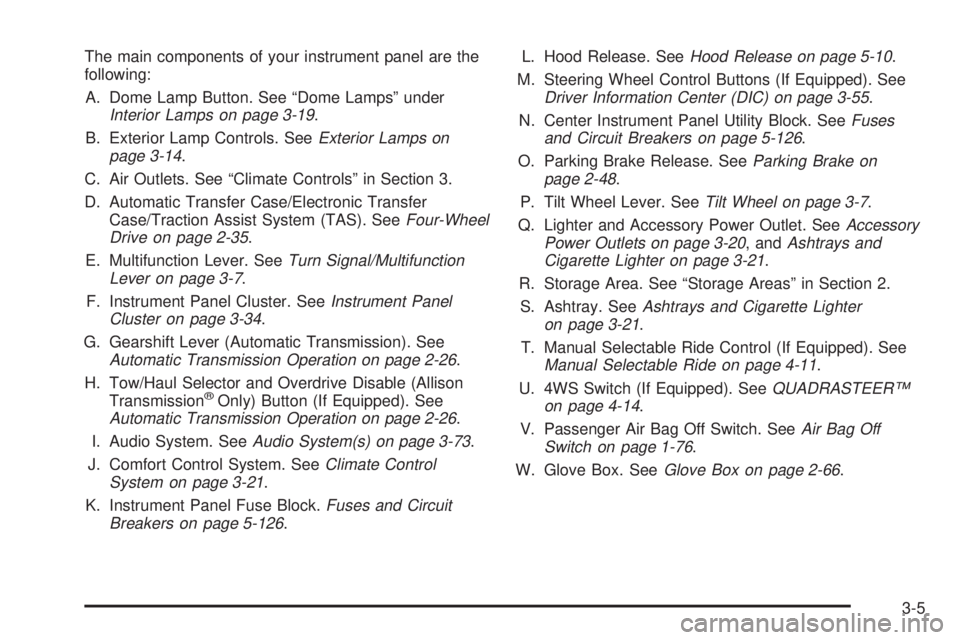
The main components of your instrument panel are the
following:
A. Dome Lamp Button. See ªDome Lampsº under
Interior Lamps on page 3-19.
B. Exterior Lamp Controls. See
Exterior Lamps on
page 3-14.
C. Air Outlets. See ªClimate Controlsº in Section 3.
D. Automatic Transfer Case/Electronic Transfer
Case/Traction Assist System (TAS). See
Four-Wheel
Drive on page 2-35.
E. Multifunction Lever. See
Turn Signal/Multifunction
Lever on page 3-7.
F. Instrument Panel Cluster. See
Instrument Panel
Cluster on page 3-34.
G. Gearshift Lever (Automatic Transmission). See
Automatic Transmission Operation on page 2-26.
H. Tow/Haul Selector and Overdrive Disable (Allison
Transmission
žOnly) Button (If Equipped). SeeAutomatic Transmission Operation on page 2-26.
I. Audio System. See
Audio System(s) on page 3-73.
J. Comfort Control System. See
Climate Control
System on page 3-21.
K. Instrument Panel Fuse Block.
Fuses and Circuit
Breakers on page 5-126.L. Hood Release. See
Hood Release on page 5-10.
M. Steering Wheel Control Buttons (If Equipped). See
Driver Information Center (DIC) on page 3-55.
N. Center Instrument Panel Utility Block. See
Fuses
and Circuit Breakers on page 5-126.
O. Parking Brake Release. See
Parking Brake on
page 2-48.
P. Tilt Wheel Lever. See
Tilt Wheel on page 3-7.
Q. Lighter and Accessory Power Outlet. See
Accessory
Power Outlets on page 3-20, andAshtrays and
Cigarette Lighter on page 3-21.
R. Storage Area. See ªStorage Areasº in Section 2.
S. Ashtray. See
Ashtrays and Cigarette Lighter
on page 3-21.
T. Manual Selectable Ride Control (If Equipped). See
Manual Selectable Ride on page 4-11.
U. 4WS Switch (If Equipped). See
QUADRASTEERŸ
on page 4-14.
V. Passenger Air Bag Off Switch. See
Air Bag Off
Switch on page 1-76.
W. Glove Box. See
Glove Box on page 2-66.
3-5
Page 184 of 588
Dome Lamps
The dome lamps will come on when you open a door.
You can also turn the dome lamps on by turning the
thumbwheel, located next to the exterior lamps control, all
the way up. In this position, the dome lamps will remain
on whether the doors are opened or closed.
E:You can use the dome override button, located
below the exterior lamps control, to set the dome lamps
to come on automatically, or remain off, when the
doors are opened. To turn the lamps off, press the
button to the in position. With the button in this position,
the dome lamps will remain off when the doors are
open. To return the lamps to automatic operation, press
the button again and return it to the out position.
Battery Run-Down Protection
This feature shuts off the dome, and reading lamps.
if they are left on for more than 10 minutes when the
ignition is off. The cargo lamp will shut off after
20 minutes. This will keep your battery from
running down.
Accessory Power Outlets
With accessory power outlets you can plug in auxiliary
electrical equipment such as a cellular telephone or
CB radio.
Your vehicle may have two accessory power outlets, or
may have one accessory power outlet located near
the cigarette lighter, if equipped. The cigarette lighter is
designed to ®t only in the receptacle to the right of
the accessory power outlet.
To use the outlet, lift the cover. When not using it,
always close the cover.
Certain power accessory plugs may not be compatible
to the accessory power outlet and could result in
blown vehicle or adapter fuses. If you experience a
problem, see your dealer for additional information on
the accessory power plugs.
Notice:Adding any electrical equipment to your
vehicle may damage it or keep other components
from working as they should. The repairs would not
be covered by your warranty. Check with your
dealer before adding electrical equipment.
When adding electrical equipment, be sure to follow the
proper installation instructions included with the
equipment.
3-20
Page 185 of 588
Notice:Improper use of the power outlet can cause
damage not covered by your warranty. Do not
hang any type of accessory or accessory bracket
from the plug because the power outlets are
designed for accessory power plugs only.
Ashtrays and Cigarette Lighter
Your vehicle may be equipped with a front ashtray
located near the center of the instrument panel. Pull on
the door to open it.
Notice:If you put papers or other ¯ammable items
in the ashtray, hot cigarettes or other smoking
materials could ignite them and possibly damage
your vehicle. Never put ¯ammable items in the
ashtray.
To remove the front ashtray, pull the ashtray toward you.
To replace the ashtray, place the ashtray on the slides at
the side of its location in the instrument panel. To use the
cigarette lighter, push it in all the way, and let go. When
it's ready, it will pop back out by itself.
Notice:Holding a cigarette lighter in while it is
heating will not allow the lighter to back away from
the heating element when it is hot. Damage from
overheating may occur to the lighter or heating
element, or a fuse could be blown. Do not hold a
cigarette lighter in while it is heating.
Climate Controls
Climate Control System
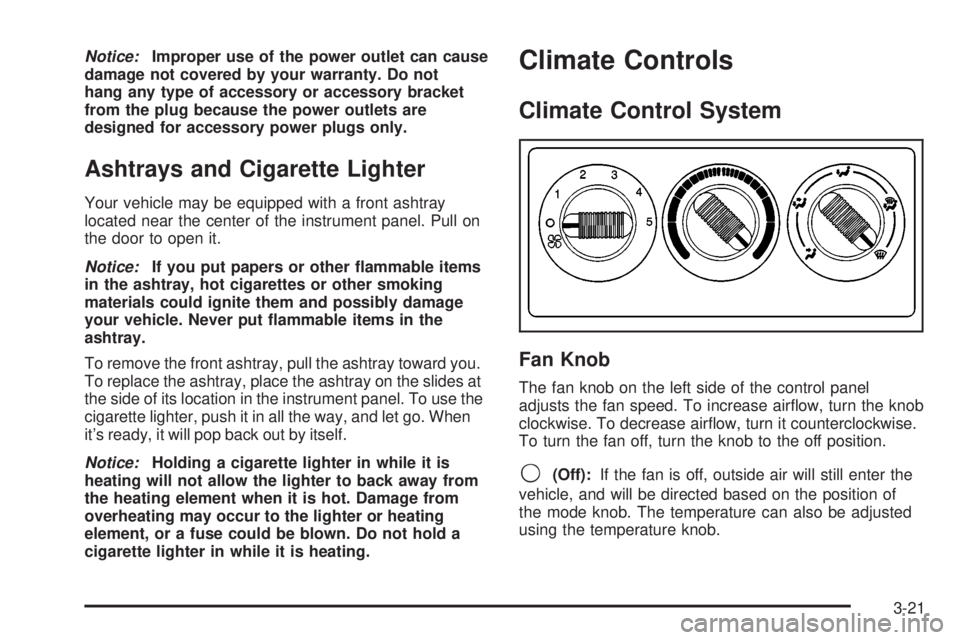
Fan Knob
The fan knob on the left side of the control panel
adjusts the fan speed. To increase air¯ow, turn the knob
clockwise. To decrease air¯ow, turn it counterclockwise.
To turn the fan off, turn the knob to the off position.
9(Off):If the fan is off, outside air will still enter the
vehicle, and will be directed based on the position of
the mode knob. The temperature can also be adjusted
using the temperature knob.
3-21
Page 186 of 588
Temperature Knob
The middle knob on the control panel lets you select the
temperature of the air ¯owing into the passenger
area. Turn the knob clockwise toward the red area for
warmer air. Turn the knob counterclockwise toward
the blue area for cooler air.
Mode Knob
The right knob on the control panel allows you to
choose the direction of air delivery.
H(Vent):This setting directs the air through the
instrument panel outlets.
)(Bi-Level):Air is delivered through the ¯oor outlets
as well as the instrument panel outlets. The ¯ow can
be divided between vent and ¯oor outlets depending
upon where the knob is placed between the settings.
6(Floor):This setting directs most of the air through
the ¯oor outlets, and the rest of the air is divided
between the windshield defroster outlets and the side
window defroster outlets.
W(Defog):Air¯ow is delivered through the ¯oor
outlets, the windshield defroster outlets and the side
window defroster outlets. The air ¯ow can be divided
between ¯oor and defrost depending upon where
the knob is placed between the settings.
1(Defrost):This setting directs most air through the
windshield defroster outlets, side window defroster
outlets and some through the ¯oor outlets.
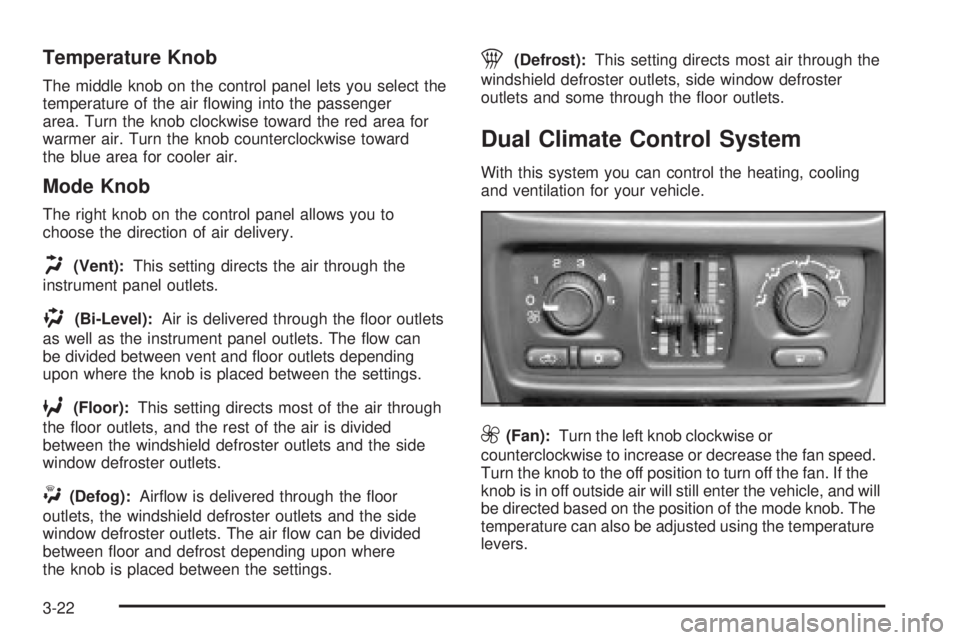
Dual Climate Control System
With this system you can control the heating, cooling
and ventilation for your vehicle.
9(Fan):Turn the left knob clockwise or
counterclockwise to increase or decrease the fan speed.
Turn the knob to the off position to turn off the fan. If the
knob is in off outside air will still enter the vehicle, and will
be directed based on the position of the mode knob. The
temperature can also be adjusted using the temperature
levers.
3-22
Page 187 of 588
Turn the right knob clockwise or counterclockwise to
direct the air¯ow inside of your vehicle.
To change the current mode, select one of the following:
H(Vent):This mode directs air to the instrument
panel vents.
)(Bi-Level):This mode directs half of the air to the
instrument panel vents; then directs most of the
remaining air to the ¯oor vents. A little air is directed
toward the windshield and the side window vents. Cooler
air is directed to the upper vents and warmer air to
the ¯oor vents.
6(Floor):This mode directs most of the air to the
¯oor vents with a little air directed to the windshield and
the side window vents.
h(Recirculation):The recirculation mode is used
to recirculate the air inside of your vehicle. Use this
mode to help prevent outside odors and/or dust
from entering your vehicle or to help cool the air inside
of your vehicle more quickly. Press this button to
turn the recirculation mode on or off. The light on the
recirculation button will illuminate. Recirculation cannot
be used in ¯oor, blend or defrost modes. An indicatoron the button will light up, ¯ash three times and turn off
when recirculation is selected in these modes.The
air-conditioning compressor will also come on when this
mode is activated. While in recirculation mode the
windows may fog when the weather is cold and damp.
To clear the fog, select either the blend or defrost
mode and increase fan speed.
Temperature Control
Driver's Side:The lever on the left side of the climate
control panel is used to raise or lower the temperature
on the driver's side of the vehicle. This lever also adjusts
the temperature to the center console outlets
(if equipped).
Passenger's Side:The lever on the right side of the
climate control panel is used to raise or lower the
temperature on the passenger's side of the vehicle.#(Air Conditioning):Press this button to turn the
air-conditioning system on or off. When the button is
pressed, an indicator light will come on and the system
will begin to cool and dehumidify the air inside of your
vehicle. You may notice a slight change in engine
performance when the air conditioning compressor shuts
off and turns on again. This is normal.
3-23
Page 188 of 588
Defogging and Defrosting
Fog on the inside of the windows is a result of high
humidity (moisture) condensing on the cool window
glass. This can be minimized if the climate control
system is used properly. There are two modes to choose
from to clear fog or frost from your windshield. Use
the defog mode to clear the windows of fog or moisture
and warm the passengers. Use the defrost mode to
remove fog or frost from the windshield more quickly.
Turn the right knob clockwise or counterclockwise
to select one of the following modes:
-(Defog):This mode directs the air to the ¯oor outlets,
windshield and the side window vents. The air
conditioning compressor will run automatically to
dehumidify the air to prevent window fogging. The
recirculation mode cannot be selected while in the
defog mode.
1(Defrost):This mode directs most of the air to the
windshield and the side window vents, with only a
little air directed to the ¯oor vents. The air conditioning
compressor will run automatically to dehumidify the
air to prevent window fogging. The recirculation mode
cannot be selected while in defrost mode.
Do not drive the vehicle until all the windows are clear.
Rear Window Defogger
The lines you see on the rear window warm the glass.
The rear window defogger uses a warming grid to
remove fog from the rear window.
<(Rear):Press this button to turn the rear window
defogger on or off. An indicator light in the button
will come on to let you know that the rear window
defogger is activated.
The rear window defogger will automatically turn off
several minutes after the button is pressed. Pressing the
button while the defogger is running can also turn off
the defogger.
If your vehicle is equipped with heated mirrors this
button will activate them.
Notice:Don't use anything sharp on the inside of
the rear window. If you do, you could cut or damage
the warming grid, and the repairs wouldn't be
covered by your warranty. Do not attach a temporary
vehicle license, tape, a decal or anything similar
to the defogger grid.
3-24
Page 189 of 588
Outlet Adjustment
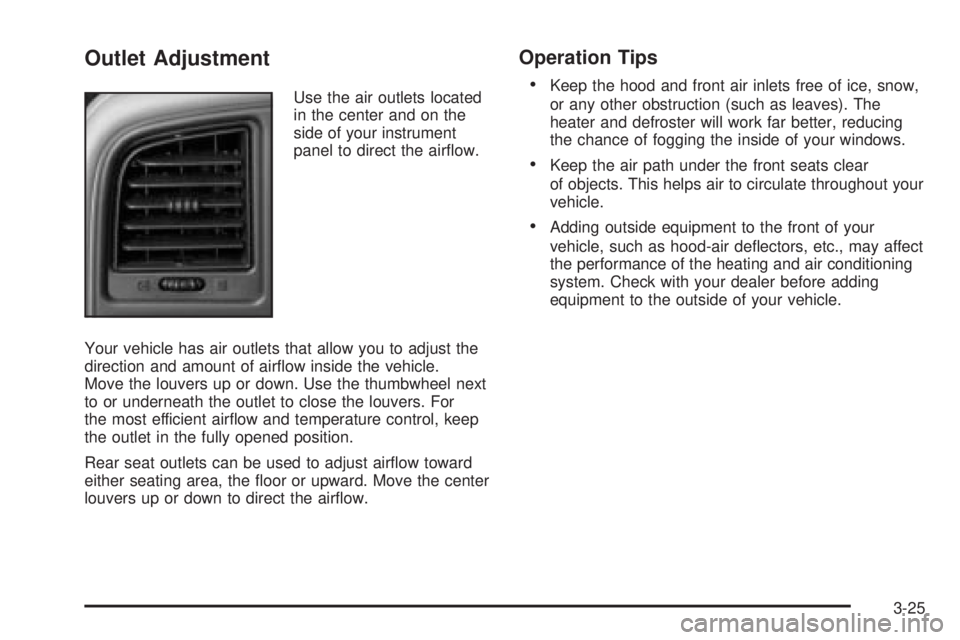
Use the air outlets located
in the center and on the
side of your instrument
panel to direct the air¯ow.
Your vehicle has air outlets that allow you to adjust the
direction and amount of air¯ow inside the vehicle.
Move the louvers up or down. Use the thumbwheel next
to or underneath the outlet to close the louvers. For
the most efficient air¯ow and temperature control, keep
the outlet in the fully opened position.
Rear seat outlets can be used to adjust air¯ow toward
either seating area, the ¯oor or upward. Move the center
louvers up or down to direct the air¯ow.
Operation Tips
·
Keep the hood and front air inlets free of ice, snow,
or any other obstruction (such as leaves). The
heater and defroster will work far better, reducing
the chance of fogging the inside of your windows.
·Keep the air path under the front seats clear
of objects. This helps air to circulate throughout your
vehicle.
·Adding outside equipment to the front of your
vehicle, such as hood-air de¯ectors, etc., may affect
the performance of the heating and air conditioning
system. Check with your dealer before adding
equipment to the outside of your vehicle.
3-25