2004 GMC SIERRA automatic transmission
[x] Cancel search: automatic transmissionPage 417 of 588
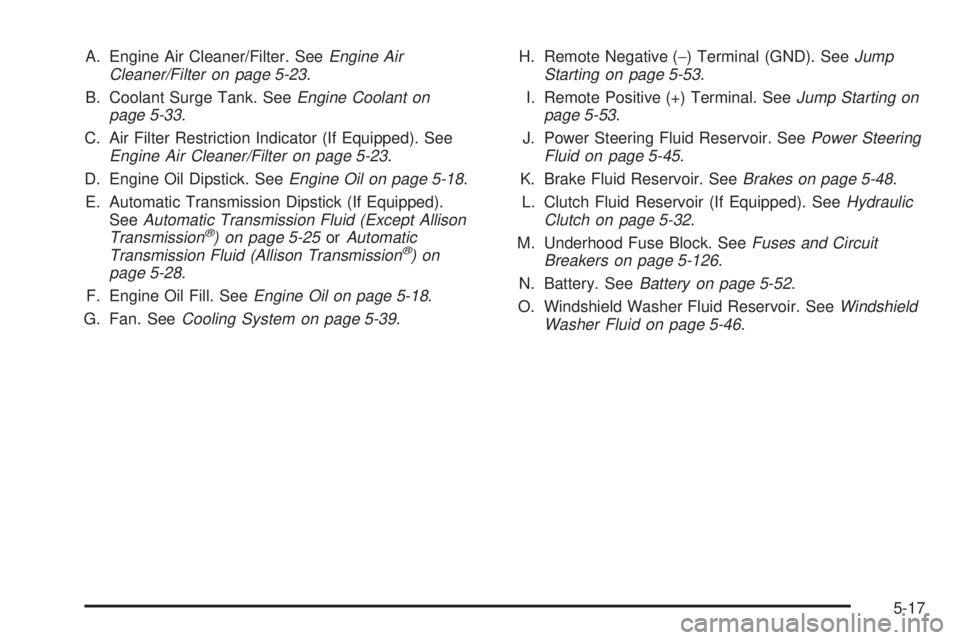
A. Engine Air Cleaner/Filter. SeeEngine Air
Cleaner/Filter on page 5-23.
B. Coolant Surge Tank. See
Engine Coolant on
page 5-33.
C. Air Filter Restriction Indicator (If Equipped). See
Engine Air Cleaner/Filter on page 5-23.
D. Engine Oil Dipstick. See
Engine Oil on page 5-18.
E. Automatic Transmission Dipstick (If Equipped).
See
Automatic Transmission Fluid (Except Allison
Transmissionž) on page 5-25orAutomatic
Transmission Fluid (Allison Transmissionž)on
page 5-28.
F. Engine Oil Fill. See
Engine Oil on page 5-18.
G. Fan. See
Cooling System on page 5-39.H. Remote Negative (-) Terminal (GND). See
Jump
Starting on page 5-53.
I. Remote Positive (+) Terminal. See
Jump Starting on
page 5-53.
J. Power Steering Fluid Reservoir. See
Power Steering
Fluid on page 5-45.
K. Brake Fluid Reservoir. See
Brakes on page 5-48.
L. Clutch Fluid Reservoir (If Equipped). See
Hydraulic
Clutch on page 5-32.
M. Underhood Fuse Block. See
Fuses and Circuit
Breakers on page 5-126.
N. Battery. See
Battery on page 5-52.
O. Windshield Washer Fluid Reservoir. See
Windshield
Washer Fluid on page 5-46.
5-17
Page 425 of 588

Automatic Transmission Fluid
(Except Allison Transmission
ž)
When to Check and Change
A good time to check your automatic transmission ¯uid
level is when the engine oil is changed.
Change both the ¯uid and ®lter every 50,000 miles
(83 000 km) if the vehicle's GVWR is over 8,600 or if
the vehicle is mainly driven under one or more of these
conditions:
·In heavy city traffic where the outside temperature
regularly reaches 90ÉF (32ÉC) or higher.
·In hilly or mountainous terrain.
·When doing frequent trailer towing.
·Uses such as found in taxi, police or delivery
service.
If your vehicle's GVWR is not over 8,600 and you do
not use your vehicle under any of these conditions,
change the ¯uid and ®lter every 100,000 miles
(166 000 km).
See
Scheduled Maintenance on page 6-4.
How to Check
Because this operation can be a little difficult, you may
choose to have this done at the dealership service
department.
If you do it yourself, be sure to follow all the instructions
here, or you could get a false reading on the dipstick.
Notice:Too much or too little ¯uid can damage
your transmission. Too much can mean that some
of the ¯uid could come out and fall on hot engine
part or exhaust system parts, starting a ®re.
Too little ¯uid could cause the transmission to
overheat. Be sure to get an accurate reading if you
check your transmission ¯uid.
Wait at least 30 minutes before checking the
transmission ¯uid level if you have been driving:
·When outside temperatures are above 90ÉF (32ÉC).
·At high speed for quite a while.
·In heavy traffic ± especially in hot weather.
·While pulling a trailer.
To get the right reading, the ¯uid should be at normal
operating temperature, which is 180ÉF to 200ÉF
(82ÉC to 93ÉC).
5-25
Page 427 of 588

SeeEngine Compartment Overview on page 5-12for
more information on location.
1. Flip the handle up and then pull out the dipstick
and wipe it with a clean rag or paper towel.
2. Push it back in all the way, wait three seconds and
then pull it back out again.
3. Check both sides of the dipstick, and read the lower
level. The ¯uid level must be in the COLD area,
below the cross-hatched area, for a cold check or in
the HOT area or cross-hatched area for a hot
check. Be sure to keep the dipstick pointed down to
get an accurate reading.
4. If the ¯uid level is in the acceptable range, push the
dipstick back in all the way; then ¯ip the handle
down to lock the dipstick in place.How to Add Fluid
Refer to the Maintenance Schedule to determine what
kind of transmission ¯uid to use. SeeRecommended
Fluids and Lubricants on page 6-14.
Add ¯uid only after checking the transmission ¯uid while
it is hot. (A cold check is used only as a reference.) If
the ¯uid level is low, add only enough of the proper ¯uid
to bring the level up to the HOT area for a hot check.
It doesn't take much ¯uid, generally less than one
pint (0.5 L).
Don't over®ll.
Notice:
We recommend you use only ¯uid labeled
DEXRONž-III, because ¯uid with that label is
made especially for your automatic transmission.
Damage caused by ¯uid other than DEXRON
ž-III is
not covered by your new vehicle warranty.
·After adding ¯uid, recheck the ¯uid level as
described under
How to Check.
·When the correct ¯uid level is obtained, push the
dipstick back in all the way; then ¯ip the handle
down to lock the dipstick in place.
5-27
Page 428 of 588

Automatic Transmission Fluid
(Allison Transmission
ž)
When to Check and Change
A good time to check your automatic transmission ¯uid
level is when the engine oil is changed.
Change both the ¯uid and ®lter every 25,000 miles
(41 500 km) if the vehicle is mainly driven under one or
more of these conditions:
·In heavy city traffic where the outside temperature
regularly reaches 90ÉF (32ÉC) or higher.
·In hilly or mountainous terrain.
·When doing frequent trailer towing.
·Uses such as found in taxi, police or delivery
service.
If you do not use your vehicle under any of these
conditions, change the ¯uid and ®lter every
50,000 miles (83 000 km).
See
Scheduled Maintenance on page 6-4.
How to Check
Because this operation can be a little difficult, you may
choose to have this done at the dealership service
department.
If you do it yourself, be sure to follow all the instructions
here, or you could get a false reading on the dipstick.
Notice:Too much or too little ¯uid can damage
your transmission. Too much can mean that some
of the ¯uid could come out and fall on hot engine
part or exhaust system parts, starting a ®re.
Too little ¯uid could cause the transmission to
overheat. Be sure to get an accurate reading if you
check your transmission ¯uid.
Wait at least 30 minutes before checking the
transmission ¯uid level if you have been driving:
·When outside temperatures are above 90ÉF (32ÉC).
·At high speed for quite a while.
·In heavy traffic ± especially in hot weather.
·While pulling a trailer.
5-28
Page 430 of 588
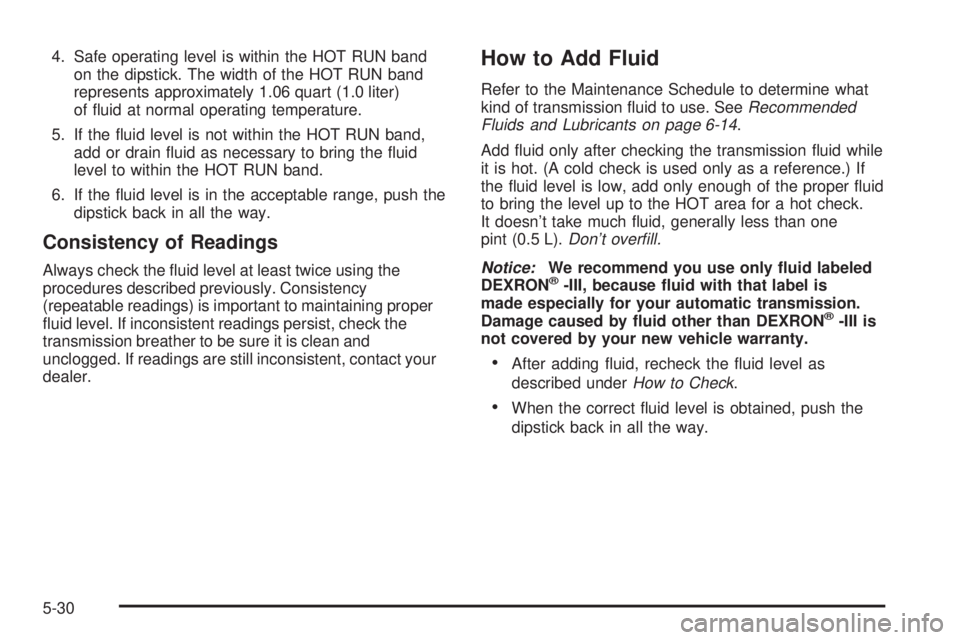
4. Safe operating level is within the HOT RUN band
on the dipstick. The width of the HOT RUN band
represents approximately 1.06 quart (1.0 liter)
of ¯uid at normal operating temperature.
5. If the ¯uid level is not within the HOT RUN band,
add or drain ¯uid as necessary to bring the ¯uid
level to within the HOT RUN band.
6. If the ¯uid level is in the acceptable range, push the
dipstick back in all the way.
Consistency of Readings
Always check the ¯uid level at least twice using the
procedures described previously. Consistency
(repeatable readings) is important to maintaining proper
¯uid level. If inconsistent readings persist, check the
transmission breather to be sure it is clean and
unclogged. If readings are still inconsistent, contact your
dealer.
How to Add Fluid
Refer to the Maintenance Schedule to determine what
kind of transmission ¯uid to use. SeeRecommended
Fluids and Lubricants on page 6-14.
Add ¯uid only after checking the transmission ¯uid while
it is hot. (A cold check is used only as a reference.) If
the ¯uid level is low, add only enough of the proper ¯uid
to bring the level up to the HOT area for a hot check.
It doesn't take much ¯uid, generally less than one
pint (0.5 L).
Don't over®ll.
Notice:
We recommend you use only ¯uid labeled
DEXRONž-III, because ¯uid with that label is
made especially for your automatic transmission.
Damage caused by ¯uid other than DEXRON
ž-III is
not covered by your new vehicle warranty.
·After adding ¯uid, recheck the ¯uid level as
described under
How to Check.
·When the correct ¯uid level is obtained, push the
dipstick back in all the way.
5-30
Page 438 of 588
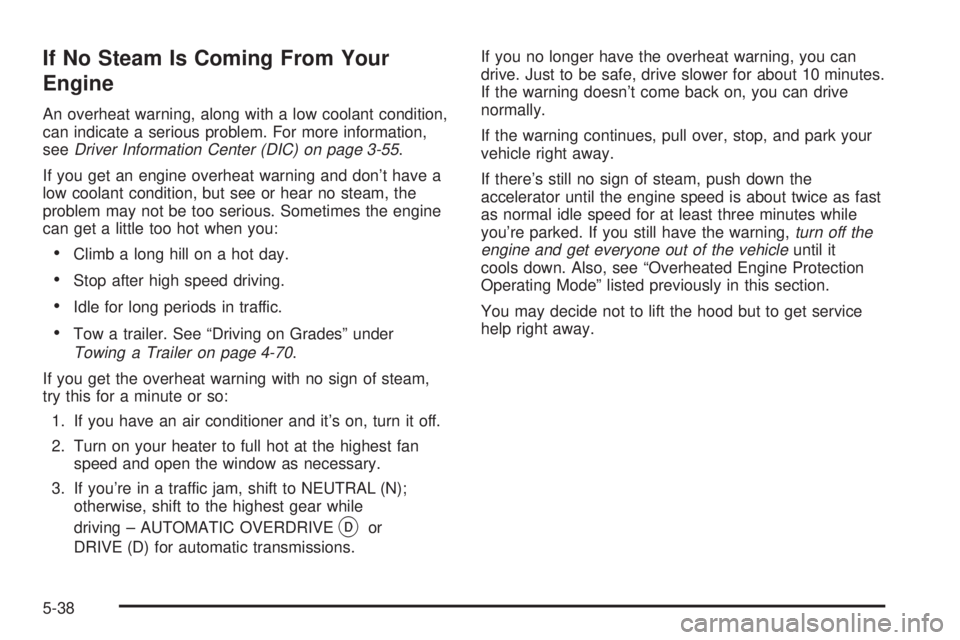
If No Steam Is Coming From Your
Engine
An overheat warning, along with a low coolant condition,
can indicate a serious problem. For more information,
see
Driver Information Center (DIC) on page 3-55.
If you get an engine overheat warning and don't have a
low coolant condition, but see or hear no steam, the
problem may not be too serious. Sometimes the engine
can get a little too hot when you:
·Climb a long hill on a hot day.
·Stop after high speed driving.
·Idle for long periods in traffic.
·Tow a trailer. See ªDriving on Gradesº under
Towing a Trailer on page 4-70.
If you get the overheat warning with no sign of steam,
try this for a minute or so:
1. If you have an air conditioner and it's on, turn it off.
2. Turn on your heater to full hot at the highest fan
speed and open the window as necessary.
3. If you're in a traffic jam, shift to NEUTRAL (N);
otherwise, shift to the highest gear while
driving ± AUTOMATIC OVERDRIVE
Xor
DRIVE (D) for automatic transmissions.If you no longer have the overheat warning, you can
drive. Just to be safe, drive slower for about 10 minutes.
If the warning doesn't come back on, you can drive
normally.
If the warning continues, pull over, stop, and park your
vehicle right away.
If there's still no sign of steam, push down the
accelerator until the engine speed is about twice as fast
as normal idle speed for at least three minutes while
you're parked. If you still have the warning,
turn off the
engine and get everyone out of the vehicleuntil it
cools down. Also, see ªOverheated Engine Protection
Operating Modeº listed previously in this section.
You may decide not to lift the hood but to get service
help right away.
5-38
Page 454 of 588
3. Get the vehicles close enough so the jumper cables
can reach, but be sure the vehicles aren't touching
each other. If they are, it could cause a ground
connection you don't want. You wouldn't be able to
start your vehicle, and the bad grounding could
damage the electrical systems.
To avoid the possibility of the vehicles rolling, set
the parking brake ®rmly on both vehicles involved in
the jump start procedure. Put an automatic
transmission in PARK (P) or a manual transmission
in NEUTRAL before setting the parking brake. If
you have a four-wheel-drive vehicle, be sure
the transfer case is in a drive gear not in NEUTRAL.
Notice:If you leave your radio or other accessories
on during the jump starting procedure, they could
be damaged. The repairs would not be covered
by your warranty. Always turn off your radio and
other accessories when jump starting your vehicle.
4. Turn off the ignition on both vehicles. Unplug
unnecessary accessories plugged into the cigarette
lighter or accessory power outlets. Turn off the
radio and all lamps that aren't needed. This
will avoid sparks and help save both batteries. And
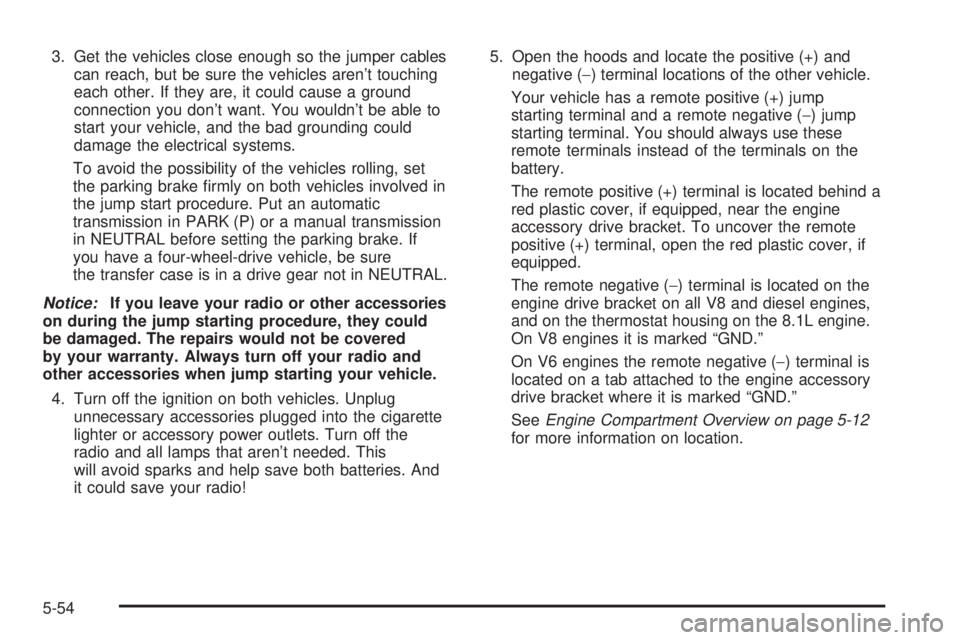
it could save your radio!5. Open the hoods and locate the positive (+) and
negative (-) terminal locations of the other vehicle.
Your vehicle has a remote positive (+) jump
starting terminal and a remote negative (-) jump
starting terminal. You should always use these
remote terminals instead of the terminals on the
battery.
The remote positive (+) terminal is located behind a
red plastic cover, if equipped, near the engine
accessory drive bracket. To uncover the remote
positive (+) terminal, open the red plastic cover, if
equipped.
The remote negative (-) terminal is located on the
engine drive bracket on all V8 and diesel engines,
and on the thermostat housing on the 8.1L engine.
On V8 engines it is marked ªGND.º
On V6 engines the remote negative (-) terminal is
located on a tab attached to the engine accessory
drive bracket where it is marked ªGND.º
See
Engine Compartment Overview on page 5-12for more information on location.
5-54
Page 481 of 588
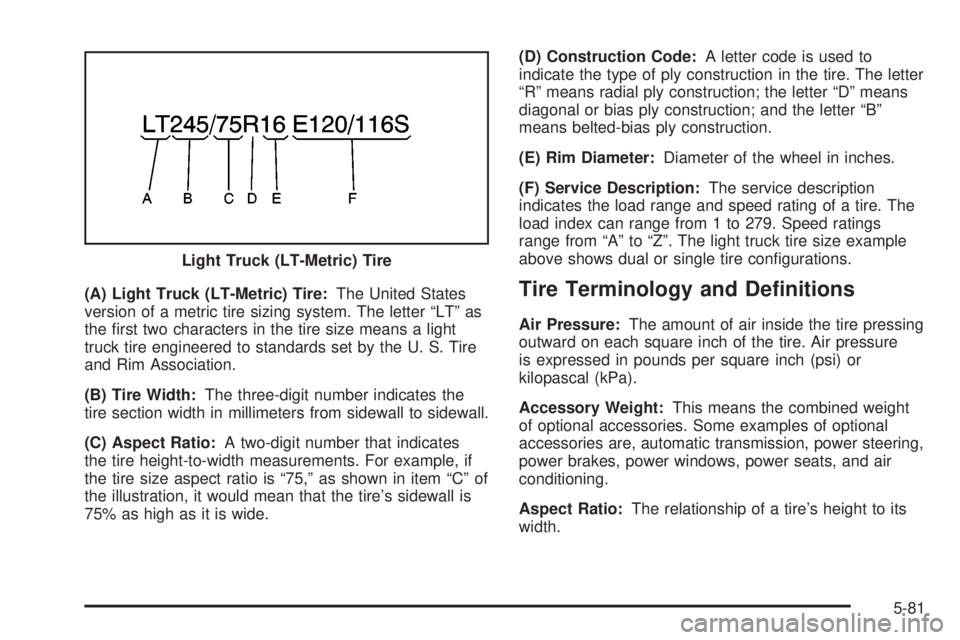
(A) Light Truck (LT-Metric) Tire:The United States
version of a metric tire sizing system. The letter ªLTº as
the ®rst two characters in the tire size means a light
truck tire engineered to standards set by the U. S. Tire
and Rim Association.
(B) Tire Width:The three-digit number indicates the
tire section width in millimeters from sidewall to sidewall.
(C) Aspect Ratio:A two-digit number that indicates
the tire height-to-width measurements. For example, if
the tire size aspect ratio is ª75,º as shown in item ªCº of
the illustration, it would mean that the tire's sidewall is
75% as high as it is wide.(D) Construction Code:A letter code is used to
indicate the type of ply construction in the tire. The letter
ªRº means radial ply construction; the letter ªDº means
diagonal or bias ply construction; and the letter ªBº
means belted-bias ply construction.
(E) Rim Diameter:Diameter of the wheel in inches.
(F) Service Description:The service description
indicates the load range and speed rating of a tire. The
load index can range from 1 to 279. Speed ratings
range from ªAº to ªZº. The light truck tire size example
above shows dual or single tire con®gurations.Tire Terminology and De®nitions
Air Pressure:The amount of air inside the tire pressing
outward on each square inch of the tire. Air pressure
is expressed in pounds per square inch (psi) or
kilopascal (kPa).
Accessory Weight:This means the combined weight
of optional accessories. Some examples of optional
accessories are, automatic transmission, power steering,
power brakes, power windows, power seats, and air
conditioning.
Aspect Ratio:The relationship of a tire's height to its
width. Light Truck (LT-Metric) Tire
5-81