2004 GMC SIERRA steering wheel
[x] Cancel search: steering wheelPage 171 of 588

Horn
To sound the horn, press the center pad on the steering
wheel.
Tilt Wheel
If your vehicle is equipped with a tilt wheel, it will allow
you to adjust the steering wheel before you drive.
You can raise it to the highest level to give your legs
more room when you exit and enter your vehicle.
The tilt steering wheel
lever is located on the
lower left side of the
column.
To tilt the wheel, hold the steering wheel and pull the
lever. Then move the steering wheel to a comfortable
position and release the lever to lock the wheel in place.
Turn Signal/Multifunction Lever
The lever on the left side of the steering column
includes the following:
·Turn and Lane Change Signals
·Headlamp High/Low-Beam Changer
·Flash-to-Pass
·Windshield Wipers
·Windshield Washer
·Cruise Control
For information on the exterior lamps, see
Exterior
Lamps on page 3-14.
3-7
Page 210 of 588
The traction off light may come on for the following
reasons:
·If you turn the system off by pressing the TAS
on/off button located to the left of the steering wheel,
the light will come on and stay on. To turn the
system back on, press the button again; the light
should go off.
·If you move the shift lever to FIRST (1), the light
will come on and stay on to indicate that the
traction system is off. This is normal operation. To
turn the system back on, move the shift lever
back to a position other than FIRST (1); the light
should go off. See
Traction Assist System (TAS) on
page 4-9.
·The light will come on and stay on if the TAS
automatic engagement feature has been turned off.
To turn the system on, press the TAS off/on
button; the light should go off. To turn the automatic
engagement feature back on, see
Traction Assist
System (TAS) on page 4-9.
·If the Traction Assist System is affected by an
anti-lock brake system, TAS or engine-related
problem, the system will turn off and the light will
come on. Have your vehicle serviced.
·If the vehicle is driven over an extremely rough road,
the system will turn off and the light will come on. The
light will go off a few seconds after the rough road
conditions go away or when the vehicle comes to a
complete stop. This is normal operation.
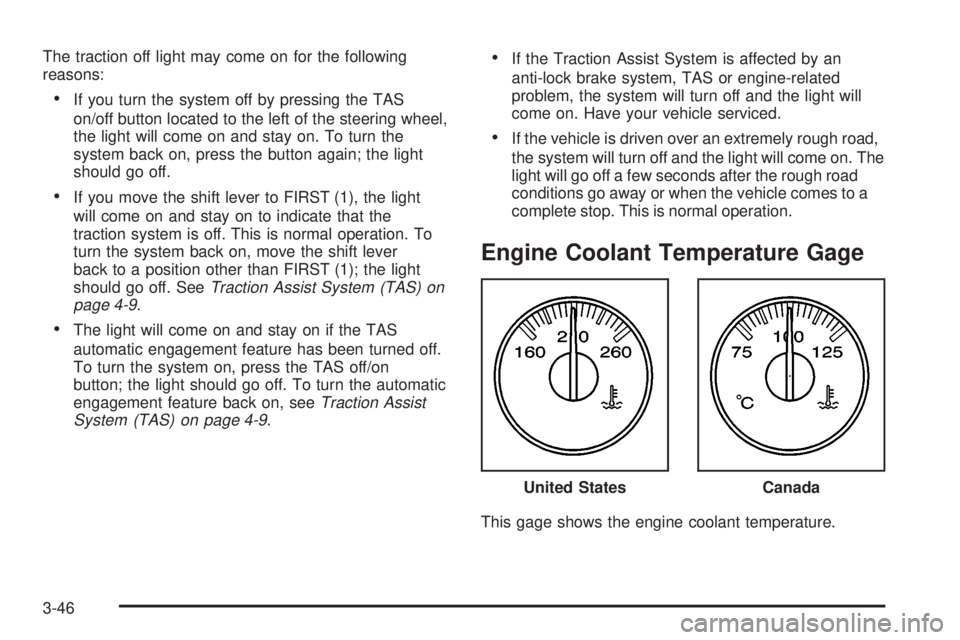
Engine Coolant Temperature Gage
This gage shows the engine coolant temperature.United States
Canada
3-46
Page 219 of 588
Driver Information Center (DIC)
The DIC display is located on the instrument panel
cluster above the steering wheel. The DIC can display
information such as the trip odometer, fuel economy and
personalization features.
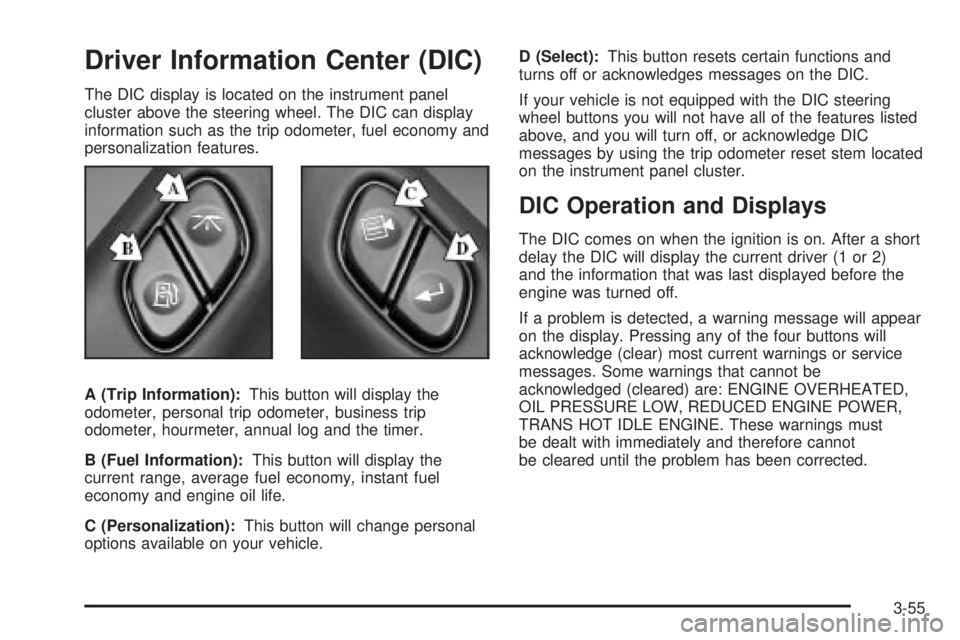
A (Trip Information):This button will display the
odometer, personal trip odometer, business trip
odometer, hourmeter, annual log and the timer.
B (Fuel Information):This button will display the
current range, average fuel economy, instant fuel
economy and engine oil life.
C (Personalization):This button will change personal
options available on your vehicle.D (Select):This button resets certain functions and
turns off or acknowledges messages on the DIC.
If your vehicle is not equipped with the DIC steering
wheel buttons you will not have all of the features listed
above, and you will turn off, or acknowledge DIC
messages by using the trip odometer reset stem located
on the instrument panel cluster.
DIC Operation and Displays
The DIC comes on when the ignition is on. After a short
delay the DIC will display the current driver (1 or 2)
and the information that was last displayed before the
engine was turned off.
If a problem is detected, a warning message will appear
on the display. Pressing any of the four buttons will
acknowledge (clear) most current warnings or service
messages. Some warnings that cannot be
acknowledged (cleared) are: ENGINE OVERHEATED,
OIL PRESSURE LOW, REDUCED ENGINE POWER,
TRANS HOT IDLE ENGINE. These warnings must
be dealt with immediately and therefore cannot
be cleared until the problem has been corrected.
3-55
Page 220 of 588
The DIC has different modes which can be accessed by
pressing the four buttons on the DIC. These buttons
are trip information, fuel information, personalization and
select. The button functions are detailed in the
following.
Trip Information Button
Press the trip information button to scroll through the
ODOMETER, PERSONAL TRIP ON/OFF, BUSINESS
TRIP ON/OFF, HOURMETER, ANNUAL LOG and
TIMER. If the personal trip and/or the business trip are
set to ON, you will also be able to scroll through
more messages. See ªPersonal Tripº and ªBusiness
Tripº next for more information.
If your vehicle is not equipped with the DIC steering
wheel buttons you can select the trip information
by pressing the trip odometer reset stem on the
instrument panel cluster.
Personal Trip
Turn PERSONAL TRIP on or off by pressing the select
button. When it is on, you will also be able to scroll
through the following by pressing the trip information
button:
·PERSONAL: XXXXXX.X MI Ð This shows the
current distance traveled since the last reset for the
personal trip odometer in either miles or kilometers.
·PERSONAL: XXXX.X GAL Ð This shows the
amount of fuel used for the personal trip.
·PERSONAL: XX.X MPGÐ This shows how many
miles per gallon of fuel your vehicle is getting for
the personal trip based on current and past driving
conditions.
·PERSONAL: XXX.X AVG MPH Ð This shows the
vehicle's average speed for the personal trip.
·PERSONAL: % ANNUAL Ð This shows the ratio of
personal trip miles to annual miles as a percent.
You can reset the personal trip odometer by pressing
and holding the trip odometer reset stem.
3-56
Page 222 of 588
Timer
The DIC can be used as a stopwatch. Press the select
button while TIMER is displayed to start the timer.
The display will show the amount of time that has
passed since the timer was last reset (not including time
the ignition is off). Time will continue to be counted as
long as the ignition is on, even if another display is being
shown on the DIC. The timer will record up to 99 hours,
59 minutes and 59 seconds (99:59:59), after which
the display will roll back to zero.
To stop the counting of time, press the select button
brie¯y while TIMER is displayed.
To reset the timer to zero, press and hold the select
button, or the trip odometer reset stem, while TIMER is
displayed.
Fuel Information Button
Use the fuel information button to scroll through the
range, average fuel economy, instant fuel economy and
the GM Oil Life System.
If your vehicle is not equipped with DIC steering wheel
control buttons you will not be able to display the
fuel information.
Fuel Range
Press the fuel information button until RANGE appears
to display the remaining distance you can drive
without refueling. It's based on fuel economy and the
fuel remaining in the tank. The display will show LOW if
the fuel level is low.
The fuel economy data used to determine fuel range is
an average of recent driving conditions. As your
driving conditions change, this data is gradually updated.
Fuel range cannot be reset.
Average Fuel Economy
Press the fuel information button until AVG ECON
appears in the display. Average fuel economy is how
many miles per gallon your vehicle is getting based on
current and past driving conditions.
Press and hold the select button for two seconds while
AVG ECON is displayed to reset the average fuel
economy. Average fuel economy will then be calculated
starting from that point. If the average fuel economy is not
reset, it will be continually updated each time you drive.
3-58
Page 223 of 588

Instant Fuel Economy
Press the fuel information button until INST ECON
appears in the display. Instant fuel economy is how
many miles per gallon your vehicle is getting at
the particular moment in time. The instant fuel economy
cannot be reset.
GM Oil Life System
Press the fuel information button until ENGINE OIL LIFE
appears in the display. The GM Oil Life System shows
an estimate of the oil's remaining useful life. It will show
100% when the system is reset after an oil change. It
will alert you to change your oil on a schedule consistent
with your driving conditions.
Always reset the engine oil life after an oil change. To
reset the Oil Life System use the fuel button to reach the
ENGINE OIL LIFE screen and then press and hold the
select button for ®ve seconds while ENGINE OIL LIFE is
displayed. OIL LIFE RESET will appear on the display for
10 seconds to let you know the system is reset.
The DIC does not replace the need to maintain your
vehicle as recommended in the Maintenance Schedule
in this manual. Also, the oil change reminder will not
detect dusty conditions or engine malfunctions that may
affect the oil. Also, the oil change reminder does not
measure how much oil you have in your engine. So, be
sure to check your oil level often. See
Engine Oil on
page 5-18.
Personalization Button
You can program certain features to a preferred setting
for up to two people. Press the personalization button
to scroll through the following personalization features.
All of the personalization options may not be available
on your vehicle. Only the options available will be
displayed on your DIC.
If your vehicle is not equipped with the DIC steering
wheel buttons you will not have any of the following
personalization options except for DISPLAY
LANGUAGE. See DISPLAY LANGUAGE later in this
section for more information.
·AUTOMATIC LOCKING
·AUTOMATIC UNLOCKING
·DELAYED LOCKING
·REMOTE LOCK FEEDBACK
·ALARM WARNING TYPE
·REMOTE UNLOCK FEEDBACK
·HEADLAMPS ON AT EXIT
·PERIMETER LIGHTING
·SEAT POSITION RECALL
·EASY EXIT DRIVER SEAT
·CURB VIEW ASSIST
3-59
Page 292 of 588
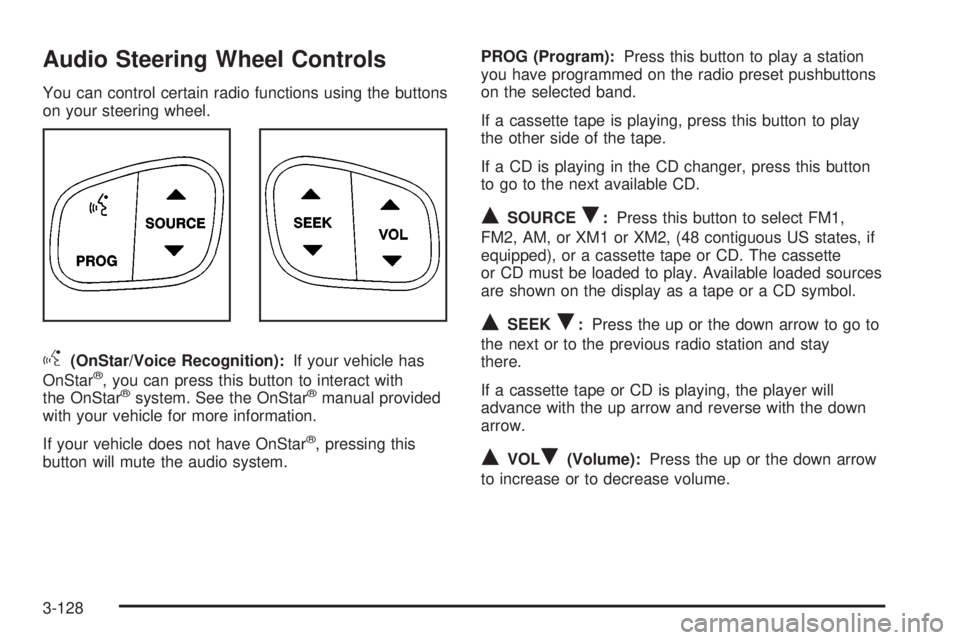
Audio Steering Wheel Controls
You can control certain radio functions using the buttons
on your steering wheel.
g(OnStar/Voice Recognition):If your vehicle has
OnStarž, you can press this button to interact with
the OnStaržsystem. See the OnStaržmanual provided
with your vehicle for more information.
If your vehicle does not have OnStar
ž, pressing this
button will mute the audio system.PROG (Program):Press this button to play a station
you have programmed on the radio preset pushbuttons
on the selected band.
If a cassette tape is playing, press this button to play
the other side of the tape.
If a CD is playing in the CD changer, press this button
to go to the next available CD.
QSOURCER:Press this button to select FM1,
FM2, AM, or XM1 or XM2, (48 contiguous US states, if
equipped), or a cassette tape or CD. The cassette
or CD must be loaded to play. Available loaded sources
are shown on the display as a tape or a CD symbol.
QSEEKR:Press the up or the down arrow to go to
the next or to the previous radio station and stay
there.
If a cassette tape or CD is playing, the player will
advance with the up arrow and reverse with the down
arrow.
QVOLR(Volume):Press the up or the down arrow
to increase or to decrease volume.
3-128
Page 297 of 588
Your Driving, the Road, and Your Vehicle..........4-2
Defensive Driving...........................................4-2
Drunken Driving.............................................4-2
Control of a Vehicle........................................4-5
Braking.........................................................4-6
Traction Assist System (TAS)...........................4-9
Manual Selectable Ride.................................4-11
Locking Rear Axle........................................4-12
Steering......................................................4-12
QUADRASTEERŸ........................................4-14
Off-Road Recovery.......................................4-17
Passing.......................................................4-17
Loss of Control.............................................4-18
Off-Road Driving with Your Four-Wheel-Drive
Vehicle....................................................4-20
Driving at Night............................................4-37
Driving in Rain and on Wet Roads..................4-39
City Driving..................................................4-42Freeway Driving...........................................4-43
Before Leaving on a Long Trip.......................4-44
Highway Hypnosis........................................4-44
Hill and Mountain Roads................................4-45
Winter Driving..............................................4-47
If You Are Stuck: In Sand, Mud, Ice or Snow . . .4-51
Towing..........................................................4-53
Towing Your Vehicle.....................................4-53
Recreational Vehicle Towing...........................4-54
Loading Your Vehicle....................................4-57
Adding a Snow Plow or Similar Equipment.......4-64
Truck-Camper Loading Information..................4-68
Trailer Recommendations...............................4-70
Pickup Conversion to Chassis Cab..................4-70
Towing a Trailer...........................................4-70
Power Take-Off (PTO).................................4-101
Section 4 Driving Your Vehicle
4-1