2004 GMC ENVOY XUV dic
[x] Cancel search: dicPage 209 of 460
Cassette Tape Messages
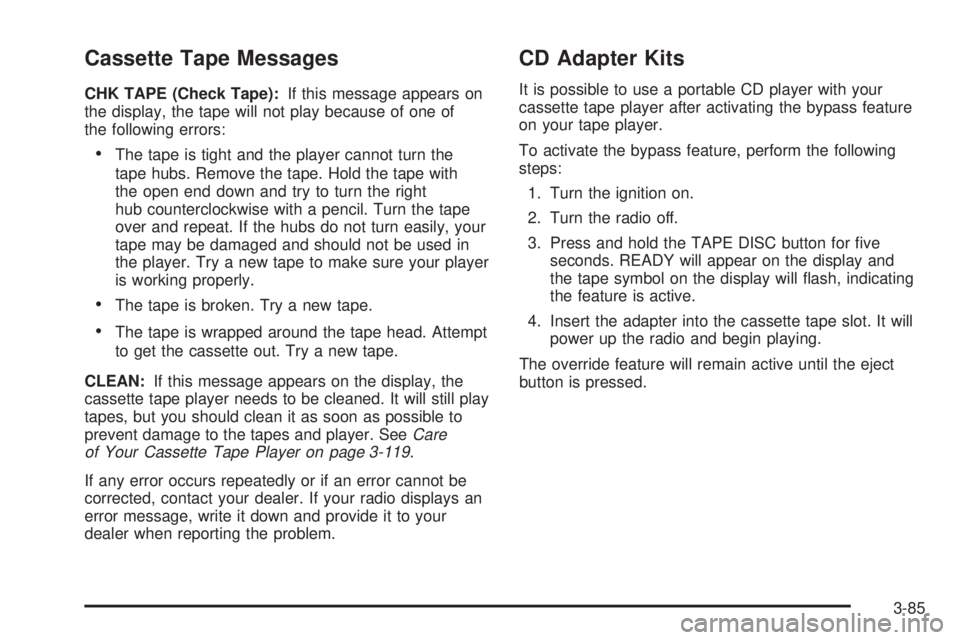
CHK TAPE (Check Tape):If this message appears on
the display, the tape will not play because of one of
the following errors:
·The tape is tight and the player cannot turn the
tape hubs. Remove the tape. Hold the tape with
the open end down and try to turn the right
hub counterclockwise with a pencil. Turn the tape
over and repeat. If the hubs do not turn easily, your
tape may be damaged and should not be used in
the player. Try a new tape to make sure your player
is working properly.
·The tape is broken. Try a new tape.
·The tape is wrapped around the tape head. Attempt
to get the cassette out. Try a new tape.
CLEAN:If this message appears on the display, the
cassette tape player needs to be cleaned. It will still play
tapes, but you should clean it as soon as possible to
prevent damage to the tapes and player. See
Care
of Your Cassette Tape Player on page 3-119.
If any error occurs repeatedly or if an error cannot be
corrected, contact your dealer. If your radio displays an
error message, write it down and provide it to your
dealer when reporting the problem.
CD Adapter Kits
It is possible to use a portable CD player with your
cassette tape player after activating the bypass feature
on your tape player.
To activate the bypass feature, perform the following
steps:
1. Turn the ignition on.
2. Turn the radio off.
3. Press and hold the TAPE DISC button for ®ve
seconds. READY will appear on the display and
the tape symbol on the display will ¯ash, indicating
the feature is active.
4. Insert the adapter into the cassette tape slot. It will
power up the radio and begin playing.
The override feature will remain active until the eject
button is pressed.
3-85
Page 212 of 460
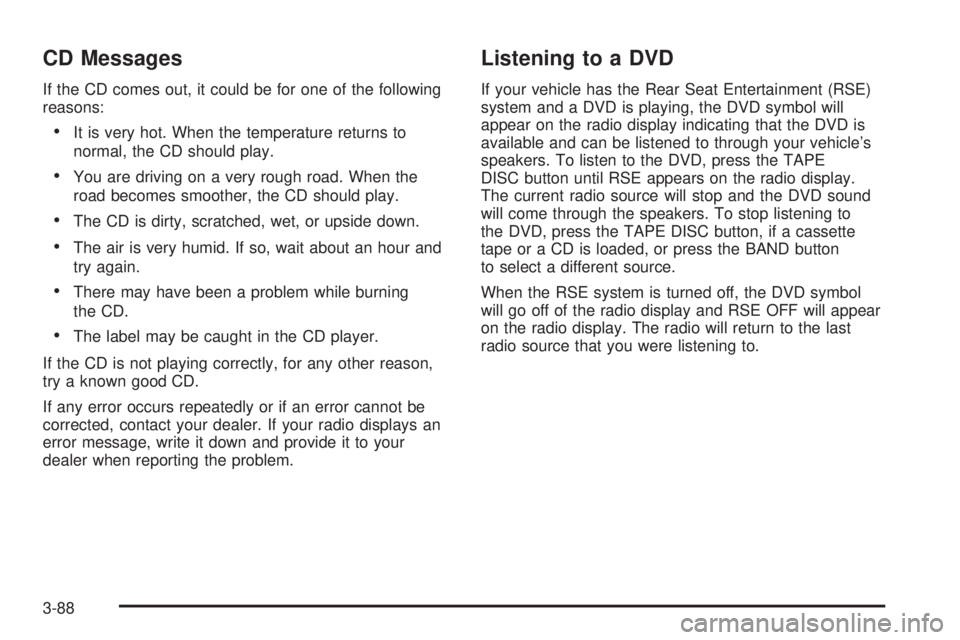
CD Messages
If the CD comes out, it could be for one of the following
reasons:
·It is very hot. When the temperature returns to
normal, the CD should play.
·You are driving on a very rough road. When the
road becomes smoother, the CD should play.
·The CD is dirty, scratched, wet, or upside down.
·The air is very humid. If so, wait about an hour and
try again.
·There may have been a problem while burning
the CD.
·The label may be caught in the CD player.
If the CD is not playing correctly, for any other reason,
try a known good CD.
If any error occurs repeatedly or if an error cannot be
corrected, contact your dealer. If your radio displays an
error message, write it down and provide it to your
dealer when reporting the problem.
Listening to a DVD
If your vehicle has the Rear Seat Entertainment (RSE)
system and a DVD is playing, the DVD symbol will
appear on the radio display indicating that the DVD is
available and can be listened to through your vehicle's
speakers. To listen to the DVD, press the TAPE
DISC button until RSE appears on the radio display.
The current radio source will stop and the DVD sound
will come through the speakers. To stop listening to
the DVD, press the TAPE DISC button, if a cassette
tape or a CD is loaded, or press the BAND button
to select a different source.
When the RSE system is turned off, the DVD symbol
will go off of the radio display and RSE OFF will appear
on the radio display. The radio will return to the last
radio source that you were listening to.
3-88
Page 220 of 460
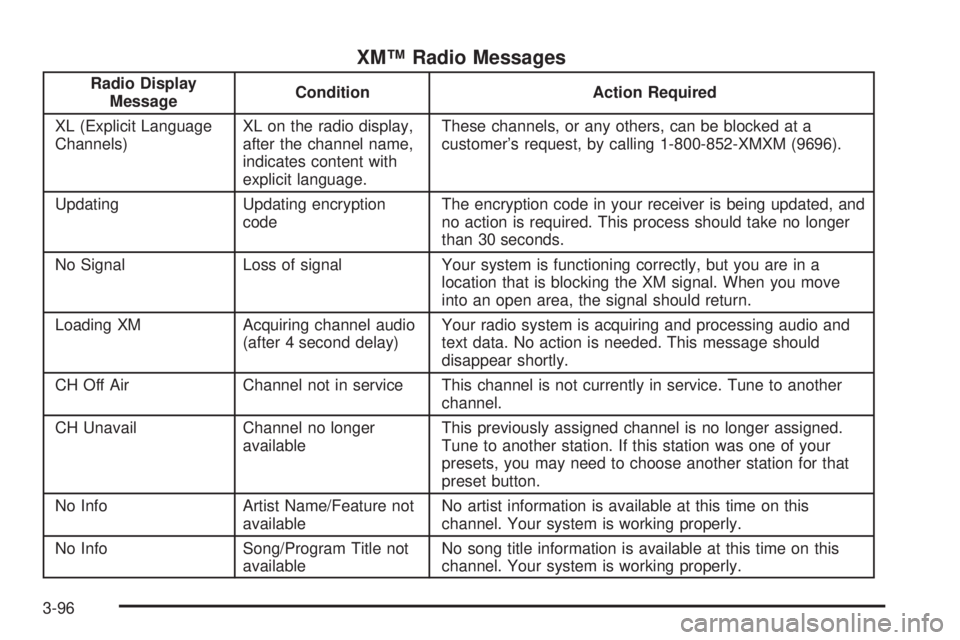
XMŸ Radio Messages
Radio Display
MessageCondition Action Required
XL (Explicit Language
Channels)XL on the radio display,
after the channel name,
indicates content with
explicit language.These channels, or any others, can be blocked at a
customer's request, by calling 1-800-852-XMXM (9696).
Updating Updating encryption
codeThe encryption code in your receiver is being updated, and
no action is required. This process should take no longer
than 30 seconds.
No Signal Loss of signal Your system is functioning correctly, but you are in a
location that is blocking the XM signal. When you move
into an open area, the signal should return.
Loading XM Acquiring channel audio
(after 4 second delay)Your radio system is acquiring and processing audio and
text data. No action is needed. This message should
disappear shortly.
CH Off Air Channel not in service This channel is not currently in service. Tune to another
channel.
CH Unavail Channel no longer
availableThis previously assigned channel is no longer assigned.
Tune to another station. If this station was one of your
presets, you may need to choose another station for that
preset button.
No Info Artist Name/Feature not
availableNo artist information is available at this time on this
channel. Your system is working properly.
No Info Song/Program Title not
availableNo song title information is available at this time on this
channel. Your system is working properly.
3-96
Page 226 of 460
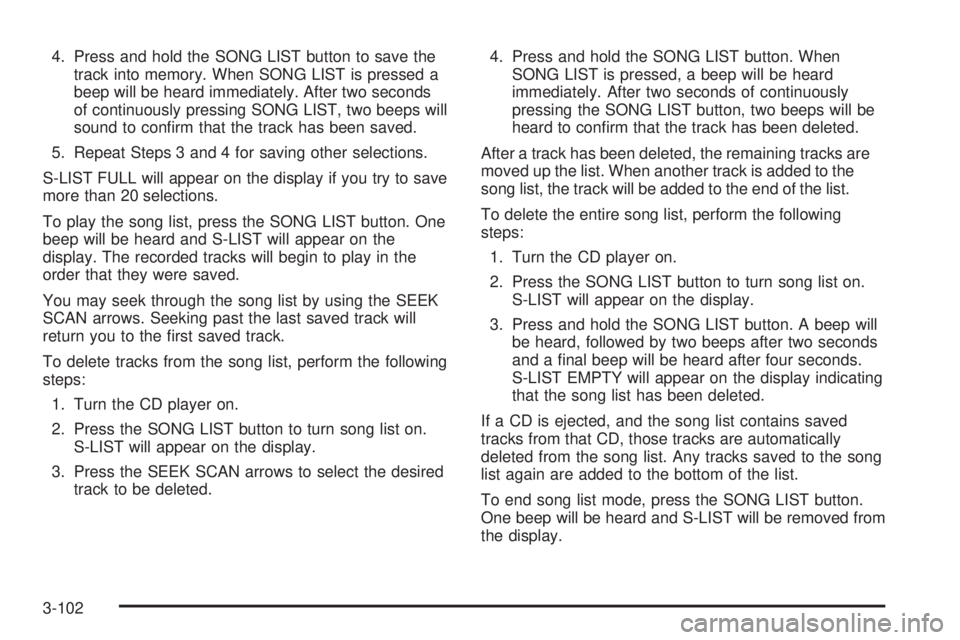
4. Press and hold the SONG LIST button to save the
track into memory. When SONG LIST is pressed a
beep will be heard immediately. After two seconds
of continuously pressing SONG LIST, two beeps will
sound to con®rm that the track has been saved.
5. Repeat Steps 3 and 4 for saving other selections.
S-LIST FULL will appear on the display if you try to save
more than 20 selections.
To play the song list, press the SONG LIST button. One
beep will be heard and S-LIST will appear on the
display. The recorded tracks will begin to play in the
order that they were saved.
You may seek through the song list by using the SEEK
SCAN arrows. Seeking past the last saved track will
return you to the ®rst saved track.
To delete tracks from the song list, perform the following
steps:
1. Turn the CD player on.
2. Press the SONG LIST button to turn song list on.
S-LIST will appear on the display.
3. Press the SEEK SCAN arrows to select the desired
track to be deleted.4. Press and hold the SONG LIST button. When
SONG LIST is pressed, a beep will be heard
immediately. After two seconds of continuously
pressing the SONG LIST button, two beeps will be
heard to con®rm that the track has been deleted.
After a track has been deleted, the remaining tracks are
moved up the list. When another track is added to the
song list, the track will be added to the end of the list.
To delete the entire song list, perform the following
steps:
1. Turn the CD player on.
2. Press the SONG LIST button to turn song list on.
S-LIST will appear on the display.
3. Press and hold the SONG LIST button. A beep will
be heard, followed by two beeps after two seconds
and a ®nal beep will be heard after four seconds.
S-LIST EMPTY will appear on the display indicating
that the song list has been deleted.
If a CD is ejected, and the song list contains saved
tracks from that CD, those tracks are automatically
deleted from the song list. Any tracks saved to the song
list again are added to the bottom of the list.
To end song list mode, press the SONG LIST button.
One beep will be heard and S-LIST will be removed from
the display.
3-102
Page 227 of 460
CD Messages
CHECK CD:If this message appears on the display, it
could be for one of the following reasons:
·It is very hot. When the temperature returns to
normal, the CD should play.
·You are driving on a very rough road. When the
road becomes smooth, the CD should play.
·The CD is dirty, scratched, wet, or upside down.
·The air is very humid. If so, wait about an hour and
try again.
·There may have been a problem while burning
the CD.
·The label may be caught in the CD player.
If the CD is not playing correctly, for any other reason,
try a known good CD.
If any error occurs repeatedly or if an error cannot be
corrected, contact your dealer. If your radio displays an
error message, write it down and provide it to your
dealer when reporting the problem.
Listening to a DVD
If your vehicle has Rear Seat Entertainment (RSE)
system and a DVD is playing, the DVD symbol
will appear on the radio display indicating that the DVD
is available and can be listened to through your
vehicles speakers. To listen to the DVD, press the CD
AUX button until RSE appears on the radio display.
The current radio source will stop and the DVD sound
will come through the speakers. To stop listening to
the DVD, press the CD AUX button, if a CD is loaded,
or press the BAND button to select a different source.
When the RSE system is turned off, the DVD symbol will
go off of the radio display and RSE OFF will appear
on the radio display. The radio will return to the
last radio source that you were listening to.
3-103
Page 229 of 460
When using the wired headphones, if the front seat
passengers play a CD in the Radio with Six-Disc CD
(if equipped) or use XMŸ Satellite Radio Service
(48 contiguous US states, if equipped), you will hear the
audio for these sources, instead of the DVD or CD
that is currently playing through the RSE.
If an error message appears on the video screen, see
ªDVD Messagesº later in this section.
DVD Player Buttons
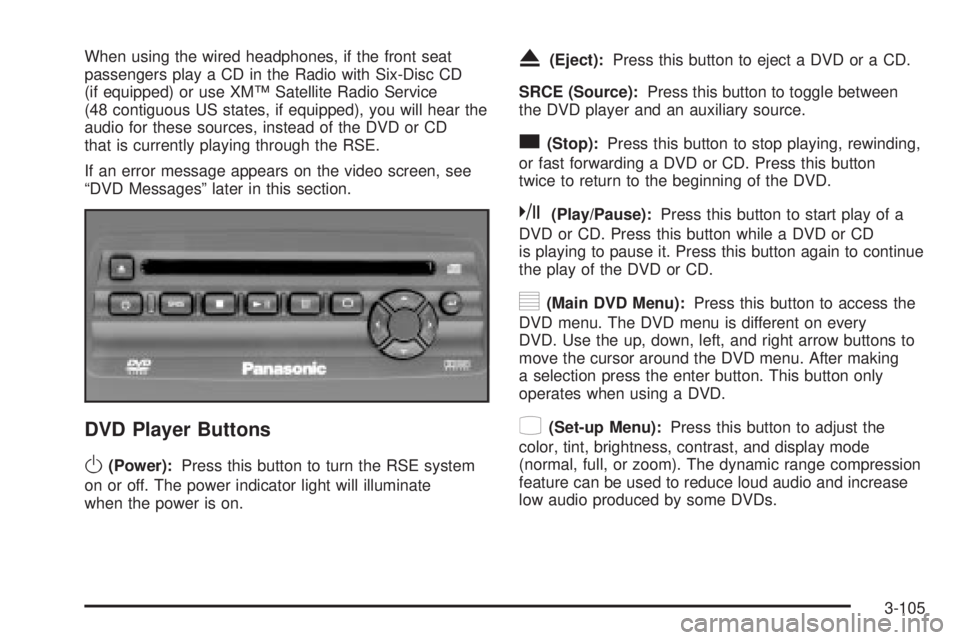
O(Power):Press this button to turn the RSE system
on or off. The power indicator light will illuminate
when the power is on.
X(Eject):Press this button to eject a DVD or a CD.
SRCE (Source):Press this button to toggle between
the DVD player and an auxiliary source.
c(Stop):Press this button to stop playing, rewinding,
or fast forwarding a DVD or CD. Press this button
twice to return to the beginning of the DVD.
k(Play/Pause):Press this button to start play of a
DVD or CD. Press this button while a DVD or CD
is playing to pause it. Press this button again to continue
the play of the DVD or CD.
y(Main DVD Menu):Press this button to access the
DVD menu. The DVD menu is different on every
DVD. Use the up, down, left, and right arrow buttons to
move the cursor around the DVD menu. After making
a selection press the enter button. This button only
operates when using a DVD.
z(Set-up Menu):Press this button to adjust the
color, tint, brightness, contrast, and display mode
(normal, full, or zoom). The dynamic range compression
feature can be used to reduce loud audio and increase
low audio produced by some DVDs.
3-105
Page 231 of 460
DVD Messages
The following errors may be displayed on the video
screen:
Disc Format Error:This message will be displayed if a
disc is inserted upside down, not readable, or the
format is not compatible with the DVD player.
Load/Eject Error:This message will be displayed if the
disc is not properly loaded or ejected.
Disc Play Error:This message will be displayed if the
DVD player cannot play the disc. Scratched or
damaged discs will cause this error.
Region Code Error:This message will be displayed if
the region code of the DVD is not compatible with
the region code of the DVD player.
No Disc:This message will be displayed if any of the
buttons on the DVD faceplate or remote control are
pressed and no disc is present in the DVD player.
Parental Control Button:This button is located behind
the video screen. Press this button while a DVD or
CD is playing to freeze the video and mute the audio.
The video screen will display Parental Control ON
and the power indicator light on the DVD player will
¯ash. It will also disable all other button operations fromthe remote control and the DVD player, with the
exception of the eject button. Press this button again to
restore operation of the DVD player.
This button may also be used to turn the DVD player
power on and automatically resume play if the ignition is
in RUN, ACCESSORY, or if RAP is active.
Video Screen
The video screen is located in the overhead console.
To use the video screen, push forward on the release
latch and the screen will fold down. Adjust the screen's
position as desired. When the video screen is not in
use, push it up into its latched position.
The DVD player and display will continue to operate
when the screen is in either the up or the down position.
The video screen contains the infrared transmitters for
the wireless headphones and the infrared receiver
for the remote control. If the screen is in the closed
position, the infrared signals will not be available for the
operation of the headphones or the remote control.
Notice:Directly touching the video screen
may damage it. Do not touch the screen. See
Cleaning the Video Screen on page 3-121for more
information.
3-107
Page 235 of 460
Headphones
The RSE system includes two sets of wireless
headphones.
Each set of headphones has an ON/OFF control.
An indicator light will illuminate on the headphones when
they are on. If the light does not illuminate, the
batteries may need to be replaced. See ªBattery
Replacementº following for more information.
Each set of headphones has a volume knob. To adjust
the volume, adjust this knob.
The headphones will automatically turn off if they lose
the infrared signal from the system after approximately
four minutes in order to preserve their battery power.
The signal may be lost if the system is turned off or if the
headphones are out of range of the infrared signal
transmitters that are located below the video display
screen.
When using the wired headphones, if the front seat
passengers play a CD in the Radio with Six-Disc CD
(if equipped) or use XMŸ Satellite Radio Service
(48 contiguous US states, if equipped), you will hear the
audio for these sources, instead of the DVD or CD
that is currently playing through the RSE.
Battery Replacement
To change the batteries, do the following:
1. Loosen the screw on the battery compartment door
located on the left side of the headphone earpiece.
2. Replace the two AAA batteries in the compartment.
Make sure that they are installed correctly, using
the diagram on the inside of the battery
compartment.
3. Tighten the screw to close the compartment door.
Notice:Do not store the headphones in heat or
direct sunlight. This could damage the headphones
and repairs would not be covered by your warranty.
Keep the headphones stored in a cool, dry place.
If the headphones are to be stored for a long period of
time, remove the batteries and keep them in a cool,
dry place.
3-111