Page 105 of 280

Using the manual lumbar support (if equipped)
The lumbar control is located on the
inboard side of the seat under the
armrest.
Rotate the control to change the
firmness of the lumbar support.
Kangaroo pouch and map pocket (if equipped)
The front of the cushion contains a pocket which can be used to hold
small objects that need to be easily accessible. The rear of the seat back
also contains a pocket for larger items which need to be easily
accessible.
Memory seats/rearview mirrors/adjustable pedals (if equipped)
This system allows automatic
positioning of the driver seat,
outside rearview mirrors, and
adjustable pedals to two
programmable positions.
The memory seat control is located
on the door next to the window
inside from the mirror.
•To program position one, move
the driver seat to the desired
position using the seat controls. Press the SET control. The SET
control indicator light will briefly illuminate. While the light is
illuminated, press control 1.
•To program position two, repeat the previous procedure using control
2.
A position can only be recalled when the transmission gearshift is in
Park. A memory seat position may be programmed at any time.
The memory seat positions are also recalled when you press your remote
entry transmitter UNLOCK control.
To program the memory seat to remote entry transmitter, refer to
Remote entry systemin theLocks and securitychapter.
SE T
12
2004 Windstar(win)
Owners Guide (post-2002-fmt)
USA English(fus)
Seating and Safety Restraints
105
Page 188 of 280
The fuses are coded as follows:
Fuse/Relay
LocationFuse Amp
RatingPassenger Compartment Fuse
Panel Description
1 Relay Accessory delay relay 1
2 Relay Accessory delay relay 2
3 10A Front wiper motor Run feed
4 5A B+ feed to outside mirrors
5 20A Vent window power feed/Radio
feed
6 5A Driver door switch
illumination/Passenger door
switch illumination
7 10A Rear wiper Run feed
8 10A Cluster/Electronic Automatic
Temperature Control (EATC) B+
feed
9 10A Passive Anti-theft System (PATS)
LED feed
10 5A Auxiliary radio, DVD
11 5A Auxiliary climate control
system/Power Liftgate
Module/Left and right power
sliding door module/Data Link
Connector (DLC)/Clock B+ feeds
2004 Windstar(win)
Owners Guide (post-2002-fmt)
USA English(fus)
Roadside Emergencies
188
Page 189 of 280

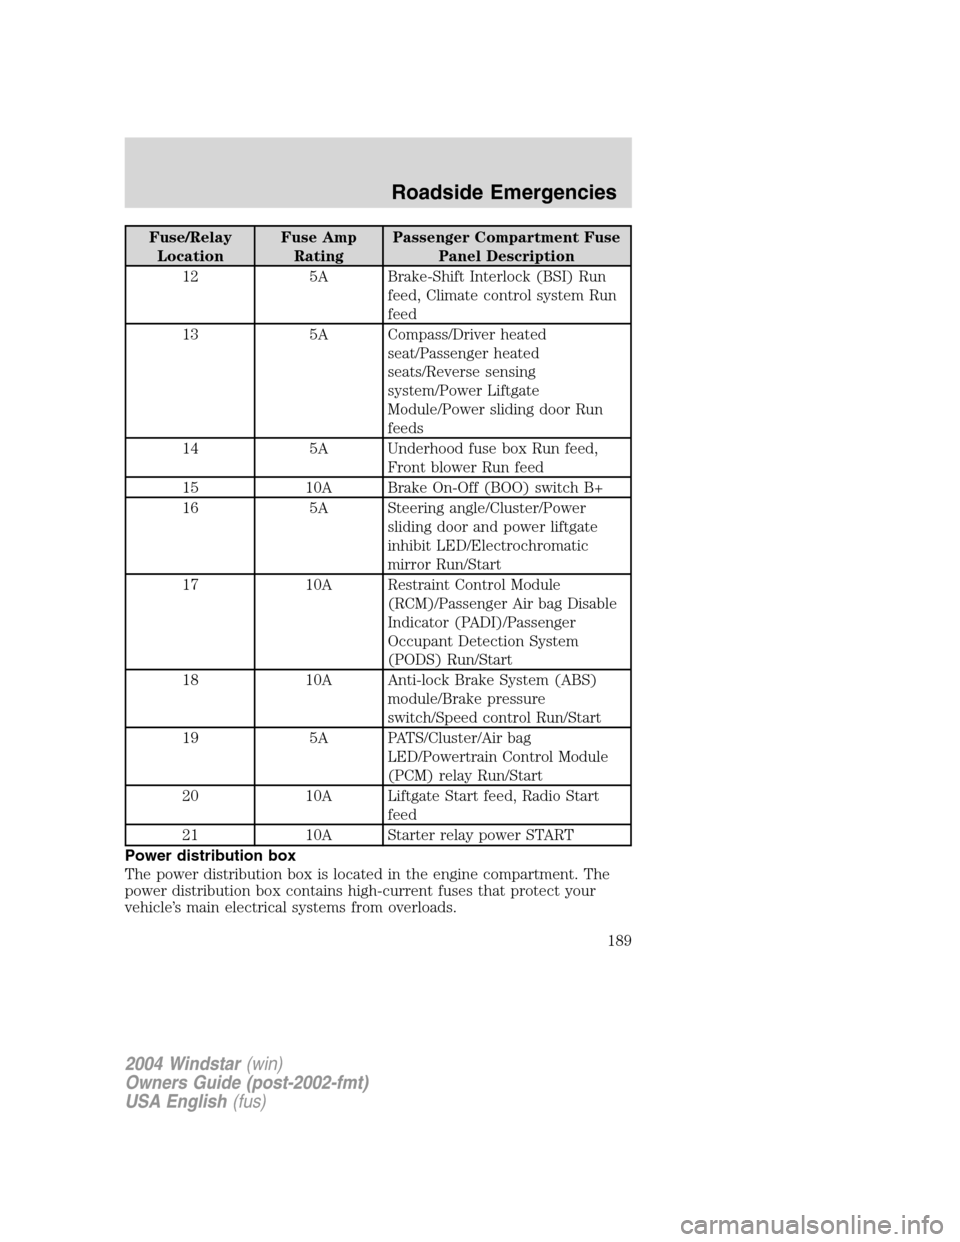
Fuse/Relay
LocationFuse Amp
RatingPassenger Compartment Fuse
Panel Description
12 5A Brake-Shift Interlock (BSI) Run
feed, Climate control system Run
feed
13 5A Compass/Driver heated
seat/Passenger heated
seats/Reverse sensing
system/Power Liftgate
Module/Power sliding door Run
feeds
14 5A Underhood fuse box Run feed,
Front blower Run feed
15 10A Brake On-Off (BOO) switch B+
16 5A Steering angle/Cluster/Power
sliding door and power liftgate
inhibit LED/Electrochromatic
mirror Run/Start
17 10A Restraint Control Module
(RCM)/Passenger Air bag Disable
Indicator (PADI)/Passenger
Occupant Detection System
(PODS) Run/Start
18 10A Anti-lock Brake System (ABS)
module/Brake pressure
switch/Speed control Run/Start
19 5A PATS/Cluster/Air bag
LED/Powertrain Control Module
(PCM) relay Run/Start
20 10A Liftgate Start feed, Radio Start
feed
21 10A Starter relay power START
Power distribution box
The power distribution box is located in the engine compartment. The
power distribution box contains high-current fuses that protect your
vehicle’s main electrical systems from overloads.
2004 Windstar(win)
Owners Guide (post-2002-fmt)
USA English(fus)
Roadside Emergencies
189
Page 191 of 280

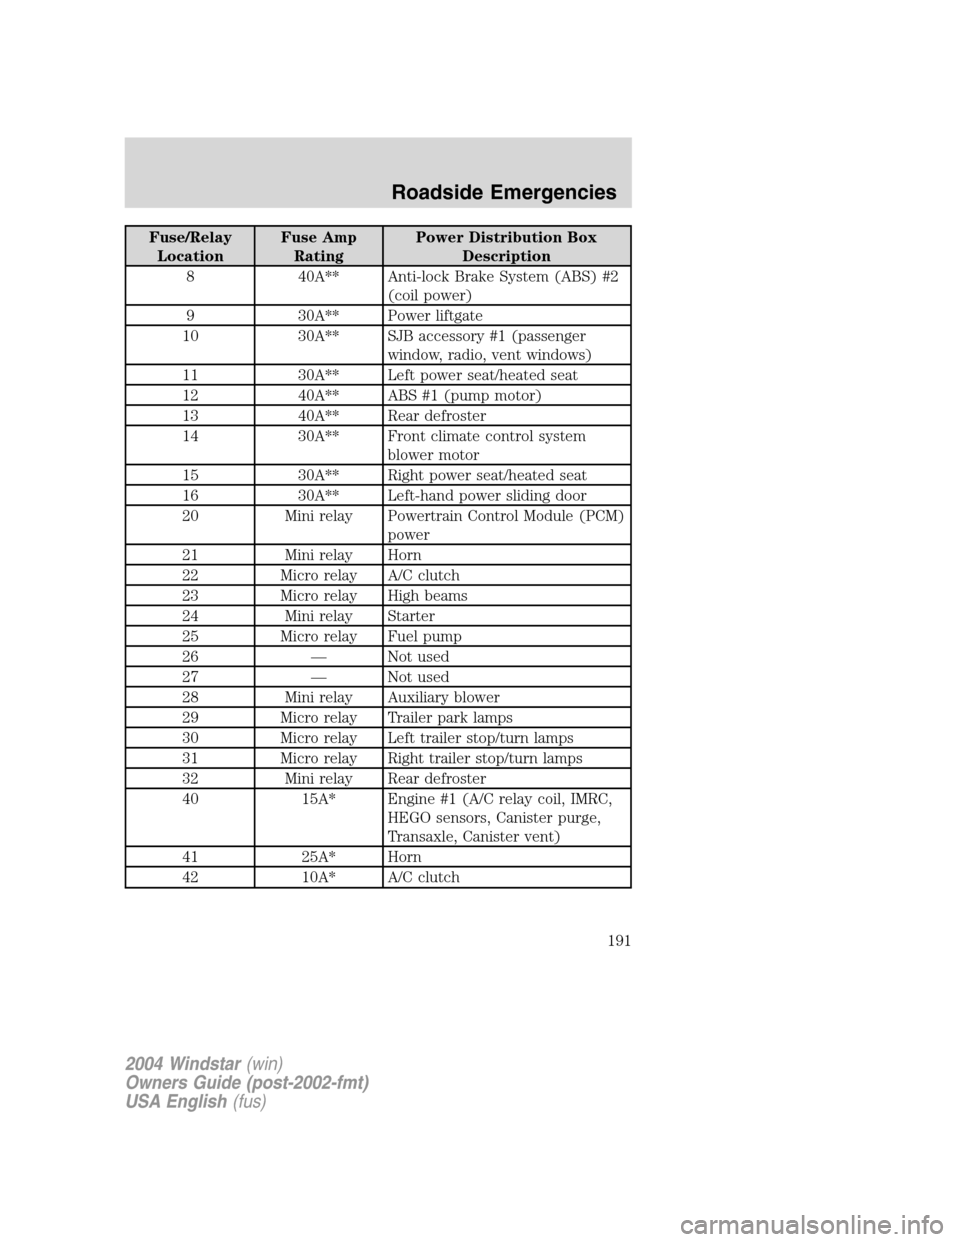
Fuse/Relay
LocationFuse Amp
RatingPower Distribution Box
Description
8 40A** Anti-lock Brake System (ABS) #2
(coil power)
9 30A** Power liftgate
10 30A** SJB accessory #1 (passenger
window, radio, vent windows)
11 30A** Left power seat/heated seat
12 40A** ABS #1 (pump motor)
13 40A** Rear defroster
14 30A** Front climate control system
blower motor
15 30A** Right power seat/heated seat
16 30A** Left-hand power sliding door
20 Mini relay Powertrain Control Module (PCM)
power
21 Mini relay Horn
22 Micro relay A/C clutch
23 Micro relay High beams
24 Mini relay Starter
25 Micro relay Fuel pump
26 — Not used
27 — Not used
28 Mini relay Auxiliary blower
29 Micro relay Trailer park lamps
30 Micro relay Left trailer stop/turn lamps
31 Micro relay Right trailer stop/turn lamps
32 Mini relay Rear defroster
40 15A* Engine #1 (A/C relay coil, IMRC,
HEGO sensors, Canister purge,
Transaxle, Canister vent)
41 25A* Horn
42 10A* A/C clutch
2004 Windstar(win)
Owners Guide (post-2002-fmt)
USA English(fus)
Roadside Emergencies
191
Page 192 of 280
Fuse/Relay
LocationFuse Amp
RatingPower Distribution Box
Description
43 15A* Engine #2 (Cooling fan relays,
Injectors, PCM, MAF sensor, IAC,
Ignition coil, ESM)
44 10A* Heated PCV
45 15A* High beams
46 20A* Trailer stop/turn lamps
47 15A* Fuel pump driver module
48 — Not used
49 10A* PCM KAP
50 10A* Alternator
51 10A* Adjustable pedals (non-memory)
or memory module
52 20A* Trailer tow park lamps
53 10A* Heated mirrors
54 30A* Front wiper motor
55 25A* Rear wiper motor
56 30A* Premium sound radio
57 20A* Cigar lighter
58 30A* SJB #1 – Center High-Mounted
Stop Lamp (CHMSL), License
plate lamps, OBD II, Dome lamp,
Auxiliary blend doors, Switch
illumination (feeds F–8, F–9, F–10
and F–11)
59 20A* Radio (non-premium)
60 30A* SJB #4 – Back-up lamps, Theft
sounder, Door locks
61 20A* 3rd row power point
2004 Windstar(win)
Owners Guide (post-2002-fmt)
USA English(fus)
Roadside Emergencies
192
Page 200 of 280

If Ford Accessory Running Boards
have been installed, use the jack
adapters supplied with the running
boards as described on the inside of
the jack storage area.
8. Locate the jack notch next to the
door closest to the tire you are
changing, then place the jack on the
frame rail directly behind the notch.
9. Turn the jack handle clockwise
until the wheel is completely off the
ground.
To lessen the risk of
personal injury, do not put
any part of your body under the
vehicle while changing a tire. Do
not start the engine when your
vehicle is on the jack. The jack is
only meant for changing the tire.
10. Remove the lug nuts with the lug wrench.
11. Replace the flat tire with the spare tire, making sure the valve stem
is facing outward. Reinstall lug nuts until the wheel is snug against the
hub. Do not fully tighten the lug nuts until the wheel has been lowered.
12. Lower the wheel by turning the jack handle counterclockwise.
2004 Windstar(win)
Owners Guide (post-2002-fmt)
USA English(fus)
Roadside Emergencies
200
Page 219 of 280

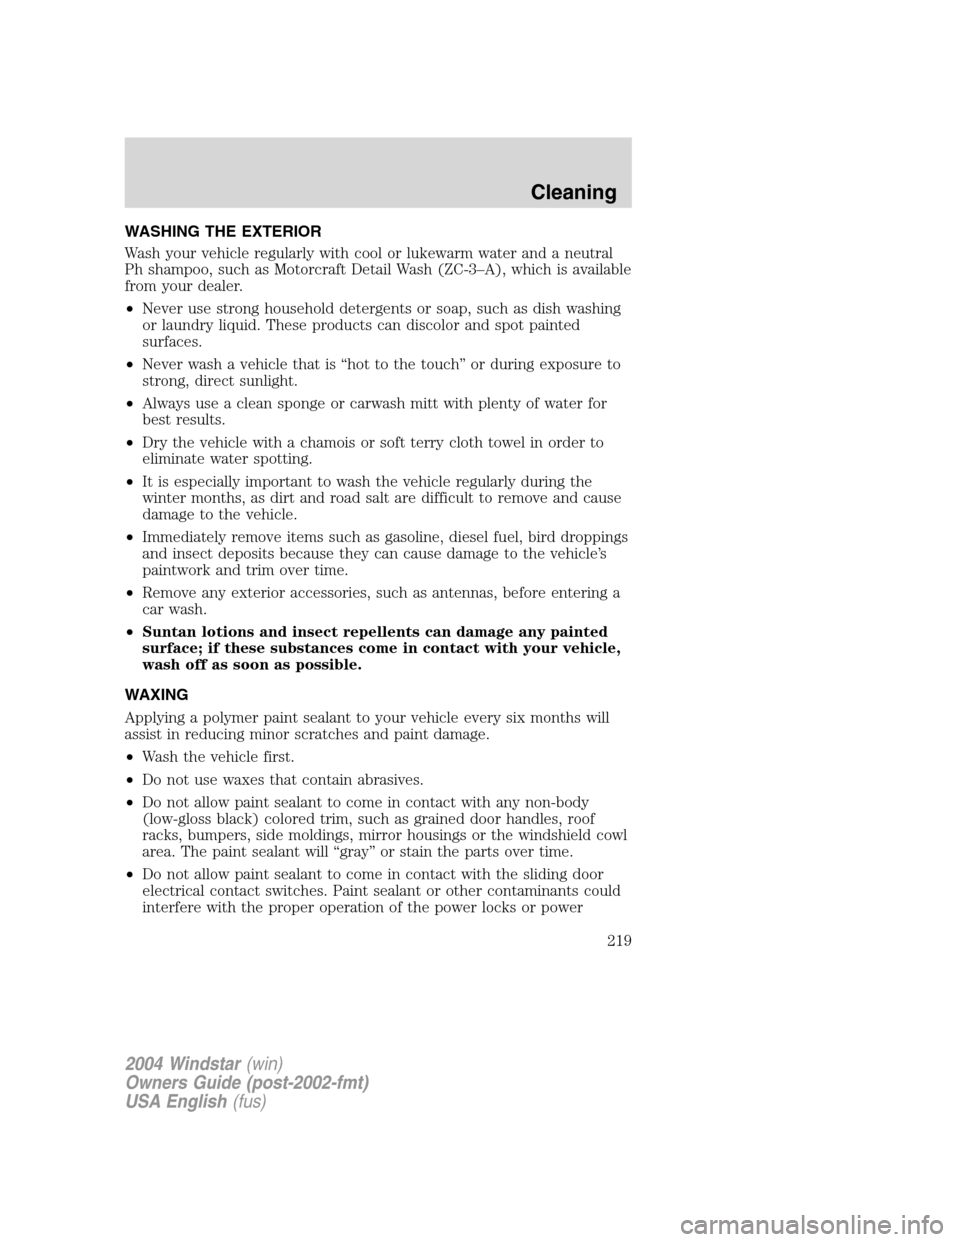
WASHING THE EXTERIOR
Wash your vehicle regularly with cool or lukewarm water and a neutral
Ph shampoo, such as Motorcraft Detail Wash (ZC-3–A), which is available
from your dealer.
•Never use strong household detergents or soap, such as dish washing
or laundry liquid. These products can discolor and spot painted
surfaces.
•Never wash a vehicle that is “hot to the touch” or during exposure to
strong, direct sunlight.
•Always use a clean sponge or carwash mitt with plenty of water for
best results.
•Dry the vehicle with a chamois or soft terry cloth towel in order to
eliminate water spotting.
•It is especially important to wash the vehicle regularly during the
winter months, as dirt and road salt are difficult to remove and cause
damage to the vehicle.
•Immediately remove items such as gasoline, diesel fuel, bird droppings
and insect deposits because they can cause damage to the vehicle’s
paintwork and trim over time.
•Remove any exterior accessories, such as antennas, before entering a
car wash.
•Suntan lotions and insect repellents can damage any painted
surface; if these substances come in contact with your vehicle,
wash off as soon as possible.
WAXING
Applying a polymer paint sealant to your vehicle every six months will
assist in reducing minor scratches and paint damage.
•Wash the vehicle first.
•Do not use waxes that contain abrasives.
•Do not allow paint sealant to come in contact with any non-body
(low-gloss black) colored trim, such as grained door handles, roof
racks, bumpers, side moldings, mirror housings or the windshield cowl
area. The paint sealant will “gray” or stain the parts over time.
•Do not allow paint sealant to come in contact with the sliding door
electrical contact switches. Paint sealant or other contaminants could
interfere with the proper operation of the power locks or power
2004 Windstar(win)
Owners Guide (post-2002-fmt)
USA English(fus)
Cleaning
Cleaning
219
Page 220 of 280

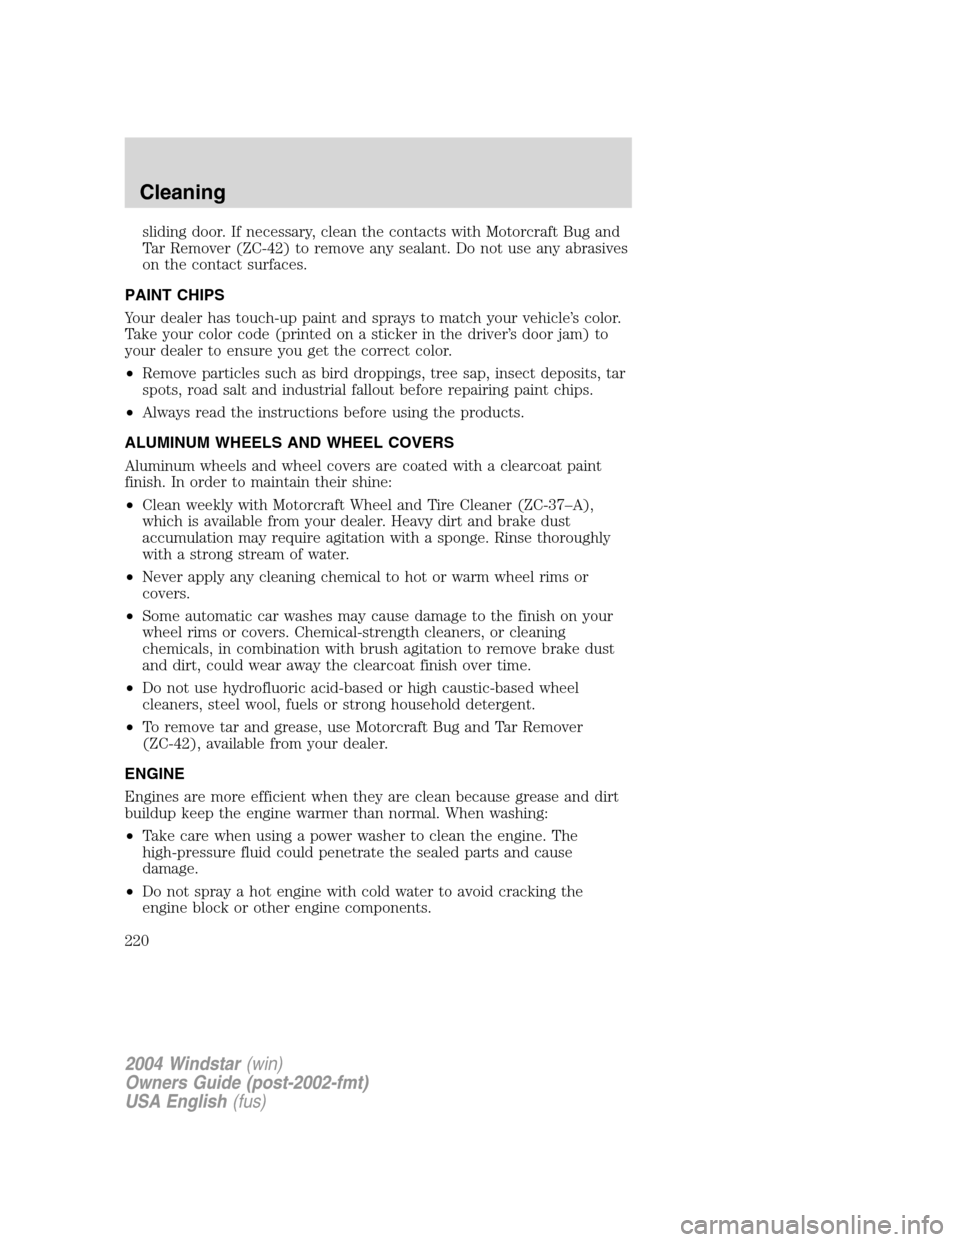
sliding door. If necessary, clean the contacts with Motorcraft Bug and
Tar Remover (ZC-42) to remove any sealant. Do not use any abrasives
on the contact surfaces.
PAINT CHIPS
Your dealer has touch-up paint and sprays to match your vehicle’s color.
Take your color code (printed on a sticker in the driver’s door jam) to
your dealer to ensure you get the correct color.
•Remove particles such as bird droppings, tree sap, insect deposits, tar
spots, road salt and industrial fallout before repairing paint chips.
•Always read the instructions before using the products.
ALUMINUM WHEELS AND WHEEL COVERS
Aluminum wheels and wheel covers are coated with a clearcoat paint
finish. In order to maintain their shine:
•Clean weekly with Motorcraft Wheel and Tire Cleaner (ZC-37–A),
which is available from your dealer. Heavy dirt and brake dust
accumulation may require agitation with a sponge. Rinse thoroughly
with a strong stream of water.
•Never apply any cleaning chemical to hot or warm wheel rims or
covers.
•Some automatic car washes may cause damage to the finish on your
wheel rims or covers. Chemical-strength cleaners, or cleaning
chemicals, in combination with brush agitation to remove brake dust
and dirt, could wear away the clearcoat finish over time.
•Do not use hydrofluoric acid-based or high caustic-based wheel
cleaners, steel wool, fuels or strong household detergent.
•To remove tar and grease, use Motorcraft Bug and Tar Remover
(ZC-42), available from your dealer.
ENGINE
Engines are more efficient when they are clean because grease and dirt
buildup keep the engine warmer than normal. When washing:
•Take care when using a power washer to clean the engine. The
high-pressure fluid could penetrate the sealed parts and cause
damage.
•Do not spray a hot engine with cold water to avoid cracking the
engine block or other engine components.
2004 Windstar(win)
Owners Guide (post-2002-fmt)
USA English(fus)
Cleaning
220