Page 1 of 248
Introduction 4
Instrument Cluster 10
Warning and control lights 10
Gauges 14
Entertainment Systems 17
AM/FM stereo cassette 17
AM/FM stereo with CD 19
AM/FM stereo with in-dash six CD 22
AM/FM stereo cassette with CD 25
Climate Controls 31
Manual heating and air conditioning 31
Lights 34
Headlamps 34
Turn signal control 36
Bulb replacement 38
Driver Controls 44
Windshield wiper/washer control 44
Steering wheel adjustment 45
Power windows 49
Mirrors 50
Speed control 51
Locks and Security 55
Keys 55
Locks 55
Anti-theft system 56
Table of Contents
1
2004 F150 Classic(p96)
Owners Guide (post-2002-fmt)
USA English(fus)
Table of Contents
Page 13 of 248

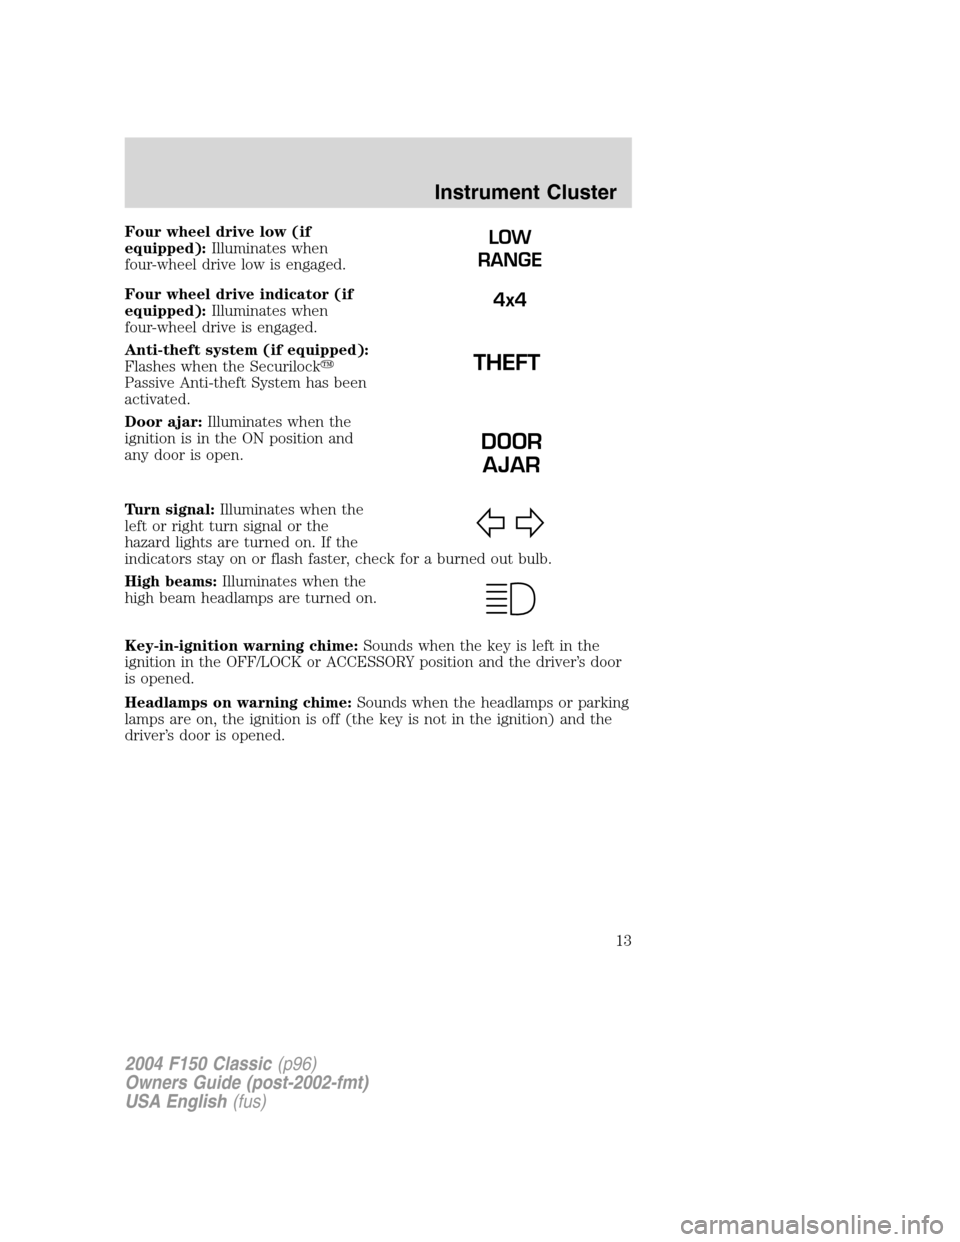
Four wheel drive low (if
equipped):Illuminates when
four-wheel drive low is engaged.
Four wheel drive indicator (if
equipped):Illuminates when
four-wheel drive is engaged.
Anti-theft system (if equipped):
Flashes when the Securilock�
Passive Anti-theft System has been
activated.
Door ajar:Illuminates when the
ignition is in the ON position and
any door is open.
Turn signal:Illuminates when the
left or right turn signal or the
hazard lights are turned on. If the
indicators stay on or flash faster, check for a burned out bulb.
High beams:Illuminates when the
high beam headlamps are turned on.
Key-in-ignition warning chime:Sounds when the key is left in the
ignition in the OFF/LOCK or ACCESSORY position and the driver’s door
is opened.
Headlamps on warning chime:Sounds when the headlamps or parking
lamps are on, the ignition is off (the key is not in the ignition) and the
driver’s door is opened.LOW
RANGE
4x4
DOOR
AJAR
2004 F150 Classic(p96)
Owners Guide (post-2002-fmt)
USA English(fus)
Instrument Cluster
13
Page 40 of 248

7. Insert the glass end of the new bulb into the headlamp assembly.
When the grooves in the plastic base are aligned, push the bulb into the
lamp assembly until the plastic base contacts the rear of the lamp
assembly.
8. Install bulb retaining ring over the plastic base and lock the ring into
the socket by turning it clockwise until you feel a“stop.”
9. Connect the electrical connector into the plastic base until it“snaps.”
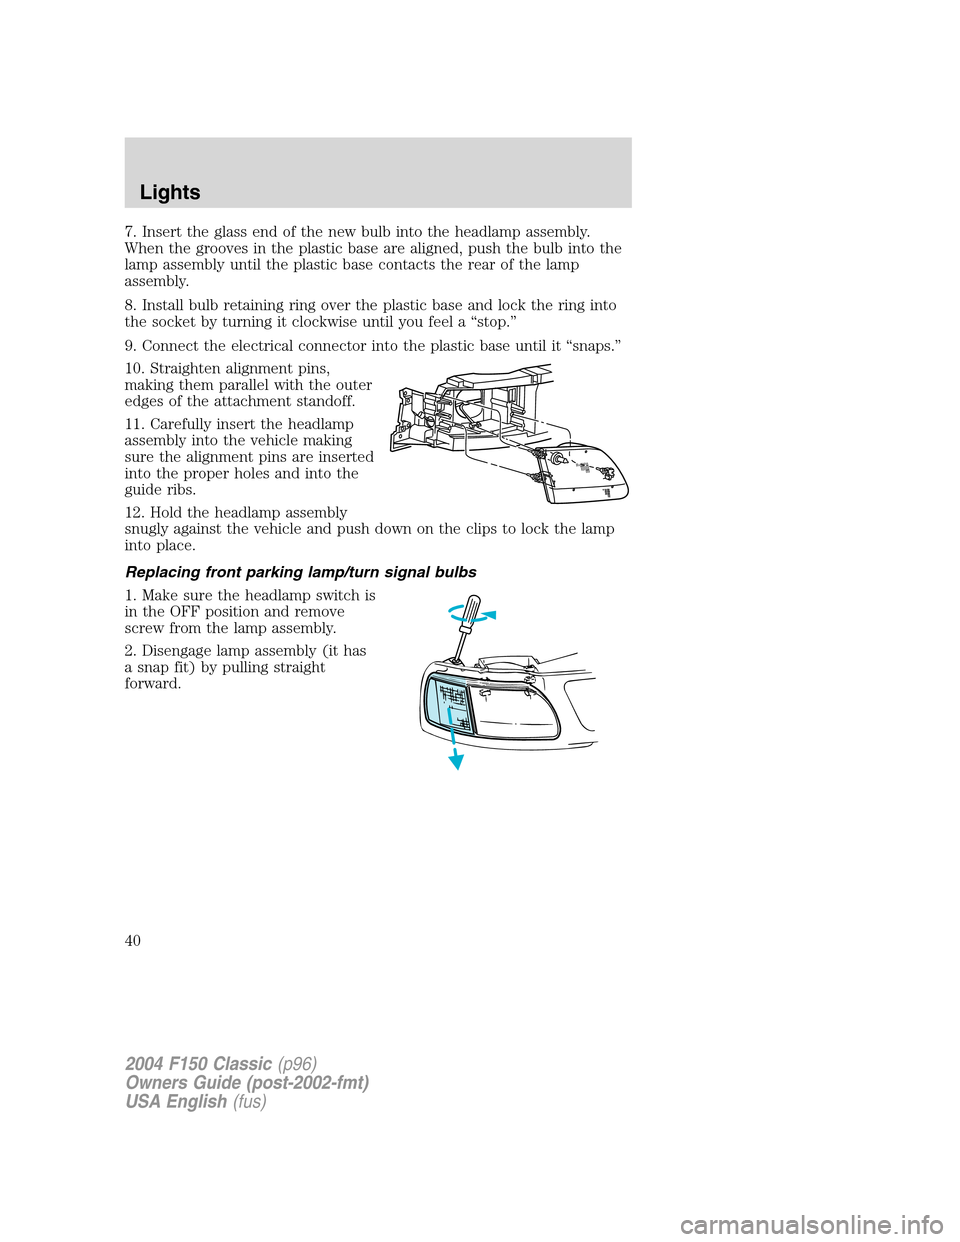
10. Straighten alignment pins,
making them parallel with the outer
edges of the attachment standoff.
11. Carefully insert the headlamp
assembly into the vehicle making
sure the alignment pins are inserted
into the proper holes and into the
guide ribs.
12. Hold the headlamp assembly
snugly against the vehicle and push down on the clips to lock the lamp
into place.
Replacing front parking lamp/turn signal bulbs
1. Make sure the headlamp switch is
in the OFF position and remove
screw from the lamp assembly.
2. Disengage lamp assembly (it has
a snap fit) by pulling straight
forward.
2004 F150 Classic(p96)
Owners Guide (post-2002-fmt)
USA English(fus)
Lights
40
Page 41 of 248

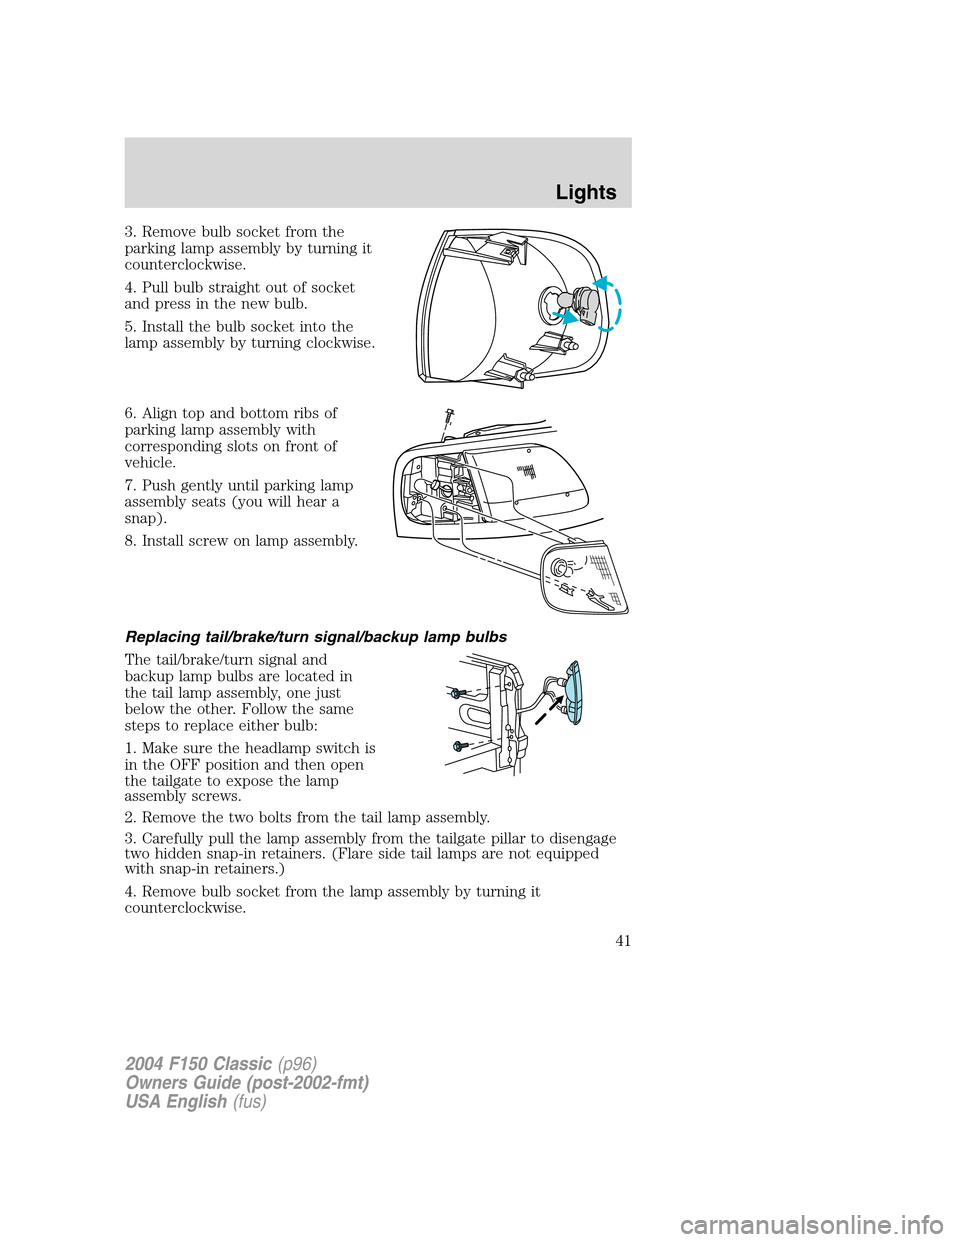
3. Remove bulb socket from the
parking lamp assembly by turning it
counterclockwise.
4. Pull bulb straight out of socket
and press in the new bulb.
5. Install the bulb socket into the
lamp assembly by turning clockwise.
6. Align top and bottom ribs of
parking lamp assembly with
corresponding slots on front of
vehicle.
7. Push gently until parking lamp
assembly seats (you will hear a
snap).
8. Install screw on lamp assembly.
Replacing tail/brake/turn signal/backup lamp bulbs
The tail/brake/turn signal and
backup lamp bulbs are located in
the tail lamp assembly, one just
below the other. Follow the same
steps to replace either bulb:
1. Make sure the headlamp switch is
in the OFF position and then open
the tailgate to expose the lamp
assembly screws.
2. Remove the two bolts from the tail lamp assembly.
3. Carefully pull the lamp assembly from the tailgate pillar to disengage
two hidden snap-in retainers. (Flare side tail lamps are not equipped
with snap-in retainers.)
4. Remove bulb socket from the lamp assembly by turning it
counterclockwise.
2004 F150 Classic(p96)
Owners Guide (post-2002-fmt)
USA English(fus)
Lights
41
Page 42 of 248

5. Pull bulb straight out of socket and press in the new bulb.
6. Install the bulb socket into the lamp assembly by turning clockwise.
7. Carefully install the tail lamp assembly on tailgate pillar snapping the
two snap-in retainers into place. (Flare side tail lamps do not snap into
place but have two tabs which fit into slots.)
8. Secure the tail lamp on the vehicle with two bolts.
Replacing high-mount brake and cargo lamp bulbs
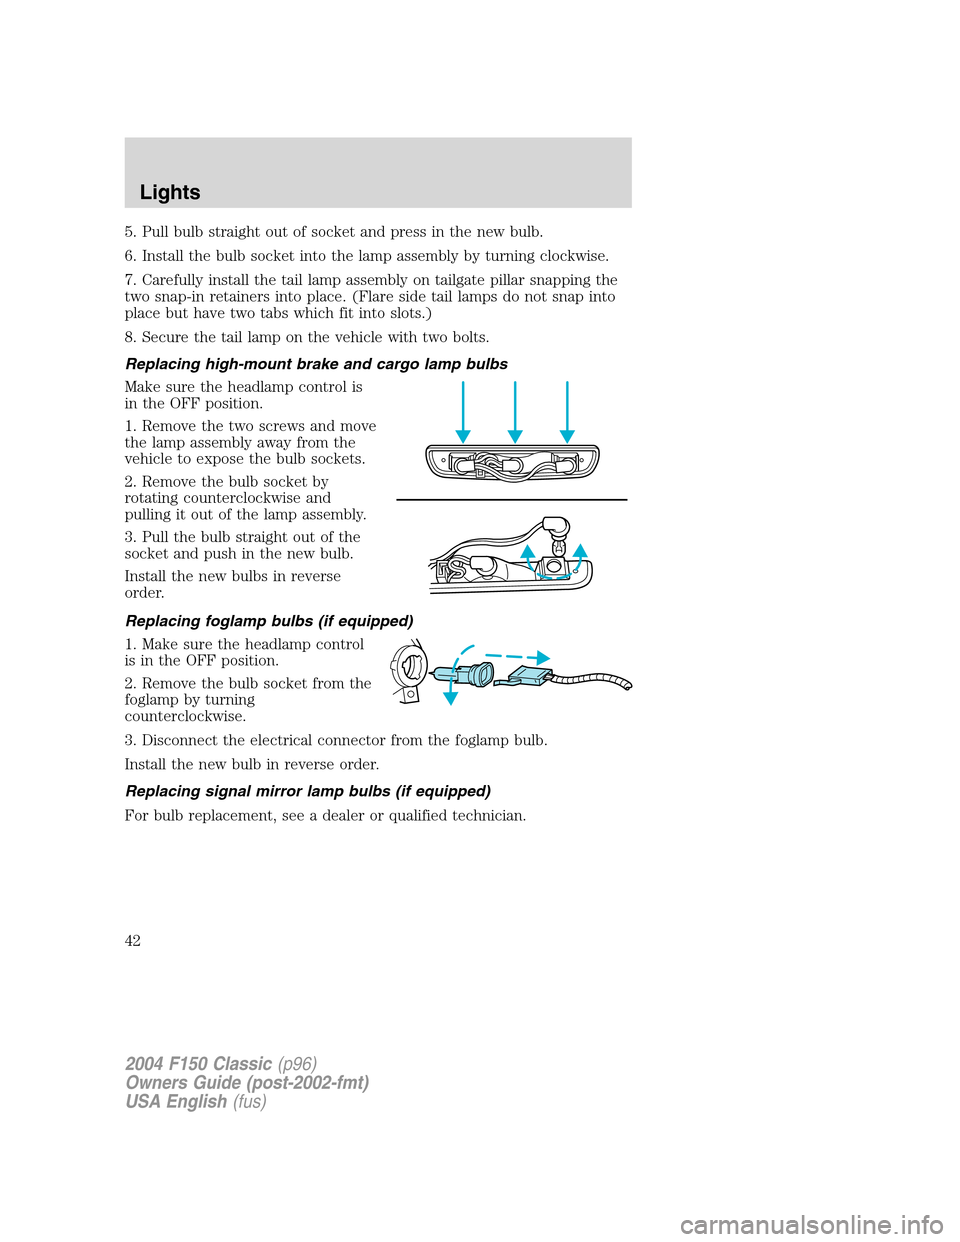
Make sure the headlamp control is
in the OFF position.
1. Remove the two screws and move
the lamp assembly away from the
vehicle to expose the bulb sockets.
2. Remove the bulb socket by
rotating counterclockwise and
pulling it out of the lamp assembly.
3. Pull the bulb straight out of the
socket and push in the new bulb.
Install the new bulbs in reverse
order.
Replacing foglamp bulbs (if equipped)
1. Make sure the headlamp control
is in the OFF position.
2. Remove the bulb socket from the
foglamp by turning
counterclockwise.
3. Disconnect the electrical connector from the foglamp bulb.
Install the new bulb in reverse order.
Replacing signal mirror lamp bulbs (if equipped)
For bulb replacement, see a dealer or qualified technician.
2004 F150 Classic(p96)
Owners Guide (post-2002-fmt)
USA English(fus)
Lights
42
Page 246 of 248

Inspection/maintenance (I/M)
testing ........................................205
Instrument panel
cleaning ...................................178
cluster ........................................10
lighting up panel and
interior .......................................36
J
Jack ............................................151
positioning ...............................151
storage .....................................151
Jump-starting your vehicle ......159
K
Keyless entry system .................60
Keys
positions of the ignition .........103
L
Lamps
autolamp system .......................34
bulb replacement
specifications chart ..................38
daytime running light ...............35
fog lamps ...................................34
headlamps .................................34
headlamps, flash to pass ..........35
instrument panel, dimming .....36
interior lamps .....................37–38
replacing bulbs ...................38–43
Lane change indicator
(see Turn signal) ........................36
Lights, warning and indicator ....10
anti-lock brakes (ABS) ..........108
speed control ............................53
Load limits .................................129Loading instructions .................133
Lubricant specifications ...231, 233
Lug nuts ....................................158
Lumbar support, seats .........67–68
M
Manual transmission .................114
fluid capacities ........................228
lubricant specifications ..........233
reverse .....................................116
Mirrors .........................................50
fold away ...................................50
side view mirrors (power) .......50
Motorcraft parts ................200, 227
O
Octane rating ............................199
Oil (see Engine oil) ..................185
P
Parking brake ............................109
Parts (see Motorcraft parts) ....227
Pedals (see Power adjustable
foot pedals) .................................51
Power adjustable foot pedals .....51
Power distribution box
(see Fuses) ...............................147
Power door locks ........................55
Power point .................................48
Power steering ..........................109
fluid, checking and adding ....206
fluid, refill capacity ................228
fluid, specifications .........231, 233
Power Windows ...........................49
2004 F150 Classic(p96)
Owners Guide (post-2002-fmt)
USA English(fus)
Index
246