2004 FORD EXPLORER engine
[x] Cancel search: enginePage 175 of 296

2. Weigh your vehicle without cargo. To obtain correct weights, take your
vehicle to a shipping company or an inspection station for trucks.
3. Subtract your loaded weight from the maximum GCWR in the chart.
This is the maximum trailer weight your vehicle can tow. It must be
below the maximum trailer weight shown in the chart.
TRAILER TOWING
Trailer towing with your vehicle may require the use of a trailer tow
option package.
Trailer towing puts additional loads on your vehicle’s engine,
transmission, axle, brakes, tires, and suspension. For your safety and to
maximize vehicle performance, be sure to use the proper equipment
while towing.
Follow these guidelines to ensure safe towing procedure:
•Stay within your vehicle’s load limits.
•Thoroughly prepare your vehicle for towing. Refer toPreparing to
towin this chapter.
•Use extra caution when driving while trailer towing. Refer toDriving
while you towin this chapter.
•Service your vehicle more frequently if you tow a trailer. Refer to the
severe duty schedule in the scheduled maintenance guide.
•Do not tow a trailer until your vehicle has been driven at least 800 km
(500 miles).
•Refer to the instructions included with towing accessories for the
proper installation and adjustment specifications.
Do not exceed the maximum loads listed on the Safety Compliance
Certification label. For load specification terms found on the label, refer
toVehicle loadingin this chapter when figuring the total weight of your
vehicle.
Your vehicle is equipped with a standard Class II integrated hitch and
requires only a draw bar and ball with a 19 mm (3/4 inch) shank
diameter. An optional Class III/Class IV hitch is also available.
Note:Do not exceed the GVWR or the GAWR specified on the
certification label.
Towing trailers beyond the maximum recommended gross trailer
weight exceeds the limit of the vehicle and could result in
engine damage, transmission damage, structural damage, loss of vehicle
control, vehicle rollover and personal injury.
2004 Explorer(exp)
Owners Guide (post-2002-fmt)
USA English(fus)
Driving
175
Page 176 of 296
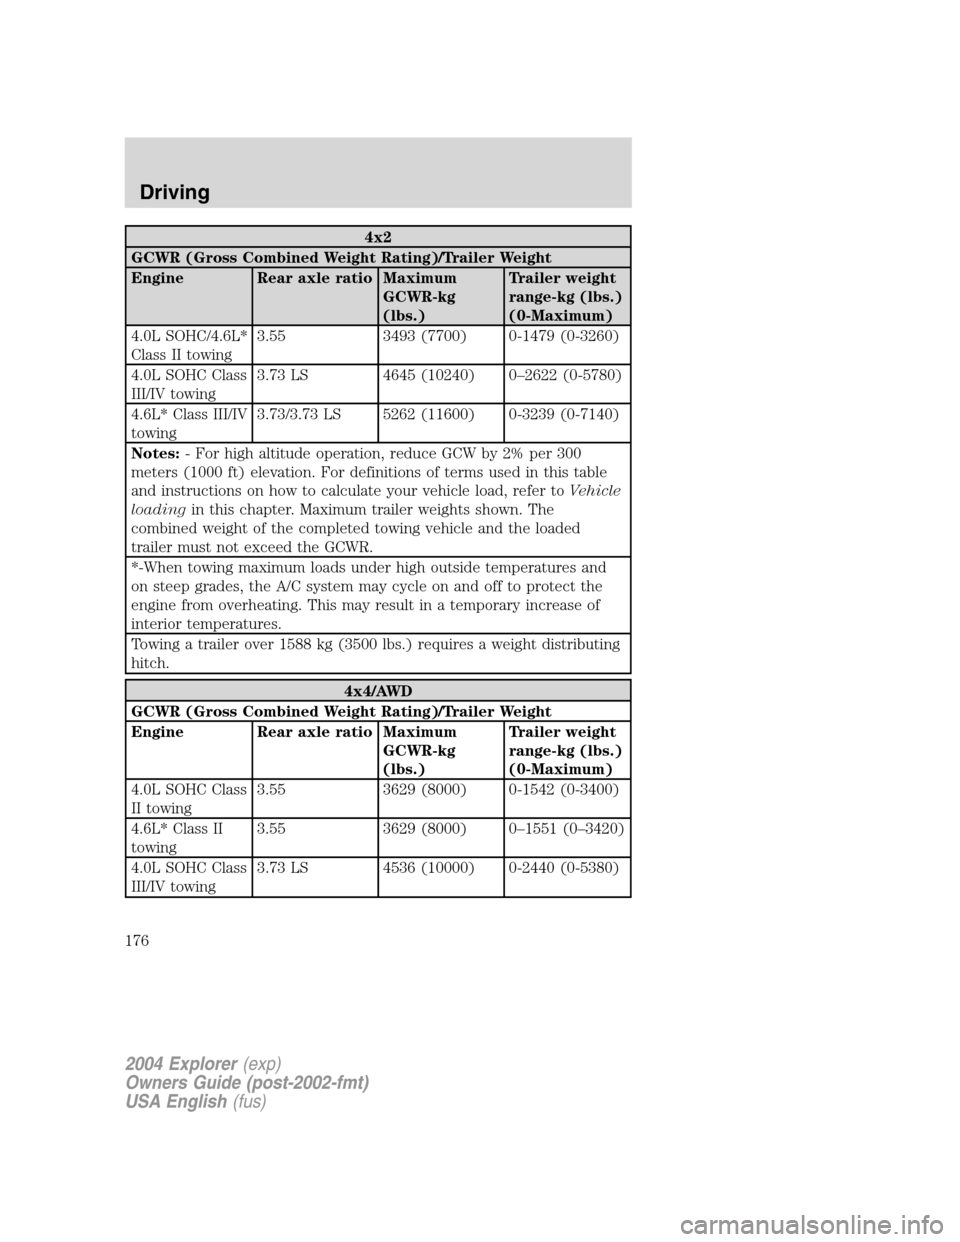
4x2
GCWR (Gross Combined Weight Rating)/Trailer Weight
Engine Rear axle ratio Maximum
GCWR-kg
(lbs.)Trailer weight
range-kg (lbs.)
(0-Maximum)
4.0L SOHC/4.6L*
Class II towing3.55 3493 (7700) 0-1479 (0-3260)
4.0L SOHC Class
III/IV towing3.73 LS 4645 (10240) 0–2622 (0-5780)
4.6L* Class III/IV
towing3.73/3.73 LS 5262 (11600) 0-3239 (0-7140)
Notes:- For high altitude operation, reduce GCW by 2% per 300
meters (1000 ft) elevation. For definitions of terms used in this table
and instructions on how to calculate your vehicle load, refer toVehicle
loadingin this chapter. Maximum trailer weights shown. The
combined weight of the completed towing vehicle and the loaded
trailer must not exceed the GCWR.
*-When towing maximum loads under high outside temperatures and
on steep grades, the A/C system may cycle on and off to protect the
engine from overheating. This may result in a temporary increase of
interior temperatures.
Towing a trailer over 1588 kg (3500 lbs.) requires a weight distributing
hitch.
4x4/AWD
GCWR (Gross Combined Weight Rating)/Trailer Weight
Engine Rear axle ratio Maximum
GCWR-kg
(lbs.)Trailer weight
range-kg (lbs.)
(0-Maximum)
4.0L SOHC Class
II towing3.55 3629 (8000) 0-1542 (0-3400)
4.6L* Class II
towing3.55 3629 (8000) 0–1551 (0–3420)
4.0L SOHC Class
III/IV towing3.73 LS 4536 (10000) 0-2440 (0-5380)
2004 Explorer(exp)
Owners Guide (post-2002-fmt)
USA English(fus)
Driving
176
Page 177 of 296
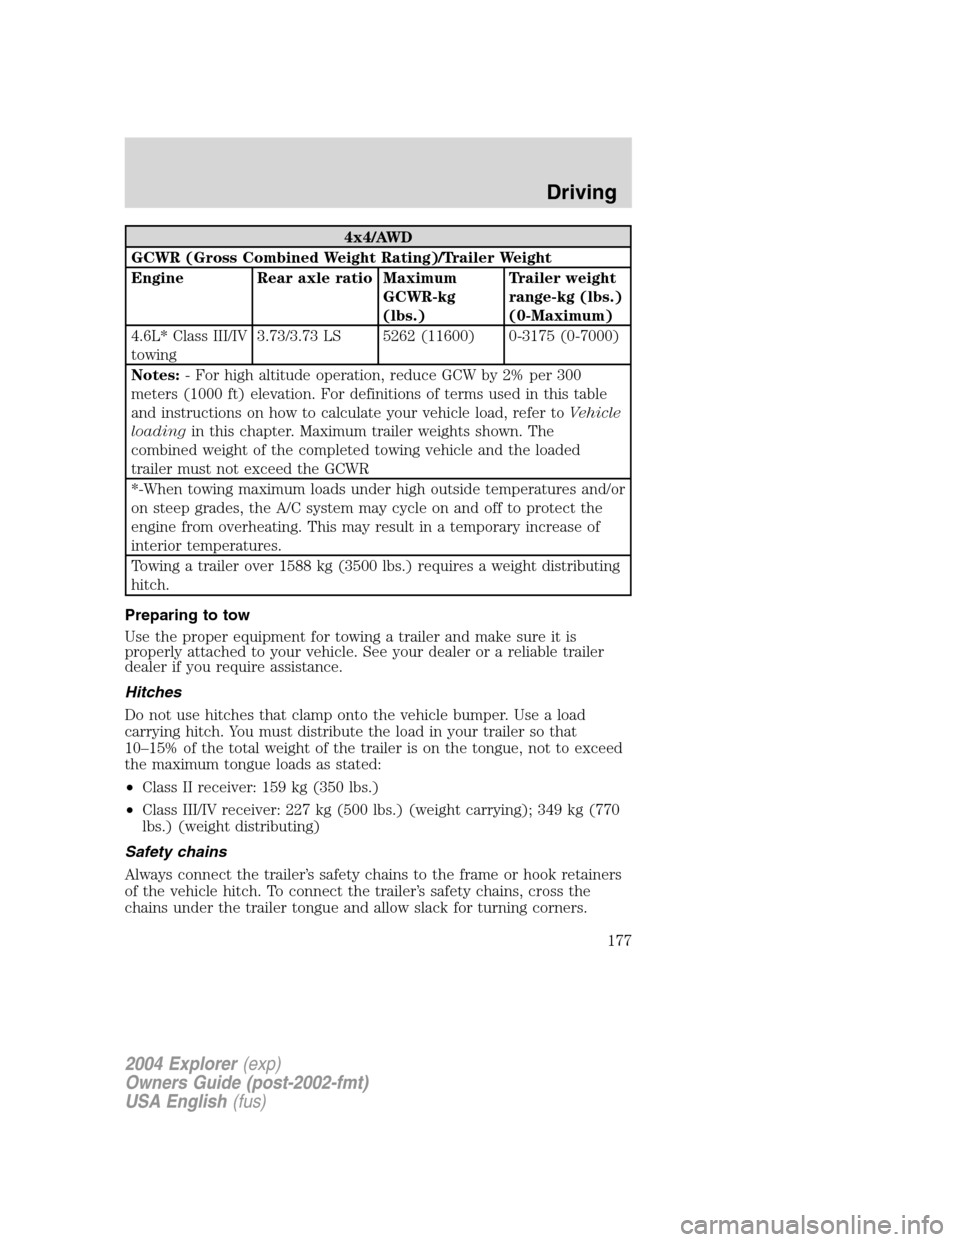
4x4/AWD
GCWR (Gross Combined Weight Rating)/Trailer Weight
Engine Rear axle ratio Maximum
GCWR-kg
(lbs.)Trailer weight
range-kg (lbs.)
(0-Maximum)
4.6L* Class III/IV
towing3.73/3.73 LS 5262 (11600) 0-3175 (0-7000)
Notes:- For high altitude operation, reduce GCW by 2% per 300
meters (1000 ft) elevation. For definitions of terms used in this table
and instructions on how to calculate your vehicle load, refer toVehicle
loadingin this chapter. Maximum trailer weights shown. The
combined weight of the completed towing vehicle and the loaded
trailer must not exceed the GCWR
*-When towing maximum loads under high outside temperatures and/or
on steep grades, the A/C system may cycle on and off to protect the
engine from overheating. This may result in a temporary increase of
interior temperatures.
Towing a trailer over 1588 kg (3500 lbs.) requires a weight distributing
hitch.
Preparing to tow
Use the proper equipment for towing a trailer and make sure it is
properly attached to your vehicle. See your dealer or a reliable trailer
dealer if you require assistance.
Hitches
Do not use hitches that clamp onto the vehicle bumper. Use a load
carrying hitch. You must distribute the load in your trailer so that
10–15% of the total weight of the trailer is on the tongue, not to exceed
the maximum tongue loads as stated:
•Class II receiver: 159 kg (350 lbs.)
•Class III/IV receiver: 227 kg (500 lbs.) (weight carrying); 349 kg (770
lbs.) (weight distributing)
Safety chains
Always connect the trailer’s safety chains to the frame or hook retainers
of the vehicle hitch. To connect the trailer’s safety chains, cross the
chains under the trailer tongue and allow slack for turning corners.
2004 Explorer(exp)
Owners Guide (post-2002-fmt)
USA English(fus)
Driving
177
Page 179 of 296
higher than normal coolant temperatures. If this occurs, reduce speed
until the coolant temperature returns to the normal range. Refer to
Engine coolant temperature gaugein theInstrument cluster
chapter.
•Anticipate stops and brake gradually.
•Do not exceed the GCWR rating or transmission damage may occur.
Servicing after towing
If you tow a trailer for long distances, your vehicle will require more
frequent service intervals. Refer to your scheduled maintenance guide for
more information.
Trailer towing tips
•Practice turning, stopping and backing up before starting on a trip to
get the feel of the vehicle trailer combination. When turning, make
wider turns so the trailer wheels will clear curbs and other obstacles.
•Allow more distance for stopping with a trailer attached.
•If you are driving down a long or steep hill, shift to a lower gear. Do
not apply the brakes continuously, as they may overheat and become
less effective.
•The trailer tongue weight should be 10–15% of the loaded trailer
weight.
•After you have traveled 80 km (50 miles), thoroughly check your
hitch, electrical connections and trailer wheel lug nuts.
•To aid in engine/transmission cooling and A/C efficiency during hot
weather while stopped in traffic, place the gearshift lever in P (Park).
•Vehicles with trailers should not be parked on a grade. If you must
park on a grade, place wheel chocks under the trailer’s wheels.
Launching or retrieving a boat
Disconnect the wiring to the trailer before backing the trailer
into the water. Reconnect the wiring to the trailer after the
trailer is removed from the water.
When backing down a ramp during boat launching or retrieval:
•do not allow the static water level to rise above the bottom edge of
the rear bumper.
•do not allow waves to break higher than 15 cm (6 inches) above the
bottom edge of the rear bumper.
2004 Explorer(exp)
Owners Guide (post-2002-fmt)
USA English(fus)
Driving
179
Page 182 of 296
Canadian customers who require roadside assistance, call
1–800–665–2006.
If you need to arrange roadside assistance for yourself, Ford Motor
Company will reimburse a reasonable amount. To obtain reimbursement
information, U.S. Ford or Mercury vehicles customers call
1-800-241-3673; Lincoln vehicle customers call 1–800–521–4140.
Canadian customers who need to obtain reimbursement information, call
1–800–665–2006.
ROADSIDE COVERAGE BEYOND BASIC WARRANTY
In the United States, you may purchase additional roadside assistance
coverage beyond this period through the Ford Auto Club by contacting
your Ford or Lincoln Mercury dealer.
Similarly in Canada, for uninterrupted Roadside Assistance coverage, you
may purchase extended coverage prior to your Basic Warranty’s Roadside
Assistance expiring. For more information and enrollment, contact
1–877–294–2582 or visit our website at www.ford.ca.
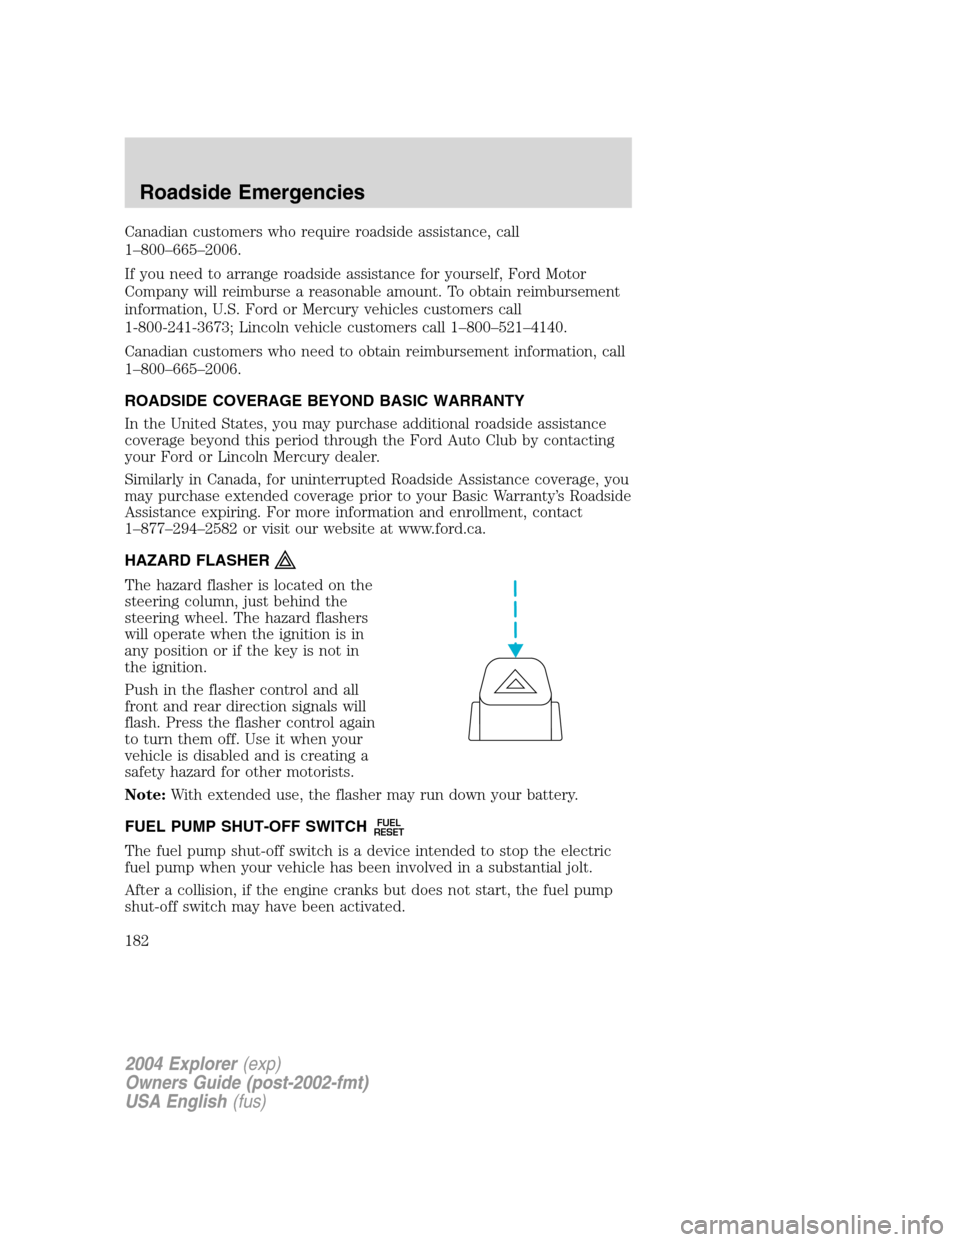
HAZARD FLASHER
The hazard flasher is located on the
steering column, just behind the
steering wheel. The hazard flashers
will operate when the ignition is in
any position or if the key is not in
the ignition.
Push in the flasher control and all
front and rear direction signals will
flash. Press the flasher control again
to turn them off. Use it when your
vehicle is disabled and is creating a
safety hazard for other motorists.
Note:With extended use, the flasher may run down your battery.
FUEL PUMP SHUT-OFF SWITCH
FUEL
RESET
The fuel pump shut-off switch is a device intended to stop the electric
fuel pump when your vehicle has been involved in a substantial jolt.
After a collision, if the engine cranks but does not start, the fuel pump
shut-off switch may have been activated.
2004 Explorer(exp)
Owners Guide (post-2002-fmt)
USA English(fus)
Roadside Emergencies
182
Page 186 of 296
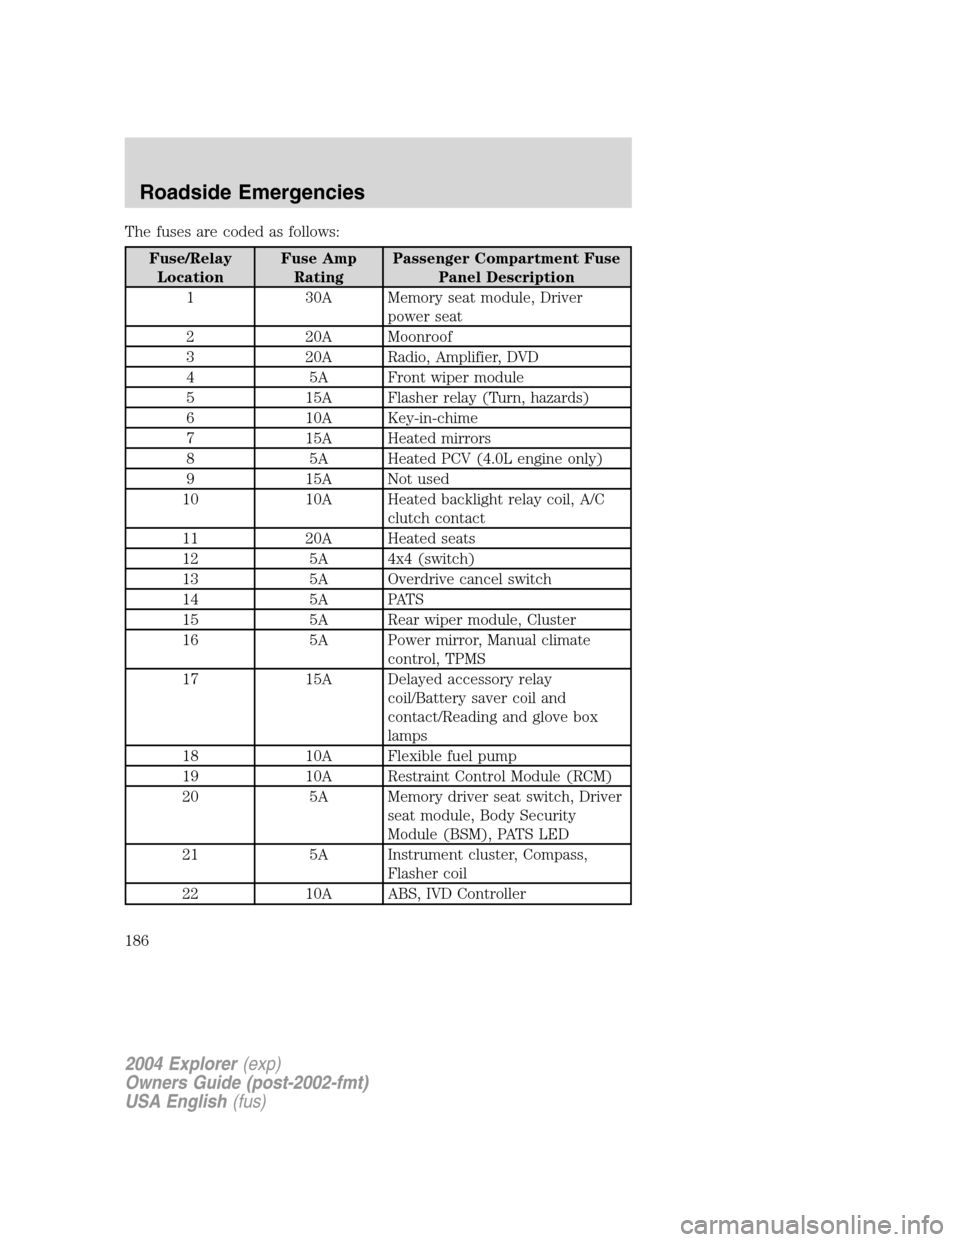
The fuses are coded as follows:
Fuse/Relay
LocationFuse Amp
RatingPassenger Compartment Fuse
Panel Description
1 30A Memory seat module, Driver
power seat
2 20A Moonroof
3 20A Radio, Amplifier, DVD
4 5A Front wiper module
5 15A Flasher relay (Turn, hazards)
6 10A Key-in-chime
7 15A Heated mirrors
8 5A Heated PCV (4.0L engine only)
9 15A Not used
10 10A Heated backlight relay coil, A/C
clutch contact
11 20A Heated seats
12 5A 4x4 (switch)
13 5A Overdrive cancel switch
14 5A PATS
15 5A Rear wiper module, Cluster
16 5A Power mirror, Manual climate
control, TPMS
17 15A Delayed accessory relay
coil/Battery saver coil and
contact/Reading and glove box
lamps
18 10A Flexible fuel pump
19 10A Restraint Control Module (RCM)
20 5A Memory driver seat switch, Driver
seat module, Body Security
Module (BSM), PATS LED
21 5A Instrument cluster, Compass,
Flasher coil
22 10A ABS, IVD Controller
2004 Explorer(exp)
Owners Guide (post-2002-fmt)
USA English(fus)
Roadside Emergencies
186
Page 189 of 296
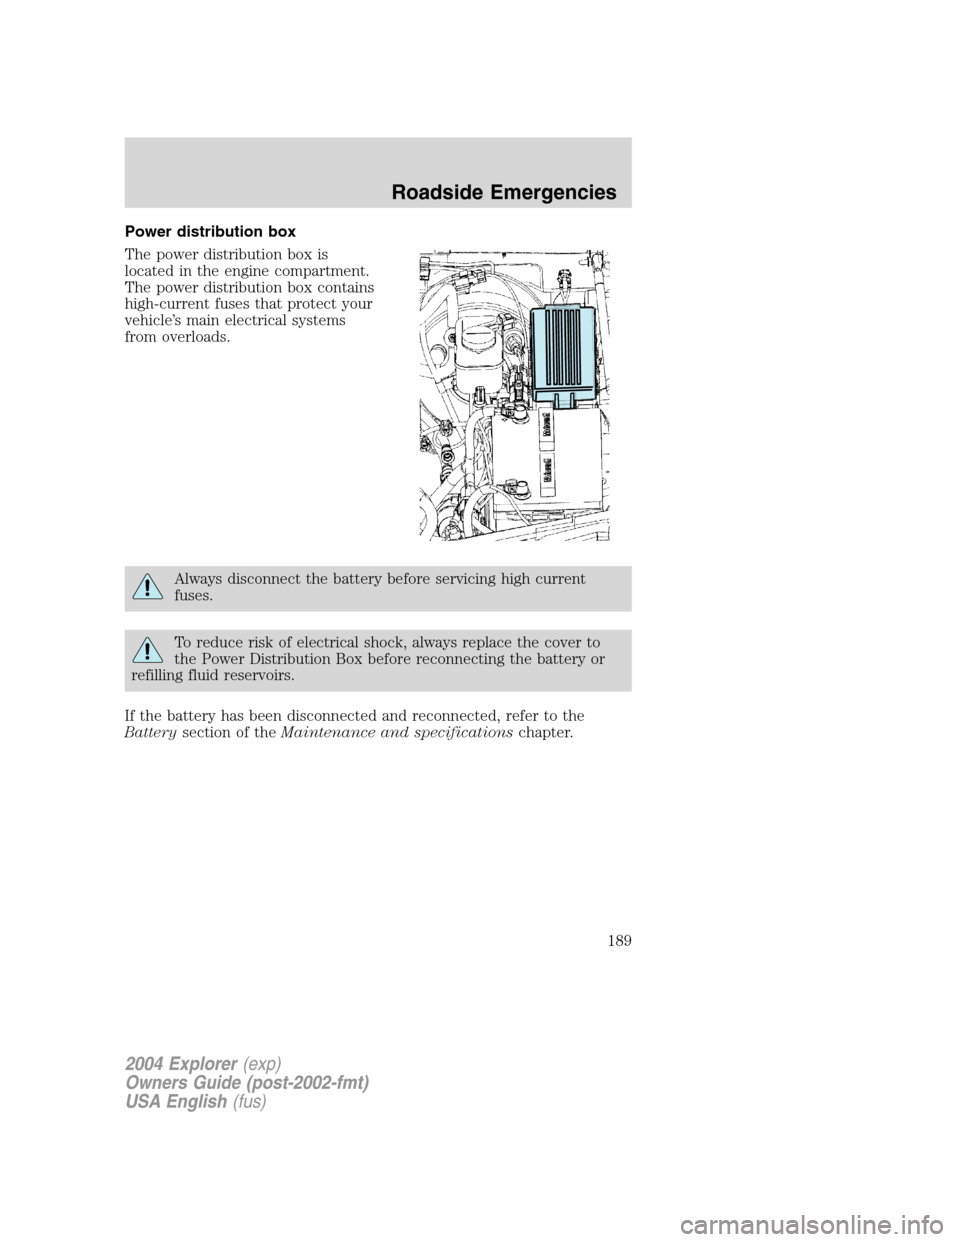
Power distribution box
The power distribution box is
located in the engine compartment.
The power distribution box contains
high-current fuses that protect your
vehicle’s main electrical systems
from overloads.
Always disconnect the battery before servicing high current
fuses.
To reduce risk of electrical shock, always replace the cover to
the Power Distribution Box before reconnecting the battery or
refilling fluid reservoirs.
If the battery has been disconnected and reconnected, refer to the
Batterysection of theMaintenance and specificationschapter.
2004 Explorer(exp)
Owners Guide (post-2002-fmt)
USA English(fus)
Roadside Emergencies
189
Page 191 of 296
Fuse/Relay
LocationFuse Amp
RatingPower Distribution Box
Description
15 15A* Memory (PCM/DEATC/Cluster),
Courtesy lamps
16 15A* Park lamps, Autolamp parklamps,
Front foglamps relay coil
17 5A* Two-speed 4x4 (relay coils)
18 20A* PCM with One-speed
Torque-On-Demand (TOD) or
Two-speed 4x4
19 20A** High beam relay
20 30A** Trailer electric brake module
21 30A** Front wiper motor
22 20A** Low beam, Autolamp
23 30A** Ignition switch
24 — Not used
25 15A* Brake on-off
26 20A* Fuel pump
27 20A* Trailer tow park lamps, Trailer
tow back-up
28 20A* Horn relay
29 60A** PJB #2
30 20A** Rear wiper motor
31 — Not used
32 — Not used
33 30A** Auxiliary blower motor
34 30A** Passenger power seat, Adjustable
pedals (non-memory)
35 — Not used
36 40A** Blower motor
37 15A* A/C clutch relay, Transmission
38 15A* Coil on plug (4.6L engine only),
Ignition coil (4.0L engine only)
39 15A* Injectors, Fuel pump relay coil
40 15A* PCM power
2004 Explorer(exp)
Owners Guide (post-2002-fmt)
USA English(fus)
Roadside Emergencies
191