2004 FORD EXPEDITION rear entertainment
[x] Cancel search: rear entertainmentPage 32 of 344

AUDIO SYSTEM WARRANTY AND SERVICE
Refer to theWarranty Guidefor audio system warranty information. If
service is necessary, see your dealer or qualified technician.
Whenever a warning is received, the radio volume will be lowered
to a volume that will allow the tones to be heard. The radio
volume will return to the previous level after the warning goes
away.
REAR SEAT ENTERTAINMENT DVD SYSTEM (IF EQUIPPED)
Your vehicle may be equipped with a Rear Seat Entertainment DVD
System which allows you to watch DVDs, play music CDs and to plug in
and play video game systems. Please review this material to become
familiar with the system features and safety information.
DVD player controls
1.MAINcontrol
•NEXT—Press to access the next track on the CD, the next chapter
on the DVD, or to go up in cursor mode.
•PREV—Press to access the previous track on the CD, the previous
chapter on the DVD, or to go down in cursor mode.
•REV—Press to reverse in CD and DVD play modes or to move the
cursor left in the menu active mode.
•FWD—Press to advance in CD and DVD play modes or to move the
cursor right in the menu active mode.
2.PLAY/PAUSEcontrol
2004 Expedition(exd)
Owners Guide (post-2002-fmt)
USA English(fus)
Entertainment Systems
32
Page 37 of 344

In stop mode, press to change to a different playing media (e.g. AM, FM,
CD...)
8.VOLUMEcontrol
Press to increase (+) or decrease (-) volume level.
Battery replacement
Batteries are supplied with the
remote control unit. Since all
batteries have a limited shelf life,
replace them when the unit fails to
control the DVD player. There is a
LED indicator light on the remote
control that will illuminate when any
control is pressed.
Slide the battery cover off as shown on the remote control to access the
batteries.
The remote control unit uses two AAA batteries.
Parental control
To enable or disable your Rear Seat
Entertainment DVD System,
simultaneously press the memory
preset controls 3 and 5 on the radio face.
For further information about the Rear Seat Controls, refer toRear Seat
Controlssection in this chapter.
Wireless headphones
Your system is equipped with 2 sets
of wireless headphones. (Two AAA
batteries are needed to operate the
headphones.) Batteries are included.
2004 Expedition(exd)
Owners Guide (post-2002-fmt)
USA English(fus)
Entertainment Systems
37
Page 38 of 344
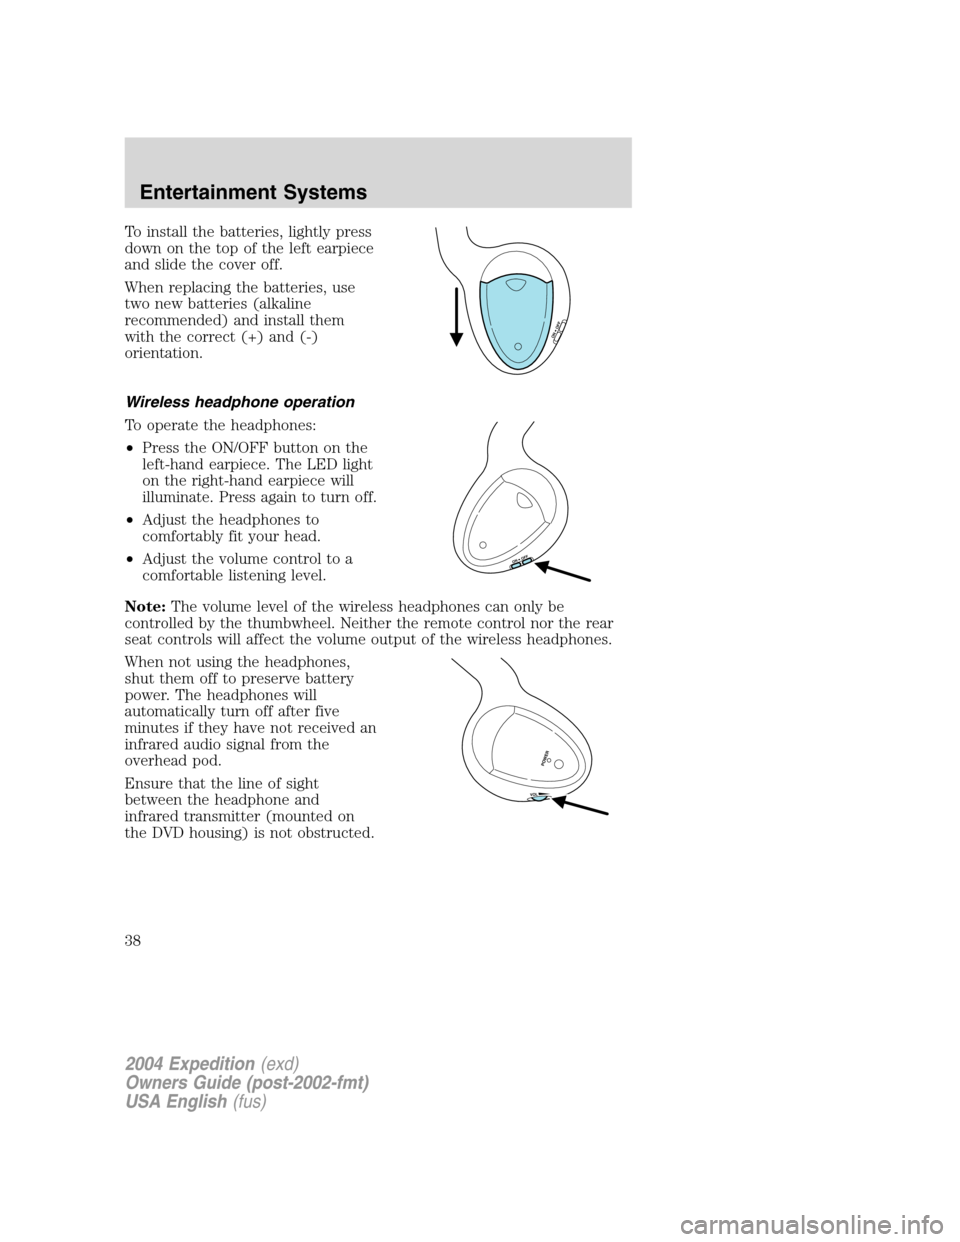
To install the batteries, lightly press
down on the top of the left earpiece
and slide the cover off.
When replacing the batteries, use
two new batteries (alkaline
recommended) and install them
with the correct (+) and (-)
orientation.
Wireless headphone operation
To operate the headphones:
•Press the ON/OFF button on the
left-hand earpiece. The LED light
on the right-hand earpiece will
illuminate. Press again to turn off.
•Adjust the headphones to
comfortably fit your head.
•Adjust the volume control to a
comfortable listening level.
Note:The volume level of the wireless headphones can only be
controlled by the thumbwheel. Neither the remote control nor the rear
seat controls will affect the volume output of the wireless headphones.
When not using the headphones,
shut them off to preserve battery
power. The headphones will
automatically turn off after five
minutes if they have not received an
infrared audio signal from the
overhead pod.
Ensure that the line of sight
between the headphone and
infrared transmitter (mounted on
the DVD housing) is not obstructed.
ON OFF
ON OFF
VOL
POWER
2004 Expedition(exd)
Owners Guide (post-2002-fmt)
USA English(fus)
Entertainment Systems
38
Page 39 of 344
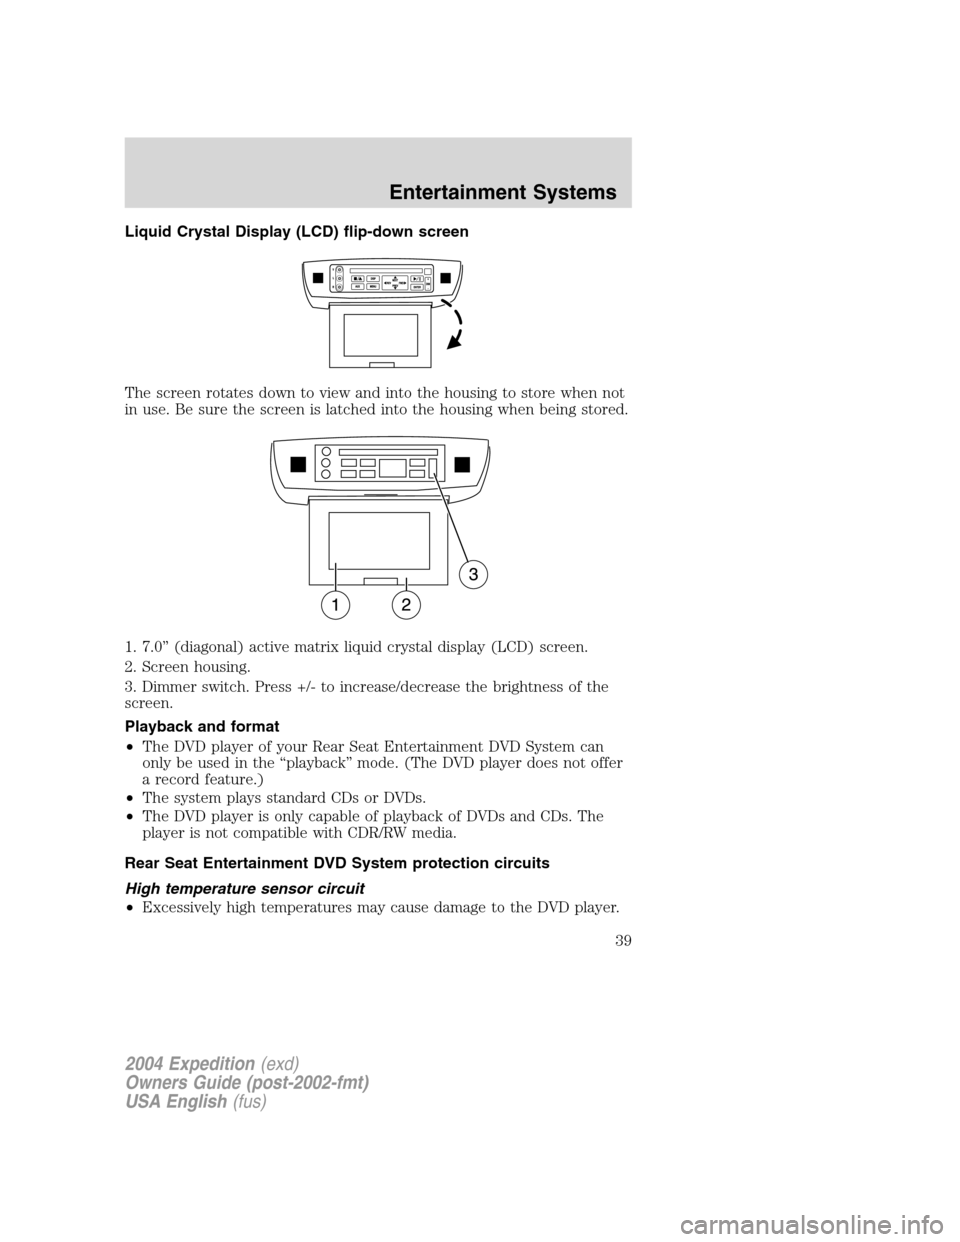
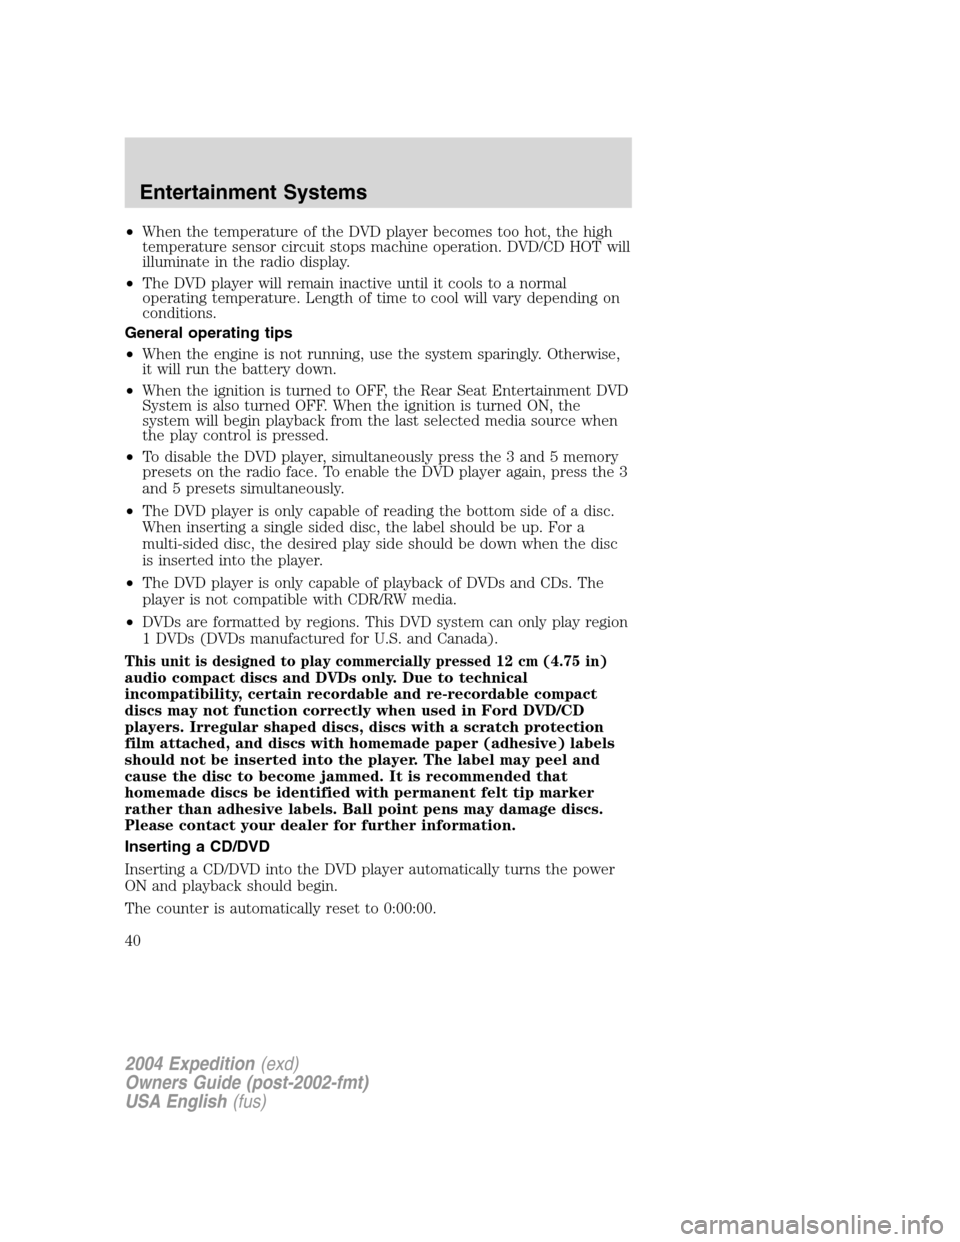
Liquid Crystal Display (LCD) flip-down screen
The screen rotates down to view and into the housing to store when not
in use. Be sure the screen is latched into the housing when being stored.
1. 7.0”(diagonal) active matrix liquid crystal display (LCD) screen.
2. Screen housing.
3. Dimmer switch. Press +/- to increase/decrease the brightness of the
screen.
Playback and format
•The DVD player of your Rear Seat Entertainment DVD System can
only be used in the“playback”mode. (The DVD player does not offer
a record feature.)
•The system plays standard CDs or DVDs.
•The DVD player is only capable of playback of DVDs and CDs. The
player is not compatible with CDR/RW media.
Rear Seat Entertainment DVD System protection circuits
High temperature sensor circuit
•Excessively high temperatures may cause damage to the DVD player.
2004 Expedition(exd)
Owners Guide (post-2002-fmt)
USA English(fus)
Entertainment Systems
39
Page 40 of 344
•When the temperature of the DVD player becomes too hot, the high
temperature sensor circuit stops machine operation. DVD/CD HOT will
illuminate in the radio display.
•The DVD player will remain inactive until it cools to a normal
operating temperature. Length of time to cool will vary depending on
conditions.
General operating tips
•When the engine is not running, use the system sparingly. Otherwise,
it will run the battery down.
•When the ignition is turned to OFF, the Rear Seat Entertainment DVD
System is also turned OFF. When the ignition is turned ON, the
system will begin playback from the last selected media source when
the play control is pressed.
•To disable the DVD player, simultaneously press the 3 and 5 memory
presets on the radio face. To enable the DVD player again, press the 3
and 5 presets simultaneously.
•The DVD player is only capable of reading the bottom side of a disc.
When inserting a single sided disc, the label should be up. For a
multi-sided disc, the desired play side should be down when the disc
is inserted into the player.
•The DVD player is only capable of playback of DVDs and CDs. The
player is not compatible with CDR/RW media.
•DVDs are formatted by regions. This DVD system can only play region
1 DVDs (DVDs manufactured for U.S. and Canada).
This unit is designed to play commercially pressed 12 cm (4.75 in)
audio compact discs and DVDs only. Due to technical
incompatibility, certain recordable and re-recordable compact
discs may not function correctly when used in Ford DVD/CD
players. Irregular shaped discs, discs with a scratch protection
film attached, and discs with homemade paper (adhesive) labels
should not be inserted into the player. The label may peel and
cause the disc to become jammed. It is recommended that
homemade discs be identified with permanent felt tip marker
rather than adhesive labels. Ball point pens may damage discs.
Please contact your dealer for further information.
Inserting a CD/DVD
Inserting a CD/DVD into the DVD player automatically turns the power
ON and playback should begin.
The counter is automatically reset to 0:00:00.
2004 Expedition(exd)
Owners Guide (post-2002-fmt)
USA English(fus)
Entertainment Systems
40
Page 42 of 344
4. DVD/ CD STATUS (PLAY/FF/REW/PAUSE)
5. AUDIO OUTPUT (not changeable)
6. Subtitles (specific language type - English or Spanish, dependent on
disc capability and ON/OFF selection.)
7. Camera angle (of picture) - Adjustable with cursor controls and
ENTER control.
Safety information
Read all of the safety and operating instructions before operating the
system and retain for future reference.
Do not attempt to service, repair or modify the Rear Seat Entertainment
DVD System. See your Ford or Lincoln Mercury dealer.
Do not insert foreign objects into the DVD compartment.
The front glass on the liquid crystal display (LCD) flip-down
screen may break when hit with a hard surface. If the glass
breaks, do not touch the liquid crystalline material. In case of contact
with skin, wash immediately with soap and water.
Do not expose the liquid crystal display (LCD) flip-down screen
to direct sunlight or intensive ultraviolet rays for extensive
periods of time. Ultraviolet rays deteriorate the liquid crystal.
Be sure to review User Manuals for video games and video game
equipment when used as auxiliary inputs for your Rear Seat
Entertainment DVD System.
Do not operate video games or video equipment if the power cords
and/or cables are broken, split or damaged. Carefully place cords and/or
cables where they will not be stepped on or interfere with the operation
of seats and/or compartments.
Disconnect video games and video equipment power cords and/or cables
when not in use.
Avoid touching auxiliary input jacks with your fingers. Do not blow on
them or allow them to get wet or dirty.
Do not clean any part of the DVD player with benzene, paint thinner or
any other solvent.
Whenever a warning is received, the radio volume will be lowered
to a volume that will allow the tones to be heard. The radio
volume will return to the previous level after the warning goes
away.
2004 Expedition(exd)
Owners Guide (post-2002-fmt)
USA English(fus)
Entertainment Systems
42
Page 47 of 344
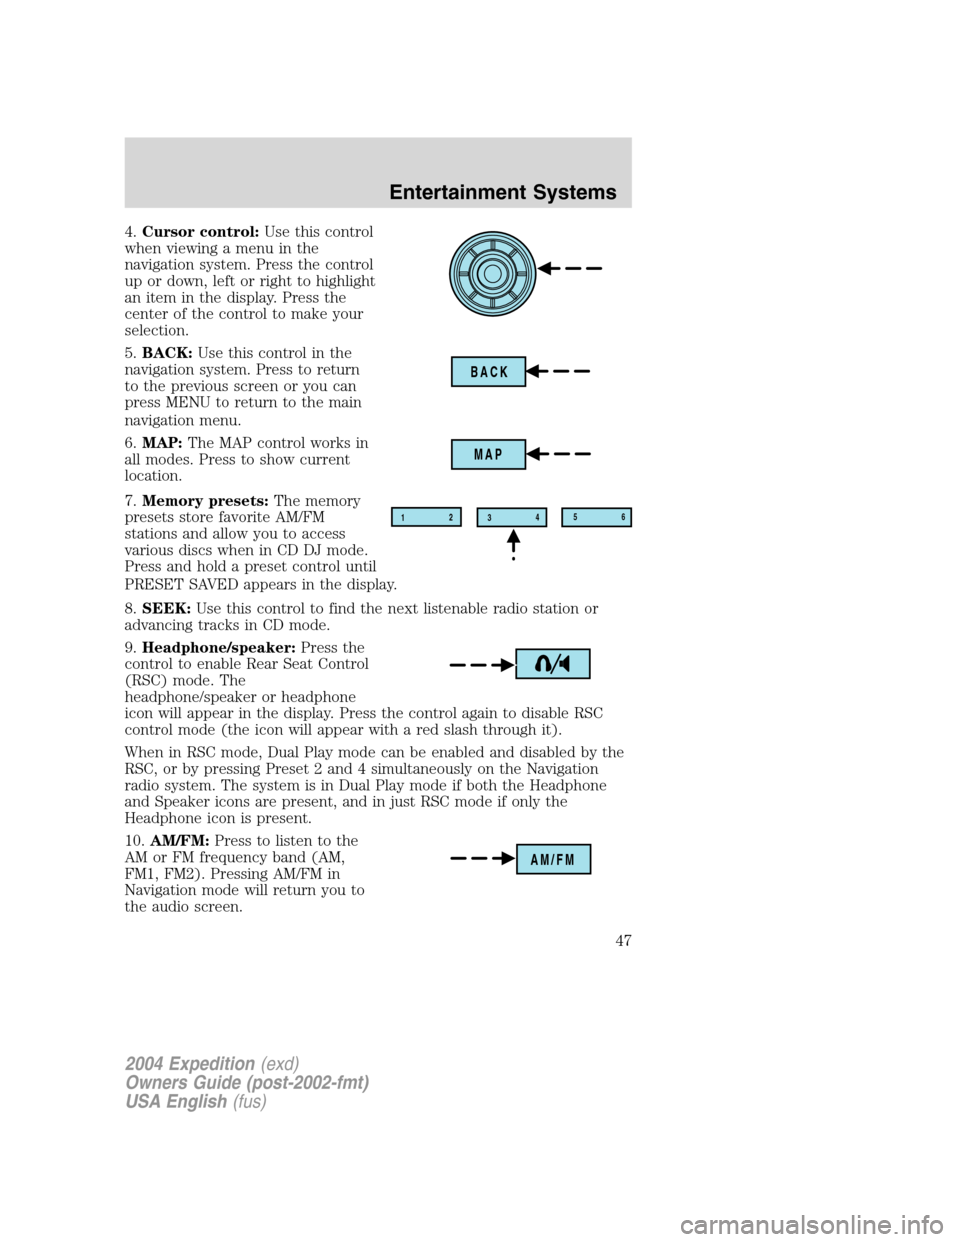
4.Cursor control:Use this control
when viewing a menu in the
navigation system. Press the control
up or down, left or right to highlight
an item in the display. Press the
center of the control to make your
selection.
5.BACK:Use this control in the
navigation system. Press to return
to the previous screen or you can
press MENU to return to the main
navigation menu.
6.MAP:The MAP control works in
all modes. Press to show current
location.
7.Memory presets:The memory
presets store favorite AM/FM
stations and allow you to access
various discs when in CD DJ mode.
Press and hold a preset control until
PRESET SAVED appears in the display.
8.SEEK:Use this control to find the next listenable radio station or
advancing tracks in CD mode.
9.Headphone/speaker:Press the
control to enable Rear Seat Control
(RSC) mode. The
headphone/speaker or headphone
icon will appear in the display. Press the control again to disable RSC
control mode (the icon will appear with a red slash through it).
When in RSC mode, Dual Play mode can be enabled and disabled by the
RSC, or by pressing Preset 2 and 4 simultaneously on the Navigation
radio system. The system is in Dual Play mode if both the Headphone
and Speaker icons are present, and in just RSC mode if only the
Headphone icon is present.
10.AM/FM:Press to listen to the
AM or FM frequency band (AM,
FM1, FM2). Pressing AM/FM in
Navigation mode will return you to
the audio screen.
BACK
MAP
12
3456
AM/FM
2004 Expedition(exd)
Owners Guide (post-2002-fmt)
USA English(fus)
Entertainment Systems
47
Page 52 of 344
AM/FM select
The AM/FM control works in radio,
CD and navigation modes.
AM/FM select in radio mode
This control allows you to select AM or FM frequency bands. Press the
control to switch between AM, FM1 or FM2 memory preset stations.
AM/FM select in CD mode
Press to stop CD play and begin radio play.
Radio reception factors:
•Distance/strength.The further an FM signal travels, the weaker it is.
The listenable range of the average FM station is approximately 40 km
(24 miles). This range can be affected by“signal modulation.”Signal
modulation is a process radio stations use to increase their
strength/volume relative to other stations.
•Terrain.Hills, mountains and tall buildings between your vehicle’s
antenna and the radio station signal can cause FM reception problems.
Static can be caused on AM stations by power lines, electric fences,
traffic lights and thunderstorms. Moving away from an interfering
structure (out of its“shadow”) returns your reception to normal.
•Station overload.Weak signals are sometimes captured by stronger
signals when you pass a broadcast tower. A stronger signal may
temporarily overtake a weaker signal and play while the weak station
frequency is displayed.
AM/FM select in navigation mode
Press once when in navigation mode to return to the audio screen (while
the navigation function continues to work in the background). Press
again to enter AM/FM mode where you are able to make frequency band
adjustments.
CD select
To begin CD play (if a CD is already
loaded), press the CD control. The
first track of the disc will begin
playing. After that, CD play will
begin where it stopped last. Press the CD control again to toggle
between CD, CD DJ, DVD/Video (or DVD/Aux Mode), if equipped with
DVD Rear seat entertainment system.
AM/FM
2004 Expedition(exd)
Owners Guide (post-2002-fmt)
USA English(fus)
Entertainment Systems
52