2004 FORD EXPEDITION change wheel
[x] Cancel search: change wheelPage 226 of 344
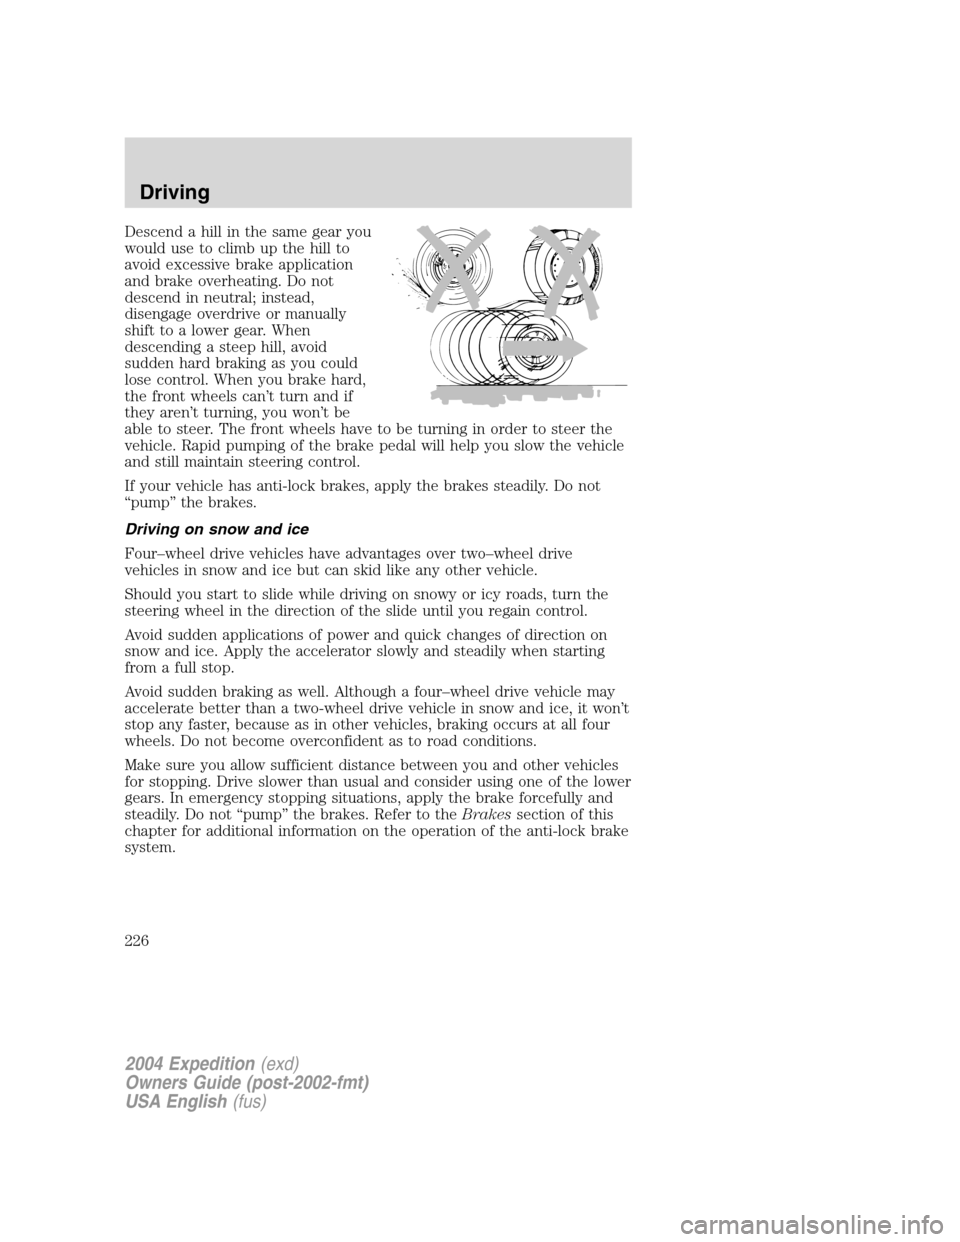
Descend a hill in the same gear you
would use to climb up the hill to
avoid excessive brake application
and brake overheating. Do not
descend in neutral; instead,
disengage overdrive or manually
shift to a lower gear. When
descending a steep hill, avoid
sudden hard braking as you could
lose control. When you brake hard,
the front wheels can’t turn and if
they aren’t turning, you won’tbe
able to steer. The front wheels have to be turning in order to steer the
vehicle. Rapid pumping of the brake pedal will help you slow the vehicle
and still maintain steering control.
If your vehicle has anti-lock brakes, apply the brakes steadily. Do not
“pump”the brakes.
Driving on snow and ice
Four–wheel drive vehicles have advantages over two–wheel drive
vehicles in snow and ice but can skid like any other vehicle.
Should you start to slide while driving on snowy or icy roads, turn the
steering wheel in the direction of the slide until you regain control.
Avoid sudden applications of power and quick changes of direction on
snow and ice. Apply the accelerator slowly and steadily when starting
from a full stop.
Avoid sudden braking as well. Although a four–wheel drive vehicle may
accelerate better than a two-wheel drive vehicle in snow and ice, it won’t
stop any faster, because as in other vehicles, braking occurs at all four
wheels. Do not become overconfident as to road conditions.
Make sure you allow sufficient distance between you and other vehicles
for stopping. Drive slower than usual and consider using one of the lower
gears. In emergency stopping situations, apply the brake forcefully and
steadily. Do not“pump”the brakes. Refer to theBrakessection of this
chapter for additional information on the operation of the anti-lock brake
system.
2004 Expedition(exd)
Owners Guide (post-2002-fmt)
USA English(fus)
Driving
226
Page 237 of 344
•Vehicles with trailers should not be parked on a grade. If you must
park on a grade, place wheel chocks under the trailer’s wheels.
Launching or retrieving a boat
Disconnect the wiring to the trailer before backing the trailer
into the water. Reconnect the wiring to the trailer after the
trailer is removed from the water.
When backing down a ramp during boat launching or retrieval:
•do not allow the static water level to rise above the bottom edge of
the rear bumper.
•do not allow waves to break higher than 15 cm (6 inches) above the
bottom edge of the rear bumper.
Exceeding these limits may allow water to enter vehicle components:
•causing internal damage to the components.
•affecting driveability, emissions and reliability.
Replace the rear axle lubricant any time the axle has been submerged in
water. Rear axle lubricant quantities are not to be checked or changed
unless a leak is suspected or repair required.
RECREATIONAL TOWING (ALL WHEELS ON THE GROUND)
An example of recreational towing would be towing your vehicle behind
a motorhome. Follow these guidelines if you have the need for
recreational towing your vehicle with all four wheels on the ground.
These guidelines are designed to ensure that your transmission is not
damaged.
2WD vehicles (with automatic transmissions):
•Place the transmission in N (Neutral)
•Maximum speed is 56 km (35 mph)
•Maximum distance is 80 km (50 miles)
If a distance of 80 km (50 miles) or a speed of 56 km (35 mph) must be
exceeded, the drive shaft will have to be removed before the vehicle is
towed.
Ford recommends the driveshaft be removed/installed only by a qualified
technician. See your local dealer for driveshaft removal/installation.
Improper removal/installation of the driveshaft can cause
transmission fluid loss, damage to the driveshaft and internal
transmission components.
2004 Expedition(exd)
Owners Guide (post-2002-fmt)
USA English(fus)
Driving
237
Page 254 of 344
3. Unsnap the wheel lug nut wrench, jack extension and handle from the
plastic tray. Remove the jack and instruction sheet from the tray
assembly.
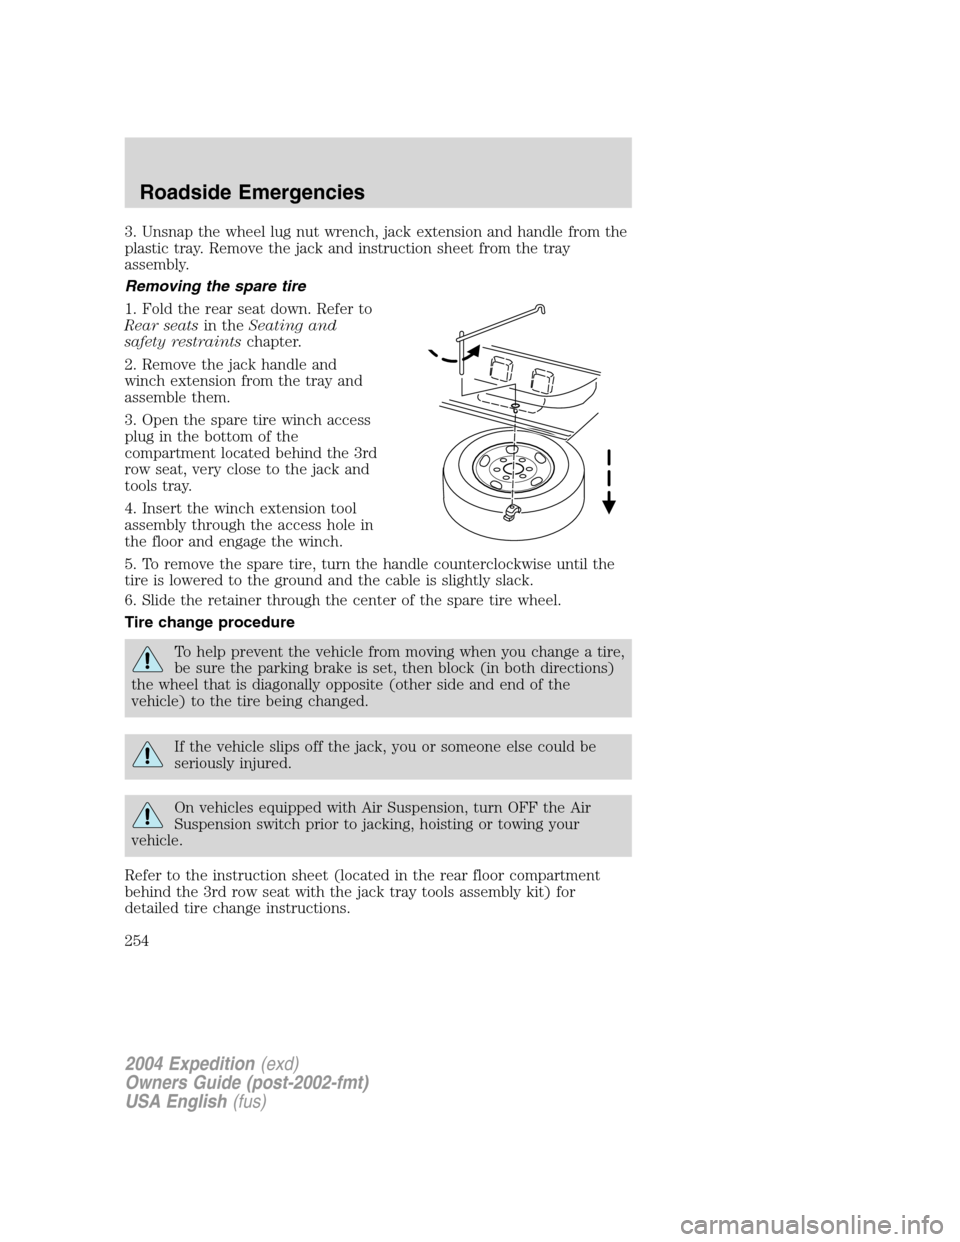
Removing the spare tire
1. Fold the rear seat down. Refer to
Rear seatsin theSeating and
safety restraintschapter.
2. Remove the jack handle and
winch extension from the tray and
assemble them.
3. Open the spare tire winch access
plug in the bottom of the
compartment located behind the 3rd
row seat, very close to the jack and
tools tray.
4. Insert the winch extension tool
assembly through the access hole in
the floor and engage the winch.
5. To remove the spare tire, turn the handle counterclockwise until the
tire is lowered to the ground and the cable is slightly slack.
6. Slide the retainer through the center of the spare tire wheel.
Tire change procedure
To help prevent the vehicle from moving when you change a tire,
be sure the parking brake is set, then block (in both directions)
the wheel that is diagonally opposite (other side and end of the
vehicle) to the tire being changed.
If the vehicle slips off the jack, you or someone else could be
seriously injured.
On vehicles equipped with Air Suspension, turn OFF the Air
Suspension switch prior to jacking, hoisting or towing your
vehicle.
Refer to the instruction sheet (located in the rear floor compartment
behind the 3rd row seat with the jack tray tools assembly kit) for
detailed tire change instructions.
2004 Expedition(exd)
Owners Guide (post-2002-fmt)
USA English(fus)
Roadside Emergencies
254
Page 256 of 344
When one of the rear wheels is off the ground, the transmission
alone will not prevent the vehicle from moving or slipping off the
jack, even if the transmission is in P (Park). To prevent the vehicle
from moving when you change the tire, be sure that the parking brake
is set and the diagonally opposite wheel is blocked. If the vehicle slips
off the jack, someone could be seriously injured.
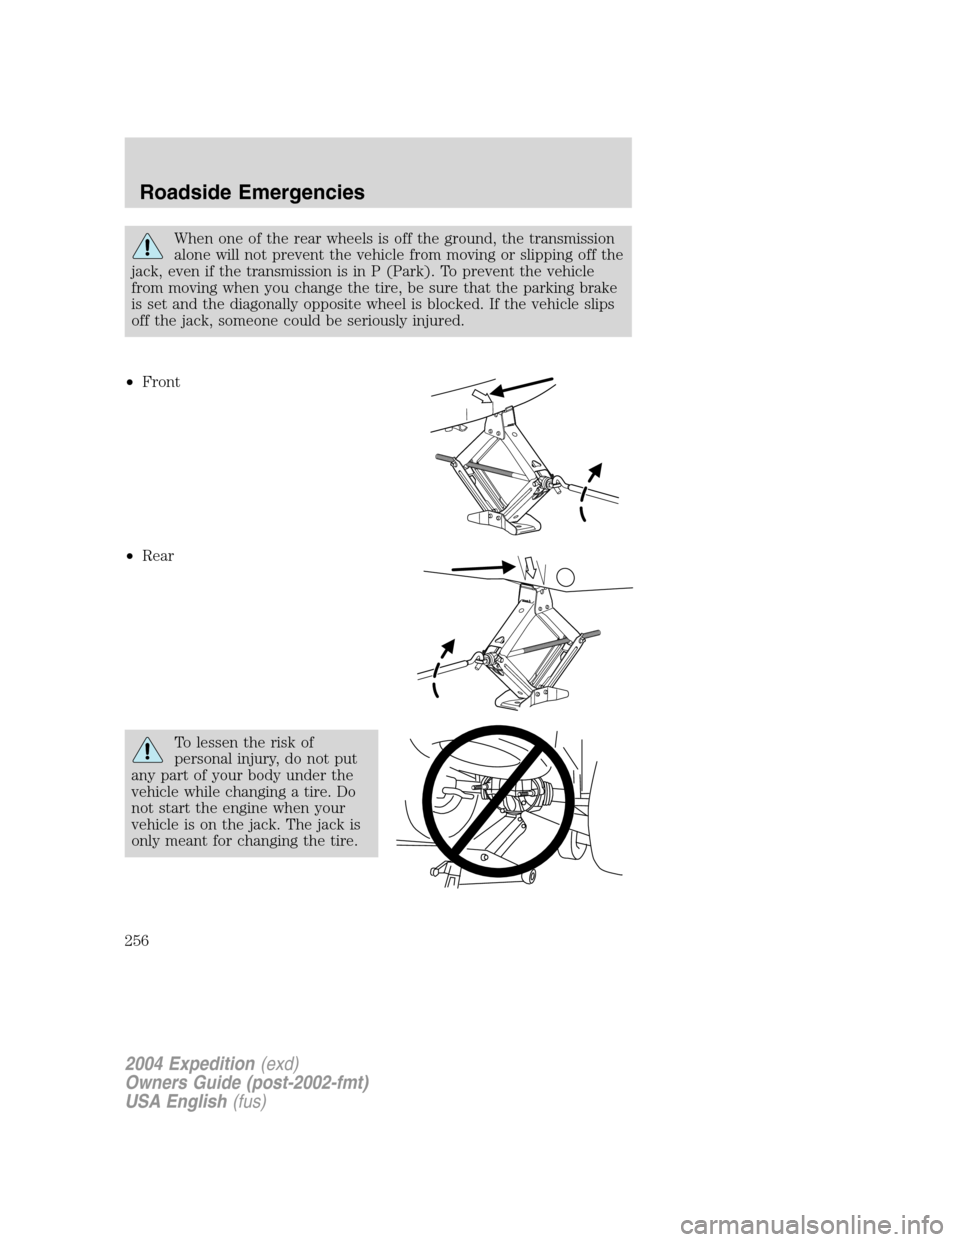
•Front
•Rear
To lessen the risk of
personal injury, do not put
any part of your body under the
vehicle while changing a tire. Do
not start the engine when your
vehicle is on the jack. The jack is
only meant for changing the tire.
2004 Expedition(exd)
Owners Guide (post-2002-fmt)
USA English(fus)
Roadside Emergencies
256
Page 314 of 344
3.65:Indicates the aspect ratio which gives the tire’s ratio of height to
width.
4.R:Indicates a“radial”type tire.
5.15:Indicates the wheel or rim diameter in inches. If you change your
wheel size, you will have to purchase new tires to match the new wheel
diameter.
6.95:Indicates the tire’s load index. It is an index that relates to how
much weight a tire can carry. You may find this information in your
owner’s guide. If not, contact a local tire dealer.
Note:You may not find this information on all tires because it is not
required by federal law.
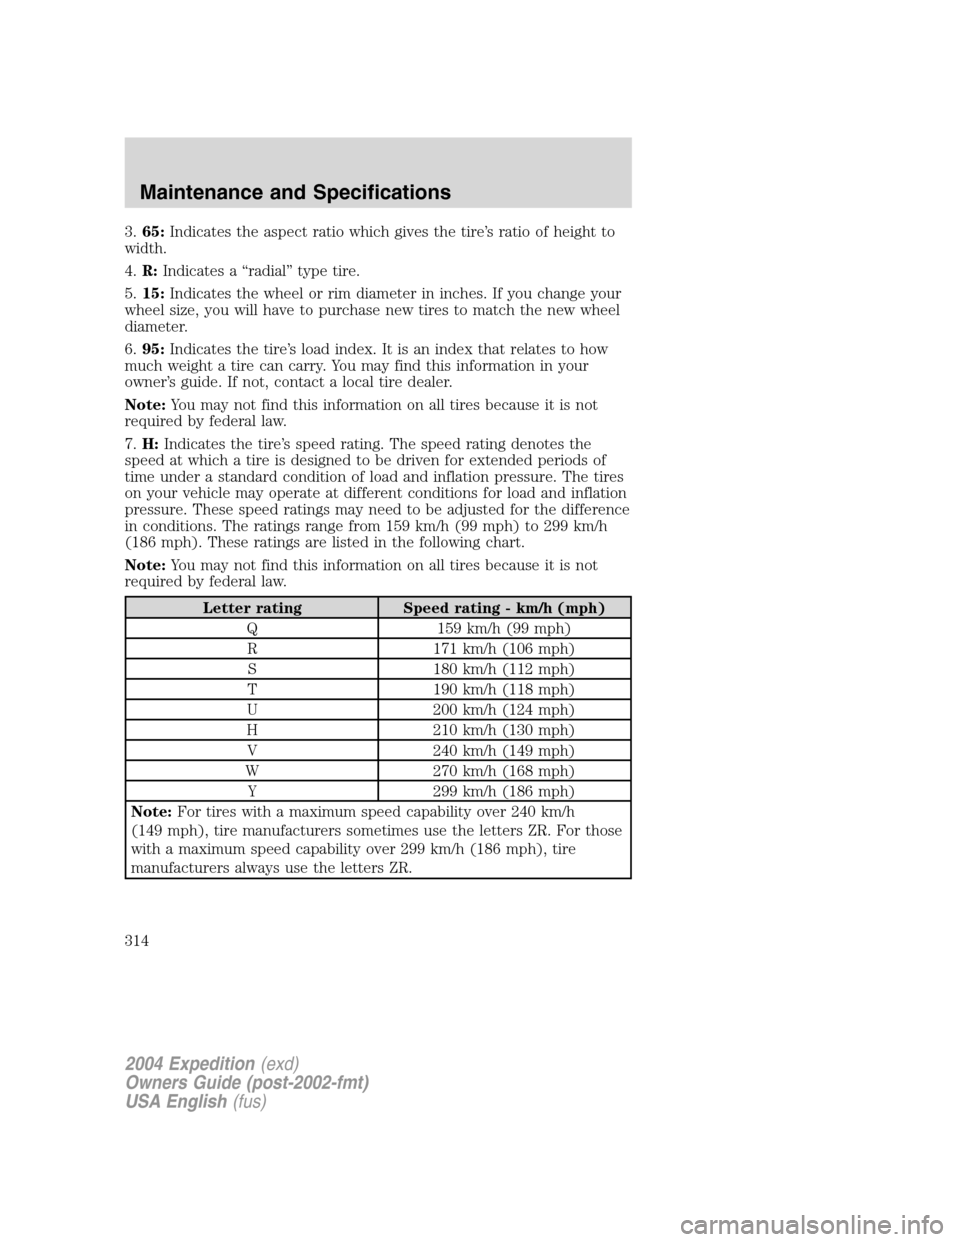
7.H:Indicates the tire’s speed rating. The speed rating denotes the
speed at which a tire is designed to be driven for extended periods of
time under a standard condition of load and inflation pressure. The tires
on your vehicle may operate at different conditions for load and inflation
pressure. These speed ratings may need to be adjusted for the difference
in conditions. The ratings range from 159 km/h (99 mph) to 299 km/h
(186 mph). These ratings are listed in the following chart.
Note:You may not find this information on all tires because it is not
required by federal law.
Letter rating Speed rating - km/h (mph)
Q 159 km/h (99 mph)
R 171 km/h (106 mph)
S 180 km/h (112 mph)
T 190 km/h (118 mph)
U 200 km/h (124 mph)
H 210 km/h (130 mph)
V 240 km/h (149 mph)
W 270 km/h (168 mph)
Y 299 km/h (186 mph)
Note:For tires with a maximum speed capability over 240 km/h
(149 mph), tire manufacturers sometimes use the letters ZR. For those
with a maximum speed capability over 299 km/h (186 mph), tire
manufacturers always use the letters ZR.
2004 Expedition(exd)
Owners Guide (post-2002-fmt)
USA English(fus)
Maintenance and Specifications
314
Page 317 of 344

Information on“T”type tires
T145/80D16 is an example of a tire
size.
Note:The temporary tire size for
your vehicle may be different than
this example.
1.T:Indicates a type of tire,
designated by the Tire and Rim
Association (T&RA), that is
intended for temporary service on
cars, SUVs, minivans and light
trucks.
2.145:Indicates the nominal width
of the tire in millimeters from
sidewall edge to sidewall edge. In
general, the larger the number, the
wider the tire.
3.80:Indicates the aspect ratio
which gives the tires ratio of height to width. Numbers of 70 or lower
indicate a short sidewall.
4.D:Indicates a“diagonal”type tire.
R:Indicates a“radial”type tire.
5.16:Indicates the wheel or rim diameter in inches. If you change your
wheel size, you will have to purchase new tires to match the new wheel
diameter.
Location of the tire label
You will find a tire label containing tire inflation pressure by tire size and
other important information located on the B-Pillar or the driver’s door.
TIRE CARE
Improper or inadequate vehicle maintenance can also cause tires to wear
abnormally. Here are some of the important maintenance items
Tire inflation pressure
Use a tire gauge to check the tire inflation pressure, including the spare,
at least monthly and before long trips. You are strongly urged to buy a
reliable tire pressure gauge, as automatic service station gauges may be
inaccurate.
SPARETIRE
TEMPORARYUSEONLY
INFLATETO60P.S.I.T
T145/80D16105M
2004 Expedition(exd)
Owners Guide (post-2002-fmt)
USA English(fus)
Maintenance and Specifications
317
Page 324 of 344

Changing tires with TPMS
It is recommended that you always
have your tires serviced by a dealer
or qualified technician.Each road
tire is equipped with a tire
pressure sensor mounted on the
wheel inside the tire connected
to the valve stem. The tire
pressure sensor must be unbolted from the wheel prior to tire
removal. The sensor can be removed by loosening the nut at the
valve stem. Failure to remove the sensor may damage it.The
rubber grommet (washer) between the wheel and the tire pressure
sensor needs to be replaced when any tire is changed to minimize air
leaks.
The tire pressure should be checked periodically (at least monthly) using
a tire gauge, refer toChecking the tire pressurein this chapter.
SNOW TIRES AND CHAINS
Snow tires must be the same size and grade as the tires you
currently have on your vehicle.
The tires on your vehicle have all weather treads to provide traction in
rain and snow. However, in some climates, you may need to use snow
tires and chains.
Follow these guidelines when using snow tires and chains:
•Use only cable type chains or chains offered by Ford as an accessory
or equivalent. Other conventional link type chains may contact and
cause damage to the vehicle’s wheel house and/or body.
•Do not install chains on the front wheels. Chains on the front wheels
may interfere with suspension components.
•Install chains securely, verifying that the chains do not touch any
wiring, brake lines or fuel lines.
•Drive cautiously. If you hear the chains rub or bang against your
vehicle, stop and re-tighten the chains. If this does not work, remove
the chains to prevent damage to your vehicle.
•If possible, avoid fully loading your vehicle.
•Remove the tire chains when they are no longer needed. Do not use
tire chains on dry roads.
2004 Expedition(exd)
Owners Guide (post-2002-fmt)
USA English(fus)
Maintenance and Specifications
324
Page 340 of 344
waxing .....................................275
wheels ......................................276
wiper blades ............................278
Compass, electronic ..................117
calibration ...............................118
set zone adjustment .......118, 120
Console ......................................129
overhead ..........................101–103
Controls
power seat ...............................147
steering column ......................111
Coolant
checking and adding ..............290
refill capacities ................294, 325
specifications ..................328, 331
Cruise control
(see Speed control) ..................108
Customer Assistance ................239
Ford accessories
for your vehicle ......................279
Ford Extended Service Plan .268
Getting assistance outside
the U.S. and Canada ..............272
Getting roadside assistance ...239
Getting the service
you need .................................266
Ordering additional
owner’s literature ...................273
The Dispute Settlement
Board .......................................268
Utilizing the Mediation/
Arbitration Program ...............271
D
Daytime running lamps
(see Lamps) ................................88
Defrost
rear window ..............................86Dipstickautomatic transmission fluid....307
engine oil .................................285
Doors
lubricant specifications ..........328
Driveline universal joint
and slip yoke .............................309
Driving under special
conditions ..................214, 222, 225
sand .........................................224
snow and ice ...........................226
through water .................224, 228
E
Electronic message center .......119
Emergencies, roadside
jump-starting ..........................258
Emission control system ..........304
Engine ........................................331
cleaning ...................................276
coolant .....................................290
fail-safe coolant ......................295
idle speed control ...................288
lubrication specifications ......328,
331
refill capacities ........................325
service points ..................283–284
starting after a collision .........240
Engine block heater .................200
Engine oil ..................................285
change oil soon warning,
message center .......................285
checking and adding ..............285
dipstick ....................................285
filter, specifications ........287, 325
recommendations ...................287
refill capacities ........................325
specifications ..................328, 331
Exhaust fumes ..........................200
2004 Expedition(exd)
Owners Guide (post-2002-fmt)
USA English(fus)
Index
340