Page 81 of 272

Windshield wiper blades
Check the wiper blades for wear at least twice a year or when they seem
less effective. Substances such as tree sap and some hot wax treatments
used by commercial car washes reduce the effectiveness of wiper blades.
Checking the wiper blades
If the wiper blades do not wipe properly, clean both the windshield and
wiper blades using undiluted windshield wiper solution or a mild
detergent. Rinse thoroughly with clean water. To avoid damaging the
blades, do not use fuel, kerosene, paint thinner or other solvents.
Changing the wiper blades
To replace the wiper blades:
1. Pull the wiper arm away from the
windshield and lock into the service
position.
2. Turn the blade at an angle from
the wiper arm. Push the lock pin
manually to release the blade and
pull the wiper blade down toward
the windshield to remove it from the
arm.
3. Attach the new wiper to the
wiper arm and press it into place
until a click is heard.
Rear window wiper blade
Refer toWindshield wiper bladesin this section for more information
on rear wiper blades.
Driver Controls
81
Page 82 of 272
TILT STEERING WHEEL
Pull the tilt steering control toward
you to move the steering wheel up
or down. Hold the control while
adjusting the wheel to the desired
position, then release the control to
lock the steering wheel in position.
Never adjust the steering wheel when the vehicle is moving.
ILLUMINATED VISOR MIRROR
Lift the mirror cover to turn on the
visor mirror lamps.
OVERHEAD CONSOLE
The appearance of your vehicle’s overhead console will vary according to
your option package.
Driver Controls
82
Page 83 of 272

Forward storage bin (if equipped)
Press the release control to open
the storage compartment. The door
will open slightly and can be moved
to full open.
The storage compartment may be
used to secure sunglasses or a
similar object.
Installing a garage door opener (if equipped)
The storage compartment can be converted to accommodate a variety of
aftermarket garage door openers:
•Place Velcro hook onto back side
of aftermarket transmitter
opposite of actuator control.
•Place transmitter into storage
compartment, control down.
•Place the provided height
adaptors onto the back of the
storage bin door as needed.
•Press the storage compartment door to activate the transmitter.
Power quarter rear windows (if equipped)
Press the
portion of the VENT
control to open the power rear
quarter windows.
Press the
portion of the VENT
control to close the power rear
quarter windows.
AUXILIARY POWER POINT
Power outlets are designed for accessory plugs only. Do not hang
any type of accessory or accessory bracket from the plug.
Improper use of the power outlet can cause damage not covered
by your warranty.
RESET
VENTVENT
MODE E/M
Driver Controls
83
Page 84 of 272
The power point is an additional power source for electrical accessories.
Do not plug optional electrical accessories into the cigarette lighter. Use
the powerpoint.
The maximum current draw of any single power point is 20 Amps.
Exceeding this limit may result in a blown fuse.
There are up to four auxiliary power points in the following locations:
•Located on the instrument panel.
•Located on the back side of the
center console (Accessible from
the second row seats).
•Located in the left side storage
compartment in the third row
seating position.
POWER POINT
Driver Controls
84
Page 85 of 272
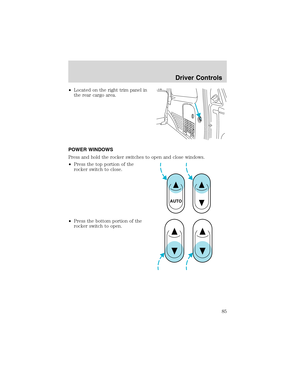
•Located on the right trim panel in
the rear cargo area.
POWER WINDOWS
Press and hold the rocker switches to open and close windows.
•Press the top portion of the
rocker switch to close.
•Press the bottom portion of the
rocker switch to open.
AUTO
Driver Controls
85
Page 86 of 272

Express down
•Press AUTO completely down and
release quickly. The driver’s
window will open fully. Depress
again to stop window operation.
One touch down can be deactivated
during operation by pushing down
on the top part of the driver power
window control.
Window lock
The window lock feature allows only
the driver to operate the power
windows.
To lock out all the window controls
except for the driver’s press the left
side of the control. Press the right
side to restore the window controls.
Accessory delay (if equipped)
With accessory delay, the window switches may be used for up to ten
minutes after the ignition switch is turned to the OFF position or until
any door is opened.
MIRRORS
Automatic dimming inside rear view mirror (if equipped)
Your vehicle is equipped with inside rear view mirror with an
auto-dimming function. The electronic day/night mirror will change from
the normal state to the non-glare state when bright lights (glare) reach
the mirror. When the mirror detects bright light from front or behind, it
will automatically adjust to minimize glare.
AUTO
Driver Controls
86
Page 87 of 272
Press the control located on the
bottom of the mirror to turn the
mirror on or off. The mirror will
automatically return to the normal
state whenever the vehicle is placed
in R (reverse)(when the mirror is
on) to ensure a bright clear view
when backing up.
Do not clean the housing or glass of
any mirror with harsh abrasives, fuel
or other petroleum-based cleaning
products.
Power side view mirrors (if equipped)
The ignition can be in any position to adjust the power side view mirrors.
To adjust your mirrors:
1. Select L to adjust the left mirror
or R to adjust the right mirror.
2. Move the control in the direction
you wish to tilt the mirror.
3. Return to the center position to lock mirrors in place.
4. Adjust spotter mirrors (if equipped) manually.
MIRRORS
L R
MIRRORS
L R
Driver Controls
87
Page 88 of 272
Heated outside mirrorsR(if equipped)
Both mirrors are heated
automatically to remove ice, mist
and fog when the rear window
defrost is activated.
Do not remove ice from the
mirrors with a scraper or
attempt to readjust the mirror
glass if it is frozen in place.
These actions could cause damage to the glass and mirrors.
Signal mirrors (if equipped)
When the turn signal is activated,
the appropriate mirror will show a
blinking red arrow.
The arrow provides an additional
warning to other drivers that your
vehicle is about to turn. Driver and
passengers seated inside the vehicle
cannot see the arrow.
Fold-away mirrors
Fold the side mirrors in carefully when driving through a narrow space,
like an automatic car wash.
The telescoping feature (if equipped) allows the mirror to extend
approximately 76 mm (3 inches).
Driver Controls
88