2004 FIAT STILO phone
[x] Cancel search: phonePage 77 of 166

CONNECT Nav+
76
“Add” icon key
“Add” icon enables to add a new en-
try to the directory.
Rotate the encoder 14-fig. 1, select
“Add” icon and press “ENTER” to
confirm 15-fig. 1; the display shows
the status in fig. 62, and the follow-
ing icon keys: “Name”, “Number”,
“Location”, “Voice recognizer”, “OK”.“Name”: allows input of name and
surname of new entry, proceed as fol-
lows:
IMPORTANTWhen selecting
“Name”, remember that it is not pos-
sible to add a name already present in
the Navigator (NAV) function direc-
tory.
– rotate the encoder 14-fig. 1,
choose “Select” icon and press “EN-
TER” to confirm 15-fig. 1; the display
shows the keypad and the editing box
fig. 63.
– form name and surname by select-
ing letters one by one through the en-
coder 14-fig. 1and then press “EN-
TER” to confirm 15-fig. 1; proceed in
this way until completing the entry;– rotate the encoder 14-fig. 1, se-
lect the “OK” icon and then press
“ENTER” to confirm 15-fig. 1; the dis-
play returns to screen in fig. 62.
“Number”: allows insertion of new
phone number, proceed as follows:
– rotate the encoder 14-fig. 1, se-
lect the “Number” icon and then press
“ENTER” to confirm 15-fig. 1; the dis-
play shows the keypad and the edit-
ing box fig. 63.
– form the number selecting digits
one by one through the encoder 14-
fig. 1and then press “ENTER” to con-
firm 15-fig. 1; proceed in this way un-
til completing the required phone
number;
– rotate the encoder 14-fig. 1, and
then press “ENTER” to confirm 15-
fig. 1; the display returns to the
screen in fig. 62.
fig. 62
F0C4056g
fig. 63
F0C4194g
Page 78 of 166

CONNECT Nav+
77
“Location”: this icon is used to store
the new entry on the SIM card or di-
rectory according to the chosen op-
tion. SIM card numbers are automat-
ically copied to the directory after PIN
validation and cleared at SIM card ex-
traction.
“Voice recognizer”: allows to man-
age a voice sample associated to
stored names/numbers.
“OK”: confirms the insertion of the
new entry, proceed as follows:
– rotate the encoder 14-fig. 1, se-
lect the “OK” icon and then press
“ENTER” 15-fig. 1; the display shows
“Please wait…” and the system will
store the new entry in the directory.IMPORTANTIf the same name is
already existing, the display will show
“Name already in directory”.
Voice recognition
(active only when Directory has
been selected as stored phone
number location)
To enter this mode proceed as fol-
lows:
– rotate the encoder 14-fig. 1, se-
lect “Voice recognizer” key and then
press “ENTER” to confirm 15-fig. 1;
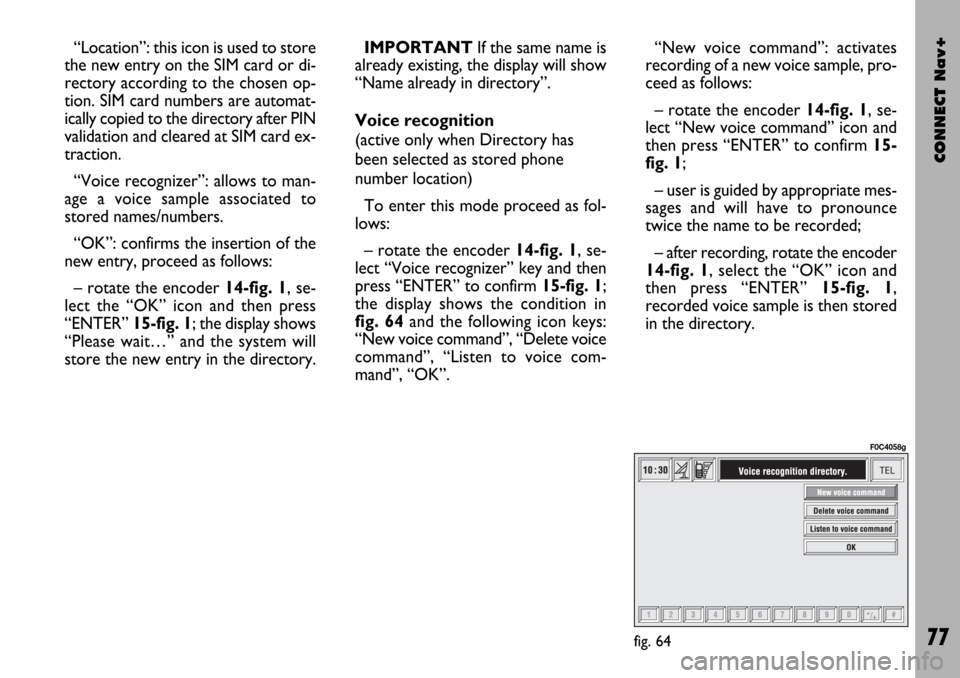
the display shows the condition in
fig. 64and the following icon keys:
“New voice command”, “Delete voice
command”, “Listen to voice com-
mand”, “OK”.“New voice command”: activates
recording of a new voice sample, pro-
ceed as follows:
– rotate the encoder 14-fig. 1, se-
lect “New voice command” icon and
then press “ENTER” to confirm 15-
fig. 1;
– user is guided by appropriate mes-
sages and will have to pronounce
twice the name to be recorded;
– after recording, rotate the encoder
14-fig. 1, select the “OK” icon and
then press “ENTER” 15-fig. 1,
recorded voice sample is then stored
in the directory.
fig. 64
F0C4058g
Page 79 of 166

CONNECT Nav+
78
IMPORTANTPress button ô2-
fig. 1 to stop recording (see chapter
“Voice recognition” at paragraph
“Storing an entry in the telephone di-
rectory with voice identification” for
further details).
“Delete voice command”: allows
deletion of a previously recorded
voice sample; proceed as follows:
– rotate the encoder 14-fig. 1, se-
lect the “Delete voice command” icon
and then press “ENTER” to confirm
15-fig. 1;
– rotate the encoder 14-fig. 1, se-
lect “OK” and then press “ENTER” to
confirm 15-fig. 1, the voice sample
will be deleted from the directory.
IMPORTANTThis icon key is ac-
tive only if the concerned entry, in the
directory, is associated to a voice sam-
ple as described previously.“Listen to voice command”: repro-
duces a previously recorded voice
sample; proceed as follows:
– rotate the encoder 14-fig. 1, se-
lect the “Listen to voice command”
icon and then press “ENTER” to con-
firm 15-fig. 1; the system will repro-
duce the selected voice sample.
IMPORTANTThis icon key is ac-
tive only if the concerned entry, in the
directory, is associated to a voice sam-
ple as described previously.
“OK”: confirm changes and stores
them in the directory.
IMPORTANTIf the user after end-
ing these operations doesn’t select
“OK” and confirm by “ENTER” 15-
fig. 1new settings will not be stored
in the directory. “Hear voice directory” icon key
This icon key (Hear voice directo-
ry) allows playback of all the previously
recorded voice samples, stored to al-
low vocal management of telephone
directory; proceed as follows:
– rotate the encoder 14-fig. 1, se-
lect “Hear voice directory” icon and
then press “ENTER” to confirm 15-
fig. 1; the system will reproduce
stored samples.
Press “ESCAPE” to stop 13-fig. 1, as
suggested on the display.
Page 81 of 166

CONNECT Nav+
80
– Lower horizontal bar icon keys, en-
abled or disabled according to the
case:
“Home”: makes access to the ad-
dress defined as Home.
“Back”: displays previously shown
card.
“Go”: goes to input address screen
(direct access or “bookmark” recall);
“Interrupt”: stops current deck load-
ing;
“
¨”, “´”: scrolls up/down when card
cannot be entirely displayed.
During loading operations, an hour-
glass is displayed on the current page.Low bar and right icon keys are ac-
tive only when they are necessary and
they are greyed when not consistent;
for example “
¨” and “´” keys are ac-
tive only when window size is not
enough to show the entire card.
Rotate the encoder 14-fig. 1to se-
lect card action key; after selecting the
required key press “ENTER” to con-
firm 15-fig. 1; the relevant screen will
be displayed.
Press “ESCAPE” 13-fig. 1and con-
firm to quit the WAP mode, the dis-
play will return to the main telephone
screen (TEL).
“Go” low bar icon key
This key fig. 65 - 66, selected by ro-
tating the encoder 14-fig. 1and then
confirmed by “ENTER” 15-fig. 1,
makes access to a specified net ad-
dress (if the Provider allows such op-
eration).Proceed as follows:
– rotate the encoder 14-fig. 1to se-
lect the “Address” icon fig. 67and
then press “ENTER” to confirm 15-
fig. 1; the display will show a keypad
for typing in the required net address;
or, if address is already stored in the
directory:
– rotate the encoder 14-fig. 1to se-
lect the “Site directory” key fig. 67
and then press “ENTER” to confirm
15-fig. 1; the display will show the
stored site directory;
– rotate the encoder 14-fig. 1to se-
lect the required address and then
press “ENTER” to confirm 15-fig. 1.
During these operations “
¨”, “´”,
“Home”, “Back” and “Interrupt” are
disabled.
Page 85 of 166

CONNECT Nav+
84
“Settings”
Settings shall be performed with ref-
erence to the information provided by
the WAP service provider.
This key fig. 69selected by rotating
the encoder 14-fig. 1and then con-
firmed by “ENTER” 15-fig. 1, allows
the following:
– to enter WAP provider telephone
number, by selecting “Provider phone
number” icon fig. 74;
– to enter connection line type, by
selecting “Connection type”, which
can be ISDN (numeric) or PSTN (ana-
log);
– to enter IP address, by selecting “IP
address” icon;– to enter IP port, by selecting “IP
port” icon;
– log-in user name, by selecting
“User name” icon;
– enter the password used to access
the WAP service, by selecting “Pass-
word” icon”;
Any of these keys activates the key-
pad to be used for entering the re-
quired data.“Voice Memo”
FUNCTION
“Voice Memo” allows management
of the messages recorded in the voice
box.
It is activated by long push on
ô2-
fig. 1or
ô3-fig. 2key (where pro-
vided): a beep and a display message
fig. 75mark the start of recording.
fig. 74
F0C4150g
fig. 75
F0C4152g
Page 86 of 166

CONNECT Nav+
85
A maximum of 3 minutes of user’s
voice sampling is available and can be
split in several recording sessions.
A further push of
ôkey 2-fig. 1
stops sampling. Next sampling will be
queued after the previous one.
After 1 minute recording operation
is stopped and the display shows the
screen in fig. 76, the function will be
disabled.Push on “Voice memo” key in main
telephone screen displays the screen
in fig. 77, where percentage of mem-
ory occupied/available and active mes-
sage number (compared with total
memorized messages number) are
shown.The icon keys at the bottom of the
display can be activated by the corre-
sponding multifunction keys on the
keypad 17-fig. 1. Options are the fol-
lowing:
Play
˙plays active message;
Stop
■stops message playback
or recording;
Skip
¯¯skips to previous
message;
Skip
˙˙skips to next message;
Record
çstarts recording;
Deletedeletes all recorded
messages.
fig. 76
F0C4153g
fig. 77
F0C4195g
Page 87 of 166

CONNECT Nav+
86
“Other menus”
FUNCTION
Rotate the encoder 14-fig. 1to se-
lect “Other menus” and then press
“ENTER” to confirm 15-fig. 1. “Oth-
er menus” in main telephone screen
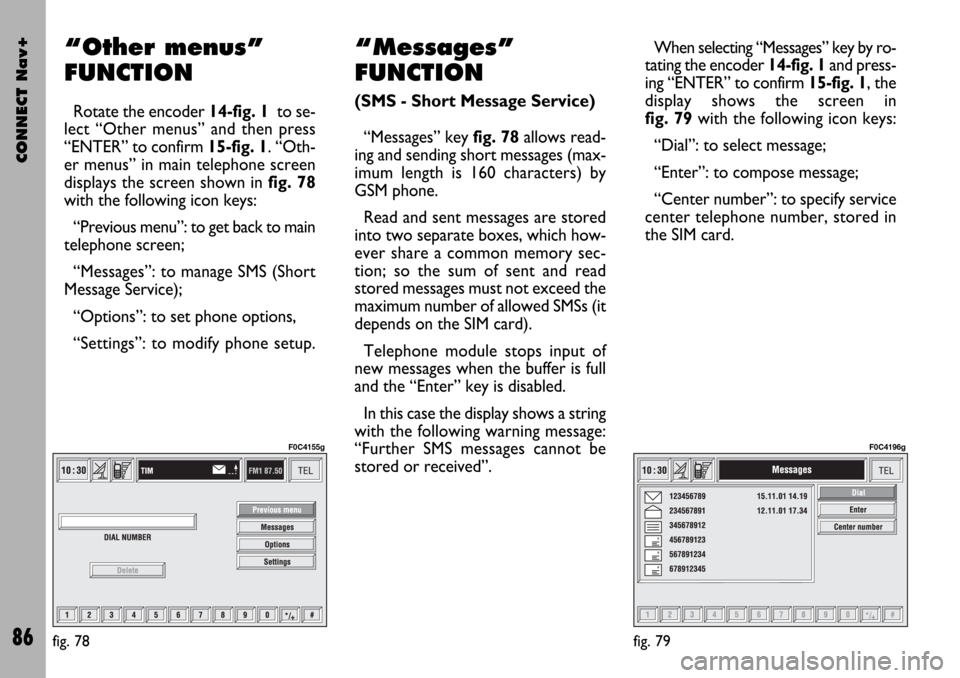
displays the screen shown in fig. 78
with the following icon keys:
“Previous menu”: to get back to main
telephone screen;
“Messages”: to manage SMS (Short
Message Service);
“Options”: to set phone options,
“Settings”: to modify phone setup.
“Messages”
FUNCTION
(SMS - Short Message Service)
“Messages” key fig. 78allows read-
ing and sending short messages (max-
imum length is 160 characters) by
GSM phone.
Read and sent messages are stored
into two separate boxes, which how-
ever share a common memory sec-
tion; so the sum of sent and read
stored messages must not exceed the
maximum number of allowed SMSs (it
depends on the SIM card).
Telephone module stops input of
new messages when the buffer is full
and the “Enter” key is disabled.
In this case the display shows a string
with the following warning message:
“Further SMS messages cannot be
stored or received”.When selecting “Messages” key by ro-
tating the encoder 14-fig. 1and press-
ing “ENTER” to confirm 15-fig. 1, the
display shows the screen in
fig. 79with the following icon keys:
“Dial”: to select message;
“Enter”: to compose message;
“Center number”: to specify service
center telephone number, stored in
the SIM card.
fig. 78
F0C4155g
fig. 79
F0C4196g
Page 90 of 166

CONNECT Nav+
89
Enter
IMPORTANT“Enter” can be se-
lected only if there is enough memo-
ry to store another message, other-
wise you have to delete one or more
messages.
Selecting “Enter” by rotating the en-
coder 14-fig. 1and pressing “ENTER”
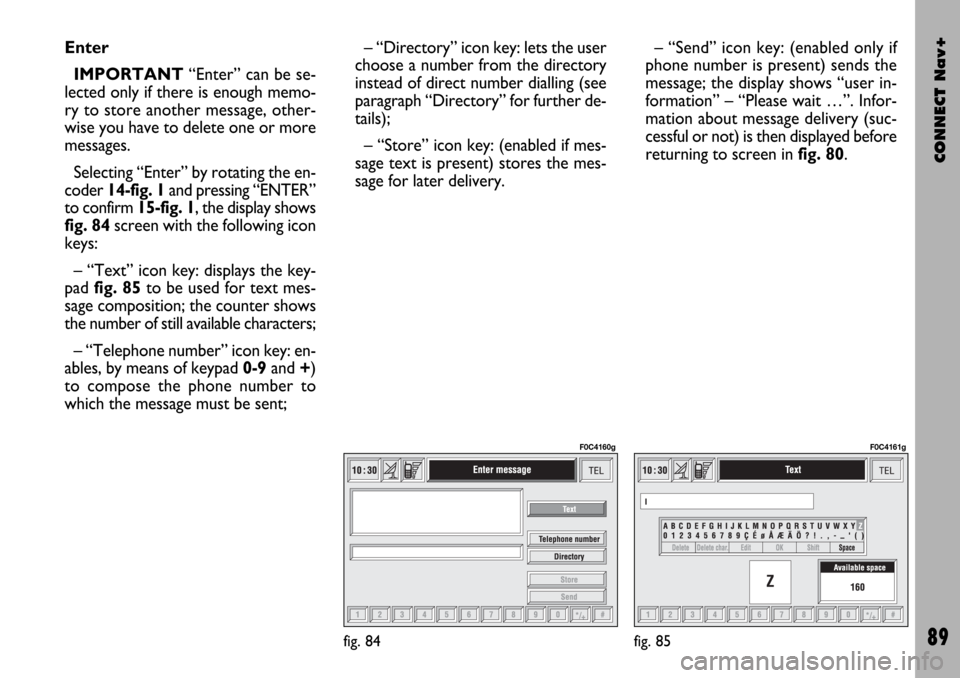
to confirm 15-fig. 1, the display shows
fig. 84screen with the following icon
keys:
– “Text” icon key: displays the key-
pad fig. 85to be used for text mes-
sage composition; the counter shows
the number of still available characters;
– “Telephone number” icon key: en-
ables, by means of keypad 0-9and +)
to compose the phone number to
which the message must be sent;– “Directory” icon key: lets the user
choose a number from the directory
instead of direct number dialling (see
paragraph “Directory” for further de-
tails);
– “Store” icon key: (enabled if mes-
sage text is present) stores the mes-
sage for later delivery. – “Send” icon key: (enabled only if
phone number is present) sends the
message; the display shows “user in-
formation” – “Please wait …”. Infor-
mation about message delivery (suc-
cessful or not) is then displayed before
returning to screen in fig. 80.
fig. 84
F0C4160g
fig. 85
F0C4161g