2004 FIAT STILO phone
[x] Cancel search: phonePage 22 of 166

CONNECT Nav+
21
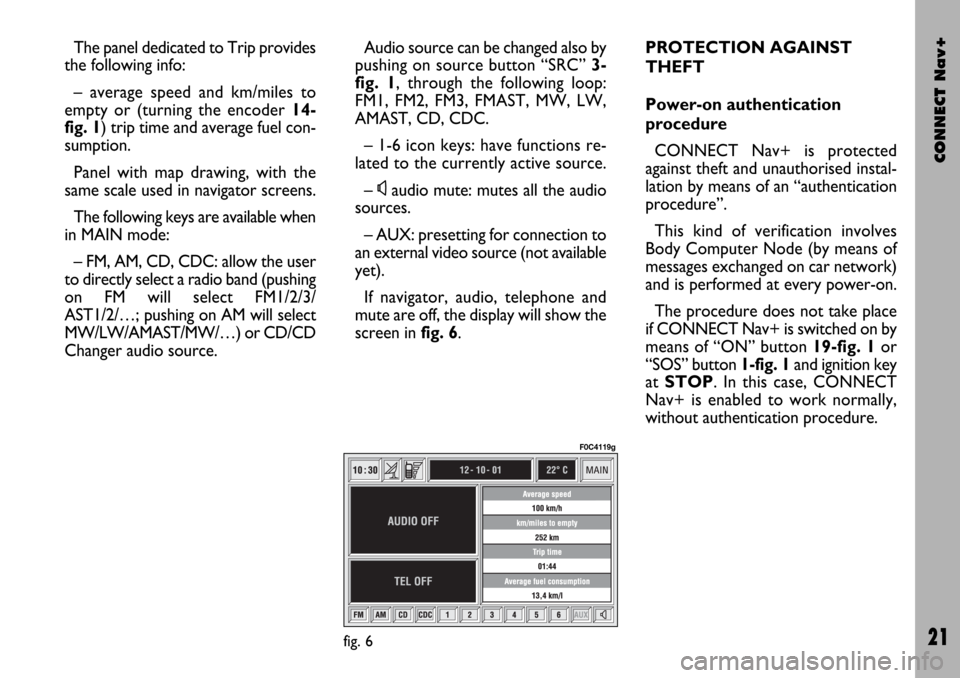
The panel dedicated to Trip provides
the following info:
– average speed and km/miles to
empty or (turning the encoder 14-
fig. 1) trip time and average fuel con-
sumption.
Panel with map drawing, with the
same scale used in navigator screens.
The following keys are available when
in MAIN mode:
– FM, AM, CD, CDC: allow the user
to directly select a radio band (pushing
on FM will select FM1/2/3/
AST1/2/…; pushing on AM will select
MW/LW/AMAST/MW/…) or CD/CD
Changer audio source.Audio source can be changed also by
pushing on source button “SRC” 3-
fig. 1, through the following loop:
FM1, FM2, FM3, FMAST, MW, LW,
AMAST, CD, CDC.
– 1-6 icon keys: have functions re-
lated to the currently active source.
–
Ùaudio mute: mutes all the audio
sources.
– AUX: presetting for connection to
an external video source (not available
yet).
If navigator, audio, telephone and
mute are off, the display will show the
screen in fig. 6.PROTECTION AGAINST
THEFT
Power-on authentication
procedure
CONNECT Nav+ is protected
against theft and unauthorised instal-
lation by means of an “authentication
procedure”.
This kind of verification involves
Body Computer Node (by means of
messages exchanged on car network)
and is performed at every power-on.
The procedure does not take place
if CONNECT Nav+ is switched on by
means of “ON” button 19-fig. 1or
“SOS” button 1-fig. 1and ignition key
at STOP. In this case, CONNECT
Nav+ is enabled to work normally,
without authentication procedure.
fig. 6
F0C4119g
Page 24 of 166

CONNECT Nav+
23
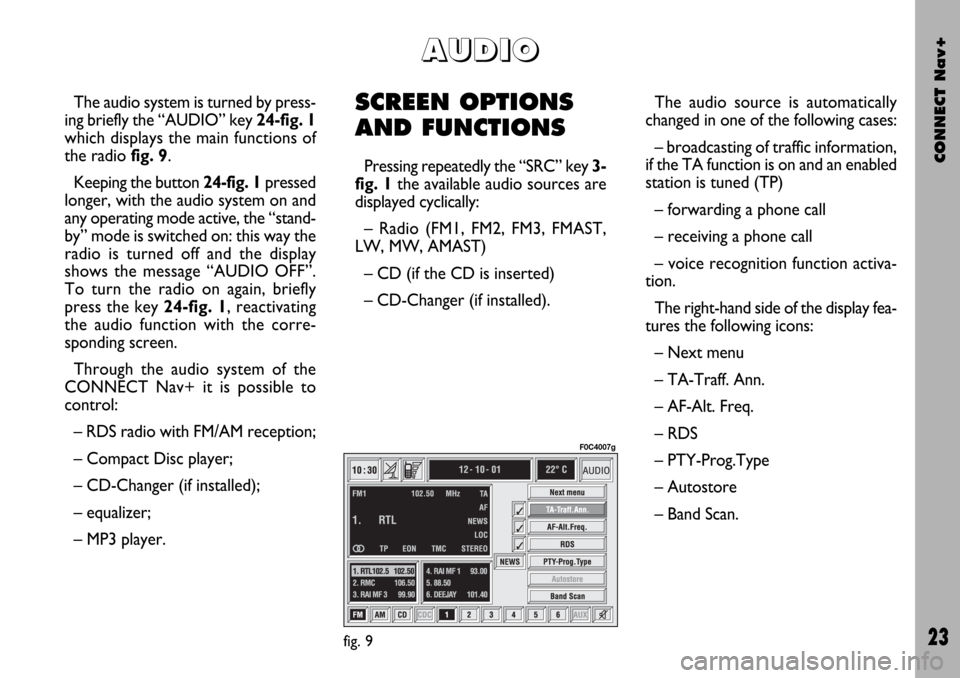
The audio system is turned by press-
ing briefly the “AUDIO” key 24-fig. 1
which displays the main functions of
the radio fig. 9.
Keeping the button 24-fig. 1pressed
longer, with the audio system on and
any operating mode active, the “stand-
by” mode is switched on: this way the
radio is turned off and the display
shows the message “AUDIO OFF”.
To turn the radio on again, briefly
press the key 24-fig. 1, reactivating
the audio function with the corre-
sponding screen.
Through the audio system of the
CONNECT Nav+ it is possible to
control:
– RDS radio with FM/AM reception;
– Compact Disc player;
– CD-Changer (if installed);
– equalizer;
– MP3 player.SCREEN OPTIONS
AND FUNCTIONS
Pressing repeatedly the “SRC” key 3-
fig. 1the available audio sources are
displayed cyclically:
– Radio (FM1, FM2, FM3, FMAST,
LW, MW, AMAST)
– CD (if the CD is inserted)
– CD-Changer (if installed).The audio source is automatically
changed in one of the following cases:
– broadcasting of traffic information,
if the TA function is on and an enabled
station is tuned (TP)
– forwarding a phone call
– receiving a phone call
– voice recognition function activa-
tion.
The right-hand side of the display fea-
tures the following icons:
– Next menu
– TA-Traff. Ann.
– AF-Alt. Freq.
– RDS
– PTY-Prog.Type
– Autostore
– Band Scan.
A A
U U
D D
I I
O O
fig. 9
F0C4007g
Page 28 of 166

CONNECT Nav+
27
The operations to be carried out for
each of the above two conditions are
listed below.
1) If you wish to receive traffic in-
formation while listening to a CD, be-
fore inserting the CD, tune to a sta-
tion enabled to broadcast traffic in-
formation (TP) and turn the TA func-
tion on. If, while playing the CD, this
station broadcasts traffic information,
CD playing will be temporarily
stopped and resumed automatically at
the end of the message.
If the CD player is already working
and at the same time you wish to re-
ceive traffic information, turning on
the TA function, the radio tunes to the
last station heard in the FM band and
the traffic announcements are trans-
mitted. 2) To receive traffic information
though not listening to the radio:
– turn on the TA function, so that
the display shows the abbreviation
“TA”;
– tune to a station enabled to broad-
cast traffic information so that “TP”
is shown on the display;
– set the system to stand-by press-
ing the “AUDIO” key 24-fig. 1.
This way, if that station broadcasts
traffic information, this will be heard
at a minimum predefined volume.
A telephone call has higher priority
than traffic message.IMPORTANT In certain countries,
radio stations exist which though the
TP function is active (the display shows
“TP”), do not broadcast traffic infor-
mation.
If the radio is working in the AM
band, choosing the FM band tunes to
the last station heard. If the chosen
station does not broadcast traffic in-
formation (“TP” not shown on the dis-
play), an automatic search is started
for an enabled station.
If the volume is changed during a traf-
fic bulletin the value is not shown on
the display and the new value is kept
only for the bulletin in progress.
Page 30 of 166

CONNECT Nav+
29
“PTY-Prog. Type” FUNCTION
(CHOOSING A TYPE
OF PROGRAMME)
The PTY function (Program Type),
when present, makes it possible to
give priority to broadcasters trans-
mitting programmes classified accord-
ing to the type of PTY. PTY pro-
grammes may concern emergency an-
nouncements or various subjects (e.g.
music, news). To access the list of PTY
programmes, choose the “PTY-
Prog.Type” icon with the encoder 14-
fig. 1and then press “ENTER” to con-
firm 15-fig. 1; the display will show
the screen with the list of PTY pro-
grammes and the subject of the last
station heard (e.g. “NEWS”). To scroll
the list of PTY programmes, turn the
encoder 14-fig. 1. To choose a type
of programme, press “ENTER” after
choosing the type 15-fig. 1.
When the PTY-Prog.Type function is
on, symbol “✓” is shown near the cor-
responding icon.
IMPORTANTThe PTY function
can only be turned on in the FM band.The list of PTY programmes is the
following:
–
NONE
– NEWS
– AFFAIRS
– SPORT
– EDUCATION
– DRAMA
– CULTURE
– SCIENCE
– VARIED
– MISC
– POP
– ROCK
– EASY
– LIGHT
– CLASSIC
– OTHER
– WEATHER
– FINANCE
– CHILDREN
– SOCIAL
– RELIGION
– PHONE IN
– TRAVEL
– LEISURE
– JAZZ
– COUNTRY
– NATIONAL
– OLDIES
– FOLK
– DOCUMENTARY
– TEST
– ALARM.
To seek a station with this pro-
gramme, follow the instructions giv-
en in the “Tuning” paragraph.
If no station is available with this type
of programme, the station selected
previously is returned.
To exit the screen with the list of
PTY programmes, choose a type of
programme, or “None” if you do not
wish to set a programme type.
Page 63 of 166

CONNECT Nav+
62
The CONNECT Nav+ is fitted with
a Dual Band GSM cellular telephone
with handfree feature.
The GSM standard (Global System
for Mobile Communication) is now
available in many countries and offers
excellent coverage: for information
about the areas served currently by
the GSM networks and those available
in the future, contact your network
provider.GENERAL
INFORMATION
The cellular telephone has the fol-
lowing functions which simplify use:
– PIN code (Personal Identification
Number) to prevent unauthorised
telephone use
– PIN change
– activation/deactivation of PIN re-
quest at access
– incoming calls acceptance and re-
fusal
– start a telephone call
– emergency call (even without SIM
card and without entering PIN code)
– reading the telephone numbers
stored on the SIM card
– entering a new telephone number
on the SIM card– deleting a telephone number from
the SIM card
– information on SIM card conditions
(correct or wrong insertion)
– access to the list of the last 10
numbers dialled to facilitate frequent
calls
– access to the list of the last 10 calls
received
– SMS function (Short Message Ser-
vice) to receive and send short text
messages
– activation and deactivation of ac-
cess to SIM card
– access and change of the lists con-
taining the most frequently dialled
numbers and to telephone directory
– manual number dialling
C C
E E
L L
L L
U U
L L
A A
R R
T T
E E
L L
E E
P P
H H
O O
N N
E E
W W
I I
T T
H H
V V
O O
I I
C C
E E
C C
O O
M M
M M
A A
N N
D D
S S
Page 64 of 166

CONNECT Nav+
63
– DTMF setting (Dual Tone Multi
Frequency) to repeat dialling and in-
hibit the own identification number
transmission
– selection of network provider
– setting volume and tone of incom-
ing calls
– display of remaining credit in case
of prepaid SIM card
– display of signal field intensity and
other status warnings with symbols
and words.PRELIMINARY
OPERATIONS
ENTERING AND EXITING
THE TELEPHONE MODE
To enter the telephone mode pro-
ceed as follows:
– turn ignition key to MAR;
– short push on “TEL” button 10-
fig. 1on front panel.
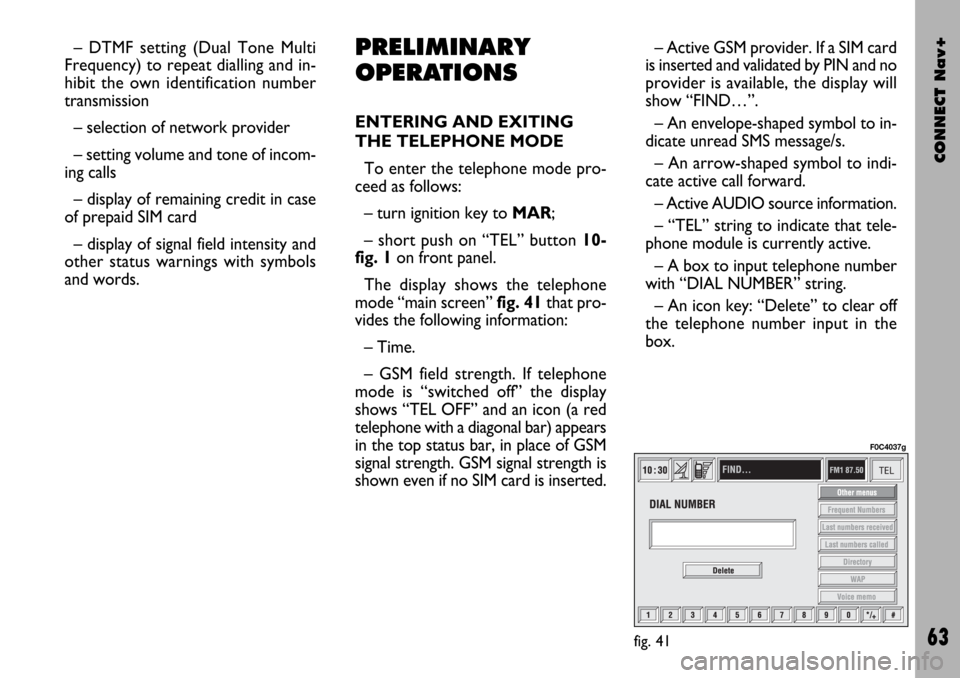
The display shows the telephone
mode “main screen”fig. 41that pro-
vides the following information:
– Time.
– GSM field strength. If telephone
mode is “switched off” the display
shows “TEL OFF” and an icon (a red
telephone with a diagonal bar) appears
in the top status bar, in place of GSM
signal strength. GSM signal strength is
shown even if no SIM card is inserted.– Active GSM provider. If a SIM card
is inserted and validated by PIN and no
provider is available, the display will
show “FIND…”.
– An envelope-shaped symbol to in-
dicate unread SMS message/s.
– An arrow-shaped symbol to indi-
cate active call forward.
– Active AUDIO source information.
– “TEL” string to indicate that tele-
phone module is currently active.
– A box to input telephone number
with “DIAL NUMBER” string.
– An icon key: “Delete” to clear off
the telephone number input in the
box.
fig. 41
F0C4037g
Page 65 of 166

CONNECT Nav+
64
– A vertical menu featuring the fol-
lowing icon keys:
Other menus:takes to second
page of telephone menu.
Frequent Numbers: allows
management of frequent number
list.
Last numbers received:stores
the phone numbers of the last 10
received calls.
Last numbers called: stores the
phone numbers of the last 10
made calls.
Directory:manages name/tele-
phone number database.
WAP:enables access to WAP
(Wireless Access Protocol) ser-
vice.
Voice memo:manages voice
box.If CONNECT Nav+ is already on
(e.g.: audio mode), to enter the tele-
phone mode proceed as follows:
– press shortly button
ß8-fig. 1, the
display will show for few seconds the
last dialled number;
– press again button
ß8-fig. 1to
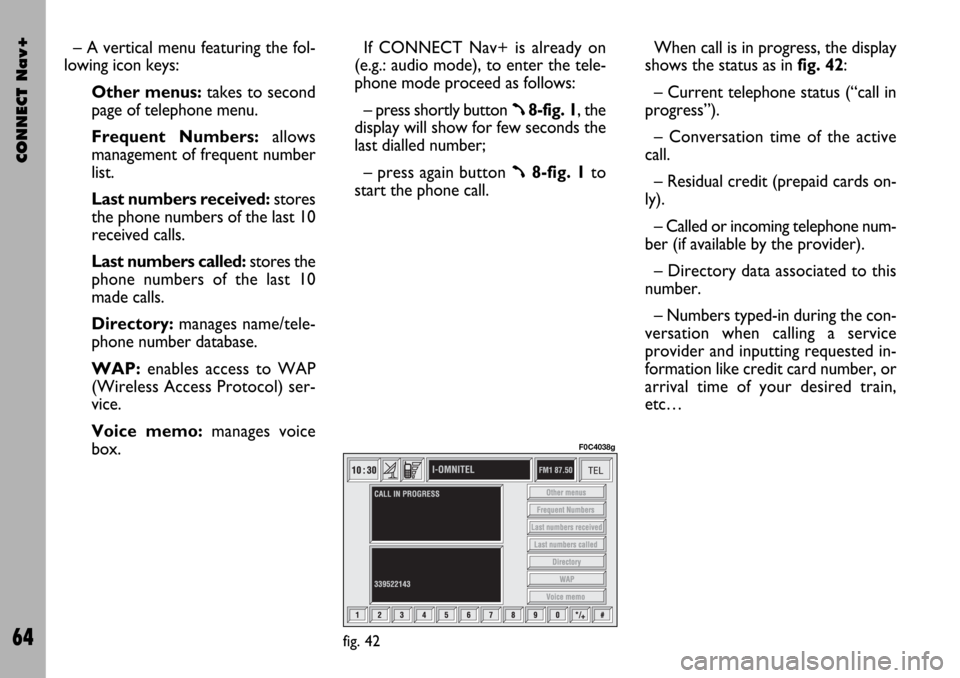
start the phone call.When call is in progress, the display
shows the status as in fig. 42:
– Current telephone status (“call in
progress”).
– Conversation time of the active
call.
– Residual credit (prepaid cards on-
ly).
– Called or incoming telephone num-
ber (if available by the provider).
– Directory data associated to this
number.
– Numbers typed-in during the con-
versation when calling a service
provider and inputting requested in-
formation like credit card number, or
arrival time of your desired train,
etc…
fig. 42
F0C4038g
Page 66 of 166

CONNECT Nav+
65
Press “ESCAPE” to return to main
telephone screen 13-fig. 1.
– A long push on “TEL” button 10-
fig. 1switches off (the display shows
an hourglass during this operation) the
telephone mode (TEL OFF). To switch
it on again, a short push on the same
button will be required.INSERTING THE
TELEPHONE CARD
If no valid SIM card is inserted when
calling the telephone function, the dis-
play shows the relevant warning mes-
sage.
The insertion of a valid SIM card
makes it possible to make the tele-
phone operational and access its func-
tions. The telephone card is to be in-
serted in the special slot 6-fig. 1with
the integrated chip at the front right
in relation to the direction of travel,
until it is held in.
IMPORTANTWhen necessary,
only use the SIM card adapter provid-
ed with the car; in the event of loss,
breakage or for buying other adapters
contact Fiat Dealership.
Correct card insertion is confirmed
by the prompt to type the card PIN
code fig. 43.
When the card is already inserted,
access to the operating system is ob-
tained by pressing the “TEL” key 10-
fig. 1or
ß8-fig. 1.To remove the SIM card, slightly
press into its housing and then release
it; it will come out a little so that you
can extract it.
IMPORTANT Removing the
SIM card with the telephone on
may cause temporary faults; be-
fore removing the SIM card the
user should always turn the tele-
phone off through the “TEL” but-
ton 10-fig. 1 or turn the CON-
NECT Nav+ system off using the
“ON” button 19-fig. 1. In the
event of faults due to removing
the SIM card with the phone
working, normal operation will
be resumed switching the system
off and on again.
fig. 43
F0C4039g