Page 82 of 202
81
CONNECT NAV
NAVIGATOR
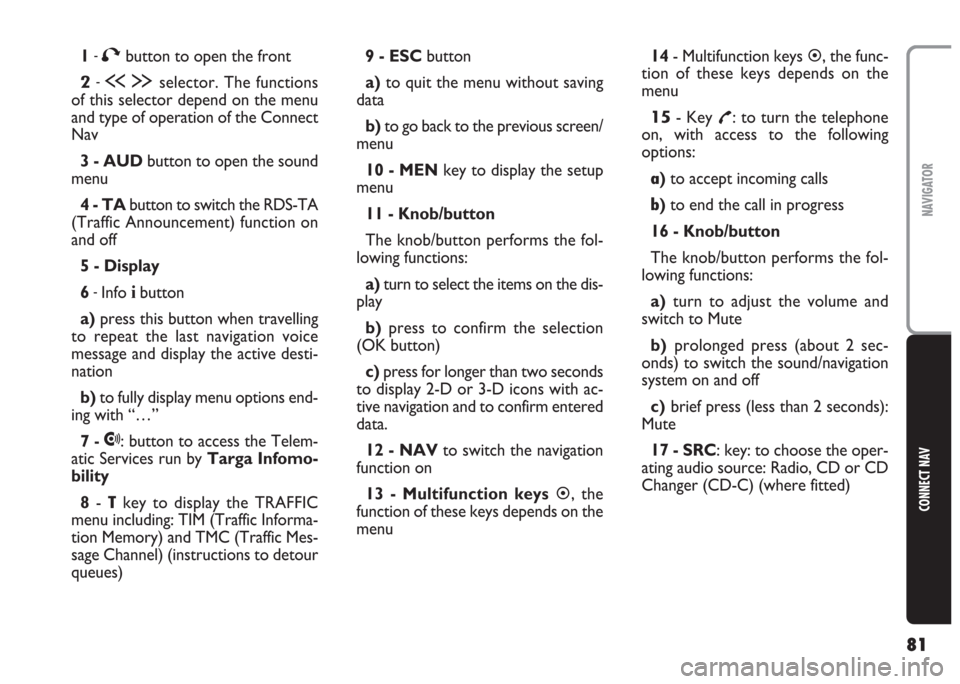
1-Tbutton to open the front
2-ù§selector. The functions
of this selector depend on the menu
and type of operation of the Connect
Nav
3 - AUDbutton to open the sound
menu
4 - TAbutton to switch the RDS-TA
(Traffic Announcement) function on
and off
5 - Display
6
-Info ibutton
a)press this button when travelling
to repeat the last navigation voice
message and display the active desti-
nation
b)to fully display menu options end-
ing with “…”
7 -
•: button to access the Telem-
atic Services run by Targa Infomo-
bility
8-
Tkey to display the TRAFFIC
menu including: TIM (Traffic Informa-
tion Memory) and TMC (Traffic Mes-
sage Channel) (instructions to detour
queues) 9 - ESCbutton
a)to quit the menu without saving
data
b)to go back to the previous screen/
menu
10 - MENkey to display the setup
menu
11 - Knob/button
The knob/button performs the fol-
lowing functions:
a)turn to select the items on the dis-
play
b)press to confirm the selection
(OK button)
c) press for longer than two seconds
to display 2-D or 3-D icons with ac-
tive navigation and to confirm entered
data.
12 - NAVto switch the navigation
function on
13 - Multifunction keys�, the
function of these keys depends on the
menu14- Multifunction keys
�, the func-
tion of these keys depends on the
menu
15- Key £: to turn the telephone
on, with access to the following
options:
a)to accept incoming calls
b)to end the call in progress
16 - Knob/button
The knob/button performs the fol-
lowing functions:
a)turn to adjust the volume and
switch to Mute
b)prolonged press (about 2 sec-
onds) to switch the sound/navigation
system on and off
c)brief press (less than 2 seconds):
Mute
17 - SRC: key: to choose the oper-
ating audio source: Radio, CD or CD
Changer (CD-C) (where fitted)
Page 83 of 202
82
CONNECT NAV
NAVIGATOR
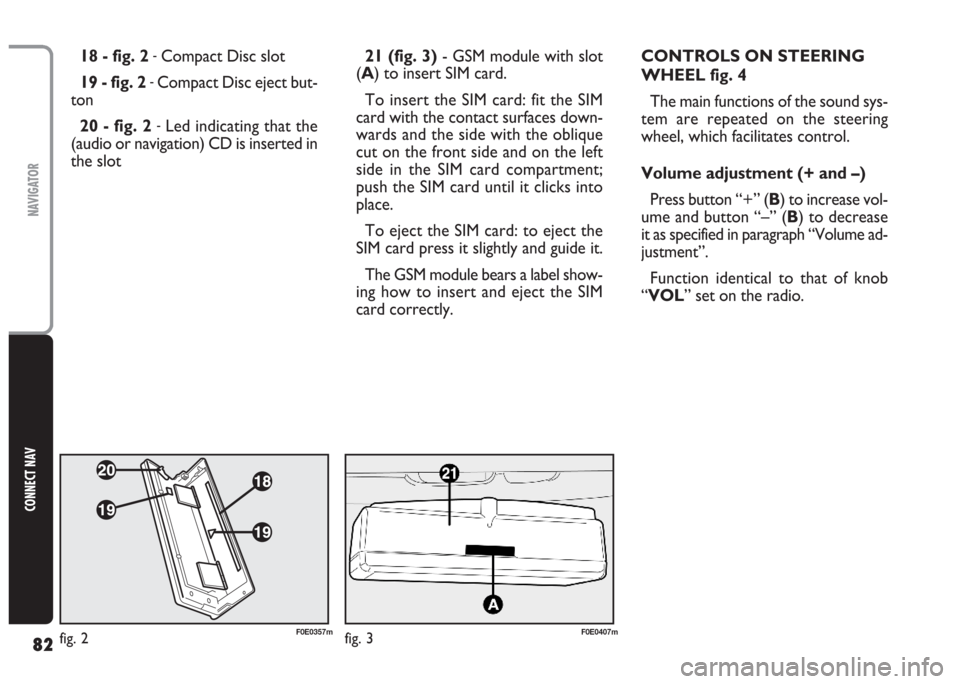
21 (fig. 3)- GSM module with slot
(A) to insert SIM card.
To insert the SIM card: fit the SIM
card with the contact surfaces down-
wards and the side with the oblique
cut on the front side and on the left
side in the SIM card compartment;
push the SIM card until it clicks into
place.
To eject the SIM card: to eject the
SIM card press it slightly and guide it.
The GSM module bears a label show-
ing how to insert and eject the SIM
card correctly. 18 - fig. 2 -Compact Disc slot
19 - fig. 2
-Compact Disc eject but-
ton
20 - fig. 2
-Led indicating that the
(audio or navigation) CD is inserted in
the slotCONTROLS ON STEERING
WHEEL fig. 4
The main functions of the sound sys-
tem are repeated on the steering
wheel, which facilitates control.
Volume adjustment (+ and –)
Press button “+” (B) to increase vol-
ume and button “–” (B) to decrease
it as specified in paragraph “Volume ad-
justment”.
Function identical to that of knob
“VOL” set on the radio.
fig. 2F0E0357mfig. 3F0E0407m
Page 85 of 202
84
CONNECT NAV
NAVIGATOR
O O
P P
E E
R R
A A
T T
I I
O O
N N
Switching on and off
with engine off
The Connect Nav can also be oper-
ated when the engine is not running
(ignition key at STOP).
Press the knob/button (16) for ap-
proximately one second.
IMPORTANT The device will au-
tomatically be switched off when the
ignition key is at STOPafter approx-
imately one hour to safeguard the car
battery. Start the engine to reset the
timeout.SELECTING FUNCTIONS
To select the required audio source,
proceed as follows:
– press SRC (17);
– turn the knob/button (16) to select
the required operating mode (Radio
or CD-Changer).
To start navigation, press NAV (12).
The specific main menu/screen will
appear for each selected source.
To access the phone mode, press
£
(15) button.
To access the Targa Infomobility
services, press
•(7) button. SWITCHING
THE CONNECT Nav ON/OFF
To turn the Connect Nav on, keep
the knob/button (16) pressed for
about 1 second. The sound system will
automatically switch to the last active
sound source at the previously se-
lected volume.
IMPORTANT The sound source is
usually played at the last selected vol-
ume when the system is switched off
and back on. However, if the volume
was higher than the preset volume, the
sound source will be played at the pre-
set volume.
To set the power-on volume, see
“Adjusting power-on, ta, announce-
ments, message and volume” in “Basic
settings ” section.
Page 87 of 202
86
CONNECT NAV
NAVIGATOR
fig. 9F0E3097g
ADJUSTING THE SOUND
(AUD Menu)
The “bass” and “treble” can be sep-
arately adjusted for each sound
source. The Balance, Fader and Loud-
ness settings are in common for all
sources.
Proceed as follows to adjust the
sound:
1) press SRC (17) to display the SRC
menu
2)turn the knob/button (11) to se-
lect the required audio source (Radio,
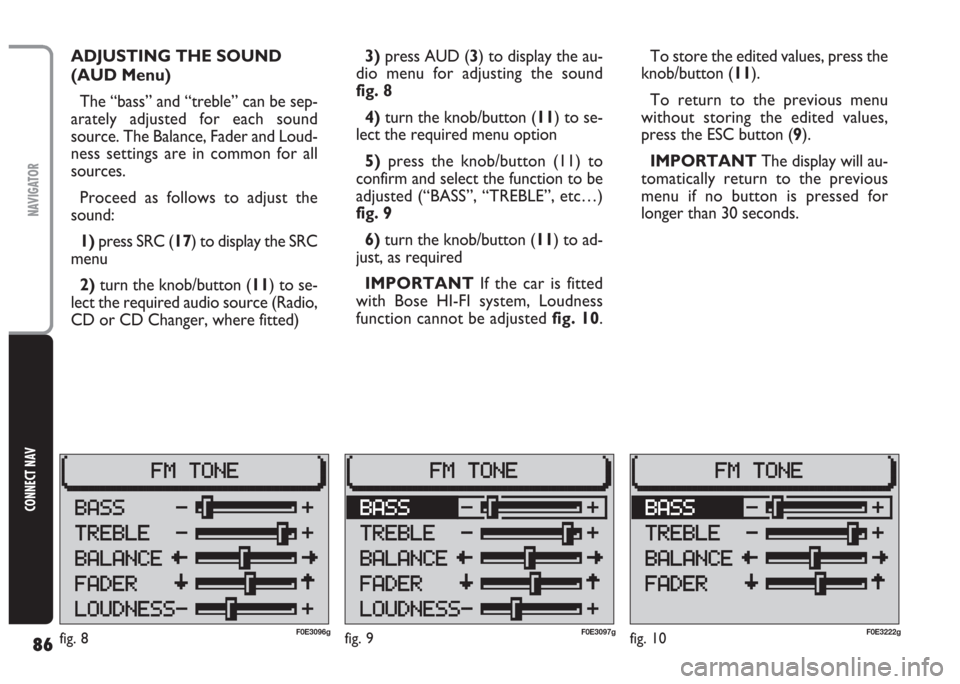
CD or CD Changer, where fitted)3)press AUD (3) to display the au-
dio menu for adjusting the sound
fig. 8
4) turn the knob/button (11) to se-
lect the required menu option
5)press the knob/button (11) to
confirm and select the function to be
adjusted (“BASS”, “TREBLE”, etc…)
fig. 9
6)turn the knob/button (11) to ad-
just, as required
IMPORTANT If the car is fitted
with Bose HI-FI system, Loudness
function cannot be adjustedfig. 10.To store the edited values, press the
knob/button (11).
To return to the previous menu
without storing the edited values,
press the ESC button (9).
IMPORTANT The display will au-
tomatically return to the previous
menu if no button is pressed for
longer than 30 seconds.
fig. 10F0E3222gfig. 8F0E3096g
Page 88 of 202
87
CONNECT NAV
NAVIGATOR
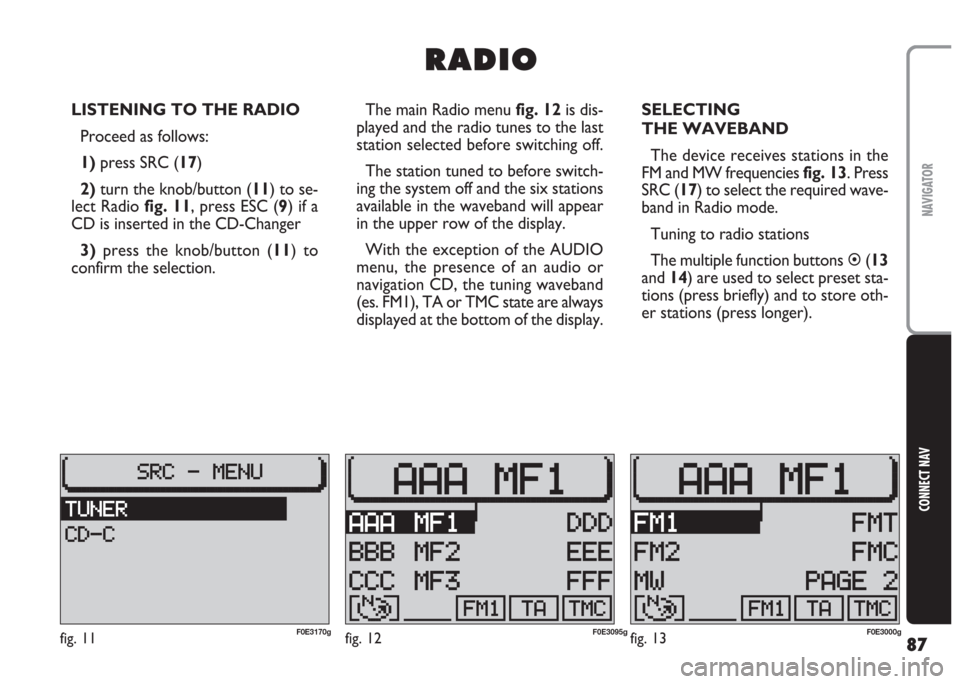
LISTENING TO THE RADIO
Proceed as follows:
1) press SRC (17)
2)turn the knob/button (11) to se-
lect Radio fig. 11, press ESC (9) if a
CD is inserted in the CD-Changer
3)press the knob/button (11) to
confirm the selection.The main Radio menu fig. 12is dis-
played and the radio tunes to the last
station selected before switching off.
The station tuned to before switch-
ing the system off and the six stations
available in the waveband will appear
in the upper row of the display.
With the exception of the AUDIO
menu, the presence of an audio or
navigation CD, the tuning waveband
(es. FM1), TA or TMC state are always
displayed at the bottom of the display.SELECTING
THE WAVEBAND
The device receives stations in the
FM and MW frequencies fig. 13. Press
SRC (17) to select the required wave-
band in Radio mode.
Tuning to radio stations
The multiple function buttons �(13
and 14) are used to select preset sta-
tions (press briefly) and to store oth-
er stations (press longer).
R R
A A
D D
I I
O O
fig. 11F0E3170gfig. 12F0E3095gfig. 13F0E3000g
Page 100 of 202
99
CONNECT NAV
NAVIGATOR
C C
O O
M M
P P
A A
C C
T T
D D
I I
S S
C C
P P
L L
A A
Y Y
E E
R R
( (
C C
D D
) )
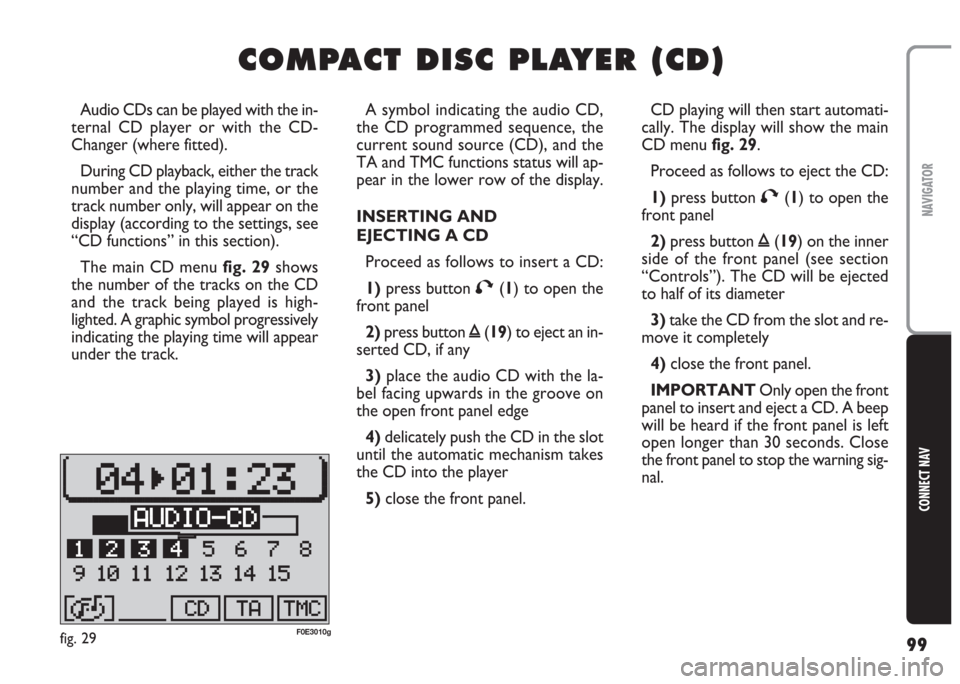
A symbol indicating the audio CD,
the CD programmed sequence, the
current sound source (CD), and the
TA and TMC functions status will ap-
pear in the lower row of the display.
INSERTING AND
EJECTING A CD
Proceed as follows to insert a CD:
1)press button T(1) to open the
front panel
2)press button ı(19) to eject an in-
serted CD, if any
3) place the audio CD with the la-
bel facing upwards in the groove on
the open front panel edge
4) delicately push the CD in the slot
until the automatic mechanism takes
the CD into the player
5) close the front panel. Audio CDs can be played with the in-
ternal CD player or with the CD-
Changer (where fitted).
During CD playback, either the track
number and the playing time, or the
track number only, will appear on the
display (according to the settings, see
“CD functions” in this section).
The main CD menu fig. 29shows
the number of the tracks on the CD
and the track being played is high-
lighted. A graphic symbol progressively
indicating the playing time will appear
under the track.CD playing will then start automati-
cally. The display will show the main
CD menu fig. 29.
Proceed as follows to eject the CD:
1)press button T(1) to open the
front panel
2)press button ı(19) on the inner
side of the front panel (see section
“Controls”). The CD will be ejected
to half of its diameter
3)take the CD from the slot and re-
move it completely
4)close the front panel.
IMPORTANT Only open the front
panel to insert and eject a CD. A beep
will be heard if the front panel is left
open longer than 30 seconds. Close
the front panel to stop the warning sig-
nal.
fig. 29F0E3010g
Page 101 of 202
100
CONNECT NAV
NAVIGATOR
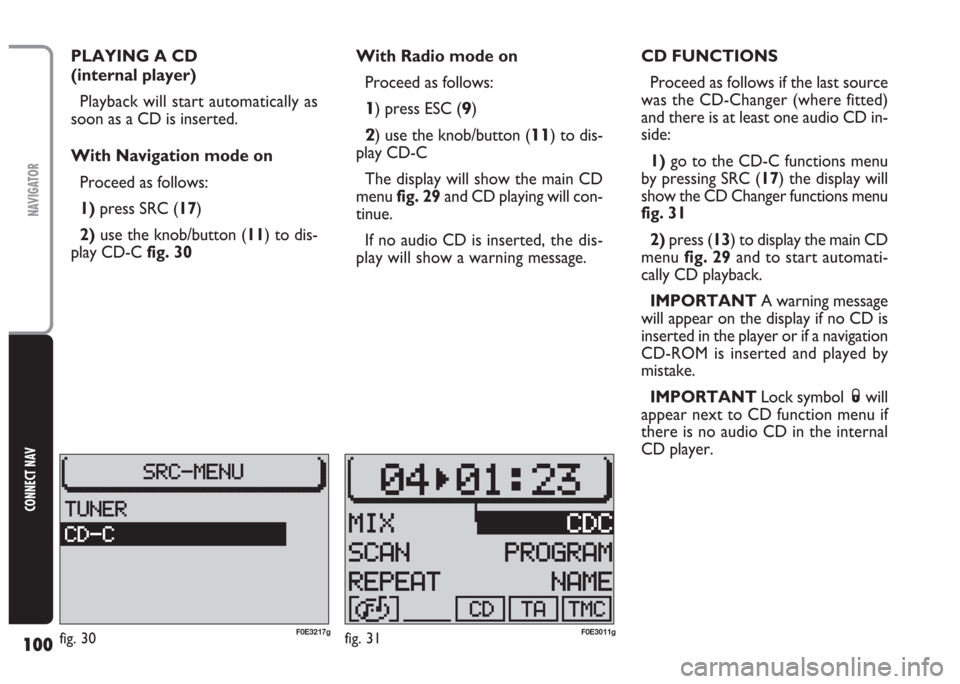
PLAYING A CD
(internal player)
Playback will start automatically as
soon as a CD is inserted.
With Navigation mode on
Proceed as follows:
1) press SRC (17)
2)use the knob/button (11) to dis-
play CD-Cfig. 30With Radio mode on
Proceed as follows:
1) press ESC (9)
2) use the knob/button (11) to dis-
play CD-C
The display will show the main CD
menu fig. 29and CD playing will con-
tinue.
If no audio CD is inserted,the dis-
play will show a warning message.CD FUNCTIONS
Proceed as follows if the last source
was the CD-Changer (where fitted)
and there is at least one audio CD in-
side:
1)go to the CD-C functions menu
by pressing SRC (17) the display will
show the CD Changer functions menu
fig. 31
2)press (13) to display the main CD
menu fig. 29and to start automati-
cally CD playback.
IMPORTANT A warning message
will appear on the display if no CD is
inserted in the player or if a navigation
CD-ROM is inserted and played by
mistake.
IMPORTANT Lock symbol Swill
appear next to CD function menu if
there is no audio CD in the internal
CD player.
fig. 30F0E3217gfig. 31F0E3011g
Page 108 of 202
107
CONNECT NAV
NAVIGATOR
PLAYING A CD WITH THE
INTERNAL CD PLAYER
(with CD-Changer,
if installed)
Proceed as follows:
1) press SRC (17) button.
2) turn the knob/button (11) to se-
lect CD-C.
3) press the knob/button (11) to
confirm.
IMPORTANT If you accidentally
select a CD that is not inserted, the
system will automatically play the next
CD. Removing the CD loader
from the player
Open the sliding lid B-fig. 42, press
EJECT E-fig. 45on the player: the
loader will be partially ejected.
Carefully remove the loader.
Close the sliding lid.
Ejecting Compact Discs
from the loader
Remove the CDs in sequence pulling
the lever corresponding to each CD.PLAYING A CD
WITH THE CD Changer
(where fitted)
With Navigation mode on
To play an audio CD inserted in the
CD-Changer when the Navigation
function is on, proceed as follows:
1) press SRC (17)
2)turn the knob/button (11) to dis-
play CD-Cfig. 46
3)press the knob/button (11) to
confirm
fig. 46F0E3217gfig. 45F0E0405m