2004 DODGE TOWN AND COUNTRY child lock
[x] Cancel search: child lockPage 16 of 2585
LUBRICANTS AND GREASES
Lubricating grease is rated for quality and usage
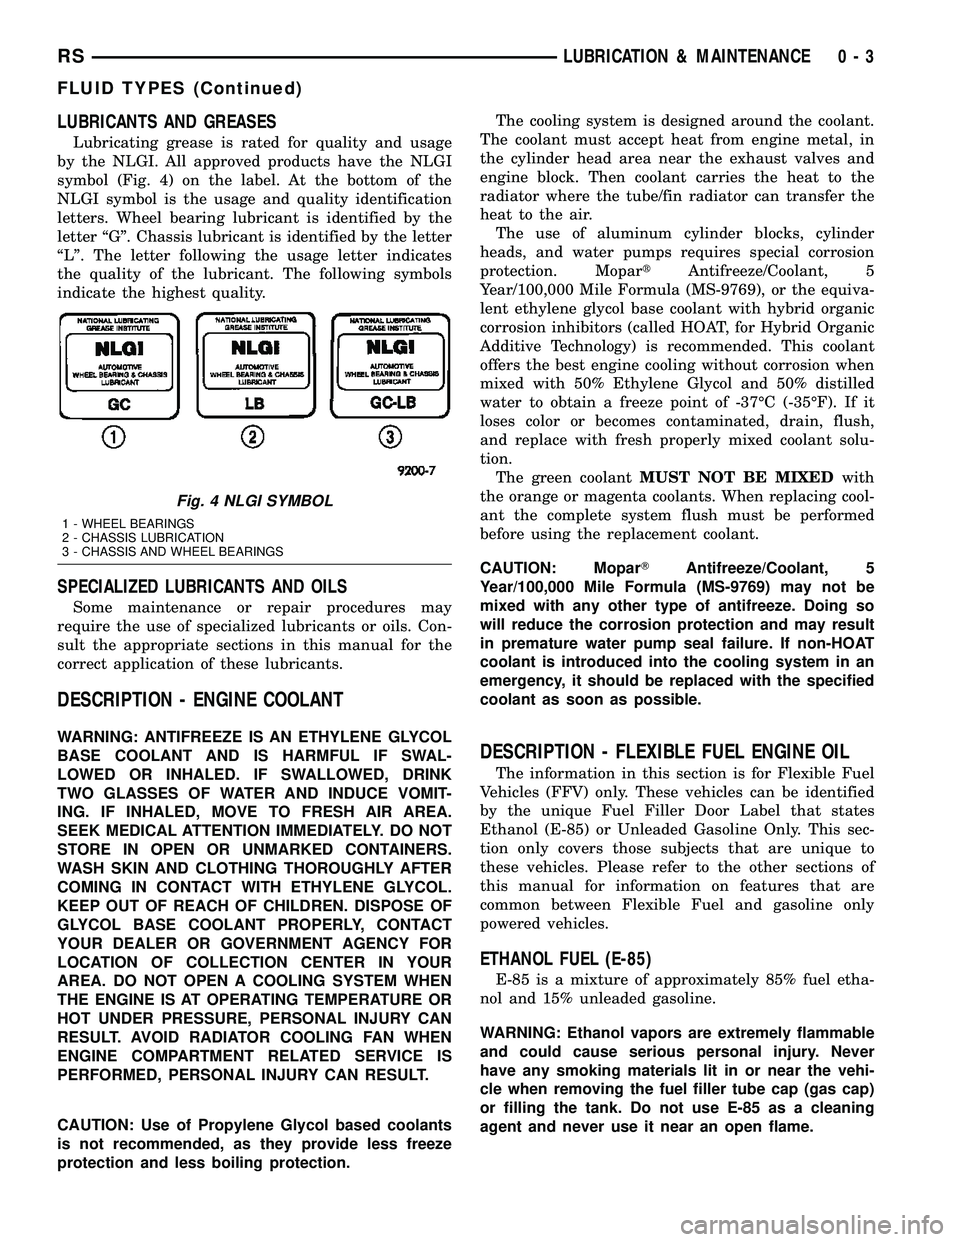
by the NLGI. All approved products have the NLGI
symbol (Fig. 4) on the label. At the bottom of the
NLGI symbol is the usage and quality identification
letters. Wheel bearing lubricant is identified by the
letter ªGº. Chassis lubricant is identified by the letter
ªLº. The letter following the usage letter indicates
the quality of the lubricant. The following symbols
indicate the highest quality.
SPECIALIZED LUBRICANTS AND OILS
Some maintenance or repair procedures may
require the use of specialized lubricants or oils. Con-
sult the appropriate sections in this manual for the
correct application of these lubricants.
DESCRIPTION - ENGINE COOLANT
WARNING: ANTIFREEZE IS AN ETHYLENE GLYCOL
BASE COOLANT AND IS HARMFUL IF SWAL-
LOWED OR INHALED. IF SWALLOWED, DRINK
TWO GLASSES OF WATER AND INDUCE VOMIT-
ING. IF INHALED, MOVE TO FRESH AIR AREA.
SEEK MEDICAL ATTENTION IMMEDIATELY. DO NOT
STORE IN OPEN OR UNMARKED CONTAINERS.
WASH SKIN AND CLOTHING THOROUGHLY AFTER
COMING IN CONTACT WITH ETHYLENE GLYCOL.
KEEP OUT OF REACH OF CHILDREN. DISPOSE OF
GLYCOL BASE COOLANT PROPERLY, CONTACT
YOUR DEALER OR GOVERNMENT AGENCY FOR
LOCATION OF COLLECTION CENTER IN YOUR
AREA. DO NOT OPEN A COOLING SYSTEM WHEN
THE ENGINE IS AT OPERATING TEMPERATURE OR
HOT UNDER PRESSURE, PERSONAL INJURY CAN
RESULT. AVOID RADIATOR COOLING FAN WHEN
ENGINE COMPARTMENT RELATED SERVICE IS
PERFORMED, PERSONAL INJURY CAN RESULT.
CAUTION: Use of Propylene Glycol based coolants
is not recommended, as they provide less freeze
protection and less boiling protection.The cooling system is designed around the coolant.
The coolant must accept heat from engine metal, in
the cylinder head area near the exhaust valves and
engine block. Then coolant carries the heat to the
radiator where the tube/fin radiator can transfer the
heat to the air.
The use of aluminum cylinder blocks, cylinder
heads, and water pumps requires special corrosion
protection. MopartAntifreeze/Coolant, 5
Year/100,000 Mile Formula (MS-9769), or the equiva-
lent ethylene glycol base coolant with hybrid organic
corrosion inhibitors (called HOAT, for Hybrid Organic
Additive Technology) is recommended. This coolant
offers the best engine cooling without corrosion when
mixed with 50% Ethylene Glycol and 50% distilled
water to obtain a freeze point of -37ÉC (-35ÉF). If it
loses color or becomes contaminated, drain, flush,
and replace with fresh properly mixed coolant solu-
tion.
The green coolantMUST NOT BE MIXEDwith
the orange or magenta coolants. When replacing cool-
ant the complete system flush must be performed
before using the replacement coolant.
CAUTION: MoparTAntifreeze/Coolant, 5
Year/100,000 Mile Formula (MS-9769) may not be
mixed with any other type of antifreeze. Doing so
will reduce the corrosion protection and may result
in premature water pump seal failure. If non-HOAT
coolant is introduced into the cooling system in an
emergency, it should be replaced with the specified
coolant as soon as possible.
DESCRIPTION - FLEXIBLE FUEL ENGINE OIL
The information in this section is for Flexible Fuel
Vehicles (FFV) only. These vehicles can be identified
by the unique Fuel Filler Door Label that states
Ethanol (E-85) or Unleaded Gasoline Only. This sec-
tion only covers those subjects that are unique to
these vehicles. Please refer to the other sections of
this manual for information on features that are
common between Flexible Fuel and gasoline only
powered vehicles.
ETHANOL FUEL (E-85)
E-85 is a mixture of approximately 85% fuel etha-
nol and 15% unleaded gasoline.
WARNING: Ethanol vapors are extremely flammable
and could cause serious personal injury. Never
have any smoking materials lit in or near the vehi-
cle when removing the fuel filler tube cap (gas cap)
or filling the tank. Do not use E-85 as a cleaning
agent and never use it near an open flame.
Fig. 4 NLGI SYMBOL
1 - WHEEL BEARINGS
2 - CHASSIS LUBRICATION
3 - CHASSIS AND WHEEL BEARINGS
RSLUBRICATION & MAINTENANCE0-3
FLUID TYPES (Continued)
Page 356 of 2585
COOLANT
DESCRIPTION - ENGINE COOLANT
WARNING: ANTIFREEZE IS AN ETHYLENE GLYCOL
BASE COOLANT AND IS HARMFUL IF SWAL-
LOWED OR INHALED. IF SWALLOWED, DRINK
TWO GLASSES OF WATER AND INDUCE VOMIT-
ING. IF INHALED, MOVE TO FRESH AIR AREA.
SEEK MEDICAL ATTENTION IMMEDIATELY. DO NOT
STORE IN OPEN OR UNMARKED CONTAINERS.
WASH SKIN AND CLOTHING THOROUGHLY AFTER
COMING IN CONTACT WITH ETHYLENE GLYCOL.
KEEP OUT OF REACH OF CHILDREN. DISPOSE OF
GLYCOL BASE COOLANT PROPERLY, CONTACT
YOUR DEALER OR GOVERNMENT AGENCY FOR
LOCATION OF COLLECTION CENTER IN YOUR
AREA. DO NOT OPEN A COOLING SYSTEM WHEN
THE ENGINE IS AT OPERATING TEMPERATURE OR
HOT UNDER PRESSURE, PERSONAL INJURY CAN
RESULT. AVOID RADIATOR COOLING FAN WHEN
ENGINE COMPARTMENT RELATED SERVICE IS
PERFORMED, PERSONAL INJURY CAN RESULT.
CAUTION: Use of Propylene Glycol based coolants
is not recommended, as they provide less freeze
protection and less boiling protection.
The cooling system is designed around the coolant.
The coolant must accept heat from engine metal, in
the cylinder head area near the exhaust valves and
engine block. Then coolant carries the heat to the
radiator where the tube/fin radiator can transfer the
heat to the air.
The use of aluminum cylinder blocks, cylinder
heads, and water pumps requires special corrosion
protection. MopartAntifreeze/Coolant, 5
Year/100,000 Mile Formula (MS-9769), or the equiva-
lent ethylene glycol base coolant with hybrid organic
corrosion inhibitors (called HOAT, for Hybrid Organic
Additive Technology) is recommended. This coolant
offers the best engine cooling without corrosion when
mixed with 50% Ethylene Glycol and 50% distilled
water to obtain a freeze point of -37ÉC (-35ÉF). If it
loses color or becomes contaminated, drain, flush,
and replace with fresh properly mixed coolant solu-
tion.
The green coolantMUST NOT BE MIXEDwith
the orange or magenta coolants. When replacing cool-
ant the complete system flush must be performed
before using the replacement coolant.
CAUTION: MoparTAntifreeze/Coolant, 5
Year/100,000 Mile Formula (MS-9769) may not be
mixed with any other type of antifreeze. Doing so
will reduce the corrosion protection and may resultin premature water pump seal failure. If non-HOAT
coolant is introduced into the cooling system in an
emergency, it should be replaced with the specified
coolant as soon as possible.DIAGNOSIS AND TESTING - COOLANT
CONCENTRATION TESTING
Coolant concentration should be checked when any
additional coolant was added to system or after a
coolant drain, flush and refill. The coolant mixture
offers optimum engine cooling and protection against
corrosion when mixed to a freeze point of -37ÉC
(-34ÉF) to -46ÉC (-50ÉF). The use of a hydrometer or a
refractometer can be used to test coolant concentra-
tion.
A hydrometer will test the amount of glycol in a
mixture by measuring the specific gravity of the mix-
ture. The higher the concentration of ethylene glycol,
the larger the number of balls that will float, and
higher the freeze protection (up to a maximum of
60% by volume glycol).
A refractometer (Special Tool 8286)(Refer to 7 -
COOLING - SPECIAL TOOLS) will test the amount
of glycol in a coolant mixture by measuring the
amount a beam of light bends as it passes through
the fluid.
Some coolant manufactures use other types of gly-
cols into their coolant formulations. Propylene glycol
is the most common new coolant. However, propylene
glycol based coolants do not provide the same freez-
ing protection and corrosion protection and is not rec-
ommended.
CAUTION: Do not mix types of coolantÐcorrosion
protection will be severely reduced.
STANDARD PROCEDURE - COOLANT SERVICE
For engine coolant recommended service schedule,
(Refer to LUBRICATION & MAINTENANCE/MAIN-
TENANCE SCHEDULES - DESCRIPTION).
COOLANT RECOVERY
CONTAINER
DESCRIPTION
The coolant recovery/reserve system container is
mounted in the engine compartment (Fig. 2). The
container is made of plastic.
OPERATION
The coolant recovery system works with the radia-
tor pressure cap to use thermal expansion and con-
traction of the coolant to keep the coolant free of
trapped air. Provides a convenient and safe method
RSENGINE7-19
Page 590 of 2585
POWER SLIDING DOOR SYSTEM
TABLE OF CONTENTS
page page
POWER SLIDING DOOR SYSTEM
DESCRIPTION.........................19
OPERATION...........................21
DIAGNOSIS AND TESTING - POWER SLIDING
DOOR SYSTEM.......................22
STANDARD PROCEDURE
STANDARD PROCEDURE - POWER DOOR
LEARN CYCLE.......................28
STANDARD PROCEDURE - PUSH-PIN
GROMMET REPLACEMENT.............28
STANDARD PROCEDURE - SLIDING DOOR
ADJUSTMENT........................28
SPECIFICATIONS
SPECIFICATIONS TABLE...............29
LATCH
DESCRIPTION.........................29
OPERATION...........................29
REMOVAL.............................29
INSTALLATION.........................29
SLIDING DOOR MOTOR
DESCRIPTION.........................30
OPERATION...........................30
REMOVAL.............................30
INSTALLATION.........................31
FULL OPEN SWITCH
DESCRIPTION.........................31
OPERATION...........................31
LEFT B-PILLAR SWITCH
DESCRIPTION.........................32OPERATION...........................32
REMOVAL.............................32
INSTALLATION.........................32
RIGHT B-PILLAR SWITCH
DESCRIPTION.........................32
OPERATION...........................32
REMOVAL.............................32
INSTALLATION.........................32
LOWER DRIVE UNIT
DESCRIPTION.........................32
OPERATION...........................32
REMOVAL.............................33
INSTALLATION.........................33
LOWER DRIVE UNIT TRACK & RACK
DESCRIPTION.........................34
OPERATION...........................34
REMOVAL.............................34
INSTALLATION.........................34
WIRING HARNESS
DESCRIPTION.........................35
OPERATION...........................35
REMOVAL.............................35
INSTALLATION.........................36
FLEX DRIVE
DESCRIPTION.........................36
OPERATION...........................36
REMOVAL.............................37
INSTALLATION.........................37
POWER SLIDING DOOR
SYSTEM
DESCRIPTION
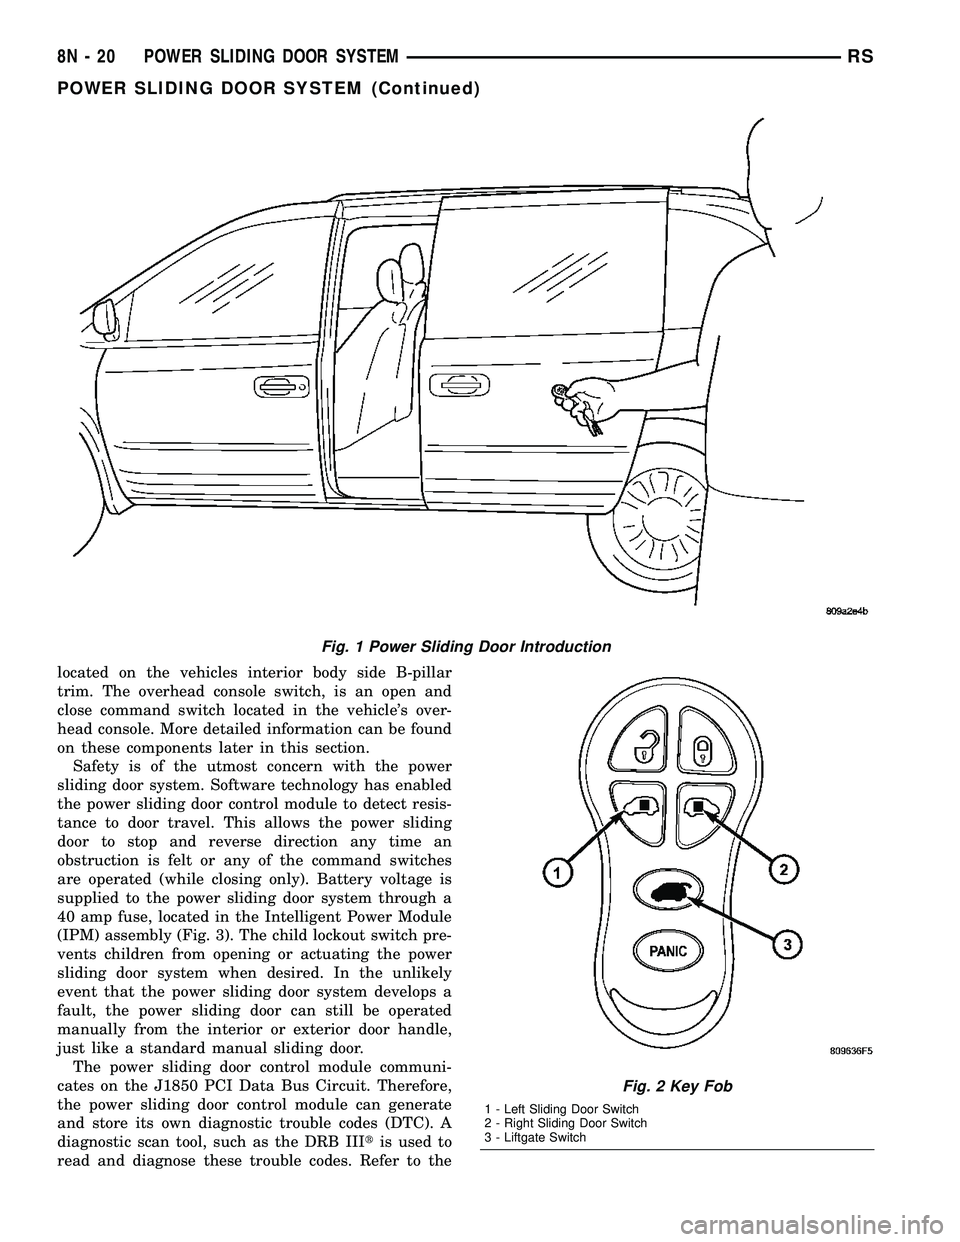
Some vehicles are equipped with a power opening
and closing sliding door system (Fig. 1). Depending
on how the vehicle is ordered it may be equipped
with only a right side power door or right and left
side power doors. This power sliding door system is a
complex system consisting of many components.
Some of these components are the door motor, latch
assembly, sliding door control module, lower drive
unit, flex drive assembly, wire harness and track,
lower drive unit track and rack assembly, full open
switch, B-pillar switch, overhead console switch, key
fob switches (Fig. 2), pawl switch, ratchet switch and
child lockout and handle switches.Each power side door has its own door control mod-
ule, located in the center of the door behind the door
trim panel. (Refer to 8 - ELECTRICAL/ELEC-
TRONIC CONTROL MODULES/DOOR CONTROL
MODULE - DESCRIPTION) The power side door
motor is located in the front portion of the door, on
the inner door panel sheet metal. The latch assembly
is located in the rear of the power side door, near the
body line. The lower drive unit is attached to the
lower door hinge. The flex drive assembly connects
the door motor to the lower drive unit. The wire har-
ness and track and the lower drive unit track are vis-
ible with the door open in the lower door sill area.
The power side door full open switch is located under
the lower drive unit and is part of the hold open
latch assembly. The pawl, ratchet, handle and child
lockout switches are all located on the power side
door latch assembly. The B-pillar switch, as it will be
referred to, is an open and close command switch
RSPOWER SLIDING DOOR SYSTEM8N-19
Page 591 of 2585
located on the vehicles interior body side B-pillar
trim. The overhead console switch, is an open and
close command switch located in the vehicle's over-
head console. More detailed information can be found
on these components later in this section.
Safety is of the utmost concern with the power
sliding door system. Software technology has enabled
the power sliding door control module to detect resis-
tance to door travel. This allows the power sliding
door to stop and reverse direction any time an
obstruction is felt or any of the command switches
are operated (while closing only). Battery voltage is
supplied to the power sliding door system through a
40 amp fuse, located in the Intelligent Power Module
(IPM) assembly (Fig. 3). The child lockout switch pre-
vents children from opening or actuating the power
sliding door system when desired. In the unlikely
event that the power sliding door system develops a
fault, the power sliding door can still be operated
manually from the interior or exterior door handle,
just like a standard manual sliding door.
The power sliding door control module communi-
cates on the J1850 PCI Data Bus Circuit. Therefore,
the power sliding door control module can generate
and store its own diagnostic trouble codes (DTC). A
diagnostic scan tool, such as the DRB IIItis used to
read and diagnose these trouble codes. Refer to the
Fig. 1 Power Sliding Door Introduction
Fig. 2 Key Fob
1 - Left Sliding Door Switch
2 - Right Sliding Door Switch
3 - Liftgate Switch
8N - 20 POWER SLIDING DOOR SYSTEMRS
POWER SLIDING DOOR SYSTEM (Continued)
Page 592 of 2585

Body Diagnostic Manual for a complete list of diag-
nostic routines.
NOTE: It may be possible to generate Sliding Door
Diagnostic Trouble Codes during normal power
sliding door operation. Refer to the Body Diagnos-
tic Manual for a complete list of diagnostic routines.
For additional information, (Refer to 8 - ELECTRI-
CAL/POWER DOORS - OPERATION). For a com-
plete power sliding door system wiring schematic,
refer to Wiring Diagrams. For power sliding door sys-
tem operation instructions, refer to the vehicle owner
manual.
WARNING: BE CERTAIN TO READ ALL WARNINGS
AND CAUTIONS IN POWER SLIDING DOOR OPER-
ATION BEFORE ATTEMPTING ANY SERVICE OF
POWER SLIDING DOOR SYSTEM OR COMPO-
NENTS.
OPERATION
With the push of a power sliding door open/close
command switch (key fob, overhead console or B-pil-
lar mounted) a signal is sent out to the Body Control
Module (BCM). The BCM then sends a signal out on
the PCI Data Bus circuit (J1850) to the power sliding
door module. The power sliding door module then
signals the power sliding door latch to release the
door to the unlatched and movable position. The
motor then starts an open cycle.
During the door open cycle, if the power sliding
door module detects sufficient resistance to doortravel, such as an obstruction in the door's path, the
power sliding door module will immediately stop door
movement and reverse door travel to the full open or
closed position. The ability for the power sliding door
module to detect resistance to door travel is accom-
plished by hall effect sensors and the door motor
speed.
The power sliding door control module has the abil-
ity to learn. Anytime a door is opened or closed using
the power sliding door system the module learns
from its cycle. If a replacement power sliding door
component is installed or a door adjustment is made,
the module must re-learn the effort required to open
or close the door. A learn cycle can be performed with
a Diagnostic Scan Tool, such as the DRB IIIt, or with
a complete cycle of the door, using any one of the
command switches. Refer to Standard Procedures in
this section for detailed instructions.
The power sliding door system is designed with a
number of system inhibitors. These inhibitors are
necessary for safety and/or feasibility of the power
sliding door system. See the power sliding door sys-
tem inhibitors noted below:
POWER SLIDING DOOR SYSTEM INHIBITORS
²The power sliding door must be in thefullopen
or closed position in order for the power sliding door
system to start a cycle. If the door is not in this posi-
tion (based on the input from the full open, pawl or
ratchet switches) the door control module will not
respond to command switch inputs.
²The vehicles transmission must be inpark or
neutralin order for the power sliding door system to
start a cycle.
²The vehicles child lockout switch must be in the
ªUNLOCKEDº position in order for the power sliding
door systems B-pillar switches to function.
²If multiple obstacles are detected during the
same power open or close cycle the power sliding
door may go into full manual mode.
²If severe Diagnostic Trouble Codes (DTC) are
stored in the power sliding door control module the
power sliding door may go into full manual mode.
²Due to the high pressure created in the passen-
ger compartment with the blower motor on high, the
power sliding door may not complete a power close
cycle unless a window is cracked, allowing the pres-
sure to escape. This situation will only be experi-
enced on some vehicles, or vehicles with brand new
side door weather seals installed. Refer to the Side
Door Adjustment procedure in the Standard Proce-
dures section of this group.
²The vehicles fuel tank filler door must be in the
closed position. Due to the sliding door interference
with the open fuel tank filler door, mechanical link-
age prevents the side door from opening and striking
Fig. 3 Power Side Door Fuse Location
RSPOWER SLIDING DOOR SYSTEM8N-21
POWER SLIDING DOOR SYSTEM (Continued)
Page 600 of 2585
SPECIFICATIONS
SPECIFICATIONS TABLE
TORQUE SPECIFICATIONS
DESCRIPTION N´m In. Lbs.
Door Latch 12 100
Lower Drive Unit
Allen Head980
Lower Drive Unit
Screw328
Lower Track Nuts 8 70
LATCH
DESCRIPTION
Vehicles equipped with a power side door or doors
utilize a power latch. One power latch is used for
each power door. The latch is located on the trailing
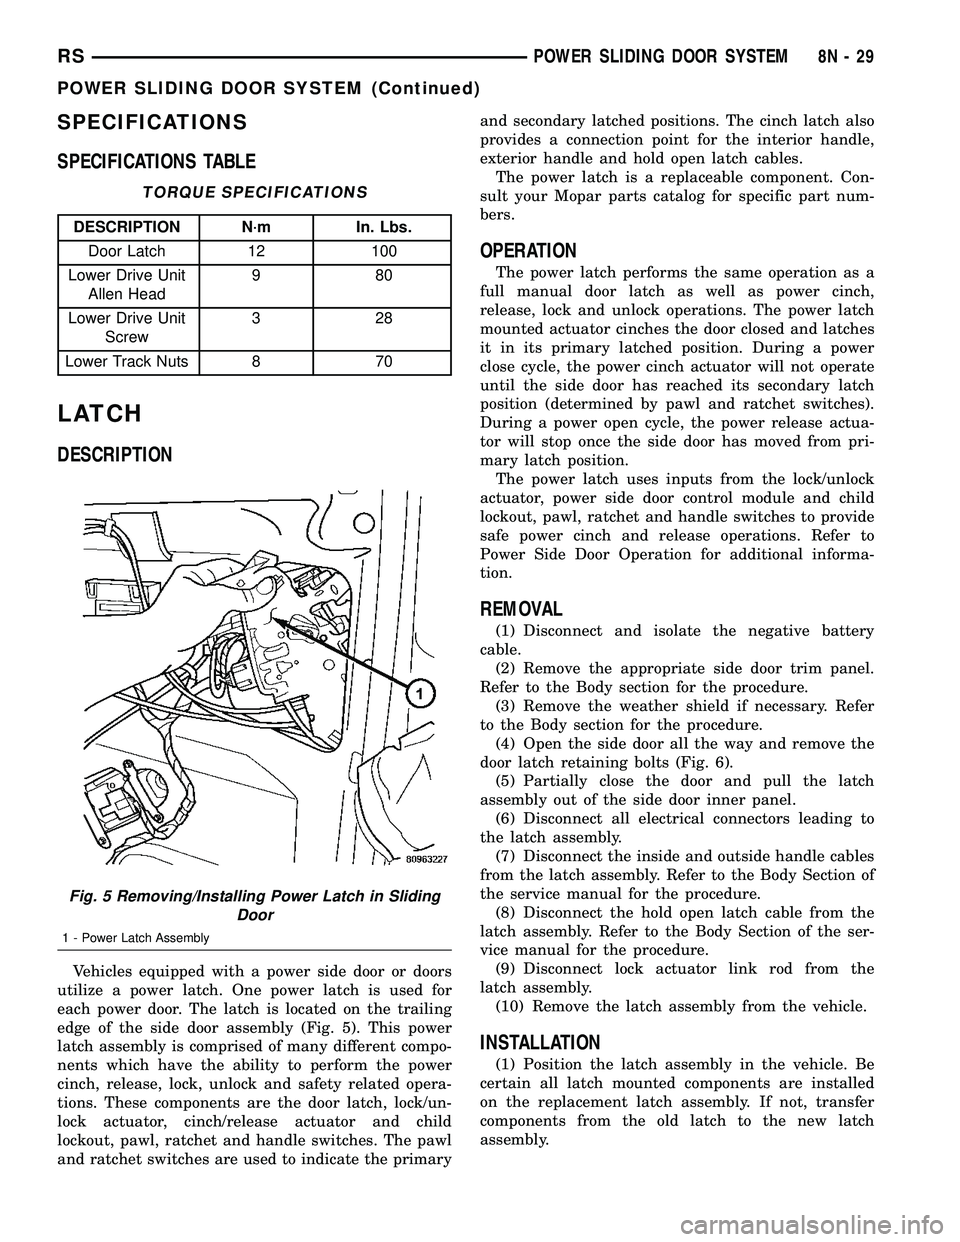
edge of the side door assembly (Fig. 5). This power
latch assembly is comprised of many different compo-
nents which have the ability to perform the power
cinch, release, lock, unlock and safety related opera-
tions. These components are the door latch, lock/un-
lock actuator, cinch/release actuator and child
lockout, pawl, ratchet and handle switches. The pawl
and ratchet switches are used to indicate the primaryand secondary latched positions. The cinch latch also
provides a connection point for the interior handle,
exterior handle and hold open latch cables.
The power latch is a replaceable component. Con-
sult your Mopar parts catalog for specific part num-
bers.
OPERATION
The power latch performs the same operation as a
full manual door latch as well as power cinch,
release, lock and unlock operations. The power latch
mounted actuator cinches the door closed and latches
it in its primary latched position. During a power
close cycle, the power cinch actuator will not operate
until the side door has reached its secondary latch
position (determined by pawl and ratchet switches).
During a power open cycle, the power release actua-
tor will stop once the side door has moved from pri-
mary latch position.
The power latch uses inputs from the lock/unlock
actuator, power side door control module and child
lockout, pawl, ratchet and handle switches to provide
safe power cinch and release operations. Refer to
Power Side Door Operation for additional informa-
tion.
REMOVAL
(1) Disconnect and isolate the negative battery
cable.
(2) Remove the appropriate side door trim panel.
Refer to the Body section for the procedure.
(3) Remove the weather shield if necessary. Refer
to the Body section for the procedure.
(4) Open the side door all the way and remove the
door latch retaining bolts (Fig. 6).
(5) Partially close the door and pull the latch
assembly out of the side door inner panel.
(6) Disconnect all electrical connectors leading to
the latch assembly.
(7) Disconnect the inside and outside handle cables
from the latch assembly. Refer to the Body Section of
the service manual for the procedure.
(8) Disconnect the hold open latch cable from the
latch assembly. Refer to the Body Section of the ser-
vice manual for the procedure.
(9) Disconnect lock actuator link rod from the
latch assembly.
(10) Remove the latch assembly from the vehicle.
INSTALLATION
(1) Position the latch assembly in the vehicle. Be
certain all latch mounted components are installed
on the replacement latch assembly. If not, transfer
components from the old latch to the new latch
assembly.
Fig. 5 Removing/Installing Power Latch in Sliding
Door
1 - Power Latch Assembly
RSPOWER SLIDING DOOR SYSTEM8N-29
POWER SLIDING DOOR SYSTEM (Continued)
Page 603 of 2585
LEFT B-PILLAR SWITCH
DESCRIPTION
Vehicles equipped with power sliding side door/s
utilize B-pillar switches. These switches are located
on the interior of the vehicle, on the B-pillar trim
panels. These switches serve as an open and close
command switch for the appropriate power side door.
The B-pillar switches are replaceable. Consult your
Mopar parts catalog for a specific part number.
OPERATION
When the Pillar switch is depressed a signal is
sent to the Body Control Module (BCM), this signal
is then sent to the Power Sliding Door Module, tell-
ing it to start a power open or close cycle. The child
lockout feature must be disabled and the side door
must be unlocked in order for the Pillar switch to
function.
REMOVAL
(1) Disconnect and isolate the negative battery
cable.
(2) Using a trim stick or other small flat-bladed
pry tool, gently pry the leading upper edge of the
B-pillar switch away from the B-pillar trim.
(3) Once the upper edge is free from pillar trim,
rock the switch out of the switch opening.
(4) Disconnect the B-pillar switch electrical con-
nector. First, slide the connector lock away from the
switch then, depress connector retaining tab while
pulling straight apart.
(5) Remove the B-pillar switch from the vehicle.
INSTALLATION
(1) Connect the B-pillar switch electrical connector.
Slide connector lock toward the switch to lock in
place.
(2) Hook the lower edge of the B-pillar switch on
the B-pillar trim and then push the switch firmly
into position.
(3) Connect the negative battery cable.
RIGHT B-PILLAR SWITCH
DESCRIPTION
Vehicles equipped with power sliding side door/s
utilize B-pillar switches. These switches are located
on the interior of the vehicle, on the B-pillar trim
panels. These switches serve as an open and close
command switch for the appropriate power side door.
The B-pillar switches are replaceable. Consult your
Mopar parts catalog for a specific part number.
OPERATION
When the Pillar switch is depressed a signal is
sent to the Body Control Module (BCM), this signal
is then sent to the Power Sliding Door Module, tell-
ing it to start a power open or close cycle. The child
lockout feature must be disabled and the side door
must be unlocked in order for the Pillar switch to
function.
REMOVAL
(1) Disconnect and isolate the negative battery
cable.
(2) Using a trim stick or other small flat-bladed
pry tool, gently pry the leading upper edge of the
B-pillar switch away from the B-pillar trim.
(3) Once the upper edge is free from pillar trim,
rock the switch out of the switch opening.
(4) Disconnect the B-pillar switch electrical con-
nector. First, slide the connector lock away from the
switch then, depress connector retaining tab while
pulling straight apart.
(5) Remove the B-pillar switch from the vehicle.
INSTALLATION
(1) Connect the B-pillar switch electrical connector.
Slide connector lock toward the switch to lock in
place.
(2) Hook the lower edge of the B-pillar switch on
the B-pillar trim and then push the switch firmly
into position.
(3) Connect the negative battery cable.
LOWER DRIVE UNIT
DESCRIPTION
Vehicles equipped with a power sliding side door
utilize a lower drive unit. The lower drive unit is
located on the sliding door lower hinge assembly
(Fig. 10). This drive unit is used to transfer the lat-
eral rotation of the flex drive assembly into longitu-
dinal movement via the drive unit gear and door
track rack teeth (Fig. 10).
The lower drive unit is a replaceable component.
Consult your Mopar parts catalog for specific part
numbers.
OPERATION
During a power open or close cycle, the power drive
unit is driven by the flex drive assembly. The lower
drive units main gear engages the lower door tracks
rack teeth, this moves the side door assembly accord-
ingly.
8N - 32 POWER SLIDING DOOR SYSTEMRS
Page 656 of 2585
RESTRAINTS
TABLE OF CONTENTS
page page
RESTRAINTS
DESCRIPTION..........................2
OPERATION............................2
WARNING.............................2
DIAGNOSIS AND TESTING - AIRBAG
SYSTEM.............................2
STANDARD PROCEDURE
STANDARD PROCEDURE - HANDLING
AIRBAGS.............................3
STANDARD PROCEDURE - SERVICE
AFTER AN AIRBAG DEPLOYMENT.........3
CHILD RESTRAINT ANCHOR
DESCRIPTION..........................4
OPERATION............................4
CLOCK SPRING
DESCRIPTION..........................4
OPERATION............................4
STANDARD PROCEDURE - CLOCK SPRING
CENTERING..........................5
REMOVAL.............................5
INSTALLATION..........................5
DRIVER AIRBAG
DESCRIPTION..........................6
OPERATION............................6
REMOVAL.............................6
INSTALLATION..........................7
DRIVER AIRBAG TRIM COVER
REMOVAL.............................7
INSTALLATION..........................7
OCCUPANT RESTRAINT CONTROLLER
DESCRIPTION..........................8
OPERATION............................8
REMOVAL.............................8
INSTALLATION..........................8
PASSENGER AIRBAG
DESCRIPTION..........................8
OPERATION............................9
REMOVAL.............................9
INSTALLATION.........................10
SEAT AIRBAG
DESCRIPTION.........................11
OPERATION...........................11
SEAT BELT BUCKLE - FRONT INBOARD
REMOVAL.............................12
INSTALLATION.........................12SEAT BELT BUCKLE - FIRST ROW INBOARD -
QUAD BUCKET
REMOVAL.............................12
INSTALLATION.........................12
SEAT BELT BUCKLE - FIRST ROW - BENCH
REMOVAL.............................13
INSTALLATION.........................13
SEAT BELT BUCKLE - SECOND ROW
INBOARD - 50/50 BENCH
REMOVAL.............................13
INSTALLATION.........................13
SEAT BELT HEIGHT ADJUSTER-BOR
C-PILLAR
REMOVAL.............................13
INSTALLATION.........................13
SEAT BELT HEIGHT ADJUSTER KNOB
REMOVAL.............................14
INSTALLATION.........................14
SEAT BELT & RETRACTOR - OUTBOARD -
FRONT
REMOVAL.............................14
INSTALLATION.........................14
SEAT BELT & RETRACTOR - FIRST ROW -
OUTBOARD
REMOVAL.............................14
INSTALLATION.........................14
SEAT BELT BUCKLE - SECOND ROW - THREE
PASSENGER BENCH
REMOVAL.............................15
INSTALLATION.........................15
SEAT BELT & RETRACTOR - SECOND ROW -
RIGHT OUTBOARD
REMOVAL.............................15
INSTALLATION.........................15
SEAT BELT & RETRACTOR - SECOND ROW -
RIGHT OUTBOARD WITH REAR HVAC - LWB
REMOVAL.............................16
INSTALLATION.........................16
SEAT BELT & RETRACTOR - SECOND ROW -
LEFT OUTBOARD
REMOVAL.............................17
INSTALLATION.........................17
SEAT BELT TENSIONER
DESCRIPTION.........................17
OPERATION...........................17
RSRESTRAINTS8O-1